%20(1).png)
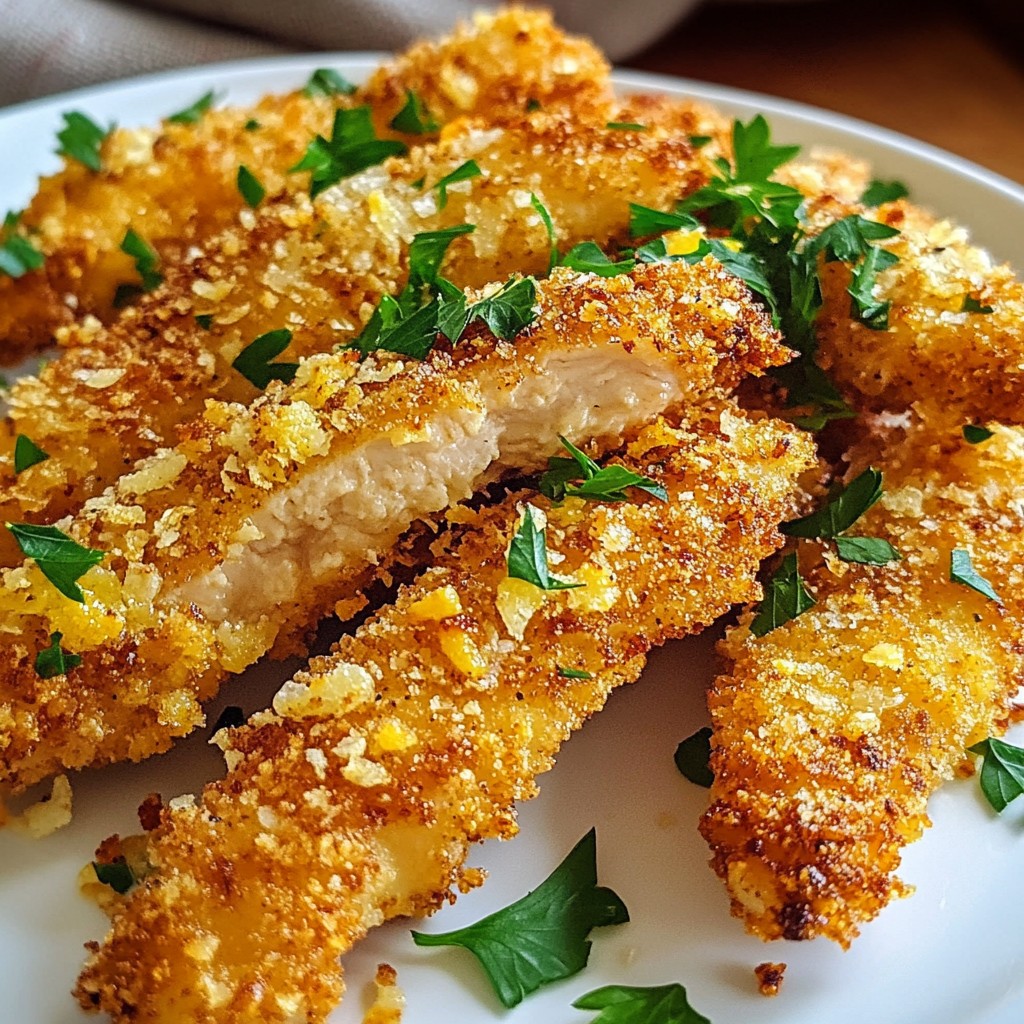
Get ready to elevate your dinner game with my Simple Recipes Garlic Parmesan Chicken Strips Delight. These crispy chicken strips are packed with flavor and easy to make! You only need a few simple ingredients, like chicken breasts, parmesan cheese, and panko breadcrumbs. I’ll guide you through step-by-step instructions to create the perfect dish. Whether you're cooking for family or a cozy night in, these chicken strips will impress. Let’s dive in!
Why I Love This Recipe
- Delicious Flavor Combination: The blend of garlic and Parmesan creates a mouthwatering experience that elevates simple chicken strips to gourmet status.
- Easy to Prepare: This recipe is straightforward and quick, making it perfect for weeknight dinners or last-minute gatherings.
- Perfectly Crispy: Using panko breadcrumbs ensures that every bite is delightfully crunchy, giving the chicken an irresistible texture.
- Versatile Serving Options: These chicken strips pair wonderfully with various dipping sauces, making them a hit with both kids and adults.
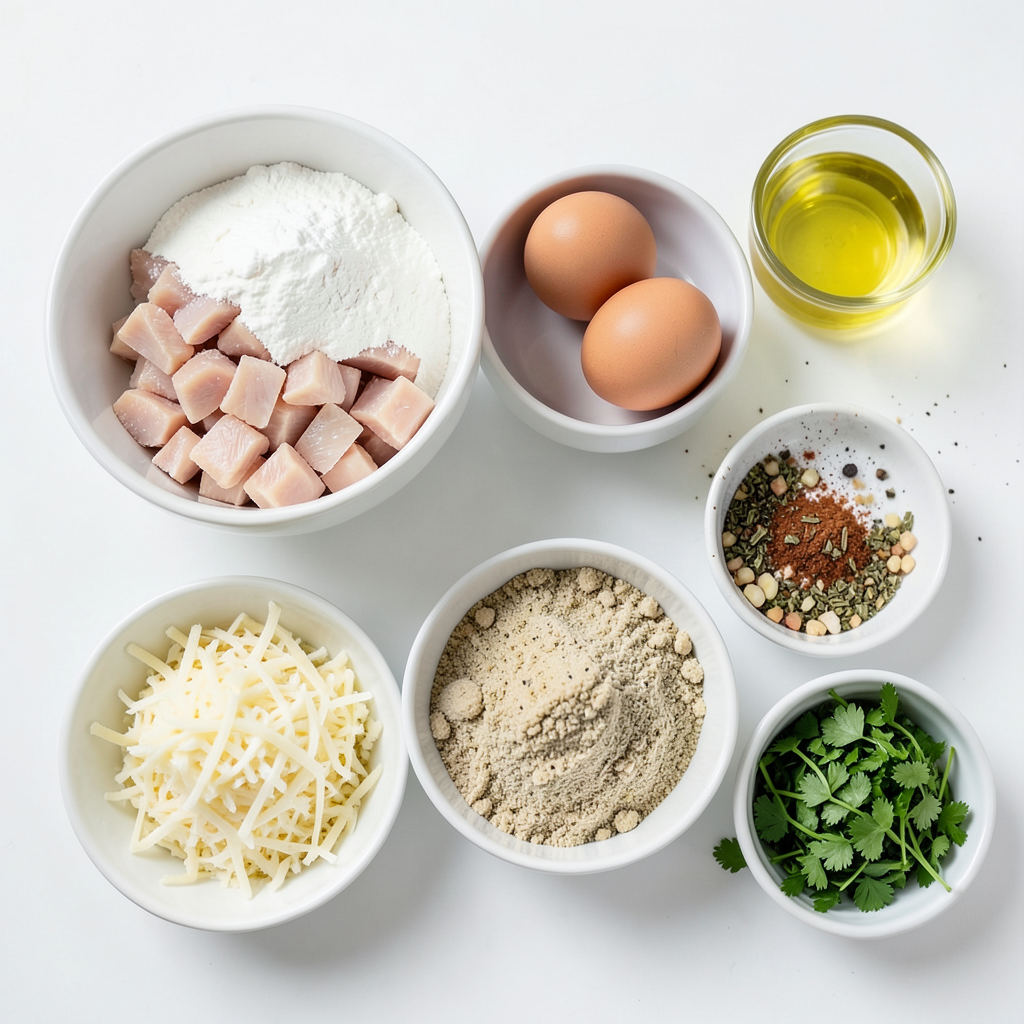
Ingredients
Main Ingredients
- 1 pound chicken breasts
- 1 cup all-purpose flour
- 1 cup panko breadcrumbs
Seasoning and Garnish
- 1/2 cup freshly grated Parmesan cheese
- 4 cloves garlic, finely minced
- 1 teaspoon dried oregano
- 1 teaspoon smoked paprika
Cooking Essentials
- Olive oil
- Salt and black pepper
In this recipe, we use simple, fresh ingredients. Chicken breasts form the base. Their mild taste pairs well with bold flavors. The all-purpose flour creates a light coat. Panko breadcrumbs add a delightful crunch. These breadcrumbs are key for that extra crispy texture.
For seasoning, we have Parmesan cheese, which brings a rich, nutty flavor. Fresh garlic gives a strong, aromatic kick. Dried oregano and smoked paprika enhance the dish with earthy notes. Don't forget the salt and black pepper. They help bring all the flavors together.
Finally, we use olive oil for frying. It adds a hint of fruity taste while keeping the chicken moist. Make sure to have these ingredients ready. They set the stage for a wonderful meal that you can enjoy with family or friends.
Step-by-Step Instructions
Preparing the Breading Station
Set up three shallow dishes in a line. In the first dish, mix 1 cup of all-purpose flour with a pinch of salt and black pepper. This adds flavor to your chicken. In the second dish, beat 2 large eggs until well mixed. The eggs help the breading stick. In the third dish, combine 1 cup of panko breadcrumbs, 1/2 cup of grated Parmesan cheese, 4 minced garlic cloves, 1 teaspoon of dried oregano, 1 teaspoon of smoked paprika, and a sprinkle of salt and pepper. Mix this well. This mixture gives the chicken a tasty crust.
Dredging the Chicken
Take a chicken strip and coat it evenly in the flour. Shake off any extra flour. Next, dip the chicken strip into the beaten egg. Let any excess egg drip off. Finally, place it in the breadcrumb mixture. Press gently to help the crumbs stick. Repeat this process for all chicken strips. This step ensures a crunchy and flavorful coating.
Cooking the Chicken Strips
In a large skillet, pour enough olive oil to cover the bottom of the pan. Heat the oil over medium heat until it shimmers but does not smoke. This means it’s ready. Carefully add the breaded chicken strips to the hot oil in small batches. Do not overcrowd the pan. Fry each side for about 4-5 minutes. Look for a deep golden brown color, and check that the internal temperature reaches 165°F. This ensures they are fully cooked.
Once cooked, transfer the chicken strips to a plate lined with paper towels. This helps absorb extra oil and keeps them crispy. Enjoy your Garlic Parmesan Chicken Strips fresh from the pan!
Tips & Tricks
Achieving Perfectly Crispy Chicken Strips
To make the best chicken strips, use panko breadcrumbs. They are light and airy. Panko gives a crispier texture than regular breadcrumbs. This crunch makes each bite more enjoyable.
Managing oil temperature is key. Heat the oil until it shimmers, but don’t let it smoke. If the oil is too cool, your strips will soak up oil. If it's too hot, they will burn. Frying at the right temperature makes all the difference.
Enhancing Flavor
You can boost flavor in many ways. Try adding a pinch of cayenne pepper for a kick. Or, mix in some Italian seasoning for a herbal twist.
You can also swap Parmesan cheese for Pecorino Romano. It gives a sharper taste. Feel free to experiment with other cheese options, like cheddar or mozzarella, for a different flavor profile.
Cooking in Batches
Avoid overcrowding the pan. When you add too many strips, the oil cools down. This makes the chicken soggy. Instead, fry in small batches.
When frying, keep an eye on the time. Cook each side for 4-5 minutes. Use a thermometer to check that the internal temperature hits 165°F. This ensures your chicken is safe to eat and perfectly cooked.
Pro Tips
- Use Fresh Ingredients: Fresh garlic and high-quality Parmesan cheese will elevate the flavor of your chicken strips, making them irresistible.
- Keep Oil Temperature Steady: If the oil is too hot, the outside will burn before the chicken is cooked through. Use a thermometer to keep the oil around 350°F.
- Let Them Rest: After frying, let the chicken strips sit for a couple of minutes before serving. This helps maintain their crispiness.
- Experiment with Seasoning: Feel free to add your favorite spices to the breadcrumb mixture for a personal touch. Try adding Italian seasoning or a pinch of cayenne for heat!
Variations
Baked Garlic Parmesan Chicken Strips
You can bake these chicken strips if you want a healthier option. To do this, preheat your oven to 400°F. Line a baking sheet with parchment paper. Arrange the breaded chicken strips on the sheet, leaving space between them. Bake for about 15 to 20 minutes. Flip them halfway through for even cooking. You want them to be golden and crispy.
Boneless Chicken Thighs Option
Using boneless chicken thighs can add more flavor. They stay juicy while cooking. However, they can be a bit richer in taste. You may want to cut back on the Parmesan if you choose thighs. Adjust the seasoning to balance the flavors. For this, keep the garlic and oregano but use less paprika.
Gluten-Free Versions
If you want a gluten-free option, substitute the all-purpose flour with rice flour. You can also use gluten-free panko for the breading. These choices will still give you that nice crunch. When frying, be sure to monitor the oil temperature closely. This helps to avoid sogginess. Always check labels to ensure your products are gluten-free.
Storage Info
Storing Leftovers
To keep your Garlic Parmesan Chicken Strips fresh, use airtight containers. This keeps out moisture and air. Place the cooled chicken strips in the container, then seal it tightly. You can store them in the fridge for up to three days. If you want them to last longer, consider freezing.
Reheating Instructions
Reheat your chicken strips to keep them crispy. The best way is to use an oven. Preheat the oven to 375°F. Place the strips on a baking sheet and heat for about 10-15 minutes. This keeps the outside crunchy. If you use a microwave, the strips may become soft. If you must use a microwave, heat in short bursts, checking often.
Freezing Chicken Strips
You can freeze chicken strips both before and after cooking. To freeze raw strips, place them in a single layer on a baking sheet. Once they are frozen, transfer them to a bag. For cooked strips, let them cool completely before freezing. They can last up to two months in the freezer. To thaw, place them in the fridge overnight. For quick thawing, use the microwave on low power. This ensures they warm evenly without cooking further.
FAQs
Can I use frozen chicken strips?
Yes, you can use frozen chicken strips. If you choose this route, cook them directly from frozen. Preheat your oil to medium heat. Fry them for about 6-8 minutes on each side. Make sure they reach an internal temperature of 165°F. This method keeps them juicy and tasty. Just remember, they may not get as crispy as fresh strips.
How can I make these chicken strips spicier?
To add heat, try a few simple tricks. You can mix cayenne pepper or chili powder into the breadcrumb mixture. Start with one teaspoon and adjust to your taste. If you want extra heat, add some hot sauce to the beaten egg. This will give your chicken strips a nice kick. You’ll love the flavor boost!
What dips pair well with Garlic Parmesan Chicken Strips?
These chicken strips go great with many dips. Here are some popular options:
- Marinara sauce
- Ranch dressing
- Honey mustard
- BBQ sauce
- Spicy aioli
Feel free to mix and match. Each dip brings out a different flavor in the strips. Enjoy your tasty meal!
To make tasty chicken strips, you need simple ingredients and clear steps. We covered the main elements, from chicken and spices to oil and storage. You can switch flavors with herbs or try different cooking methods, like baking. Storing and reheating tips help keep them crispy. Remember, experimenting can lead to new favorites. Cook with care, and you'll enjoy every bite!