Go Back
- 2 boneless chicken breasts - 1 cup panko bread crumbs - 1/2 cup all-purpose flour - 1 teaspoon garlic powder - 1 teaspoon onion powder - 1 teaspoon paprika - Salt and pepper to taste - 2 large eggs, beaten - Cooking spray - Tonkatsu sauce (for drizzling) - Shredded cabbage (for garnish) - Lemon wedges (for squeezing) The main ingredients for this dish are simple but important. Start with boneless chicken breasts. They are easy to work with and cook evenly. Panko bread crumbs give that special crunch. They are lighter and crispier than regular bread crumbs. All-purpose flour acts as the base layer, making it easier for the coating to stick. For seasonings, garlic powder, onion powder, and paprika add great flavor. They make each bite tasty. Don’t forget salt and pepper; they enhance all the other flavors. You will also need eggs for the egg wash. They help the panko stick nicely. Cooking spray is a must to help crisp the chicken in the air fryer. Tonkatsu sauce is the star of the show when serving. It’s sweet, tangy, and oh-so-delicious. Shredded cabbage adds a nice crunch and freshness. Finally, lemon wedges bring a zesty kick when squeezed over the chicken. Gather these ingredients before you start cooking. Each one plays a role in making your Air Fryer Chicken Katsu crunchy and flavorful. To start, you need to ensure your chicken breasts are even. If they are thick, slice each breast in half. This creates thinner cutlets. Next, place each cutlet between two sheets of plastic wrap. Use a meat mallet to pound them gently. Aim for about 1/2 inch thick. This helps the chicken cook evenly. Now, let’s prepare the dredging stations. In a shallow dish, mix the all-purpose flour with garlic powder, onion powder, paprika, salt, and pepper. Make sure to combine it well. In another shallow dish, whisk the eggs lightly. This adds air and helps the panko stick. In the third dish, add the panko bread crumbs. Season them with a pinch of salt and pepper. Take each chicken cutlet and dredge it in the flour mixture. Shake off any excess flour. Next, dip it into the beaten eggs. Ensure it’s fully coated. Finally, press the chicken into the panko breadcrumbs. Make sure to cover both sides for a nice crunch. Preheat your air fryer to 400°F (200°C). Run it for about 5 minutes. Lightly spray the basket with cooking spray. This helps prevent sticking. Carefully arrange the breaded chicken cutlets in a single layer in the basket. Avoid overcrowding. Lightly spray the tops with more cooking spray. Cook the cutlets for about 10-12 minutes. Flip them halfway to achieve an even golden brown. The chicken should reach an internal temperature of 165°F (74°C). Once the chicken katsu is done, remove it from the air fryer. Let it rest for about a minute. This helps the juices stay in the meat. After resting, slice it into strips for serving. To get that perfect crunch, panko breading is key. Panko is lighter and crispier than regular breadcrumbs. This gives your chicken katsu a nice, crunchy texture. When you coat the chicken, make sure to cover every inch. Use cooking spray on top of the breaded chicken before frying. This helps it get extra crispy while cooking. To make your chicken katsu burst with flavor, enhance the flour mixture. Add more spices like cayenne for heat or dried herbs for depth. You can also mix in some Parmesan cheese for extra richness. For serving, drizzle tonkatsu sauce generously over the chicken. It adds a sweet and tangy touch. Pair it with fresh, shredded cabbage for crunch and a squeeze of lemon for brightness. Cooking time can change based on the size of your chicken pieces. Thicker pieces need more time to cook through. Always check the internal temperature. Your chicken should reach 165°F (74°C) for safe eating. If it’s not done, return it to the air fryer for a few more minutes. {{image_4}} You can swap chicken for pork if you prefer. Pork katsu has a rich flavor. Use pork loin or tenderloin for best results. For a vegetarian twist, try eggplant or tofu. Slice them thin, then follow the same coating steps. This way, you can enjoy a crispy texture without meat. Mix it up by adding spices to the flour. Try cayenne for heat or thyme for an earthy taste. This will give your katsu a unique twist. When it comes to sauces, tonkatsu is a classic, but don’t stop there. You can serve it with BBQ sauce or sweet chili sauce for something different. Each sauce brings its own flavor. Pair your chicken katsu with fresh vegetables. Steamed broccoli or carrots work great. They add color and nutrition to your meal. Rice is a popular choice. White rice or fried rice complement the katsu well. Noodles can also be a tasty option. Try soba or udon for a delightful meal. After you enjoy your air fryer chicken katsu, store the leftovers in the fridge. Place the chicken in an airtight container. This helps keep it fresh. Use it within three days for the best taste. If you want to keep chicken katsu longer, freezing is a good option. Wrap each piece tightly in plastic wrap, then place them in a freezer bag. This prevents freezer burn. You can freeze the chicken katsu for up to three months. To reheat the chicken, first, thaw it overnight in the fridge. Preheat your air fryer to 375°F (190°C). Heat the chicken for about 8-10 minutes until it is warm and crispy again. To keep the texture of chicken katsu when storing, avoid stacking the pieces. Stacking can make them soggy. Instead, lay them flat in a single layer. When reheating, use a light spray of cooking oil to maintain crunchiness. Chicken katsu is a Japanese dish made with breaded chicken. You coat the chicken with flour, dip it in egg, and then cover it with panko breadcrumbs. This process gives the chicken a crispy texture. Traditionally, you serve it with tonkatsu sauce and shredded cabbage. Yes, you can use frozen chicken. Just make sure to thaw it first. You want the chicken to be evenly cooked. Thaw it in the fridge overnight or use the microwave for a quick thaw. Chicken katsu can be a part of a healthy meal. It uses chicken breast, which is lean. However, it is fried or air-fried, so be mindful of portion sizes and sauces. Pair it with veggies for a balanced dish. You can use regular breadcrumbs if you don't have panko. They may not be as crunchy, but they will work. Crushed cornflakes or crushed crackers can also add crunch and flavor. The chicken is done when it reaches an internal temperature of 165°F (74°C). You can use a meat thermometer to check. The outside should be golden brown and crispy. If it looks undercooked, give it more time in the air fryer. In this article, we explored making delicious chicken katsu. I broke it down into simple steps for you. We discussed the key ingredients, special tips, and various options. Remember, achieving that perfect crunch comes from using panko and cooking spray. Feel free to mix flavors and try different proteins too. Store leftovers properly to keep them tasty. Enjoy your cooking and impress friends and family with your chicken katsu!

Air Fryer Chicken Katsu

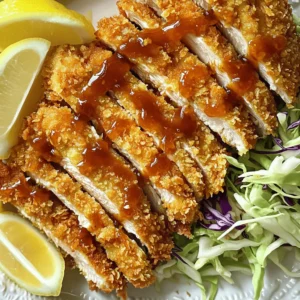
Craving something delicious? Try this crispy air fryer chicken katsu recipe that's easy to make and full of flavor! You'll learn how to perfectly bread and cook chicken cutlets for a crunchy, golden finish that pairs beautifully with tonkatsu sauce and fresh cabbage. Ideal for a quick dinner or impressive meal prep, this recipe is sure to please! Click to discover how to make it and elevate your cooking game today!

Ingredients
  

2 boneless chicken breasts

1 cup panko bread crumbs

1/2 cup all-purpose flour

2 large eggs, beaten

1 teaspoon garlic powder

1 teaspoon onion powder

1 teaspoon paprika

Salt and pepper to taste

Cooking spray

Tonkatsu sauce (for generous drizzling)

Shredded cabbage (for garnish)

Lemon wedges (for a refreshing squeeze)

Instructions
 

Prepare the Chicken: Start by ensuring your chicken breasts are of even thickness. If they are thick, carefully slice each breast in half horizontally to create thinner cutlets. To further flatten them, place each cutlet between two sheets of plastic wrap or parchment paper. Use a meat mallet to pound them gently to about 1/2 inch thick, which helps them cook evenly.

    Prepare the Dredging Stations: In a shallow dish, combine the all-purpose flour with garlic powder, onion powder, paprika, salt, and pepper, mixing well to ensure an even distribution of flavors.

      Egg Wash: In a separate shallow dish, pour in the beaten eggs, whisking them lightly to incorporate air. This will help the panko breadcrumbs adhere to the chicken.

        Panko Coating: In a third shallow dish, add the panko bread crumbs and season them with a pinch of extra salt and pepper to enhance the flavor.

          Coat the Chicken: Take each chicken cutlet and dredge it in the seasoned flour mixture, shaking off any excess flour. Then, dip it into the beaten eggs, ensuring it’s fully coated. Finally, press the chicken into the panko breadcrumbs, making sure to cover both sides thoroughly for a delightful crunch.

            Preheat the Air Fryer: Preheat your air fryer to 400°F (200°C) by running it for approximately 5 minutes. Lightly spray the air fryer basket with cooking spray to prevent sticking.

              Cook the Chicken Katsu: Carefully arrange the breaded chicken cutlets into the air fryer basket in a single layer, ensuring they are not overcrowded. Lightly spray the tops of the cutlets with a little more cooking spray to encourage optimal crispiness.

                Air Fry: Cook the cutlets in the air fryer for about 10-12 minutes. Make sure to flip them halfway through cooking to achieve an even golden brown finish. The chicken should reach an internal temperature of 165°F (74°C) and be crispy on the outside.

                  Rest and Slice: Once the chicken katsu reaches the desired doneness, carefully remove it from the air fryer and let it rest for about a minute. This allows the juices to redistribute, keeping the meat tender. Then, slice it into strips for serving.

                    Serve and Enjoy: Serve the crispy chicken katsu generously drizzled with tonkatsu sauce, accompanied by a side of fresh, shredded cabbage. For an added zesty touch, garnish with lemon wedges that can be squeezed over the chicken just before enjoying.

                      Prep Time: 15 mins | Total Time: 30 mins | Servings: 2-4