Go Back
- 1 can chickpeas (15 oz), drained and rinsed - Extra virgin olive oil and spices for seasoning - Cooked quinoa or brown rice as a base Crispy Chickpea Power Bowls start with hearty chickpeas. These little gems pack protein and fiber. When roasted, they become crunchy and full of flavor. Use extra virgin olive oil to help them crisp up and add great taste. Add spices like smoked paprika and garlic powder for a delicious kick. You can serve them over cooked quinoa or brown rice. Both options provide a great base for your meal. - Cherry tomatoes, cucumber, avocado - Fresh parsley for garnish Fresh produce brings life to your power bowl. Cherry tomatoes add sweetness. Diced cucumber gives crunch. Sliced avocado adds creaminess that balances the dish. Don’t forget to sprinkle fresh parsley on top. It adds color and a bright flavor that enhances the whole meal. - Feta cheese for added flavor - Tahini sauce for drizzling For extra taste, consider adding feta cheese. It gives a salty punch. Tahini sauce is another great option. Drizzle it on top for a rich and nutty flavor. Both add more layers to your Crispy Chickpea Power Bowls. Feel free to mix and match to suit your taste. For the complete list of ingredients and instructions, check the Full Recipe. First, set your oven to 425°F (220°C). This step ensures your chickpeas get crispy. Next, prepare a baking sheet by lining it with parchment paper. This helps prevent sticking. In a mixing bowl, combine the drained chickpeas with two tablespoons of extra virgin olive oil. Add in one teaspoon of smoked paprika, garlic powder, and ground cumin. Don’t forget to sprinkle in some sea salt and black pepper. Toss everything well to coat the chickpeas evenly. This step is key for that perfect crispiness. Now, spread the seasoned chickpeas on the prepared baking sheet in a single layer. Bake them in the preheated oven for 25-30 minutes. Be sure to shake the pan halfway through roasting. This helps them cook evenly. You want them golden brown and crispy for the best taste. After roasting, you can follow the rest of the recipe to assemble your delicious power bowls. Check out the Full Recipe for all the tasty details! To get the best crispy chickpeas, start with dry chickpeas. They give a better crunch than canned ones. If you use canned chickpeas, make sure to drain and rinse them well. Next, avoid overcrowding the baking sheet. If you place too many chickpeas together, they will steam instead of crisp up. Use enough space between them for even roasting. Layer your ingredients to make the power bowls look great. Start with a base of quinoa or brown rice. Then, add the crispy chickpeas on top. Follow with halved cherry tomatoes, diced cucumber, and avocado slices. This order makes the colors and textures pop. Drizzle the tahini sauce just before serving. This keeps it fresh and creamy, enhancing the flavors. For a beautiful display, use clear glass bowls. These let you see the vibrant colors of your ingredients. It's a feast for the eyes! Don’t forget to include lemon wedges on the side. They add a bright touch and a zesty flavor that pairs well with the dish. {{image_4}} You can switch the quinoa for different grains. Try brown rice, couscous, or farro. Each base adds its own taste and texture. If you want a lighter meal, use mixed greens. They bring freshness and crunch to your bowl. Want more protein? Add grilled chicken or tofu. Both options cook quickly and taste great. You can also swap chickpeas with another legume, like black beans. They provide a hearty feel and pair well with other flavors. Elevate your dish with roasted vegetables. Carrots, bell peppers, or sweet potatoes work well. You can also add a spicy dressing for some heat. Fresh herbs like cilantro or mint can change the taste. They bring brightness and freshness to each bite. To keep your crispy chickpea power bowls fresh, refrigerate them in airtight containers. You can store them for up to 3 days. For the best taste, keep the crispy chickpeas separate from other ingredients. This way, they stay crunchy and delicious. When you want to enjoy leftovers, re-crisp the chickpeas in the oven. Set your oven to 400°F (200°C) and spread the chickpeas on a baking sheet. Bake for about 5-10 minutes. This method keeps them crispy. I recommend avoiding the microwave. Microwaving can make them soft and chewy. If you want to save some for later, you can freeze cooked quinoa or grains. They freeze well and are perfect for future meals. You can also freeze chickpeas, but they may lose their crispiness. It’s best to enjoy them fresh for the best texture. All ingredients listed are naturally vegan. You can enjoy this meal without any animal products. The chickpeas, quinoa, and fresh veggies all provide great flavors and nutrients. Yes, but remember to soak and cook them first. Dried chickpeas need time to soften. Soaking them overnight can help. Then, cook them until they are tender before seasoning. Try using almond butter or a yogurt dressing. Both options add creaminess to the bowl. Each will give a unique flavor twist while keeping it delicious. This blog post explored how to make delicious Crispy Chickpea Power Bowls. You learned about the key ingredients, like chickpeas, quinoa, and fresh veggies. I shared step-by-step instructions, tips for perfect crispiness, and creative variations for extra flavor. In conclusion, enjoy these bowls as a healthy meal or snack. They are easy to customize and full of taste. With simple steps and options, you can create your own version and impress your friends!

Crispy Chickpea Power Bowls

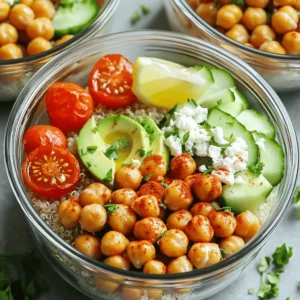
Discover the ultimate Crispy Chickpea Power Bowls recipe that packs flavor and nutrition into every bite! Featuring perfectly roasted chickpeas, creamy avocado, and vibrant veggies over a hearty base of quinoa, this dish is as delightful to eat as it is to look at. Ideal for meal prep or a quick weeknight dinner, this recipe is not to be missed. Click through to explore the full recipe and elevate your meal game today!

Ingredients
  

1 can (15 oz) chickpeas, drained and rinsed

2 tablespoons extra virgin olive oil

1 teaspoon smoked paprika

1 teaspoon garlic powder

1 teaspoon ground cumin

Sea salt and freshly cracked black pepper to taste

2 cups cooked quinoa (or brown rice) for a hearty base

1 cup cherry tomatoes, halved for sweetness

1 cup cucumber, diced for crunch

1 ripe avocado, thinly sliced for creaminess

½ cup feta cheese, crumbled (optional for a tangy finish)

¼ cup fresh parsley, finely chopped for brightness

2 tablespoons tahini sauce (for drizzling)

Instructions
 

Preheat the Oven: Set your oven to 425°F (220°C) and prepare a baking sheet by lining it with parchment paper to prevent sticking.

    Prepare the Chickpeas: In a mixing bowl, combine the rinsed chickpeas with extra virgin olive oil, smoked paprika, garlic powder, ground cumin, and a generous pinch of sea salt and freshly cracked black pepper. Toss everything together until the chickpeas are evenly coated in the spice mixture.

      Roast the Chickpeas: Spread the seasoned chickpeas onto the prepared baking sheet in a single layer. Roast in the preheated oven for 25-30 minutes, or until they turn golden brown and crispy. Make sure to shake the pan halfway through roasting to promote even cooking.

        Assemble the Power Bowls: In a large serving bowl, place a generous portion of cooked quinoa (or brown rice) as the base. Layer on the crispy roasted chickpeas, followed by the halved cherry tomatoes, diced cucumber, and delicate slices of avocado. If desired, sprinkle crumbled feta cheese atop for a salty punch.

          Garnish with Flavor: Drizzle tahini sauce elegantly over the assembled bowls, then finish with a sprinkle of finely chopped fresh parsley for added color and a burst of herbal flavor.

            Serve & Enjoy: Present the power bowls warm or at room temperature, perfect for a nutritious meal at any time of the day.

              Prep Time: 15 minutes | Total Time: 45 minutes | Servings: 4

                - Presentation Tips: Serve the bowls in clear glass containers to showcase the beautiful vibrant colors and textures of the ingredients. Adding a lemon wedge on the side can offer an extra zing of freshness that complements the dish beautifully.