Go Back
Gather these items to make your no-bake chocolate peanut butter bars: - 1 cup graham cracker crumbs - 1 cup rolled oats - 1/2 cup creamy peanut butter - 1/2 cup pure maple syrup - 1/4 cup honey (or agave syrup for vegan) - 1/2 cup powdered sugar - 1 cup dark chocolate chips (dairy-free for vegan) - 1 tablespoon unrefined coconut oil - A pinch of sea salt Measuring these ingredients correctly is key. Use dry measuring cups for the crumbs and oats. For sticky items like peanut butter and syrup, a liquid measuring cup works best. If you want to swap some ingredients, here are good options: - Honey: Use agave syrup for a vegan version. - Peanut Butter: Almond or cashew butter can work well. - Chocolate Chips: Dark chocolate chips can be replaced with semi-sweet or milk chocolate. - Maple Syrup: Honey can substitute, but this will not be vegan. These swaps let you cater to your taste or dietary needs. To make these bars vegan, choose these items: - Replace honey with agave syrup. - Use dairy-free chocolate chips. - Ensure the peanut butter is free of added sugars or oils. These choices keep the bars tasty and suitable for all. You still get rich flavors without any animal products. Start by gathering your ingredients. You need graham cracker crumbs, rolled oats, creamy peanut butter, pure maple syrup, honey, and powdered sugar. In a large bowl, mix the graham cracker crumbs and rolled oats. Make sure they combine well. In a separate bowl, whisk the creamy peanut butter, maple syrup, and honey. You want this mixture to be smooth and creamy. Next, pour the peanut butter mixture into the bowl with the dry ingredients. Add the powdered sugar. Stir it all together until you form a sticky dough. This will be the base of your bars. It's thick, so use a spatula or your hands to mix it well. Now, it's time to make the chocolate topping. In a microwave-safe bowl, add the dark chocolate chips and coconut oil. Heat this mixture in the microwave. Do it in 30-second intervals and stir well each time. This way, the chocolate melts evenly. Once it’s glossy and smooth, pour the melted chocolate over the peanut butter base. Use a spatula to spread it evenly across the top. For a finishing touch, sprinkle a pinch of sea salt over the chocolate. This will enhance the flavor and make it pop! After layering the chocolate, it's time to chill the bars. Place the baking dish in the refrigerator for at least two hours. This helps the bars set properly. Once they are firm to the touch, lift them out using the parchment paper edges. Now, cut the bars into squares or rectangles. Use a sharp knife for clean cuts. These no-bake chocolate peanut butter bars are ready to enjoy! To keep your no-bake chocolate peanut butter bars fresh, store them in an airtight container. This helps prevent them from drying out. You can keep them in the fridge for up to a week. If you want to keep them longer, freeze them. They can last for about three months in the freezer. Just remember to wrap them well in plastic wrap before placing them in a freezer bag. For the best chocolate topping, melt your chocolate chips slowly. Use short bursts in the microwave, stirring in between. This method avoids burning the chocolate. Adding coconut oil helps make the chocolate smooth and shiny. If the chocolate feels too thick, add a touch more coconut oil. This keeps it pourable when you spread it over the bars. You can switch up the flavors in your bars. Try adding some shredded coconut or dried fruit for a twist. You can also use different nut butters. Almond or cashew butter can give your bars a new taste. Feel free to mix in some chopped nuts or seeds for added crunch. These small changes can make your no-bake bars unique and fun! {{image_4}} You can easily make these bars nut-free. Simply replace the peanut butter with sun butter. Sun butter comes from sunflower seeds and has a similar texture. It adds a nice, nutty taste without using nuts. This swap keeps the bars safe for those with nut allergies. The rest of the recipe stays the same. Enjoy your nut-free treat! To make these bars gluten-free, choose gluten-free graham cracker crumbs. Many brands offer gluten-free options that taste great. Also, check the oats you use. Some oats may have gluten due to cross-contamination. Use certified gluten-free rolled oats for best results. With these simple swaps, you can enjoy a gluten-free dessert that everyone will love. Feel free to get creative with flavors! You can add shredded coconut for a tropical twist. Just mix in half a cup of unsweetened coconut with the base. Dried fruits like cranberries or raisins also work well. They add sweetness and a chewy texture. Try adding a teaspoon of vanilla extract for extra flavor. These small changes make your bars unique and fun to eat. Store your no-bake chocolate peanut butter bars in an airtight container. This helps keep them fresh and tasty. You can keep them in the fridge for about a week. If you notice any moisture, it may affect the texture. So, ensure the container is sealed well. You can also layer parchment paper between bars to stop them from sticking. If you want to keep these bars for longer, freezing is a great option. Wrap each bar in plastic wrap or foil. Place them in a freezer-safe bag or container. They can last up to three months in the freezer. To enjoy, just thaw them in the fridge for a few hours before serving. This helps maintain their delicious taste. When serving, try to cut the bars right before you eat them. This keeps them firm and fresh. For a fun twist, drizzle extra melted chocolate on top. You can also add crushed nuts for a nice crunch. Serve them on a pretty plate to impress your guests. Enjoy your treats while they are at their best! Yes, you can use other nut butters! Almond butter, cashew butter, or even sunflower seed butter work great. Each nut butter will give a unique flavor. Just keep the same amount as the creamy peanut butter in the recipe. This will keep the bars tasty and hold their shape. These bars can last about a week in the fridge. Make sure to store them in an airtight container. If you want them to last longer, you can freeze them. They can stay fresh for up to three months in the freezer. Just wrap each bar tightly in plastic wrap before freezing. Yes, you can skip the maple syrup! You can replace it with agave syrup or more honey. Both options will keep the bars sweet and sticky. If you want a sugar-free option, try using a sugar substitute that measures like syrup. Just ensure the texture stays right for the best results. In this blog post, we explored the key ingredients and methods for making no-bake bars. You learned how to measure ingredients and discovered vegan options. Then, we covered step-by-step instructions for creating your bars and shared helpful tips for storage and perfect chocolate. Remember, you can try different flavors and make nut-free or gluten-free variations. Get creative and enjoy the process! Your no-bake bars will be a tasty success.

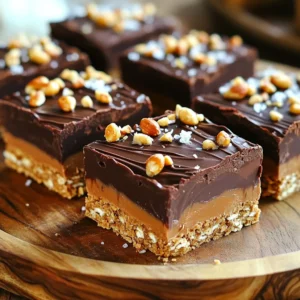
No-Bake Chocolate Peanut Butter Bars

Indulge in these decadent no-bake chocolate peanut butter bars that are easy to make and satisfy your sweet cravings! With simple ingredients like graham cracker crumbs, creamy peanut butter, and rich dark chocolate, you’ll have a delicious treat ready in no time. Perfect for any occasion, these bars are not only tasty but also visually appealing. Click to explore the full recipe and enjoy these delightful no-bake bars today!

Ingredients
  

1 cup graham cracker crumbs

1 cup rolled oats

1/2 cup creamy peanut butter

1/2 cup pure maple syrup

1/4 cup honey (substitutable with agave syrup for a vegan-friendly option)

1/2 cup powdered sugar

1 cup dark chocolate chips (use dairy-free for a vegan variation)

1 tablespoon unrefined coconut oil

A pinch of sea salt for finishing

Instructions
 

In a large mixing bowl, combine the graham cracker crumbs and rolled oats until evenly mixed.

    In a separate bowl, whisk together the creamy peanut butter, pure maple syrup, and honey until the mixture is velvety and well blended.

      Pour the smooth peanut butter mixture into the bowl with the graham cracker and oats. Add the powdered sugar, then stir vigorously until all ingredients are thoroughly combined and a sticky dough forms.

        Line an 8x8 inch baking dish with parchment paper, making sure to leave some paper hanging over the sides for easy lifting later.

          Transfer the mixture into the prepared baking dish, using your hands or a spatula to press it down firmly and evenly across the bottom.

            In a microwave-safe bowl, combine the dark chocolate chips and coconut oil. Heat in the microwave using 30-second intervals, stirring after each interval until the chocolate is completely melted and glossy.

              Carefully pour the melted chocolate over the pressed peanut butter mixture in the baking dish, and spread it evenly with a spatula or the back of a spoon.

                Finish by sprinkling a pinch of sea salt over the top, enhancing both flavor and texture.

                  Place the baking dish in the refrigerator and allow the bars to chill for at least 2 hours, or until they are firm to the touch.

                    Once set, gently lift the bars out of the dish using the overhanging parchment paper and cut into squares or rectangles as desired.

                      Prep Time: 20 mins | Total Time: 2 hrs 20 mins | Servings: 16 bars

                        - Presentation Tips: Serve the bars on a decorative platter and consider drizzling additional melted chocolate over the top for a touch of elegance. For an extra visual appeal, garnish with crushed peanuts or a light sprinkle of flaky sea salt.