Air Fryer Apple Hand Pies Simple and Tasty Treat

Are you ready to delight your taste buds? These Air Fryer Apple Hand Pies are simple, tasty treats that will impress your friends and family. With a crunchy crust and sweet apple filling, they’re perfect for any occasion. In this guide, I’ll share all the ingredients, easy steps, and expert tips you need to make these delicious hand pies. Let’s dive in and create something wonderful together!
Ingredients
List of Necessary Ingredients
To make these tasty Air Fryer Apple Hand Pies, you need:
– 2 medium apples (Granny Smith or Honeycrisp)
– 1 tablespoon fresh lemon juice
– 1 teaspoon ground cinnamon
– 2 tablespoons packed brown sugar
– 1 tablespoon cornstarch
– 1 package (10 oz) refrigerated pie crusts
– 1 large egg (for egg wash)
– 1 tablespoon milk
– Powdered sugar for dusting (optional)
Recommended Apple Varieties
I recommend using Granny Smith or Honeycrisp apples for this recipe.
– Granny Smith: These apples are tart and hold their shape well.
– Honeycrisp: They are sweet and crisp, adding a nice balance to the filling.
Both types of apples bring great flavor and texture to your hand pies.
Substitutions for Ingredients
You can swap some ingredients if needed. Here are a few ideas:
– Apples: Use Fuji or Gala apples for a sweeter taste.
– Brown sugar: White sugar can replace brown sugar, but it will be less rich.
– Cornstarch: Use flour as a thickener if you don’t have cornstarch.
– Egg wash: Brush with milk or melted butter if you skip the egg.
These swaps keep the recipe simple and still delicious!
Step-by-Step Instructions
Preparation of Apple Filling
Start by peeling and dicing your apples. I like to use Granny Smith or Honeycrisp. They add a nice balance of sweet and tart. Place the diced apples in a bowl. Add one tablespoon of fresh lemon juice. Then sprinkle in one teaspoon of ground cinnamon and two tablespoons of packed brown sugar. Finally, add one tablespoon of cornstarch to help thicken the filling. Mix everything well until the apples are coated. Let it sit for about ten minutes. This waiting time helps the flavors blend better.
Assembling the Hand Pies
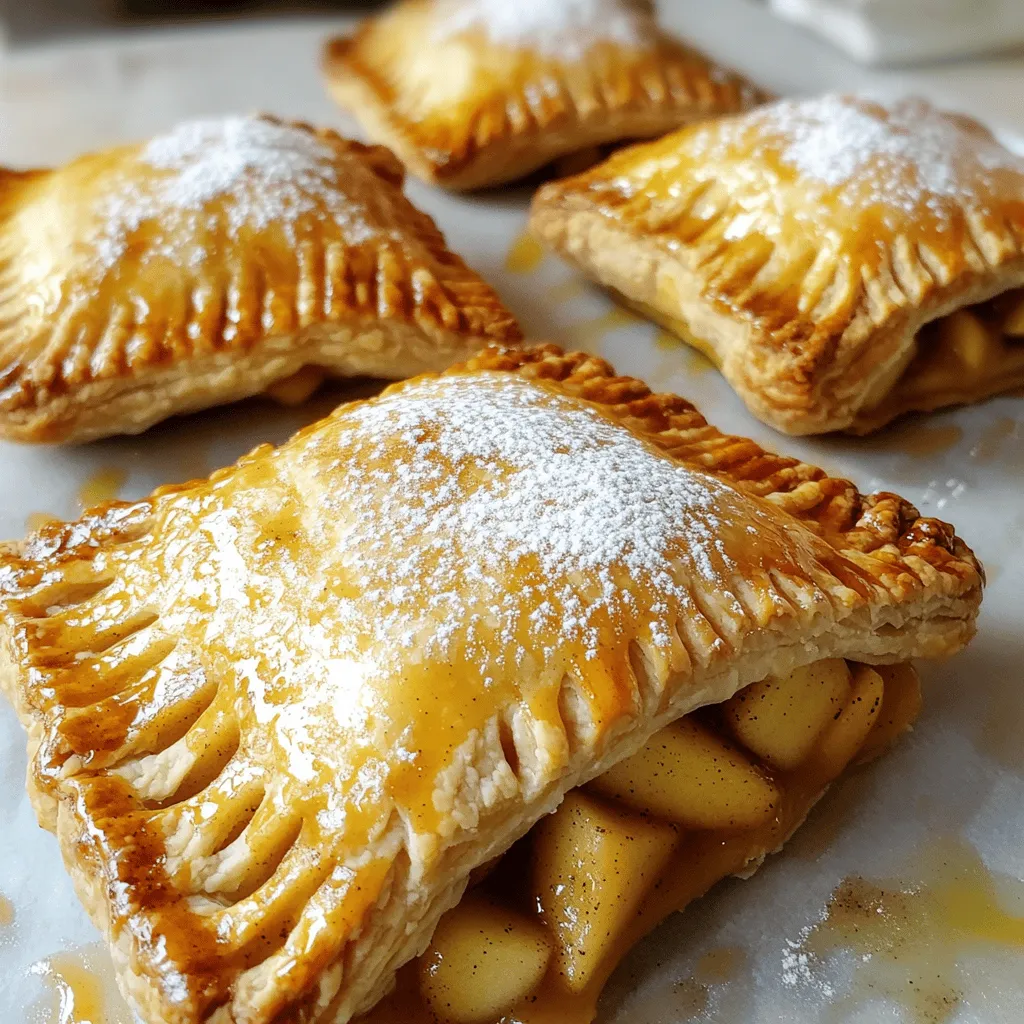
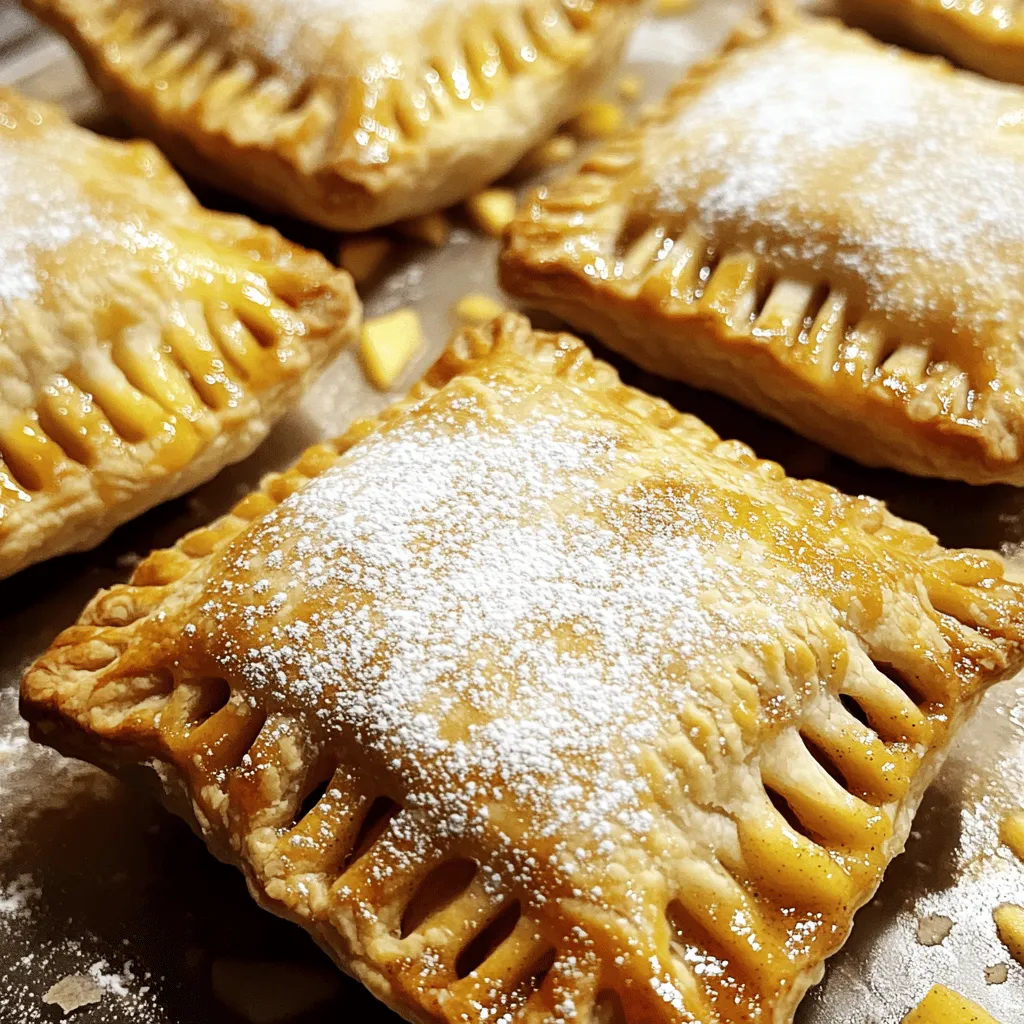
Next, take out the refrigerated pie crusts. Dust your work surface lightly with flour. Unroll the pie crusts and roll them out a bit more if needed. Cut each crust into four equal squares. You will have eight squares in total. Now, spoon one to two tablespoons of apple filling onto the center of each square. Be careful not to overfill them! Fold two opposite corners of the square over the filling to form a triangle. Press the edges together to seal them tightly. For a fun touch, use a fork to crimp the edges.
Cooking in the Air Fryer
Now it’s time to cook! Preheat your air fryer to 350°F (175°C). While it heats, whisk together one large egg and one tablespoon of milk in a small bowl. This mix makes an egg wash. Brush the tops of each hand pie with the egg wash to give them a golden color while cooking. Place the hand pies in the air fryer basket in a single layer. Do not overcrowd the basket; you may need to cook in batches. Air fry them for about 10 to 12 minutes. Watch for a rich golden brown color and a flaky texture. Once done, carefully remove them using tongs or a spatula. Let them cool on a wire rack for a few minutes. If you want, dust them with powdered sugar for a sweet finish. Enjoy your tasty hand pies!
Tips & Tricks
Ensuring the Flakiness of the Crust
To make your crust flaky, use cold ingredients. Cold pie crusts create steam when cooked. This steam helps the crust puff up. Roll out the crust on a floured surface. Keep the dough as thick as possible. Thin dough can burn and won’t be as flaky. Use a fork to crimp the edges. This not only seals the pies but adds a nice touch.
What to Do if Filling Leaks
If your filling leaks, don’t worry! First, make sure you don’t overfill. Use just 1-2 tablespoons of filling. If it still leaks, you can patch it up. Use some extra dough to cover any gaps. You can also place baking paper under the pies while cooking. This helps catch any drips.
Best Practices for Air Frying
When using the air fryer, preheat it to 350°F (175°C). This ensures even cooking. Arrange the pies in a single layer. Avoid crowding them together. If you have many, cook in batches. This helps them crisp up nicely. Keep an eye on them as they cook. They will be done in about 10-12 minutes. Look for a golden-brown color and a flaky texture.

Variations
Different Fruit Fillings
You can use other fruits for your hand pies. Pears, cherries, or blueberries work well. Just adjust the sugar based on the fruit’s sweetness. For example, cherries may need more sugar than apples. Experiment with your favorite fruits to find the best mix.
Adding Spices and Flavorings
Spices can change the taste of your hand pies. Try adding nutmeg or ginger for warmth. Vanilla extract can add sweetness too. Just a small amount can make a big difference. You could even add a pinch of cayenne for a surprising kick.
Healthy Ingredient Swaps
Want to make your hand pies healthier? Use whole wheat pie crusts instead of regular ones. You can also swap brown sugar for honey or maple syrup. For a lower-calorie option, consider using applesauce instead of some butter or sugar. These simple changes can keep the flavor while making them a bit better for you.
Storage Info
How to Store Leftover Hand Pies
To store your leftover hand pies, let them cool completely. Wrap each pie in plastic wrap or foil. Place them in an airtight container to keep them fresh. Store them in the fridge for up to three days. This helps keep the crust crispy and the filling tasty.
Freezing Instructions
If you want to freeze your hand pies, first let them cool. Wrap each pie tightly in plastic wrap. Then, place the wrapped pies in a freezer-safe bag. You can freeze them for up to three months. When you’re ready to eat them, you can bake them straight from the freezer.
Reheating Tips
To reheat your hand pies, preheat the air fryer to 350°F (175°C). Place the pies in the basket without overcrowding. Air fry for about 5-7 minutes until they are warm and crispy again. You can also use an oven at 350°F for about 10 to 15 minutes. This method keeps the crust nice and flaky. Enjoy them as if they were fresh!
FAQs
Can I make Air Fryer Apple Hand Pies in advance?
Yes, you can prepare the hand pies ahead of time. Fill and seal the pies, then place them in the fridge for up to 24 hours. This keeps them fresh and ready to cook. If you want to store them longer, freeze them before cooking. Just remember to add a few extra minutes when you cook from frozen.
What other methods can I use to bake these hand pies?
You can bake these hand pies in a regular oven as well. Preheat your oven to 375°F (190°C). Place the hand pies on a baking sheet lined with parchment paper. Bake for 15-20 minutes, or until golden brown. You will miss that crispy air fryer texture, but they will still taste great!
How do I know when the hand pies are fully cooked?
Check the color of the crust. It should be golden brown. If you press lightly, the crust should feel flaky and firm. You can also use a fork to poke a small hole in the pie. If the filling bubbles out, they are ready to eat! Always allow them to cool slightly before enjoying.
You now know how to make tasty apple hand pies. We covered all the key ingredients and their best substitutes. I shared simple steps to prepare the filling, assemble, and cook in an air fryer.
Remember the tips for a flaky crust and how to handle leaks. You can mix in different fruits or spices for fun variations. Store extras properly to keep them fresh. Enjoy these hand pies with family and friends. Happy baking!


![- 1 ¾ cups all-purpose flour - 1 teaspoon baking soda - ½ teaspoon baking powder - ½ teaspoon salt - 1 teaspoon ground cinnamon - ½ teaspoon ground nutmeg - ½ teaspoon ground ginger - ½ cup granulated sugar - ½ cup brown sugar, packed firmly - 2 large eggs - 1 cup pumpkin puree - ½ cup vegetable oil - 1 teaspoon pure vanilla extract - 1 cup semi-sweet chocolate chips - ½ cup chopped walnuts (optional) To make Chocolate Chip Pumpkin Bread, you need simple ingredients. You’ll want to gather flour, sugars, eggs, and pumpkin puree. Pumpkin puree gives the bread moisture and flavor. The spices, like cinnamon and nutmeg, add warmth and depth. You can use canned pumpkin or make your own from fresh pumpkins. Using two types of sugar helps balance the flavor. Granulated sugar adds sweetness, while brown sugar adds a rich, caramel taste. Don’t forget the chocolate chips! They melt into gooey pockets of joy. If you like nuts, add walnuts for crunch. They complement the sweet and spicy flavors. - 9x5-inch loaf pan - Mixing bowls (medium & large) - Whisk or electric mixer - Spatula or wooden spoon - Parchment paper For baking, you’ll need some tools. A 9x5-inch loaf pan is perfect for this bread. Mixing bowls, both medium and large, will help you combine ingredients. A whisk or electric mixer makes it easy to blend. Use a spatula or wooden spoon to fold in the chocolate chips. Parchment paper is a must for easy removal after baking. This is your list of ingredients and tools to create a cozy fall treat. You can find the full recipe in the previous sections to guide you through the steps. Enjoy the process of baking and the delightful smell that fills your kitchen! - Preheat oven to 350°F (175°C). - Grease and line the loaf pan with parchment paper. To start, you need your oven hot. Preheating helps the bread rise well. Greasing the pan is key. It keeps the bread from sticking. Lining it with parchment paper makes removal easy. You’ll thank yourself later! - Whisk together flour, baking soda, baking powder, salt, and spices. - Set aside for later use. Next, grab a mixing bowl. Add the flour, baking soda, and baking powder. Toss in the salt, cinnamon, nutmeg, and ginger. Whisk them together until mixed well. This step ensures even flavors in your bread. Set this bowl aside for now. - Beat sugars and eggs until fluffy. - Stir in pumpkin puree, oil, and vanilla extract. In a large bowl, mix granulated and brown sugars with the eggs. Use an electric mixer or a whisk. Beat until it’s light and fluffy. Then, stir in the pumpkin puree, vegetable oil, and vanilla. Mix until it’s smooth. This creates the moist base for your bread. - Gradually add dry ingredients to wet mixture. - Fold gently to avoid overmixing. Now, slowly add the dry mix to the wet mix. Use a spatula for this step. Gently fold the ingredients together. Be careful not to overmix. This keeps your pumpkin bread light and airy. - Fold in chocolate chips and optional walnuts. Time for the fun part! Gently fold in the chocolate chips. If you like nuts, add the walnuts now. This gives your bread an amazing crunch and flavor. Ensure they are evenly distributed. - Pour batter into loaf pan and smooth the top. - Bake for 55-65 minutes and check for doneness. Pour your batter into the prepared loaf pan. Smooth the top with a spatula. Place it in the oven. Bake for 55 to 65 minutes. Check doneness with a toothpick. It should come out clean or with a few moist crumbs. Enjoy the aroma filling your kitchen! This step brings you closer to a delicious treat. For the full recipe, refer to the entire guide. Checking for doneness is easy. Insert a toothpick into the center of the bread. If it comes out clean or with a few moist crumbs, the bread is ready. This method helps ensure you don’t overbake. If you live at a high altitude, you may need to adjust the baking time. Start checking at the 50-minute mark to see if it is done. To keep your chocolate chip pumpkin bread light, avoid overmixing. Mix the wet and dry ingredients just until combined. This small tip makes a big difference! Also, using ingredients at room temperature helps them blend better. Eggs and oil mix more smoothly when they are warm. For a lovely presentation, serve the bread warm with butter. This adds a rich flavor that everyone loves. You can also dust the top with powdered sugar for a sweet touch. Fresh mint leaves make a nice garnish and add a pop of color. Arrange the slices on a wooden board for a rustic feel. This will impress your guests! {{image_4}} You can make this bread gluten-free. Just substitute all-purpose flour with a gluten-free flour blend. This change keeps the taste and texture similar. Look for a blend that contains xanthan gum to improve the bread's structure. Want a vegan option? You can replace the eggs with flaxseed meal or applesauce. For flaxseed, mix one tablespoon with three tablespoons of water. Let this sit until it thickens. Applesauce works well too; use ¼ cup instead of one egg. Also, choose plant-based oils and sugars for a fully vegan treat. Adding fruits like raisins or cranberries gives the bread a fruity twist. These add a burst of flavor and chewiness. You can also swap chocolate chips for white chocolate or caramel. These options create a different taste and make the bread even more exciting. Try mixing and matching for your perfect loaf! To keep your chocolate chip pumpkin bread fresh, store it in two ways. At room temperature, wrap the bread tightly in plastic wrap or place it in an airtight container. This method helps maintain its soft texture. You can also refrigerate it to extend its shelf life. In the fridge, it will stay good for about one week. If you want to save some for later, freezing is a great option! First, wrap the bread tightly in plastic wrap, then place it in a freezer-safe bag. This will help keep it fresh. When you’re ready to enjoy it, just take it out and let it thaw in the fridge overnight. To warm it up, pop slices in the microwave for a few seconds or use a toaster. Chocolate chip pumpkin bread tastes amazing with drinks! Pair it with coffee or tea for a cozy treat. The warm flavors of the bread go well with hot beverages, making it a perfect snack for fall. You can also serve it with a bit of butter or cream cheese for extra richness. Yes, you can use fresh pumpkin puree instead of canned. Using fresh pumpkin can add a deeper flavor. To make fresh puree, cut a pumpkin in half and remove the seeds. Bake the halves at 350°F for about 45 minutes, or until soft. Let them cool, then scoop out the flesh. Blend until smooth for your recipe. Look for a golden-brown top. The bread should spring back when touched gently. For the best test, insert a toothpick into the center. If it comes out clean or with a few moist crumbs, the bread is done. If it has wet batter, bake it a bit longer. Yes, you can add more chocolate chips! This will make the bread sweeter and richer. Just remember that too many chips can make the bread dense. Start with an extra half cup if you want more chocolate flavor. Use a sharp serrated knife for clean slices. Wait until the bread has cooled completely. This helps prevent the bread from squishing. Start at one end and slice straight down for even pieces. At room temperature, this bread lasts about 3 to 5 days. Keep it in an airtight container. If you put it in the fridge, it can last up to a week. Just remember that refrigeration can change the texture a bit. Sure! You can use nutmeg, allspice, or cardamom. Each spice brings a new twist to the flavor. Try mixing in a teaspoon of nutmeg for warmth or allspice for a hint of sweetness. Adjust the amount to your taste for a new fall delight. For the full recipe, check the [Full Recipe]. You now have a complete guide to making Chocolate Chip Pumpkin Bread. From the key ingredients to equipment and steps, you can easily whip up this tasty treat. Don't forget the tips for storage and variations to customize your bread. Whether you try a gluten-free version or add fruits, the options are endless. Enjoy your baking journey and share this delicious bread with family or friends!](https://joymealplan.com/wp-content/uploads/2025/06/f538d1de-de93-4194-9f26-14cc05263462-768x768.webp)


