Air Fryer Garlic Butter Mushrooms Easy Flavor Boost

Are you ready to elevate your meals with a quick and delicious side dish? Air Fryer Garlic Butter Mushrooms are packed with flavor and simple to make! With just a handful of ingredients, you can enjoy tender mushrooms coated in buttery garlic goodness. In this post, I’ll guide you step-by-step to create this easy flavor boost that will impress your family and friends. Let’s dive into the magic of air frying!
Ingredients
Main Ingredients
– 500g button mushrooms, cleaned and stems trimmed
– 4 tablespoons unsalted butter, melted
– 4 cloves garlic, finely minced
– 2 tablespoons fresh parsley, finely chopped
– 1 teaspoon dried thyme
– Salt and black pepper, to taste
– Juice of half a lemon
Optional Garnishes
– Extra parsley
– Lemon wedges
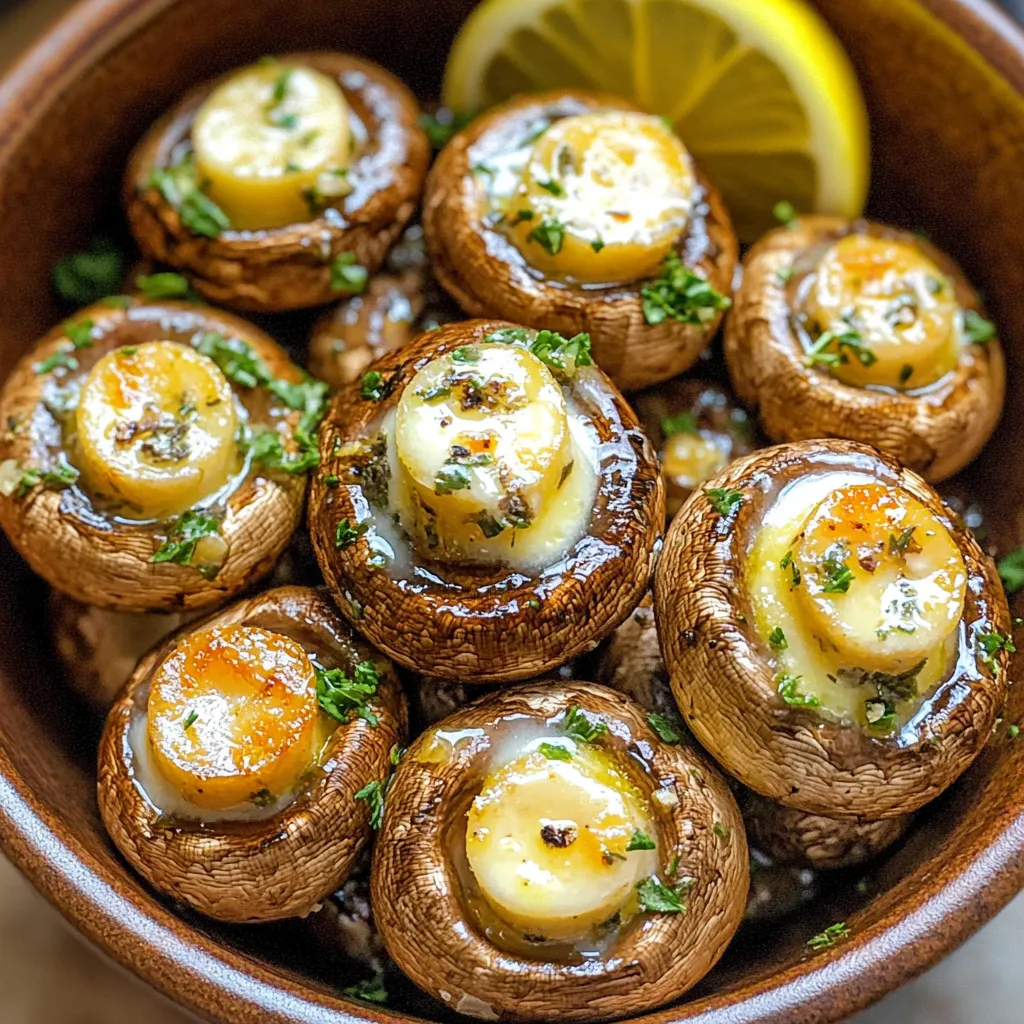
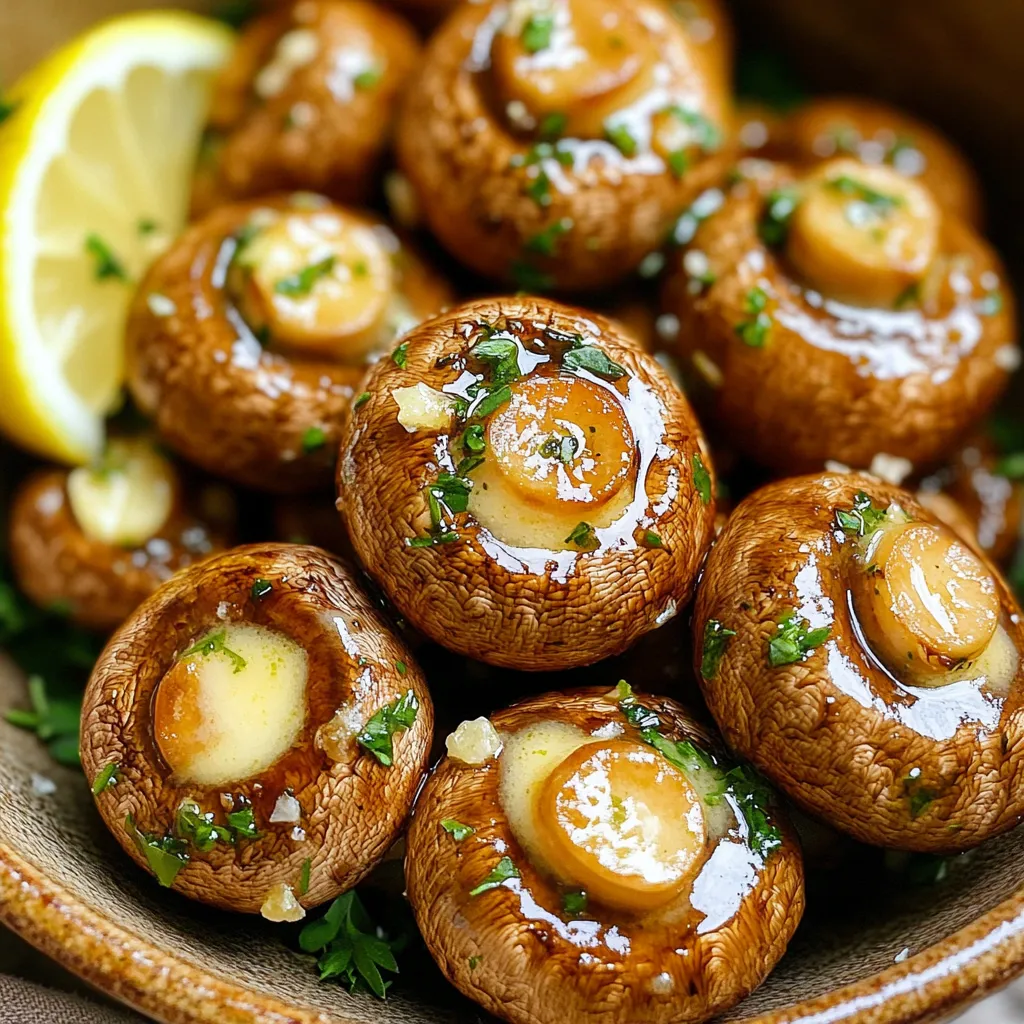
The main ingredients for this dish are simple yet flavorful. Button mushrooms shine here. They absorb the rich garlic butter mix well. The unsalted butter adds creaminess without extra salt. Fresh garlic gives a punch of taste. Parsley adds a fresh touch, while thyme brings depth. Don’t forget the salt and pepper. They balance the flavors perfectly. A splash of lemon juice brightens everything.
Optional garnishes include extra parsley for color. Lemon wedges can add zest when serving. These small details make your dish look and taste great. You can play with these ingredients based on what you have.
Step-by-Step Instructions
Preparing the Garlic Butter Mixture
To start, melt the butter in a bowl. You can use a microwave or a small pan on low heat. Once melted, add the minced garlic, chopped parsley, dried thyme, salt, and black pepper. Mix these well. The smell will make your kitchen feel warm and inviting.
Coating the Mushrooms
Next, clean the mushrooms. Rinse them quickly under water and trim the stems. Make sure they are dry. Add the cleaned mushrooms to your garlic butter mix. Toss them gently so that each mushroom gets coated well. This step is key for flavor.
Air Frying the Mushrooms
Now, preheat your air fryer to 180°C (360°F). This should take about five minutes. Preheating gets the air hot and helps the mushrooms cook evenly. Once hot, place the mushrooms in the air fryer basket in a single layer. Avoid stacking them. This way, they can crisp up nicely.
Cook the mushrooms for about 8 to 10 minutes. Shake the basket halfway through the cooking time. This helps them cook on all sides. When done, the mushrooms should be golden brown and tender.
After they finish cooking, remove them from the air fryer. Drizzle fresh lemon juice over the hot mushrooms. Toss them gently again to blend the flavors. Now they are ready to serve!
Tips & Tricks
Ensuring Perfectly Cooked Mushrooms
– Avoiding overcrowding: Arrange the mushrooms in a single layer. This helps them cook evenly. If you pile them up, they may steam instead of crisp. Work in batches if needed.
– Checking for doneness: After cooking for 8 to 10 minutes, check the mushrooms. They should be tender and golden brown. You can poke one with a fork to ensure it is soft.
Enhancing Flavor
– Adding additional spices: While garlic and thyme are great, you can mix in other spices. Try a pinch of red pepper flakes for heat or smoked paprika for depth.
– Using flavored butter: Instead of plain butter, use herb-infused butter. This adds even more taste to your dish and makes each bite burst with flavor.
Presentation Tips
– Serving suggestions: Serve the mushrooms warm in a rustic bowl. This looks inviting and appetizing. You can pair them with steak or pasta for a complete meal.
– Garnishing ideas: Top with extra chopped parsley for color. Add lemon wedges on the side for a fresh touch. This adds brightness and enhances the overall look of your dish.

Variations
Different Mushroom Types
You can switch up the mushrooms for your dish. Use cremini mushrooms for a richer taste. They have a firmer texture and a deep flavor. Portobello mushrooms are another great option. Their meaty texture makes them perfect for a hearty side. Just remember to slice them into thick pieces for even cooking.
Flavor Add-Ins
To take your mushrooms to the next level, think about adding cheese. A sprinkle of parmesan or feta can add a salty kick. If you like heat, try adding red pepper flakes. This gives the mushrooms a spicy twist that will wake up your taste buds. You can also add a splash of balsamic vinegar for a tangy depth.
Dietary Modifications
If you’re looking for vegan options, use plant-based butter. It works just as well and keeps things creamy. For gluten-free diets, check that your additional ingredients are gluten-free. Most of the main ingredients are safe, but always read labels to be sure. These small changes let everyone enjoy this tasty dish.
Storage Info
Storing Leftovers
To keep your garlic butter mushrooms fresh, use these tips:
– Refrigeration tips: Place the cooled mushrooms in an airtight container. They last in the fridge for up to three days. Make sure they are completely cool before sealing to avoid moisture build-up.
– Freezing options: If you want to store them longer, freeze the mushrooms. Use a freezer-safe bag and remove as much air as possible. They can last up to two months.
Reheating Instructions
When you’re ready to enjoy those tasty leftovers, follow these methods:
– Best methods for reheating: The best way is to use an air fryer. Preheat it to 180°C (360°F), then heat the mushrooms for 3 to 5 minutes. This keeps them crisp. You can also use a skillet on low heat for about 5 minutes.
– Maintaining texture: Avoid using a microwave, as it can make the mushrooms soggy. Heating them slowly helps preserve their texture and flavor, so they taste freshly made.
FAQs
How do you clean mushrooms before cooking?
To clean mushrooms, start by using a damp paper towel. Wipe off dirt gently. Avoid soaking them in water. Mushrooms can absorb water, making them soggy. Trim the stems if they look dry or tough. This helps keep them tender and flavorful.
Can I use other herbs instead of thyme?
Yes, you can. Try using rosemary for a more robust flavor. Oregano also works well and adds a nice twist. Basil adds a fresh taste if you want something lighter. Feel free to mix and match your favorite herbs. This lets you customize the dish to your liking.
What dishes pair well with garlic butter mushrooms?
Garlic butter mushrooms are great with many dishes. Serve them as a side with steak or chicken. They also make a tasty topping for pasta. For a lighter meal, add them to a salad. You can even use them in a warm sandwich or wrap. The options are endless!
You can create delicious garlic butter mushrooms with simple steps. We covered key ingredients, like mushrooms, garlic, and herbs. I shared tips to ensure they cook perfectly, along with ways to add flavor. You learned about variations and storage tips for your leftovers. Enjoy exploring these recipes and make them your own. Your kitchen will fill with rich flavors, and your dishes will impress everyone.


![To make tasty honey garlic meatballs, you need: - 1 pound ground beef (or a blend of beef and pork for extra flavor) - 1/2 cup fresh breadcrumbs (homemade or store-bought) - 1/4 cup grated Parmesan cheese (for richness) - 1 large egg (to bind the mixture) - 2 cloves garlic, finely minced (for depth) - 1 tablespoon fresh ginger, finely minced (adds warmth) - 1/4 cup chopped green onions (for freshness) - Salt and black pepper to taste These main ingredients create a rich and flavorful base for the meatballs. The garlic and ginger add a nice zing, while the egg helps hold everything together. The honey garlic sauce is where the magic happens. You’ll need: - 1/2 cup honey (natural sweetness) - 1/4 cup soy sauce (for savory flavor) - 1 tablespoon rice vinegar (adds tang) - 1 teaspoon sesame oil (for nuttiness) - 1 teaspoon cornstarch mixed with 1 tablespoon water (to thicken the sauce) This sauce blends sweet and savory flavors. The honey pairs well with soy sauce, creating a perfect glaze for the meatballs. Feel free to customize your meatballs! Here are some ideas: - Use ground turkey instead of beef for a lighter option. - Add chopped herbs like parsley or cilantro for extra freshness. - Swap in breadcrumbs for crushed crackers if you want a different texture. - For a spicy kick, mix in some red pepper flakes. These tweaks can help you make the recipe your own. Enjoy experimenting with flavors! For the complete recipe, check out the Full Recipe link. To make tasty meatballs, start by gathering your ingredients. In a big bowl, combine: - 1 pound ground beef (or beef and pork mix) - 1/2 cup fresh breadcrumbs - 1/4 cup grated Parmesan cheese - 1 large egg - 2 cloves garlic, finely minced - 1 tablespoon fresh ginger, finely minced - 1/4 cup chopped green onions - Salt and black pepper to taste Use your hands or a spatula to mix these well. Be gentle! Overmixing will make the meatballs tough. You want them soft and tender. Now, it’s time to bake. Preheat your oven to 400°F (200°C). This step helps the meatballs cook evenly. Line a baking sheet with parchment paper. This keeps them from sticking and makes cleaning easy. Next, use clean hands to scoop out the meat mixture. Roll it into small balls, about 1 inch wide. Place them on the baking sheet, leaving space between each one. Bake for 15 to 20 minutes. You’ll know they’re done when they turn golden brown and reach an internal temperature of 165°F. While the meatballs bake, prepare the delicious sauce. In a small saucepan, mix: - 1/2 cup honey - 1/4 cup soy sauce - 1 tablespoon rice vinegar - 1 teaspoon sesame oil Heat this mix over medium heat. Stir it gently until it simmers. In a small bowl, mix 1 teaspoon cornstarch with 1 tablespoon water. Stir this into the sauce to thicken it. Cook for 2-3 more minutes until the sauce is shiny and thick. Once the meatballs are ready, take them out of the oven. Place them in a serving dish. Drizzle the warm honey garlic sauce over them. Garnish with extra chopped green onions for a fresh look. Enjoy every bite! For the full recipe, check out the details above. To make tender meatballs, start by mixing the meat gently. Overmixing makes them tough. Add breadcrumbs and egg for moisture. Let the mixture rest for a few minutes before shaping. This helps flavors blend well. Use clean hands to form the meatballs. Aim for about one inch in size for even cooking. For a rich honey garlic sauce, combine honey and soy sauce in a small pan. Heat it slowly to keep the honey from burning. Adding rice vinegar brings a nice tang. Finally, mix cornstarch with a bit of water to thicken it. Stir this mixture into the sauce until it coats the back of a spoon. This step is key for a glossy finish. These honey garlic meatballs shine on their own. Serve them on a platter with toothpicks. Pair them with rice or noodles for a full meal. Fresh veggies, like steamed broccoli or a crisp salad, add color and crunch. For added flair, drizzle extra sauce over the meatballs and sprinkle sesame seeds. This makes for a lovely presentation. Check the [Full Recipe] for more details! {{image_4}} You can use many meats for honey garlic meatballs. Ground beef is classic, but ground pork adds great flavor. You can even mix beef and pork for a tasty twist. Ground turkey is a leaner choice. It still pairs well with honey garlic sauce. Chicken also works great if you prefer a lighter meat. The key is to choose a meat you love. If you want a meat-free option, try using plant-based ground meat. There are many brands available today. You can also make meatballs with lentils or chickpeas. Just mash them up and mix in the same ingredients. For a fun twist, use quinoa or rice as a base. They both add texture and make the dish hearty. You can add fun flavors to your meatballs. Try mixing in some grated carrots or chopped bell peppers for a veggie boost. Fresh herbs, like cilantro or basil, can give a fresh kick. If you like heat, add red pepper flakes or sriracha to the mix. For an Asian twist, toss in some chopped water chestnuts or sesame seeds. These add crunch and make your meatballs stand out. You can find the full recipe to try these variations. After enjoying your honey garlic meatballs, let them cool down. Place them in an airtight container. They will stay fresh in the fridge for about 3 to 4 days. Make sure to separate layers with parchment paper to avoid sticking. To reheat, use the oven for best results. Preheat it to 350°F (175°C). Place the meatballs on a baking sheet. Heat them for about 10 to 15 minutes. This keeps them juicy and warm. You can also use the microwave, but they might get soggy. If you do use the microwave, cover them with a damp paper towel to keep moisture in. For long-term storage, you can freeze the meatballs. First, let them cool completely. Then, place them on a baking sheet in a single layer. Freeze them for a couple of hours until firm. Once frozen, transfer them to a freezer bag. They can last up to 3 months. When ready to eat, thaw them in the fridge overnight before reheating. These steps will help you enjoy your honey garlic meatballs anytime! Check out the Full Recipe for more cooking tips. Yes, you can use ground turkey instead of beef. Ground turkey makes a lighter meatball. It has less fat, so you may want to add a bit more cheese or breadcrumbs. This keeps the meatballs moist and tasty. The flavor will change slightly, but they will still taste great. To check if your meatballs are done, use a meat thermometer. They need to reach 165°F inside. You can also cut one in half. The inside should be no longer pink. Look for a nice golden brown color on the outside. These signs show that your meatballs are safe to eat. Honey garlic meatballs pair well with many sides. Here are some ideas: - Steamed rice - Roasted vegetables - Noodles - Salad - Mashed potatoes These sides balance the sweet and savory flavors. You can mix and match for a fun meal. For more ideas, check out the Full Recipe for serving suggestions. Honey garlic meatballs are simple and tasty. We covered the main ingredients and how to mix them. You learned step-by-step instructions for baking and making the sauce. I shared tips for tender meatballs and perfect sauce. You can also explore meat options and vegetarian choices. Don’t forget about storing leftovers and reheating them. Try the variations for a new twist. Enjoy cooking, and have fun sharing these delightful bites with friends and family!](https://joymealplan.com/wp-content/uploads/2025/05/91b0df71-a0c5-411f-83a7-9789c0a24c3c-768x768.webp)

