Air Fryer Honey Garlic Salmon Bites Quick and Tasty

Looking for a quick and tasty meal? Look no further than these Air Fryer Honey Garlic Salmon Bites! With just a handful of simple ingredients, you can create a flavorful dish in under 15 minutes. This easy recipe combines the sweetness of honey with savory garlic for a meal that’s perfect for busy nights. Let’s dive into how to make these delicious bites that your family will love!
Why I Love This Recipe
- Quick and Easy: This recipe takes only 30 minutes from start to finish, making it perfect for busy weeknights.
- Flavorful Marinade: The combination of honey, soy sauce, garlic, and ginger creates a deliciously sweet and savory coating.
- Healthy Option: Salmon is packed with omega-3 fatty acids, making these bites a nutritious choice for any meal.
- Versatile Dish: These salmon bites can be served as an appetizer, main dish, or tossed in a salad for a fresh, light meal.
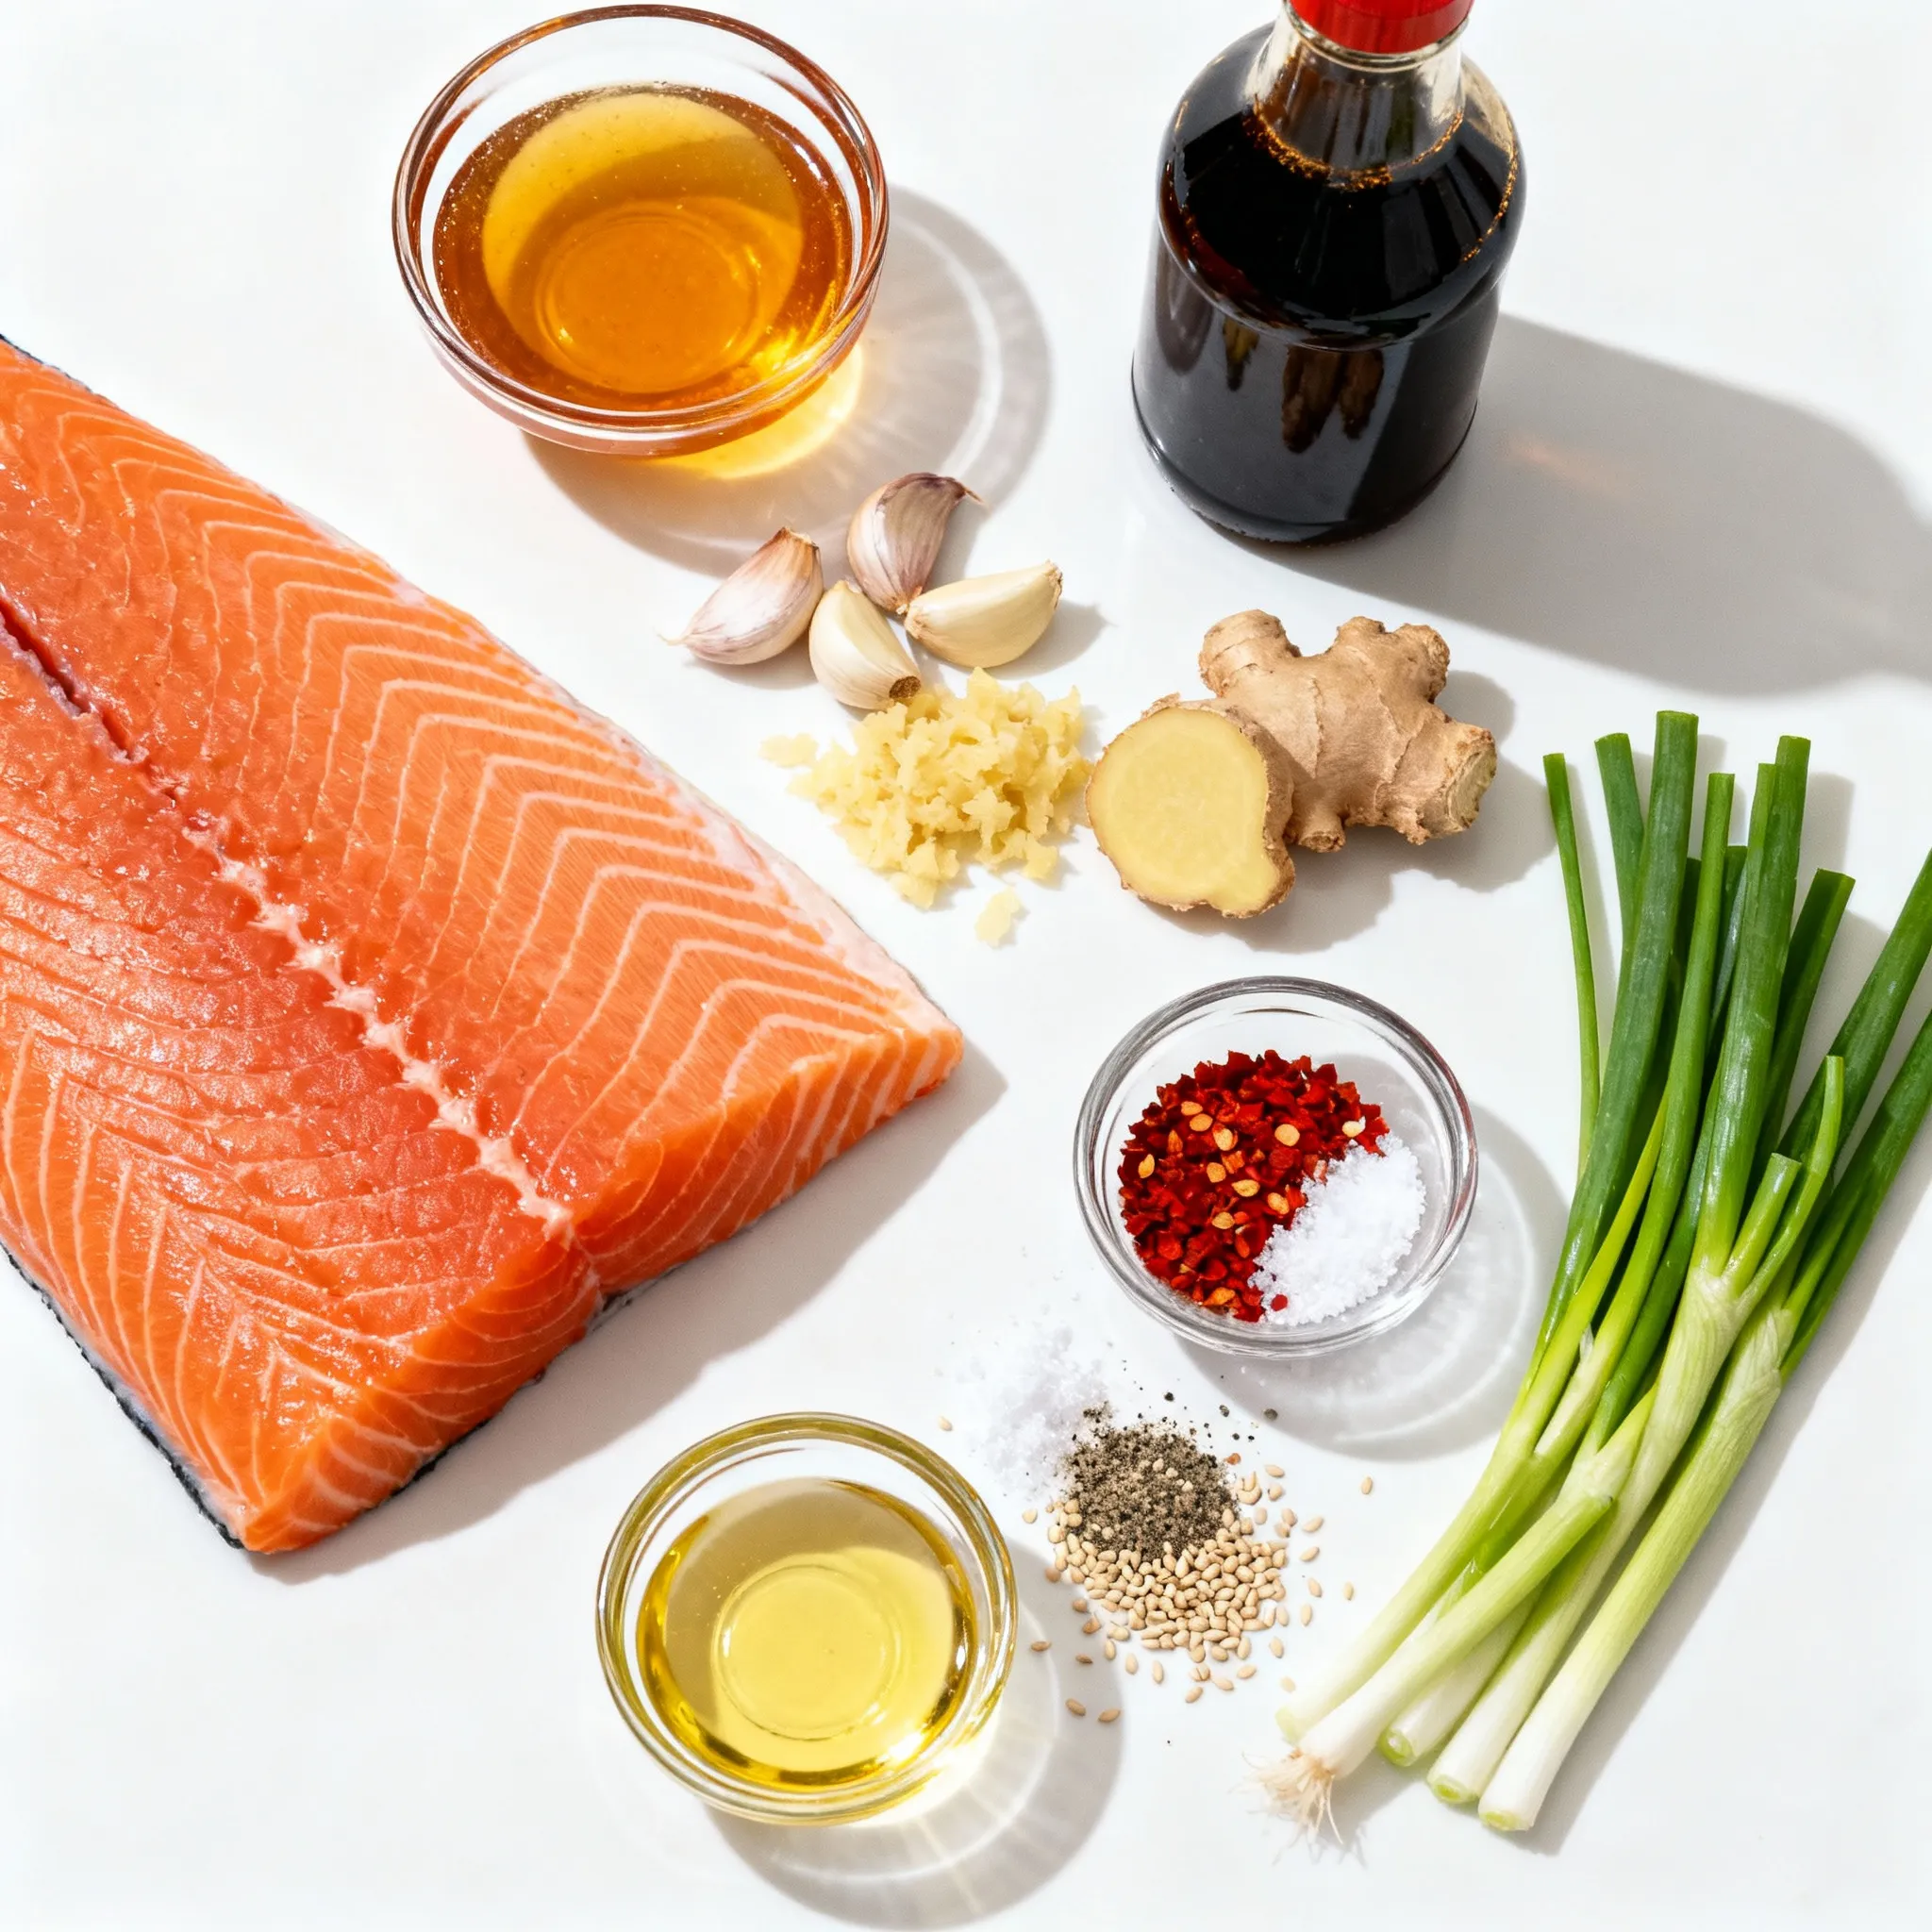
Ingredients
Main Ingredients
– 1 lb salmon fillet, skinless
– 3 tablespoons honey
– 2 tablespoons soy sauce
– 2 cloves garlic
Additional Flavoring Ingredients
– 1 teaspoon fresh ginger
– 1 tablespoon sesame oil
– Red pepper flakes (optional)
Garnishes
– Green onions
– Sesame seeds
– Salt and pepper
When making Air Fryer Honey Garlic Salmon Bites, choose fresh, high-quality salmon. The skinless fillet allows the marinade to soak in well. Honey adds sweetness, while soy sauce brings depth. Garlic gives a nice punch, and ginger adds warmth. Sesame oil rounds out the flavors, making each bite rich and satisfying.
For those who enjoy a bit of heat, adding red pepper flakes can elevate the dish. They give a spicy kick that balances the sweet and savory notes.
For garnishing, green onions and sesame seeds add color and texture. Salt and pepper enhance the natural flavors of the salmon. This simple yet delicious combination makes the dish shine.
Make sure to prep all ingredients before starting. It streamlines the cooking process and helps you stay organized. Enjoy this quick and tasty recipe!

Step-by-Step Instructions
Preparing the Marinade
To start, we need to make the marinade. In a medium bowl, combine these ingredients:
– 3 tablespoons honey
– 2 tablespoons soy sauce
– 2 cloves garlic, finely minced
– 1 teaspoon fresh ginger, freshly grated
– 1 tablespoon sesame oil
Whisk these together until they blend well. Now, add a pinch of red pepper flakes, salt, and pepper to taste. This mix brings sweet, salty, and spicy flavors that make the salmon bites shine.
Marinating the Salmon
Next, it’s time to marinate the salmon. Take 1 pound of skinless salmon fillet and cut it into 1-inch bite-sized pieces. Coat the salmon bites in the marinade. Ensure each piece is fully covered.
Cover the bowl and let it sit for at least 15 minutes. If you have extra time, you can let it marinate in the fridge for up to 1 hour. This step infuses the salmon with rich flavors, making every bite delicious.
Cooking in the Air Fryer
Now, we’re ready to cook! Preheat your air fryer to 400°F (200°C). This step usually takes about 5 minutes.
While it heats up, take the marinated salmon bites out of the bowl. Remember to save the marinade for later. Place the salmon bites in the air fryer basket. Arrange them in a single layer, giving them space for even cooking.
Cook the salmon for 8-10 minutes. Keep an eye on them. You want them to be cooked through with a lovely golden brown color. This quick cooking method keeps the salmon juicy and tender.
Tips & Tricks
Achieving the Best Flavor
– Marinate the salmon for at least 15 minutes. If you have time, let it sit for up to 1 hour. This helps the salmon absorb all the flavors.
– Always use fresh ingredients. Fresh garlic and ginger make a huge difference in taste.
Air Fryer Cooking Tips
– Space the salmon pieces well in the basket. This allows hot air to circulate and cook each piece evenly.
– Check if the salmon is done by using a fork. It should flake easily and look opaque.
Serving Suggestions
– Serve the salmon bites with lime wedges. A squeeze of lime adds a fresh zing.
– For a great presentation, plate the salmon on a platter lined with parchment paper. Scatter sesame seeds on top for a nice look.
Pro Tips
- Marinate for Maximum Flavor: Allow the salmon bites to marinate for at least 15 minutes, but ideally up to an hour in the refrigerator for a deeper flavor infusion.
- Check for Doneness: The salmon is perfectly cooked when it flakes easily with a fork and has a golden brown exterior. Keep an eye on it to avoid overcooking.
- Customize the Heat: Adjust the amount of red pepper flakes based on your spice preference. You can also add sriracha or chili oil for an extra kick.
- Presentation Matters: Serve the salmon bites on a beautiful platter and garnish with fresh green onions and sesame seeds for an appealing look.

Variations
Ingredient Swaps
You can change up the fish you use. Try trout or cod instead of salmon. Each fish adds its own taste. Also, if you want a new flavor, swap honey for maple syrup. This switch gives a rich, different sweetness.
Spice Level Adjustments
Want more heat? Add extra red pepper flakes to the marinade. This small change makes a big difference in taste. You can also use chili garlic sauce for even more flavor. It gives a nice kick that many love.
Serving with Side Dishes
These salmon bites pair well with many sides. Serve them with steamed vegetables for a healthy meal. You can also have them with rice or quinoa. Both options make the meal complete and filling. Enjoy them as a simple yet delicious dinner.
Storage Info
Storing Leftovers
To store your honey garlic salmon bites, first let them cool. Place them in an airtight container. Store them in the fridge for up to three days. If you want to keep them longer, freezing works well. Wrap the bites tightly in plastic wrap, then place them in a freezer bag. They can last up to three months in the freezer.
Reheating Tips
You can reheat salmon bites in the air fryer or oven. For the air fryer, set it to 350°F (175°C). Heat the bites for about 5-6 minutes. This keeps them crispy. If using the oven, preheat to 350°F (175°C), and bake for about 10 minutes. To avoid drying out the salmon, cover it with foil during reheating. This traps moisture, keeping the salmon juicy.
Shelf Life
Homemade salmon bites last about three days in the fridge. Always check for signs of spoilage. Look for a sour smell or a slimy texture. If either is present, it’s best to toss them out. Keeping an eye on your leftovers helps ensure safety and quality.
FAQs
Can I use frozen salmon?
Yes, you can use frozen salmon. First, you should thaw it before cooking. Place the salmon in the fridge overnight for safe thawing. If you need to thaw it faster, put the salmon in a sealed bag and submerge it in cold water. Change the water every 30 minutes until it is thawed. After thawing, pat it dry with a paper towel. This step helps the marinade stick better.
What can I substitute for soy sauce?
If you need a soy sauce substitute, you have options. Tamari is a great gluten-free choice. Coconut aminos work too and add a hint of sweetness. For a low-sodium option, look for reduced-sodium soy sauce. If you want a unique flavor, try miso paste mixed with water. Each of these options can fit different dietary needs while keeping the taste delicious.
How do I know when the salmon is done?
To check if the salmon is done, look for its color and texture. The salmon should be opaque and easy to flake with a fork. If it looks shiny and translucent, it needs more time. Typically, cooking salmon bites for 8-10 minutes at 400°F is perfect. If you have a meat thermometer, aim for an internal temperature of 145°F. This ensures the salmon is safe to eat and perfectly cooked.
This recipe shows how to make flavorful air-fried salmon bites. You learned to create a tasty marinade and how to prep the salmon. Remember, a longer marination time boosts flavor. You can also change ingredients for variety, like using trout or maple syrup. Proper storage and reheating keep your leftovers tasty and safe. Enjoy these bites as part of a healthy meal. Happy cookin

Air Fryer Honey Garlic Salmon Bites
Ingredients
- 1 lb salmon fillet, skinless, cut into 1-inch bite-sized pieces
- 3 tablespoons honey
- 2 tablespoons soy sauce (or tamari for gluten-free)
- 2 cloves garlic, finely minced
- 1 teaspoon fresh ginger, freshly grated
- 1 tablespoon sesame oil
- 1/2 teaspoon red pepper flakes (optional, for a spicy kick)
- to taste salt and pepper
- 2 green onions, finely sliced (for garnish)
- sesame seeds, for garnish
Instructions
- In a medium mixing bowl, combine the honey, soy sauce, minced garlic, freshly grated ginger, sesame oil, red pepper flakes (if using), and a pinch of salt and pepper. Whisk these ingredients together until they are thoroughly blended into a marinade.
- Carefully add the salmon bites to the marinade, ensuring each piece is fully coated. Cover the bowl and let it sit for a minimum of 15 minutes. For a more intense flavor, you can refrigerate it for up to 1 hour.
- Preheat your air fryer to 400°F (200°C) for about 5 minutes, allowing it to reach the right temperature for cooking.
- After the salmon has marinated, take the bites out of the marinade, saving the marinade for later. Arrange the salmon pieces in the air fryer basket in a single layer, ensuring they have some space between them for even cooking.
- Cook the salmon bites in the air fryer for 8-10 minutes at 400°F (200°C), or until they are beautifully cooked through and have achieved a golden brown color on the exterior.
- While the salmon is air frying, pour the reserved marinade into a small saucepan. Heat it over medium heat, bringing it to a gentle simmer. Let it cook for approximately 3-5 minutes, or until it has thickened slightly.
- Once the salmon bites are ready, carefully remove them from the air fryer and drizzle the thickened honey garlic sauce over the top. Toss the salmon gently to ensure each piece is well-coated in the sauce.
- For a vibrant finish, garnish the dish with finely sliced green onions and a sprinkle of sesame seeds before serving.


![- 1 block firm tofu - 1/4 cup cornstarch - 2 tablespoons vegetable oil - 1 cup cooked brown rice - 1 cup broccoli florets - 1 cup snap peas - 1 medium carrot, julienned - 1 red bell pepper, sliced into thin strips - 1/4 cup teriyaki sauce - 1 tablespoon sesame seeds - 2 green onions, sliced thinly - Optional: lime wedges for serving This recipe for crispy teriyaki tofu bowls highlights delicious flavors and fresh veggies. You start with firm tofu because it holds its shape well when cooked. Make sure to press and drain it thoroughly before cooking. This step removes extra moisture and helps achieve that perfect crunch. Next, you coat the tofu cubes in cornstarch. This coating is key for creating a crispy exterior. The cornstarch absorbs moisture and forms a crunchy crust when you sauté the tofu. For the veggies, I love using broccoli, snap peas, carrots, and red bell pepper. These not only add color but also provide a mix of textures and flavors. They pair wonderfully with the savory teriyaki sauce. Speaking of the sauce, you can use store-bought teriyaki sauce for ease or make your own at home. Either way, the sauce adds a sweet and salty kick to the dish. Adding sesame seeds and sliced green onions on top gives the bowls a nice finish. If you want a bit of zing, serve lime wedges on the side. For the full recipe, refer to the earlier section. Enjoy making these tasty crispy teriyaki tofu bowls! Start by pressing the tofu. This step removes extra moisture. Slice the tofu into bite-sized cubes. I like to use a sharp knife for clean cuts. Next, coat the tofu. Sprinkle cornstarch over the cubes in a bowl. Toss the tofu gently until each piece is coated. This coating helps achieve a crispy texture when cooking. Heat vegetable oil in a large non-stick skillet. Use medium-high heat for the perfect crisp. Once hot, add the tofu. Cook for about 8-10 minutes. Turn the cubes to cook evenly. Watch for a golden-brown color on all sides. This is how you get that crunch that everyone loves. While the tofu cooks, steam the broccoli and snap peas. Use a steamer basket over boiling water. Steam for about 3-4 minutes. You want the veggies to be bright and tender-crisp. This keeps their color and nutrients intact. For added crunch, prepare other vegetables like carrots and bell peppers as you go. Once the tofu is crispy, lower the heat. Pour teriyaki sauce over the tofu. Stir gently to coat each piece. Allow it to cook for 1-2 more minutes. This gives the sauce time to thicken and stick to the tofu. The flavor will be rich and delicious. In each serving bowl, start with a layer of brown rice. Top it with the crispy teriyaki tofu. Add the steamed broccoli, snap peas, julienned carrots, and red bell pepper slices. The colors will make your dish pop. Finally, garnish with sesame seeds and sliced green onions. This adds a nice touch and extra flavor. For an optional zest, serve lime wedges on the side. For the full recipe, check out [Full Recipe]. To make your tofu crispy, drying is key. After pressing the tofu, pat it dry well. This helps remove extra moisture. Less moisture means a better fry and a crispier texture. The oil temperature matters too. Heat your vegetable oil over medium-high heat. If the oil is too cool, the tofu will soak up oil instead of becoming crispy. A good test is to drop a small piece of tofu in the oil. If it sizzles, you're ready to fry. To make your teriyaki tofu even tastier, consider adding spices or marinades. You can sprinkle garlic powder or ginger for extra flavor. Marinating the tofu for at least 15 minutes can also deepen its taste. Choosing the right teriyaki sauce is crucial. You can buy sauce or make your own for a fresher taste. A sauce with a balance of sweet and salty works best. Look for options with natural ingredients for a healthier dish. When serving your teriyaki tofu, pair it with sides that complement the dish. Steamed rice works great, but you can also try quinoa for a nutty flavor. Adding a side salad can enhance the meal's freshness. You can customize your bowl to fit your tastes. Try swapping out vegetables based on what you like. Add more crunch with sliced radishes or extra color with yellow bell peppers. Enjoy the freedom to make it your own! For the full recipe, refer to the section above. {{image_4}} If you want to switch up the protein, tofu isn’t your only choice. You can use chicken or tempeh instead. Both options add great flavor and texture. For chicken, choose boneless, skinless thighs for juiciness. Cut them into bite-sized pieces and cook them like the tofu. Tempeh, made from fermented soybeans, offers a nutty taste. Simply slice it and coat it in cornstarch, just like the tofu. You can make your bowls even better with seasonal veggies. In spring, try asparagus or green beans. In summer, add zucchini or bell peppers. Fall offers butternut squash or Brussels sprouts. You can also mix in leafy greens like spinach or kale. They add nutrients and a vibrant color. Mushrooms are another great choice. They bring umami and a meaty bite. While store-bought teriyaki sauce is tasty, making your own is fun and easy. Combine soy sauce, honey, garlic, and ginger for a fresh taste. Simmer it until it thickens. Other sauces can work too. Try a spicy chili sauce for heat or a peanut sauce for creaminess. Each option brings its own unique flavor to your crispy tofu bowls. For the full recipe, check out the Crispy Teriyaki Tofu Bowls. To store your leftover crispy teriyaki tofu bowls, place them in an airtight container. Make sure the bowl cools down to room temperature before sealing it. This helps keep the tofu crispy and the veggies fresh. You can store these bowls in the fridge for up to three days. If you plan to enjoy them later, it's best to keep the sauce separate until you're ready to eat. For the best texture when reheating, use an oven or a skillet. Preheat your oven to 350°F (175°C) and place the tofu bowls on a baking sheet. Heat for about 10 to 15 minutes until warmed through. If using a skillet, add a splash of water to prevent sticking and cover it. This method helps retain the crispiness of the tofu and keeps the veggies tender. You can freeze these tofu bowls for later use. To do this, let the bowls cool completely. Place the tofu and veggies in a freezer-safe container. Avoid freezing the rice, as it can become mushy. These bowls can last up to three months in the freezer. When you're ready to enjoy them, thaw in the fridge overnight and reheat using the methods above. To make tofu crispy, follow these key steps: - Press the tofu: Remove as much water as you can. - Cube the tofu: Cut it into even, bite-sized pieces. - Dry the tofu: Pat each piece with a paper towel. - Coat with cornstarch: Sprinkle cornstarch evenly over the tofu. - Heat the oil: Use a hot skillet with vegetable oil. - Cook until golden: Sauté the tofu for about 8-10 minutes, turning it often. These steps help create a crispy texture that you will love. Yes, you can easily make this dish vegan. Here are some simple swaps: - Use plant-based teriyaki sauce: Check labels for non-vegan ingredients. - Add more vegetables: Use any fresh veggies you enjoy. - Try different grains: Substitute brown rice with quinoa or farro. These changes keep the dish tasty and vegan-friendly. Store your leftover teriyaki tofu bowls with these tips: - Use airtight containers: Keep air out to maintain freshness. - Refrigerate: Store in the fridge for up to 3 days. - Separate the sauce: Keep the sauce separate to avoid sogginess. These steps help retain taste and texture. Serve your teriyaki bowls in an eye-catching way. Here are some ideas: - Layer the ingredients: Start with a base of rice, then tofu, and veggies on top. - Garnish well: Add sesame seeds and green onions for flair. - Use lime wedges: Serve with lime on the side for a zesty kick. These tips make your dish look appealing and delicious. You can find the full recipe [here](#). This guide covered making teriyaki tofu bowls from start to finish. You learned about key ingredients and how to prepare everything for a tasty meal. We shared tips for crispy tofu and ideas for variations. Remember, adjust the dish to fit your taste and enjoy it fresh or stored for later. This meal is healthy, fun, and easy to customize. Dive in and have fun cooking!](https://joymealplan.com/wp-content/uploads/2025/06/6f569fa0-62f8-4b7a-b8f1-a73cdf9881a3-768x768.webp)

