Air Fryer Jalapeño Poppers Crunchy and Flavorful Snack

Are you ready for a snack that’s both crunchy and packed with flavor? Air fryer jalapeño poppers are the perfect bite-sized treat for game days, parties, or just a fun night at home. With a creamy cheese filling and crispy panko coating, these poppers are simple to make and a real crowd-pleaser. Join me as I share the best tips and tricks to prepare this delicious snack!
Ingredients
List of Required Ingredients
– 12 fresh jalapeño peppers
– 8 oz cream cheese, softened to room temperature
– 1 cup shredded sharp cheddar cheese
– 1/2 cup panko breadcrumbs
– 1 teaspoon garlic powder
– 1 teaspoon onion powder
– 1/2 teaspoon smoked paprika
– Salt and pepper, to taste
– Olive oil spray
Selecting fresh jalapeños is key for great poppers. Look for peppers that feel firm and bright. They should not have wrinkles or soft spots. Choose medium-sized jalapeños for a good balance of heat and flavor. The heat can vary by size, so be mindful of your spice level.
If you want to switch things up, consider these substitutions:
– Use Greek yogurt or sour cream instead of cream cheese for a tangy twist.
– Try pepper jack or mozzarella for a different cheese experience.
These simple swaps can change the flavor and make your dish unique. Now, get ready to make the crunchiest, most flavorful jalapeño poppers ever!
Step-by-Step Instructions
Prepping the Air Fryer
First, preheat your air fryer to 375°F (190°C). This step helps cook the poppers evenly. While it heats up, check the basket. Make sure it is clean and dry. A clean basket ensures good air circulation.
Preparing the Jalapeños
To prepare the jalapeños, start by slicing each pepper in half lengthwise. Use a small spoon or knife to scoop out the seeds and white membranes. This helps reduce the heat. If you love spice, leave some seeds in for a kick.
Making the Cheese Filling
Now, let’s make the cheese filling. In a bowl, mix 8 oz of softened cream cheese with 1 cup of shredded cheddar cheese. Add 1 teaspoon each of garlic powder and onion powder. Then, sprinkle in 1/2 teaspoon of smoked paprika. Don’t forget to season with salt and pepper. Mix until everything is smooth and creamy.
Stuffing and Coating
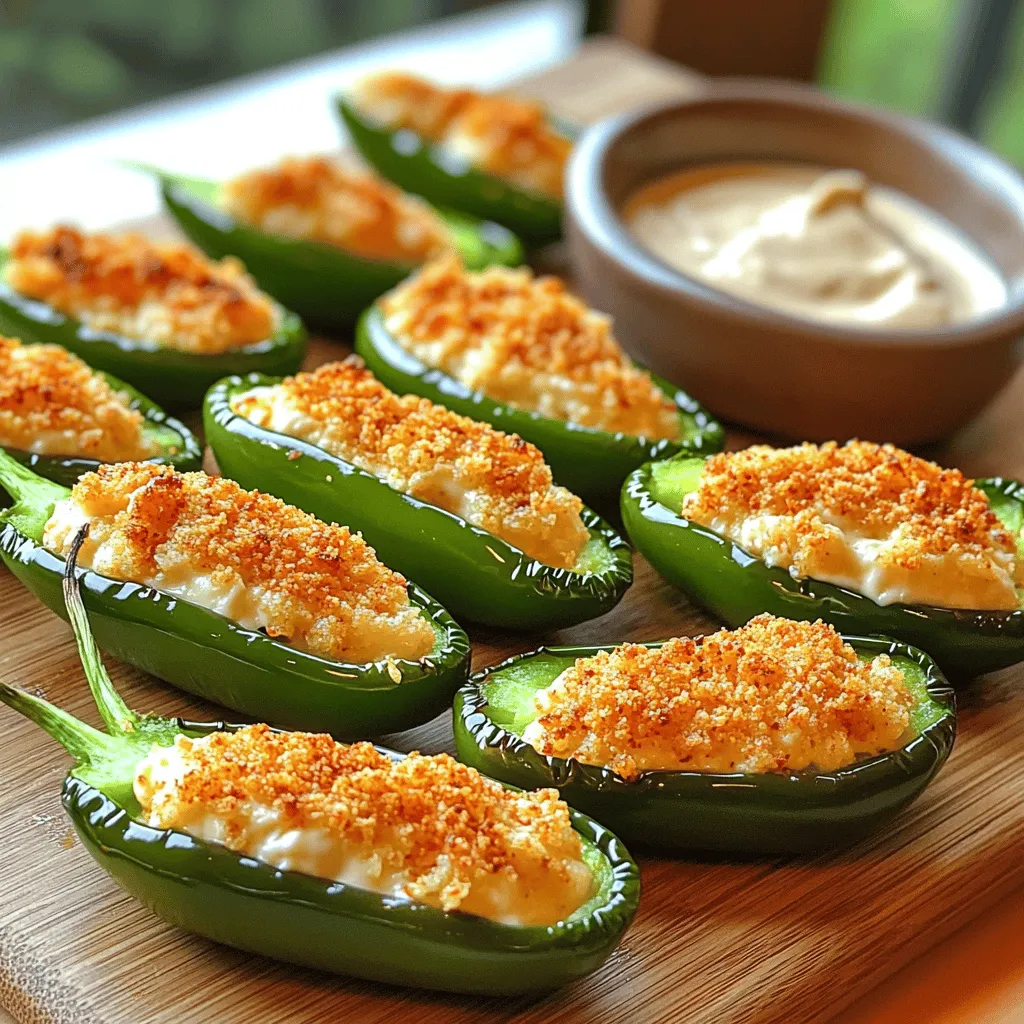
Take a jalapeño half and fill it with the cheese mixture. Press it in well so the filling stays inside. In another bowl, place 1/2 cup of panko breadcrumbs. Lightly spray the tops of the stuffed peppers with olive oil. This helps the breadcrumbs stick better. Dip the oiled side into the breadcrumbs, covering it evenly.
Air Frying Process
Now, it’s time to air fry! Place the stuffed jalapeños in a single layer in the air fryer basket. Make sure they are not touching. This helps them cook evenly. Air fry for about 10-12 minutes. Keep an eye on them until they turn golden brown and the cheese is bubbly.
Serving Suggestions
Once they are ready, use tongs to take them out. Let them cool for a few minutes on a plate. This waiting time helps the flavors develop. For a lovely presentation, serve them on a bright platter. Add some chopped herbs on top for color. Pair with ranch or blue cheese dip for a refreshing contrast.
Tips & Tricks
Achieving the Perfect Crunch
To get that perfect crunch, use olive oil spray. This spray helps the breadcrumbs get golden and crispy. Just a light spritz on top of the poppers makes a big difference.
For even coating, sprinkle the panko breadcrumbs on after spraying. Dip each oiled jalapeño half in the breadcrumbs. Make sure to cover all the tops. This step ensures that every bite is crunchy.
Flavor Enhancements
To boost flavor, add spices or herbs to the cheese filling. Garlic powder and onion powder are great choices. You can also try adding fresh herbs like cilantro or parsley.
Experiment with cheese blends too. Sharp cheddar is tasty, but mixing it with pepper jack adds spice. Go ahead and play around with flavors to find your favorite.
Common Mistakes to Avoid
Avoid overstuffing the jalapeños. If you pack them too tightly, the filling can spill out while cooking. Keep the filling generous, but not overflowing.
Do not overcrowd the air fryer basket. Give each jalapeño space to cook evenly. If they are too close, they won’t crisp up right. Cook them in batches if needed for the best results.

Variations
Spicy Variations
Want more heat? Keep some jalapeño seeds in the mix. The seeds add an extra kick. You can also try spicy cheese options. Pepper jack or habanero cheddar both work great. These choices will spice up your poppers nicely.
Vegetarian/Dietary Variants
If you’re vegan, swap in vegan cream cheese. This keeps the flavor while meeting dietary needs. For a gluten-free option, use gluten-free panko breadcrumbs. You can find these at many grocery stores. These simple changes let everyone enjoy the dish.
Flavor Profile Alterations
Try a Southwest twist by adding black beans to the filling. This gives your poppers a hearty feel. You can also make Mediterranean-style poppers. Just add crumbled feta for a tangy touch. These variations keep things fun and exciting in the kitchen.
Storage Info
Proper Storage Techniques
To store leftover jalapeño poppers, let them cool down completely. Place them in an airtight container. You can refrigerate them for up to three days. If you want to keep them longer, freezing is a good option. Wrap each popper tightly in plastic wrap, then place them in a freezer bag. This keeps them fresh and prevents freezer burn.
Reheating Instructions
Reheating in the air fryer is the best method. Preheat your air fryer to 350°F (175°C). Place the jalapeño poppers in a single layer in the basket. Heat them for about 5-7 minutes until they are warm and crispy again. If you don’t have an air fryer, you can use an oven. Set it to 350°F (175°C) and bake the poppers on a tray for about 10-15 minutes.
Shelf Life
Jalapeño poppers last about three days in the fridge. If frozen, they can last up to three months. Always check for signs of spoilage. If they smell off or look discolored, it’s best to toss them. Trust your senses; they guide you well!
FAQs
How long do you air fry jalapeño poppers?
You should air fry jalapeño poppers for about 10-12 minutes. This time works for most air fryer models. Some models may cook faster, so check them after 8 minutes. If you want a crispier finish, you can add an extra 2-3 minutes. Always ensure they turn golden brown and the cheese bubbles.
Can you make jalapeño poppers ahead of time?
Yes, you can prep jalapeño poppers ahead of time. Stuff the jalapeños and coat them with breadcrumbs. Place them in the fridge for up to 24 hours. When ready, just air fry them as needed. If you want to freeze them, wrap them well in plastic wrap. They will last for about three months in the freezer.
What can I serve with air fryer jalapeño poppers?
You can serve jalapeño poppers with many tasty sides. Some great options are:
– Ranch dressing
– Blue cheese dip
– Salsa
– Guacamole
– Fresh veggies like carrot and cucumber sticks
These sides add more flavor and coolness to balance the heat.
Are jalapeño poppers healthy?
Jalapeño poppers can be a fun snack, but they have some calories. Each popper has cream cheese and cheddar cheese, which adds fat. However, they can fit into a balanced diet if you enjoy them in moderation. You can make them healthier by using low-fat cheese or adding more veggies.
How do I lower the spice level in jalapeño poppers?
To make jalapeño poppers milder, here are some tips:
– Remove all seeds and membranes from the peppers, as they hold most heat.
– Use mild cheese instead of sharp cheddar.
– Mix in some sour cream or yogurt into the cheese filling to cool it down.
– Choose larger jalapeños, which tend to be less spicy than smaller ones.
You now have all the details to make tasty air fryer jalapeño poppers. We covered key ingredients, from jalapeños to seasonings. I shared tips for picking fresh peppers and suggestions for substitutions. You learned step-by-step instructions to prepare, stuff, and air fry these snacks. Remember the tricks for crunch and flavor, and explore variations to suit your taste. Store leftovers wisely and reheat for best results. Enjoy experimenting with these delicious poppers!


![- 1 block (14 oz) firm tofu, pressed and drained - 1/2 cup cornstarch - 3 tablespoons vegetable oil - 1/4 cup honey - 2 tablespoons soy sauce - 4 cloves garlic, minced - 1 teaspoon fresh ginger, grated - 1 tablespoon sesame seeds, toasted - 2 green onions, sliced - Salt and pepper to taste To make crispy honey garlic tofu, you need simple ingredients that pack big flavor. Start with firm tofu. It holds its shape well and crisps up nicely. Press and drain it to get rid of excess water. This step is key for crispy tofu. Next, grab some cornstarch. It’s your secret weapon for that crunchy coating. It sticks to the tofu and gets crispy in the hot oil. Vegetable oil helps fry the tofu evenly. Use a good amount, but don’t drown the tofu. For the sauce, honey adds sweetness. Soy sauce brings saltiness, and garlic and ginger give it a warm kick. These flavors blend perfectly. You can adjust the honey and soy sauce to fit your taste. Finally, sesame seeds and sliced green onions are for garnishing. They add a nice crunch and color to your dish. This crispy honey garlic tofu is not just tasty; it's visually appealing too. For the full recipe, check out the detailed steps. - Cut the tofu into 1-inch cubes. - Toss tofu cubes in cornstarch with salt and pepper. Start by cutting your block of firm tofu into 1-inch cubes. Make sure the pieces are even for cooking. Next, take a shallow dish and add cornstarch. Sprinkle in some salt and pepper. Toss those tofu cubes in the cornstarch mixture, coating each piece well. Shake off any extra cornstarch to keep them light and crispy. - Heat vegetable oil in a skillet over medium-high. - Sauté tofu until golden brown and crispy. Now, heat 3 tablespoons of vegetable oil in a skillet over medium-high heat. Wait until the oil is hot. Carefully place the tofu cubes in the skillet in a single layer. Sauté them for about 5 to 7 minutes. Turn the pieces so they cook evenly. You want them to turn golden brown and get nice and crispy. Once done, transfer the tofu to a paper towel-lined plate to absorb excess oil. - Sauté garlic and ginger in the skillet. - Combine honey and soy sauce, allowing to thicken. In the same skillet, lower the heat to medium. Add 4 minced garlic cloves and 1 teaspoon of grated ginger. Sauté these for about 1 minute. You'll know they're ready when they smell great and turn golden. Now, pour in 1/4 cup of honey and 2 tablespoons of soy sauce. Stir well and let it cook for 2 to 3 minutes until it thickens a bit. - Coat crispy tofu in the honey garlic sauce. - Serve with garnishes. Gently place the crispy tofu back into the skillet. Toss it in the honey garlic sauce until every piece is coated. Remove from heat and sprinkle 1 tablespoon of toasted sesame seeds and 2 sliced green onions over the dish. This adds flavor and makes it look nice. For the full recipe, check the details above! - Use firm tofu for best results: Firm tofu holds its shape and crisps up nicely. - Ensure the tofu is properly pressed and drained: Pressing removes excess water. This helps the tofu absorb flavors and get crispy. - Adjust honey and soy sauce ratios to taste: You can make it sweeter or saltier by changing these amounts. - Experiment with adding red pepper flakes for heat: A little spice can really elevate the dish. Add to your liking. - Consider using an air fryer for an even crispier finish: Air frying gives a great crunch without extra oil. - Double-fry method for ultimate crunch: Fry the tofu once, let it rest, and fry again. This makes it super crispy. For more details, check the Full Recipe. {{image_4}} You can switch tofu for other proteins. Tempeh is a great choice. It has a nutty flavor and a firmer texture. Just cut it into cubes like tofu. Cook it the same way for a tasty dish. Seitan is another option. It mimics meat well and offers a chewy texture. It absorbs flavors easily. Use seitan if you're looking for a heartier bite. Want a kick? Add sriracha to the sauce. This gives a spicy twist to the sweet honey. You can also try orange juice or maple syrup. These swaps change the flavor profile. Orange adds a fresh zest, while maple syrup gives a rich taste. Both can make your dish stand out. Crispy honey garlic tofu shines when paired with sides. Steamed vegetables bring color and nutrition. A fresh salad can add crunch. You can also use this tofu in wraps or tacos. Just fill them with your favorite veggies and tofu. It makes for a fun and easy meal. For the full recipe, follow the steps and enjoy your cooking journey! You can keep crispy honey garlic tofu in the fridge. Place it in an airtight container. It will stay fresh for up to 3 days. This way, you can enjoy it later without losing flavor. To reheat your tofu, use the oven or a skillet. This keeps it crispy and tasty. Avoid using the microwave. It makes the tofu soggy, which we want to prevent. You can also freeze cooked tofu. It will last for up to 2 months in the freezer. When you want to eat it, simply thaw it out. After thawing, re-crisp it in a skillet or oven before serving. This method helps regain its crunchy texture. Typically, crispy honey garlic tofu lasts up to 3 days when stored properly. To keep it fresh, place it in an airtight container. Ensure the tofu is cool before sealing. This helps maintain its flavor and texture. Yes, you can make this recipe vegan. Simply replace honey with agave or maple syrup. Both options add sweetness without using animal products. This change keeps the dish plant-based and equally delicious! Crispy honey garlic tofu pairs well with rice, noodles, or a fresh vegetable stir-fry. You can serve it over steamed jasmine rice for a classic combo. Noodles coated in a light sauce also work great. Adding a side of colorful stir-fried veggies brings extra nutrition and flavor. Firm or extra-firm tofu works best for a crispy texture. These types hold their shape and don’t crumble. For the best results, make sure you press and drain the tofu well before cooking. This removes excess moisture, allowing for a delightful crunch. For the full recipe, check out the [Full Recipe]. In this post, we covered how to make crispy honey garlic tofu. You learned about the key ingredients, from firm tofu to the sweet and savory sauce. I shared step-by-step cooking tips and tricks for the perfect texture and flavor. Remember, you can customize the recipe with different proteins or sauces. Store leftovers correctly to enjoy this dish later. Overall, this recipe is fun, flexible, and delicious. Give it a try, and you’ll impress your friends or family!](https://joymealplan.com/wp-content/uploads/2025/07/a62a8118-0118-41a9-8dcd-10793e5e2e73-768x768.webp)


![- 1 lb sirloin steak, cut into 1-inch cubes - 3 tablespoons unsalted butter - 4 cloves garlic, minced - Fresh herbs: rosemary and thyme - Olive oil, salt, and pepper When making garlic butter steak bites, you want to start with high-quality sirloin steak. This cut is tender and holds flavor well. Cut it into 1-inch cubes for even cooking. Next, unsalted butter is key. It melts beautifully, adding richness. Garlic brings a strong flavor to the dish. Use fresh cloves, and don't skip this step. Fresh herbs like rosemary and thyme brighten the taste. Seasoning with salt and pepper enhances every bite. Finally, a splash of olive oil keeps the steak from sticking. - Alternative cuts of steak - Butter alternatives for a dairy-free version - Additional spices for flavor enhancement If you don't have sirloin, ribeye or tenderloin work well too. They offer rich flavors and tenderness. For a dairy-free option, you can use olive oil or coconut oil instead of butter. This keeps the dish tasty while meeting dietary needs. Want more flavor? Try adding spices like smoked paprika or chili flakes for a kick. You can mix and match based on what you have at home. The goal is to create a dish that you enjoy. For the complete recipe, check out the [Full Recipe]. First, pat the steak cubes dry with a paper towel. This step helps the steak sear better. If the surface is wet, the steak will steam instead of brown. Next, season both sides with salt and pepper. Use enough to enhance the flavor but not too much to overpower it. Heat a large skillet over medium-high heat. Add the olive oil and wait until it shimmers. This shows the oil is hot and ready. Carefully place the steak bites in a single layer. Avoid overcrowding the pan; this helps each piece brown nicely. Sear each side for 2-3 minutes until you reach your desired doneness. For best results, medium-rare is ideal. Once you remove the steak bites, lower the heat to medium. Add the unsalted butter to the same skillet. Let it melt completely, stirring with a wooden spoon. This picks up any flavorful bits from the pan. These bits add depth to your sauce. After melting, stir in the minced garlic, rosemary, and thyme. Cook for about a minute. You want the garlic fragrant but not browned, as it can taste bitter. Return the seared steak bites to the skillet. Gently toss them in the garlic butter sauce. This ensures each piece is well-coated. Cook for another 1-2 minutes. This allows the flavors to meld beautifully. The aroma will fill your kitchen, making it hard to wait. For the full recipe, refer to the earlier section. To get a great sear on your steak bites, you need patience. Heat your skillet until it's hot. A good sear locks in flavor and keeps the meat tender. If you crowd the skillet, the steak will steam instead of sear. Cook in batches if needed. This will give you that beautiful brown crust. When cooking garlic, be careful not to burn it. Add the garlic to the butter only after it has melted. Stir it for about a minute until it smells amazing. If you want a bit of spice, add a pinch of red pepper flakes. This will give your garlic butter a nice kick. For serving, think about how to impress your guests. You can serve the steak bites in the skillet they cooked in. This adds a rustic charm. Drizzle the garlic butter over the top for a nice look. Garnish with fresh herbs like parsley. Use toothpicks for easy eating. These ideas will make your dish stand out at any gathering. {{image_4}} You can use many cuts for steak bites. Sirloin is great, but ribeye is richer. Ribeye has more fat, which adds flavor. Other choices include tenderloin and flank steak. Each cut has its own cooking time. - Sirloin: Cook for 2-3 minutes per side for medium-rare. - Ribeye: Needs about 3-4 minutes per side. - Tenderloin: A quick 2-3 minutes per side works well. - Flank Steak: Cook for 3-4 minutes, but cut against the grain. You can change the flavor by adding herbs and spices. Try fresh cilantro or basil for a twist. If you want heat, use paprika or cayenne. These spices bring a new layer of taste to your dish. - Cilantro: Add at the end for a fresh taste. - Basil: Use fresh or dried for a sweet flavor. - Paprika: Adds warmth and color. - Cayenne: Just a pinch for a spicy kick. Want to make your dish fit your diet? There are great low-carb and keto choices. Use a different type of butter for dairy-free options. You can also skip the butter and use olive oil. - Low-Carb: Stick to steak and herbs. - Keto: All ingredients are keto-friendly. - Gluten-Free: This recipe is naturally gluten-free. - Dairy-Free: Olive oil can replace butter for a lighter taste. For the Full Recipe, check out the main section. To keep your cooked steak bites fresh, store them in the fridge. Let them cool first. Place them in an airtight container. This helps keep moisture in and air out. Use glass or plastic containers with tight lids. They work best for storage. When reheating, aim to keep the steak juicy. The best method is using the skillet. Heat it on low. Add a splash of broth or water to keep moisture. Place the steak bites in the skillet for a few minutes. Stir gently to warm them up. This method helps keep the steak tender and flavorful. You can freeze cooked steak bites for later. First, let them cool completely. Then, place them in a freezer-safe bag. Squeeze out as much air as you can. This prevents freezer burn. When you’re ready to eat, thaw them in the fridge overnight. Reheat in a skillet for best taste. To check if steak bites are done, use a meat thermometer. For medium-rare, aim for 130°F. Insert the thermometer into the center of a steak bite. You can also press the meat with your finger. If it feels firm but still has some give, it's likely medium-rare. - Tips for checking doneness levels: - Use a thermometer for accurate results. - Learn the feel of different doneness levels. - Recommended meat thermometers: - Instant-read thermometers work best. - Probe thermometers are great for cooking longer cuts. Yes, you can prepare some parts ahead of time. Cut the steak and season it a few hours before cooking. This makes the flavors blend well. - Preparing ahead of time: - Cut and season the steak. - Make the garlic butter and store it. - Best storage practices: - Keep uncooked steak in the fridge. - Store garlic butter in an airtight container. Garlic Butter Steak Bites go well with many sides. Fresh salads, roasted veggies, or mashed potatoes are popular choices. - Popular side dishes like salads and vegetables: - A crisp green salad adds freshness. - Roasted asparagus or broccoli complements the steak. - Creative serving suggestions: - Serve on a bed of creamy mashed potatoes. - Add some crusty bread to soak up the garlic butter. For medium-rare steak bites, sear them for about 2-3 minutes on each side. Timing can vary with the heat of your skillet. - Timing tips for different levels of doneness: - Medium: 3-4 minutes per side. - Rare: about 1-2 minutes per side. - Common mistakes to avoid during cooking: - Don't overcrowd the pan; it lowers the heat. - Avoid flipping too often; let them sear well. You’ve learned how to make delicious garlic butter steak bites step by step. We covered essential and optional ingredients, cooking techniques, and tips for the perfect sear. You can personalize the dish with different herbs and cuts of steak. Plus, we discussed how to store and reheat leftovers properly. Now, you have the tools to impress at any meal. Enjoy experimenting with flavors while creating your own delicious variations. Happy cooking!](https://joymealplan.com/wp-content/uploads/2025/07/52ecc706-aa2d-497b-a3c5-28ea991b92c7-768x768.webp)