
Are you ready for a fresh twist on a classic favorite? This Avocado Egg Salad is creamy, tasty, and super simple to whip up. With just a few basic ingredients, you can transform hard-boiled eggs into a delightful meal or snack. Whether you’re looking for a healthy lunch option or a fun dish to share, this recipe has you covered. Let’s dive in and create something delicious together!
Ingredients
List of Required Ingredients
– Hard-boiled eggs
– Ripe avocado
– Greek yogurt or mayonnaise
– Dijon mustard
– Fresh lemon juice
– Red onion
– Fresh cilantro or parsley
– Seasonings: salt, black pepper, and smoked paprika
– Optional: lettuce leaves for serving
Gathering the right ingredients is key. For a tasty avocado egg salad, you need four large hard-boiled eggs. Boil them until they are firm, then cool and peel. Next, grab a ripe avocado; it should feel soft but not mushy.
You can choose Greek yogurt for creaminess or mayonnaise if you want a richer taste. Dijon mustard adds a nice tang. Fresh lemon juice brightens the flavors.
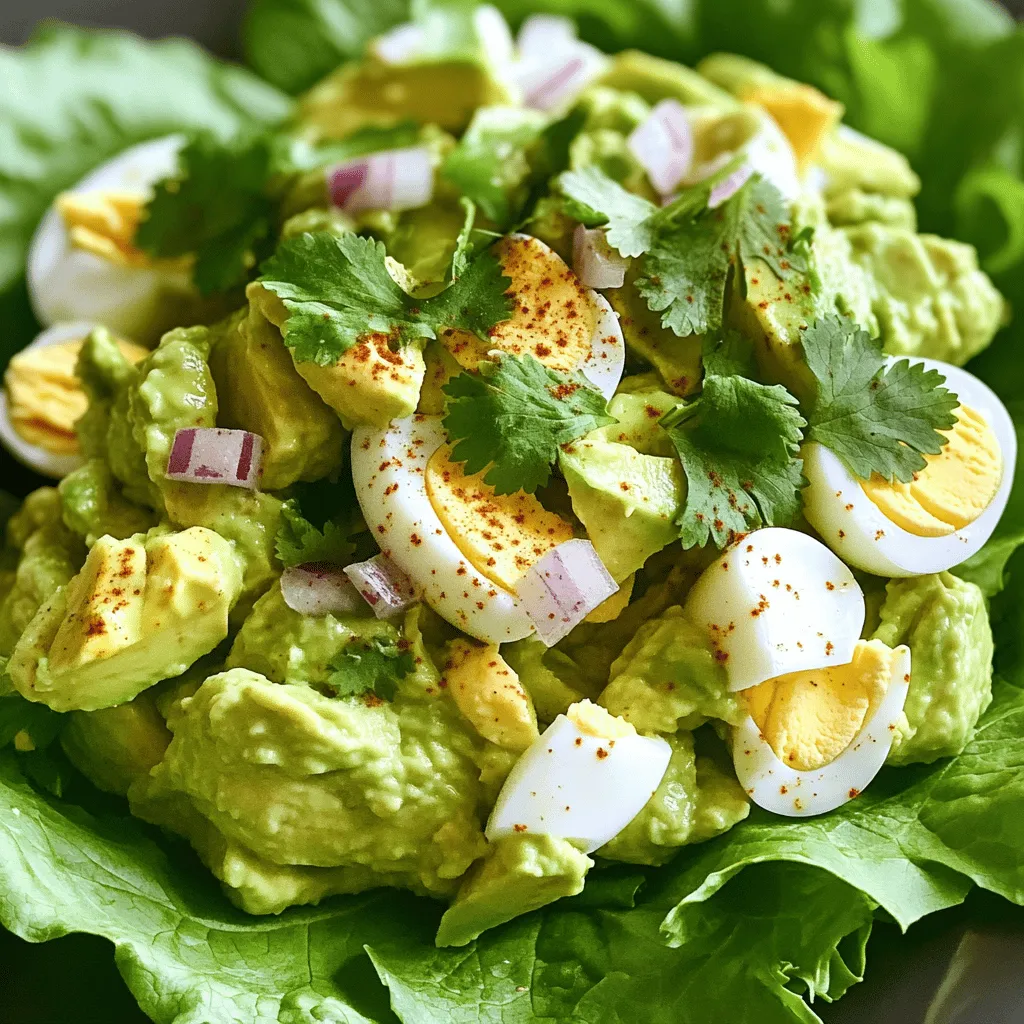
For crunch, include a small red onion finely diced. Fresh herbs like cilantro or parsley add a pop of color and taste. Finally, season with salt, black pepper, and a pinch of smoked paprika if you like a smoky twist.
If you want to serve it in a fun way, you can use crisp lettuce leaves. This simple mix of ingredients creates a creamy, nutritious dish.
Step-by-Step Instructions
Preparation of Ingredients
To make this avocado egg salad, start with the eggs.
1. How to boil eggs perfectly:
– Place eggs in a pot and cover them with water.
– Bring the water to a boil over high heat.
– Once boiling, cover the pot and remove it from heat.
– Let the eggs sit in hot water for about 9-12 minutes.
– After that, drain the water and cool the eggs in cold water.
2. Tips for mashing avocado:
– Choose a ripe avocado. It should feel soft but not mushy.
– Cut the avocado in half and remove the pit.
– Scoop the flesh into a bowl and mash with a fork.
– Aim for a creamy texture, leaving some small chunks for flavor.
Mixing the Salad
Next, it’s time to mix the salad together.
1. Detailed steps for combining ingredients:
– In a large mixing bowl, combine the mashed avocado, Greek yogurt, Dijon mustard, and lemon juice.
– Stir until the mixture is smooth and creamy.
2. Proper folding technique to maintain egg texture:
– Add the chopped hard-boiled eggs to the bowl.
– Use a spatula to gently fold the eggs into the avocado mix.
– Be careful not to break the eggs too much; you want some pieces intact.
Final Touches
Now, let’s finish up the salad.
1. Adjusting flavors and seasoning before serving:
– Add the diced red onion and coarsely chopped cilantro to the mix.
– Season with salt, black pepper, and smoked paprika, if using.
– Mix gently and taste. Adjust seasoning to your liking.
2. Best practices for presentation:
– Spoon the salad onto crisp lettuce leaves for a nice look.
– You can also spread it on whole-grain bread or crackers.
– For a pretty finish, sprinkle a little smoked paprika on top.
This simple avocado egg salad recipe is tasty and colorful.
Tips & Tricks
Storing Leftovers
To keep your avocado egg salad fresh, store it in an airtight container. This will help lock in moisture and flavor. You can also place a piece of plastic wrap directly on the salad before sealing the container. To prevent browning of the avocado, add a little extra lemon juice on top. This will slow down oxidation and keep your salad looking bright.
Making Ahead
You can make this avocado egg salad up to two days in advance. Just store it well in the fridge. If you need to reheat it, do so gently in a microwave. Use a low setting to avoid cooking the eggs again. However, I recommend enjoying it cold for the best taste.
Serving Suggestions
This salad pairs well with many sides. You can serve it with fresh veggies like carrots or celery sticks. For a heartier meal, try it with whole-grain bread or crunchy crackers. You can also spoon it onto crisp lettuce leaves for a fun wrap. This adds texture and freshness to your dish. Enjoy making this avocado egg salad your own!
Variations
Different Ingredients to Try
You can switch up ingredients for a fresh twist. If you want a lighter base, try using silken tofu instead of Greek yogurt or mayonnaise. It gives a creamy texture without the calories. You can also add a dollop of salsa for a zesty kick.
Consider mixing in diced bell peppers or chopped celery. These add crunch and color. If you love heat, a pinch of cayenne or chili powder can spice things up.
Healthy Additions
Boost the nutrition by adding proteins like chickpeas or diced turkey. These options make the salad heartier. You can also mix in seeds, like sunflower or pumpkin seeds, for extra healthy fats.
Fresh herbs can elevate flavor. Try dill for a bright taste or chives for a mild onion flavor. These small changes can make your avocado egg salad unique and delightful.
Dietary Considerations
If you want a vegan version, skip the eggs and yogurt. Instead, use mashed chickpeas and avocado. This keeps the creamy texture you love while adding plant-based protein.
For a gluten-free option, serve the salad in lettuce wraps instead of bread. Adjust the yogurt or mayonnaise to a gluten-free version if needed. Look for low-calorie yogurt for lighter choices. Each small change can help you enjoy a healthier meal without losing flavor.
Storage Info
Proper Storage Techniques
To keep your avocado egg salad fresh, use an airtight container. Glass containers work great. You can also use plastic containers, but make sure they seal well. Store the salad in the fridge right after you make it. This helps keep it cool and safe to eat.
Shelf Life
Your avocado egg salad will stay fresh in the fridge for about three days. After that, check for signs of spoilage. Look for brown spots on the avocado or a sour smell. If it looks or smells off, it’s best to throw it away. Always trust your senses when it comes to food safety.
FAQs
How to make avocado egg salad without dairy?
To make avocado egg salad without dairy, skip the Greek yogurt or mayonnaise. Instead, use an extra ripe avocado. Mash it well to create a creamy base. This keeps the salad rich and smooth. You can add a bit of mustard for flavor. Use fresh lemon juice for a zesty kick. This simple swap makes the dish just as tasty!
Can avocado egg salad be frozen?
I do not recommend freezing avocado egg salad. When you freeze it, the texture can change. Avocado may become mushy after thawing. Eggs can also lose their firmness. It’s best to enjoy this salad fresh. If you have leftovers, store them in the fridge for up to three days.
What are the health benefits of avocado and eggs in this recipe?
Avocados are full of healthy fats. They help with heart health and keep you full. They also give you vitamins like E and C. Eggs are a great source of protein. They support muscle growth and keep energy levels up. Together, they make a nutritious meal. This salad provides a balance of fats and proteins, making it filling and healthy. Enjoy it as a light lunch or snack!
This blog post covered how to make a delicious avocado egg salad. We listed the key ingredients, explained how to prepare them, and shared steps for mixing and serving the salad. You learned useful tips for storage, making it ahead, and how to customize the recipe with different ingredients.
In summary, this salad is versatile, easy to make, and can fit various diets. Enjoy experimenting with your own twists to make it even better!


