Bang Bang Ground Turkey Bowls Flavorful and Simple Meal

Craving a meal that’s both tasty and easy to make? Look no further than Bang Bang Ground Turkey Bowls! This dish combines lean turkey with vibrant veggies and a kicky sauce that packs a punch. Plus, it’s quick to whip up, making it perfect for busy nights. Join me as we dive into this flavorful recipe, filled with tips and tricks to help you create a bowl that everyone will love!
Why I Love This Recipe
- Quick and Easy: This recipe comes together in just 25 minutes, making it perfect for busy weeknights.
- Flavor Packed: The combination of garlic, ginger, and sriracha creates a deliciously bold flavor that excites the palate.
- Customizable: You can easily swap out the vegetables or adjust the spice level to suit your taste preferences.
- Healthy and Wholesome: With lean ground turkey and fresh veggies, this dish is a nutritious option that doesn’t compromise on taste.
Ingredients
Main Ingredients
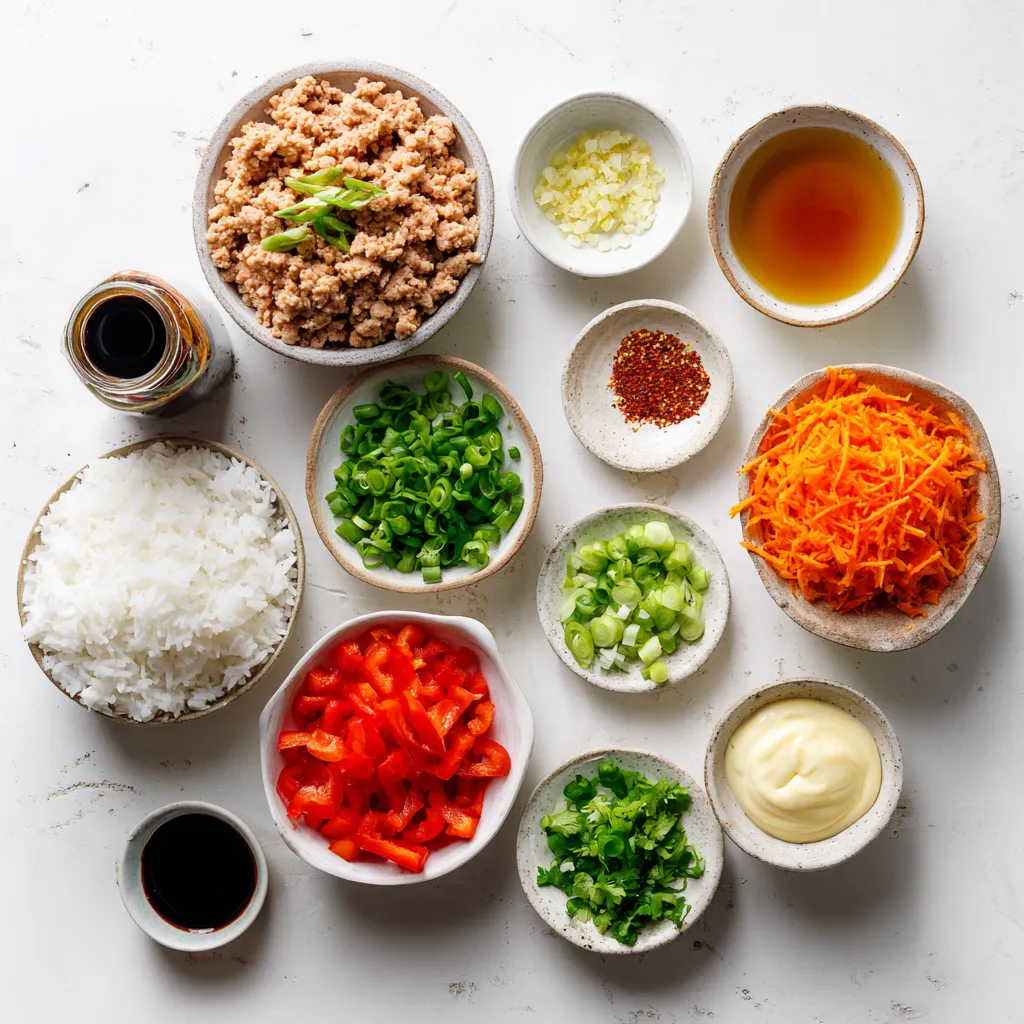
– 1 pound ground turkey
– 2 tablespoons olive oil
– 1 tablespoon minced garlic
– 1 tablespoon minced ginger
– 1 red bell pepper, diced
– 1 cup shredded carrots
You will need ground turkey as the main protein. It is lean and cooks quickly. Olive oil adds flavor, while garlic and ginger give a warm aroma. Red bell pepper and carrots are colorful and add crunch.
Sauce Components
– 1/4 cup mayonnaise
– 2 tablespoons sriracha sauce
– 1 tablespoon soy sauce
– Salt and pepper to taste
This sauce is the star of the dish. Mayonnaise makes it creamy, while sriracha adds heat. Soy sauce brings in savory notes. Adjust salt and pepper to your taste.
Optional Toppings
– Sesame seeds
– Green onions
– Fresh cilantro
These toppings add fun and flavor. Sesame seeds give a nutty crunch. Green onions provide a fresh bite, and cilantro adds a burst of color and taste. Feel free to mix and match!

Step-by-Step Instructions
Preparing the Base
First, take a large, non-stick skillet. Heat two tablespoons of olive oil over medium heat. Wait until the oil shimmers. Add one tablespoon of minced garlic and one tablespoon of minced ginger. Sauté these for one to two minutes. Stir often until you smell a fragrant aroma.
Next, add one pound of ground turkey to the skillet. Season it with salt and pepper. Cook the turkey for about five to seven minutes. Break the meat apart with a spatula. Cook until it is evenly browned and no longer pink.
Adding Vegetables
After the turkey is cooked, toss in one diced red bell pepper and one cup of shredded carrots. Stir all the ingredients together. Cook for another three to four minutes. You want the vegetables to soften slightly.
Making the Bang Bang Sauce
In a small bowl, whisk together one-quarter cup of mayonnaise, two tablespoons of sriracha sauce, and one tablespoon of soy sauce. Mix until the sauce is smooth and creamy. This is your spicy bang bang sauce.
Remove the skillet from heat. Drizzle a few tablespoons of your bang bang sauce over the turkey and vegetables. Stir well to coat everything evenly. Reserve some sauce for later.
Tips & Tricks
Cooking Techniques
Using a non-stick skillet makes cooking easier. It helps prevent the turkey from sticking. This means less mess and less chance of burning.
Break the turkey into small pieces. This helps it cook evenly. Smaller pieces brown better and absorb flavors well.
Serving Suggestions
Layer your ingredients for a colorful dish. Place rice on the bottom, then add turkey and veggies. This makes the bowl look nice and inviting.
Try using chopsticks for a fun way to eat. It makes the meal feel more interactive. Plus, it’s a great way to enjoy the textures of the dish.
Adjusting Spice Levels
You can change the heat by using less sriracha. If you want a milder sauce, start with one teaspoon. Taste it and add more if you like.
Add extra seasonings to enhance flavors. Try garlic powder or a pinch of paprika. These will add depth without overpowering the dish.
Pro Tips
- Use Extra Lean Turkey: Opt for extra lean ground turkey to keep the dish healthier without sacrificing flavor.
- Customize the Heat: Adjust the amount of sriracha in the bang bang sauce to suit your personal spice preference.
- Veggie Variations: Feel free to add or substitute with other vegetables like zucchini or snap peas for added nutrition and variety.
- Meal Prep Friendly: This recipe is great for meal prep; make a larger batch and store in airtight containers for quick lunches throughout the week.

Variations
Protein Alternatives
You can swap ground turkey for other proteins. Chicken works well and cooks similarly. Beef offers a richer flavor, while plant-based meat suits vegans. Each choice changes the taste but keeps it delicious. You can adjust the spices too. This flexibility lets you cater to everyone’s likes and needs.
Grain Options
When it comes to grains, you have choices. White rice is fluffy and light. Brown rice adds a nutty taste and more fiber. Quinoa is another great option, packed with protein. For a low-carb choice, try cauliflower rice. Each option brings something unique to your bowl.
Vegetable Substitutions
Feel free to mix in other vegetables. Snap peas add a crisp bite, while broccoli brings a hearty texture. Seasonal veggies like zucchini or asparagus are also great. Using fresh, in-season produce enhances your dish’s flavor and nutrition. Don’t be afraid to get creative!
Storage Info
Refrigeration Guidelines
To store leftover Bang Bang Ground Turkey Bowls, let them cool first. Transfer them to an airtight container. This helps keep the flavors fresh. You can store them in the fridge for three to four days.
Best practices for keeping ingredients fresh:
– Keep ingredients separate when possible. This prevents sogginess.
– Use glass containers to avoid stains.
– Label containers with dates for easy tracking.
Freezer Tips
You can freeze the prepared turkey mixture. Allow it to cool completely. Then, place it in a freezer-safe bag or container. Remove as much air as possible. This helps prevent freezer burn.
Thawing and reheating instructions:
– Thaw the turkey mixture overnight in the fridge.
– Reheat it on the stove over medium heat until hot.
– Stir occasionally to heat evenly.
Shelf Life Expectations
In the fridge, your Bang Bang Ground Turkey Bowls last about three to four days. In the freezer, they can last up to three months. For best flavor, eat them within the first month. Always check for off smells or colors before eating leftovers.
FAQs
Can I make Bang Bang Ground Turkey Bowls ahead of time?
Yes, you can make these bowls ahead of time. Meal prepping saves time during busy weeks. Cook the ground turkey and veggies, then store them in the fridge. Store rice separately to keep it fresh. You can mix everything together when you’re ready to eat. The flavors will blend and taste even better after sitting a bit. Just reheat everything in a pan or microwave before serving.
What can I use instead of sriracha for the sauce?
If you want a different flavor, try sauces like sweet chili, harissa, or gochujang. Each brings its own unique taste. Sweet chili sauce adds a nice sweetness, while gochujang gives a deeper, fermented flavor. Adjust the amount based on how spicy you want your dish. You can also mix mayonnaise with garlic or lemon for a creamy twist.
How do I make this dish vegetarian or vegan?
To make this dish vegetarian or vegan, swap out the ground turkey for plant-based meat. Crumbled tofu or tempeh works well too. You can use chickpeas for extra protein. For the sauce, replace mayonnaise with vegan mayo. Make sure your sriracha is vegan, as not all brands are. This way, you keep the flavor while sticking to your dietary needs.
In this blog post, I shared how to make flavorful Bang Bang Ground Turkey Bowls. We explored the main ingredients, including ground turkey, fresh vegetables, and a tasty sauce. I discussed step-by-step instructions and tips for cooking and serving. You can customize the dish with various toppings, proteins, and grains. Remember to store leftovers properly to maintain freshness. With this recipe, you can create a fun and delicious meal your family will love. Enjoy experimenting with your own variations and have fun in the kitche

Bang Bang Ground Turkey Bowls
Ingredients
- 1 pound ground turkey
- 2 tablespoons olive oil
- 1 tablespoon minced garlic
- 1 tablespoon minced ginger
- 1 red bell pepper diced
- 1 cup shredded carrots
- 2 green onions chopped
- 1 cup cooked rice
- 1 quarter cup mayonnaise
- 2 tablespoons sriracha sauce
- 1 tablespoon soy sauce
- None to taste salt and pepper
- None optional sesame seeds
- None optional extra chopped green onions
- None optional fresh cilantro
Instructions
- In a large, non-stick skillet, heat the olive oil over medium heat until shimmering.
- Add the minced garlic and ginger to the hot skillet. Sauté them for 1-2 minutes, stirring frequently, until they release a fragrant aroma.
- Incorporate the ground turkey into the skillet, seasoning it generously with salt and pepper. Cook for approximately 5-7 minutes, breaking the meat apart with a spatula until it is evenly browned and no longer pink.
- Once the turkey is cooked through, toss in the diced red bell pepper and shredded carrots. Stir all the ingredients together and continue to cook for an additional 3-4 minutes until the vegetables have softened slightly.
- In a separate small bowl, whisk together the mayonnaise, sriracha sauce, and soy sauce until the mixture is smooth and creamy, creating your spicy bang bang sauce.
- Remove the skillet from heat and drizzle a few tablespoons of your prepared bang bang sauce over the turkey and vegetable mixture. Stir well to evenly coat everything. Be sure to reserve some sauce for drizzling when serving.
- For serving, place a generous scoop of cooked rice into each bowl. Top it with the turkey and vegetable mixture. Finally, drizzle the remaining bang bang sauce over the top and garnish with chopped green onions, sesame seeds, and fresh cilantro, as desired.


![- Feta cheese - Cherry tomatoes - Olive oil - Garlic - Dried oregano - Red pepper flakes - Salt and pepper - Pasta options (penne or fusilli) - Fresh basil leaves - Optional garnishes (lemon zest) For this dish, you need fresh and high-quality ingredients. The feta cheese brings creaminess, while the cherry tomatoes add sweetness. Olive oil enhances the flavor and helps with cooking. Garlic gives a lovely aroma and taste. Dried oregano adds a hint of earthiness, and red pepper flakes can bring a nice kick. Salt and pepper are essential for seasoning. You can pick either penne or fusilli pasta for this recipe. Both hold the creamy sauce well. Fresh basil leaves add brightness and color to your dish. If you want a zesty touch, lemon zest is a perfect addition. When you gather these ingredients, you set the stage for a simple yet delightful meal. Each component plays a role in making your baked feta pasta a creamy delight. Be sure to look at the full recipe for all the details! First, set your oven temperature to 400°F (200°C). This temperature works well for baking the feta and tomatoes. Next, choose a baking dish that fits all your ingredients. A medium-sized dish works best, allowing enough space for everything. Now it’s time to create your dish. Place the block of feta cheese in the center of the baking dish. Surround it with the halved cherry tomatoes. This colorful mix makes the dish look inviting. Drizzle olive oil over the feta and tomatoes. Then, add minced garlic, dried oregano, red pepper flakes, salt, and pepper. This step adds a burst of flavor to the dish. Place the dish in your preheated oven. Bake for about 30 minutes. Look for the tomatoes to blister and the feta to soften. When it’s ready, the feta should turn a lovely golden color. While that bakes, boil salted water in a pot for the pasta. Cook the pasta according to the package instructions until it is al dente. After cooking, drain the pasta and set it aside. After 30 minutes, carefully take the baking dish out of the oven. Use a fork to mash the softened feta and blistered tomatoes. This creates a creamy sauce. Now, gently fold the cooked pasta into your baking dish. Toss everything together to coat the pasta well. Finally, taste your dish and adjust the seasoning. You can add more salt, pepper, or red pepper flakes for extra flavor. Serve the dish right away, garnished with fresh basil leaves. If you like, add a sprinkle of grated lemon zest for a refreshing twist. Enjoy your simple and creamy delight! For more details, check the Full Recipe. To get the best baked feta pasta, know your oven. Every oven heats a little differently. If yours runs hot, lower the temp by 25°F. Check on the dish after 25 minutes. Look for blistered tomatoes and soft feta. If the feta is golden and creamy, it’s ready! Cook your pasta to al dente. This means it should still have a slight bite. Follow the package directions, but check it a minute early. Save some starchy pasta water when draining. This water helps the sauce stick to the pasta. Want to boost flavor? Try adding a pinch of lemon zest or a dash of balsamic vinegar. Fresh herbs like parsley or thyme can brighten the dish too. If you like heat, toss in more red pepper flakes. You can mix and match spices to fit your taste! {{image_4}} You can easily make Baked Feta Pasta gluten-free. Just use gluten-free pasta instead of regular pasta. Many brands offer tasty options that work well. If you want a vegan version, substitute feta cheese with a plant-based alternative. Look for brands that make creamy vegan feta. These options still give that tangy flavor you love. To add some color and nutrition, toss in vegetables. Spinach wilts nicely and adds a fresh taste. Zucchini can also work well; just chop it into small pieces. For protein, you can add cooked chicken or shrimp. Both will make your dish more filling. Cook the protein separately, then mix it in right before serving. While penne and fusilli are great, you can use other pasta types too. Bowtie or rotini can hold the creamy sauce well. For a lighter option, serve the dish over zoodles or spiralized veggies. You’ll get a fresh twist while keeping it healthy. For the full recipe, check out [Full Recipe]. After you enjoy your baked feta pasta, store any leftovers in the fridge. Use a tight container to keep it fresh. Make sure to cool it down before sealing. It will stay good for about three to four days. This dish tastes great the next day, too. You can reheat your pasta in two ways: the microwave or the oven. If you use the microwave, heat in short bursts. Stir it after each burst to keep it creamy. For the oven, preheat to 350°F (175°C). Place the pasta in an oven-safe dish, cover it, and heat for about 15 minutes. This way, you maintain the texture of the sauce. Yes, you can freeze this dish, but it’s best to freeze it before baking. Place the unbaked dish in a freezer-safe container. It will last around two to three months. When ready to eat, thaw it overnight in the fridge and bake as normal. If you freeze it after baking, the texture might change, but it’s still tasty. Just be careful when reheating to avoid drying it out. Baked Feta Pasta started in Finland. It became popular on social media in 2020. The dish caught on for its simple steps and great taste. People enjoyed the creaminess of feta mixed with tomatoes. It became a fun way to cook pasta. Now, it's a favorite in many homes worldwide. Yes, you can prep Baked Feta Pasta ahead of time. You can bake the feta and tomatoes the night before. Store them in the fridge after cooling. When ready to eat, cook the pasta and mix it in. Just be sure to adjust the baking time as needed. Baked Feta Pasta has some healthy aspects. Feta cheese offers protein and calcium. Tomatoes provide vitamins and antioxidants. However, it also has olive oil and pasta, which add calories. Balance is key. You can add veggies for extra nutrients. This dish pairs well with many sides. A fresh salad with greens is great. Garlic bread adds a nice crunch. You can also serve it with roasted vegetables. For a light option, try steamed broccoli or green beans. To add heat, use more red pepper flakes. You can also try adding sliced jalapeños. For a smoky flavor, mix in some smoked paprika. Taste as you go, so it's just right for your spice level. In this blog post, we explored how to create baked feta pasta. We covered the ingredients, step-by-step instructions, and tips for the perfect dish. Remember to select fresh ingredients for the best flavor. You can personalize the recipe with your choice of pasta and optional add-ins. This dish is simple, satisfying, and perfect for any meal. Enjoy experimenting with flavors and variations to make it your own. With these steps, you'll serve a delightful meal that family and friends will love.](https://joymealplan.com/wp-content/uploads/2025/07/e04698b2-b085-49cc-98ed-107e8e7c4045-768x768.webp)


![- 1 pound boneless, skinless chicken breasts - Marinade: 1 cup buttermilk - Breading elements: 1 cup panko breadcrumbs, 1/2 cup all-purpose flour - Seasonings: 1 teaspoon garlic powder, 1 teaspoon onion powder, 1 teaspoon smoked paprika, 1/2 teaspoon salt, 1/2 teaspoon black pepper, 1/4 teaspoon cayenne pepper (optional) - Cooking oil: 2 tablespoons extra virgin olive oil - Garnish: Fresh parsley, finely chopped I love using fresh, simple ingredients for my crispy baked chicken tenders. The chicken breasts are the star here. I always choose boneless and skinless for easy handling. This keeps them juicy and tender. For the marinade, I use buttermilk. It helps to make the chicken soft and adds great flavor. Soak the chicken for at least 30 minutes. You can go up to two hours for the best taste. Next comes the breading. I prefer panko breadcrumbs because they give the best crunch. The all-purpose flour helps the breadcrumbs stick. Mixing garlic powder, onion powder, smoked paprika, salt, and pepper adds a nice depth of flavor. I add cayenne pepper for those who like a bit of heat. It’s optional, but it gives a great kick. Finally, a drizzle of extra virgin olive oil helps the tenders bake to a golden brown. You can finish with fresh parsley for a pop of color. Want the full recipe? Check out the [Full Recipe]. It’s a delicious way to enjoy chicken! First, set your oven to 425°F (220°C). While it heats up, grab a baking sheet. Line it with parchment paper. This will help the chicken not stick. It also makes cleanup easy. Take a big bowl and pour in the buttermilk. Add the chicken strips. Make sure they are all covered. Cover the bowl with plastic wrap. Let it sit for at least 30 minutes. For even more flavor, you can marinate it for up to 2 hours in the fridge. In another shallow dish, mix the flour, garlic powder, onion powder, smoked paprika, salt, black pepper, and cayenne pepper. Whisk it well. In a separate bowl, place the panko breadcrumbs. This is what will give your chicken that crunchy outside. After marinating, take the chicken out of the buttermilk. Let the excess drip off. Next, coat each piece in the flour mixture. Make sure each strip is covered. Gently shake off the extra flour. For extra crunch, dip the chicken back into the buttermilk. Then, roll it in the panko breadcrumbs. Press down a bit to help the crumbs stick. Arrange the coated chicken on the lined baking sheet. Drizzle a little olive oil on top. This helps it get golden brown. Bake the chicken for 20-25 minutes. Check with a meat thermometer. It should reach 165°F (75°C). Once the chicken is baked, take it out of the oven. Let it rest for about 5 minutes. This helps keep the juices in. Finally, garnish with fresh parsley. It adds a nice touch. Serve hot with your favorite sauces. Don't forget to check the Full Recipe for all the details! For the crispiest chicken tenders, use panko breadcrumbs. Panko adds a light and airy crunch that regular breadcrumbs can't match. Their larger flakes create a wonderful texture. To take it up a notch, use the double-dipping technique. First, coat the chicken in flour, then dip it back into the buttermilk before rolling it in panko. This extra layer of breading will give you an amazing crunch. To make your chicken tenders more flavorful, add spices to the breading mix. Garlic powder, onion powder, and smoked paprika all work great. Feel free to adjust the amounts to fit your taste. You can also try different marinades. A simple mix of lemon juice and herbs can change the flavor profile entirely. Experiment with your favorites to find the perfect taste. If you want a healthier option, consider using an air fryer. It cooks the chicken tenders with less oil while still keeping them crispy. Adjust the cooking time to about 12-15 minutes at 400°F (200°C). Another great tip is to place the chicken tenders on a wire rack. This allows hot air to circulate around the tenders, leading to even cooking and a crispier finish. {{image_4}} You can easily change the flavor of your chicken tenders. Here are two fun ideas: - Lemon pepper chicken tenders: Add lemon zest and black pepper to the flour mix. This gives a bright and zesty taste that wakes up your meal. - BBQ chicken tenders: Brush the tenders with your favorite BBQ sauce before baking. This adds a sweet and tangy flavor that kids love. If you have dietary needs, you can still enjoy these tenders: - Gluten-free options: Use gluten-free breadcrumbs instead of regular. This way, everyone can enjoy the meal without any worry. - Low-carb alternatives: Swap regular flour with almond flour or coconut flour. Both options give you a nice crunch while keeping carbs low. Pair your chicken tenders with tasty sides and dips: - Suggested dipping sauces: Try ranch dressing, honey mustard, or spicy sriracha. Each adds a unique kick to your tenders. - Side dish pairings: Serve them with a fresh salad, crispy fries, or steamed veggies. These sides complete your meal and add more nutrition. For more ideas, check out the Full Recipe to explore different flavors and tips! To keep your chicken tenders fresh, store them right. First, let the cooked tenders cool. Then, place them in an airtight container. You can store them in the fridge for up to three days. If you want to keep them longer, freezing is a great option. Use containers that seal tightly. Glass or plastic containers work well. If you use plastic wrap, make sure it hugs the tenders closely. This way, they won’t dry out. When you want to enjoy your leftovers, reheating is key. The best way to keep them crispy is to use the oven. Preheat your oven to 375°F (190°C) and bake for about 10 to 15 minutes. This method makes the chicken hot and crispy again. You can also use an air fryer. Set it to 375°F (190°C) and heat for about 5 to 7 minutes. This method is quick and gives great results. You can freeze both uncooked and cooked chicken tenders. For uncooked tenders, place them on a baking sheet to freeze individually first. Once they are frozen, transfer them to a freezer bag. This keeps them from sticking together. For cooked tenders, let them cool, then store them in an airtight container. They can last up to three months in the freezer. When you are ready to eat, just reheat them as mentioned earlier. For more detailed cooking methods, check the Full Recipe. Bake chicken tenders for 20 to 25 minutes at 425°F. This time gives them a golden color and keeps them juicy. Always check their internal temperature; it should reach 165°F for safety. Yes, you can make these chicken tenders ahead of time. Prepare them fully and store them in the fridge for up to 24 hours. When you're ready to eat, just pop them in the oven to reheat. This way, you save time while still enjoying a tasty meal. If you don't have buttermilk, use regular milk with a splash of vinegar or lemon juice. Let it sit for about five minutes. This method mimics buttermilk's acidity and helps tenderize the chicken just as well. Check chicken tenders with a meat thermometer. They are done when they hit 165°F inside. If you don’t have a thermometer, cut one open. The meat should be white, not pink, and the juices should run clear. Yes, chicken thighs work well in this recipe. They are more flavorful and juicy than breasts. Just cut them into strips like you would with the chicken breasts. The cooking time may be similar, so keep an eye on them. Crispy baked chicken tenders are easy and tasty. You start with simple ingredients, like chicken, buttermilk, and spices. The steps are clear, from marinating to baking. I shared tips for extra crunch and tasty flavors. Finally, you can personalize these tenders with countless variations and sides. Whether it's for a family dinner or meal prep, these tenders will impress. Enjoy making them and exploring your options!](https://joymealplan.com/wp-content/uploads/2025/06/4bfc5954-182f-42e7-9a90-e67bfbd9568b-768x768.webp)