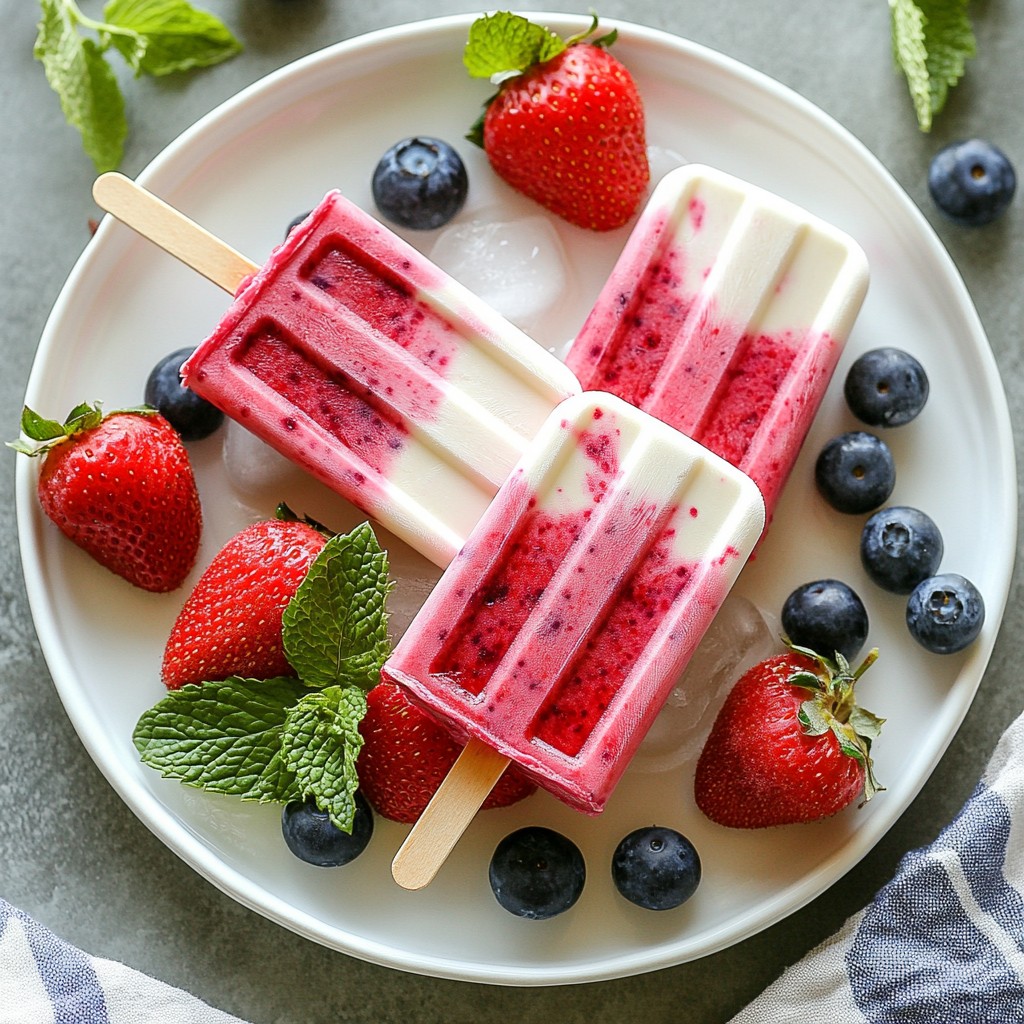
Looking for a cool treat this summer? Berry yogurt popsicles are not just sweet; they're packed with flavor and easy to make. In this guide, I’ll share the best ingredients, tips for freshness, and fun variations to keep things exciting. Perfect for kids and adults alike, these popsicles will be your go-to snack. Let’s dive in and make a refreshing delight everyone will love!
Why I Love This Recipe
- Healthy and Nutritious: These popsicles are packed with vitamins and antioxidants from the berries, making them a guilt-free treat.
- Customizable Flavors: You can easily swap out the berries for your favorites or even add other fruits for a unique twist.
- Perfect for Hot Days: These refreshing popsicles are ideal for cooling down during warm weather, perfect for kids and adults alike.
- Easy to Make: With just a few simple ingredients and steps, you can whip up these delicious treats in no time!
Ingredients
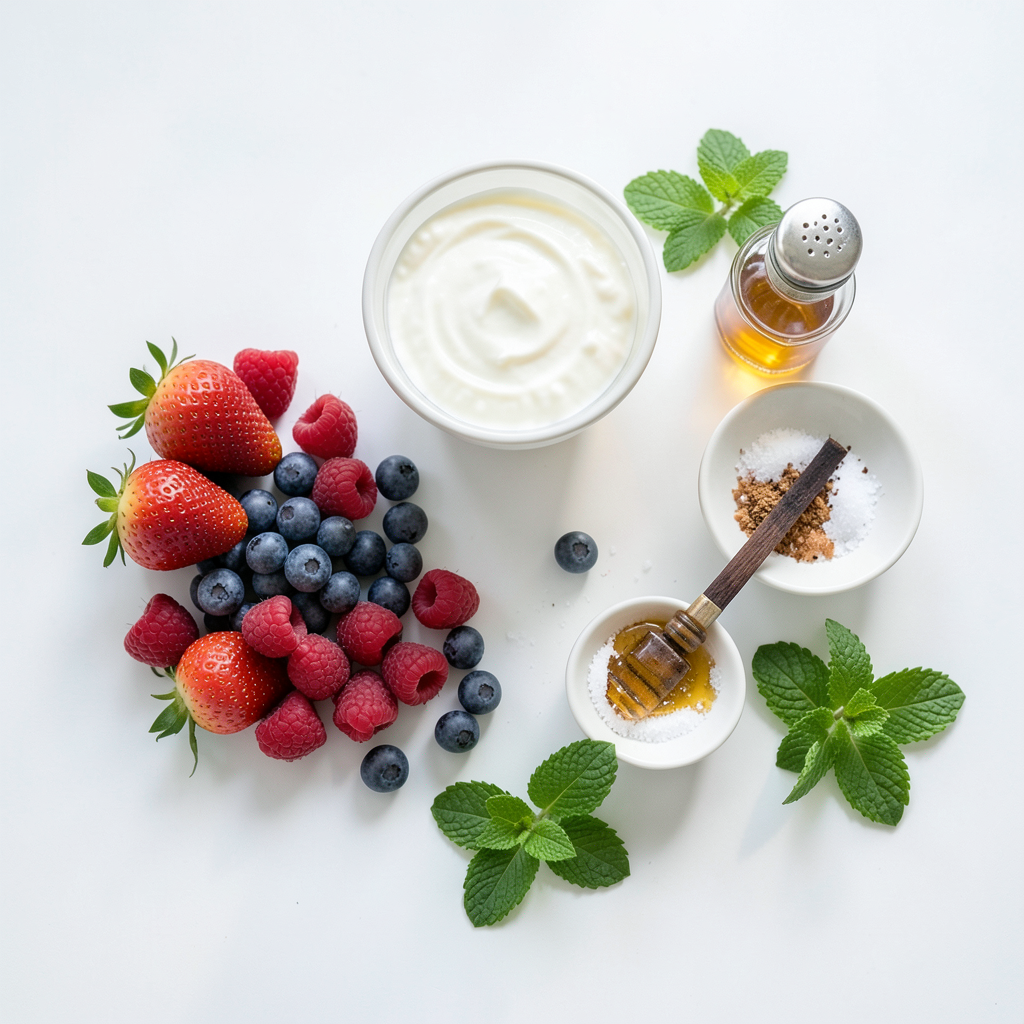
List of Ingredients for Berry Yogurt Popsicles
To make Berry Yogurt Popsicles, you will need the following ingredients:
- 2 cups mixed berries (strawberries, blueberries, raspberries)
- 2 cups Greek yogurt (plain or vanilla-flavored)
- ¼ cup honey or maple syrup (adjust to your desired sweetness)
- 1 teaspoon vanilla extract
- A pinch of salt
- Optional: Fresh mint leaves for garnish
Suggested Variations of Ingredients
You can get creative with your popsicles. Here are some fun variations:
- Berries: Try using different combinations of berries like blackberries or cherries.
- Yogurt: Swap Greek yogurt for coconut yogurt for a dairy-free option.
- Sweeteners: Use agave syrup or even fruit puree for natural sweetness.
- Flavor Boosts: Add a splash of lemon juice for a zesty kick.
Tips for Choosing the Freshest Berries
Choosing ripe, fresh berries makes your popsicles even better. Here are my top tips:
- Look for color: Choose berries that are bright and vibrant.
- Check for firmness: Berries should feel firm, not mushy.
- Smell for sweetness: Ripe berries have a sweet, fruity aroma.
- Inspect for mold: Avoid any berries that show signs of mold or decay.
These simple steps ensure you get the best flavors in your popsicles. Enjoy making your Berry Yogurt Popsicles!
Step-by-Step Instructions
Detailed Instructions for Making Berry Yogurt Popsicles
To start, rinse your mixed berries well. I like to use strawberries, blueberries, and raspberries for a colorful mix. Next, blend most of the berries in a blender until smooth. If you want some texture, keep a few berries whole. This makes the popsicles fun to eat.
In a large bowl, add Greek yogurt, honey or maple syrup, vanilla extract, and a pinch of salt. Mix everything until it is smooth and creamy. This yogurt mixture gives popsicles a rich taste.
Now it's time to layer! Pour the yogurt mix into your popsicle molds until they are half full. Then, spoon in a layer of the blended berry mix. If you saved whole berries, add them in now for extra flavor. Finish by topping with more yogurt mix. This layering looks lovely and tastes amazing.
Tips for Achieving the Perfect Texture
For the best popsicle texture, freeze them overnight. This allows them to set fully. If you freeze them for just a few hours, they may be too soft.
Make sure to use Greek yogurt. It gives a thick and creamy texture. If you want a lighter taste, use plain yogurt instead. You can also adjust sweetness with honey or maple syrup. Try tasting the mix before pouring.
Instructions for Layering and Presentation
When layering, be gentle with the yogurt and berry mixes. Use a small spoon to avoid mixing them too much. The goal is to see beautiful layers in your popsicles.
Once they are frozen, remove them from the molds by running warm water over the outside. This makes it easy to pull them out. For a finishing touch, garnish with fresh mint leaves. They add a nice pop of color and flavor!
Tips & Tricks
How to Make Popsicles Kid-Friendly
To make these popsicles kid-friendly, let kids join the fun! Kids love to help in the kitchen. Have them wash the berries and add them to the blender. They can also mix the yogurt and sweetener. You can even let them choose their favorite berries. This way, they will be more excited to eat them.
Using Alternative Sweeteners
If you want a different sweet taste, try other sweeteners. Agave syrup or stevia work well. You can even use mashed bananas for a fruity flavor. Just remember to adjust the amount. Always taste the mix before you freeze it. Make sure it’s as sweet as you like.
Storing and Freezing Tips for Best Results
For the best popsicles, freeze them overnight. This gives them time to set. When storing, wrap the popsicles in plastic wrap. This keeps them fresh and prevents freezer burn. They last about two weeks in the freezer. If you want to eat them later, just take out what you need. Enjoy these tasty treats when you want a refreshing snack!
Pro Tips
- Choose Ripe Berries: For the best flavor, select berries that are ripe and sweet. This enhances the overall taste of your popsicles.
- Experiment with Yogurt: Try different flavors of Greek yogurt to add unique tastes to your popsicles. Vanilla, honey, or berry-flavored yogurts work beautifully!
- Layering Technique: To achieve beautiful layers, pour the yogurt mixture slowly and use a spoon to create distinct layers between the yogurt and berry mixtures.
- Storage Tips: Store your popsicles in an airtight container in the freezer to prevent freezer burn and keep them tasting fresh longer.
Variations
Layered Popsicle Ideas
Layered popsicles look great and taste amazing. You can create fun layers with different colors and flavors. Start with yogurt, then add a berry layer. Keep repeating until you fill the mold. This gives each bite a surprise. For a twist, try a yogurt layer with honey and berries on top. It will be creamy and fruity!
Using Different Yogurt Flavors
Greek yogurt is a great base, but you can mix it up! Try using flavored yogurts like strawberry or vanilla. This adds a new taste to your popsicles. You can also use dairy-free yogurt if you prefer. Coconut yogurt adds a nice tropical twist. Explore different flavors to find your favorite!
Incorporating Other Fruits or Add-ins
Don’t limit yourself to just berries! You can add banana slices or mango chunks to your pops. These fruits make the popsicles sweeter and more fun to eat. You can also mix in yogurt with spinach for a green twist. Or add chia seeds for extra texture and health. The options are endless!
Storage Info
Best Practices for Storing Popsicles
To keep your berry yogurt popsicles fresh, store them in a sealed container. Use an airtight container or a freezer bag. This helps prevent freezer burn. You can also wrap each popsicle in plastic wrap for extra protection. Label your container with the date so you know when you made them.
How Long Do Homemade Popsicles Last?
Homemade popsicles can last about 2 to 3 months in the freezer. After that, they may lose flavor and texture. To enjoy their best taste, try to eat them within a month. If you keep them sealed well, they should remain tasty for a longer time.
Re-freezing Tips for Thawed Popsicles
If you thaw your popsicles, it’s best not to refreeze them. This can cause ice crystals to form. If they melt, enjoy them right away or use them in smoothies. If you must refreeze, do so quickly and eat them soon after. Always prioritize food safety for the best experience.
FAQs
Can I use frozen berries instead of fresh?
Yes, you can use frozen berries. They are often picked at peak ripeness. This means they have great flavor and nutrition. Just thaw them before blending. If you use frozen berries, your popsicles may be a bit icier, but they will still taste great.
What if I don’t have popsicle molds?
If you don't have popsicle molds, don't worry! You can use small cups or ice trays. Pour the mixture into your chosen container. Use wooden sticks or spoons as handles. Just make sure to freeze them solid before trying to remove them.
How can I make these popsicles dairy-free?
To make these popsicles dairy-free, swap the Greek yogurt for a dairy-free option. Coconut yogurt or almond yogurt works well. Choose a brand without added sugars for a healthier treat. This will still give you a creamy texture while being dairy-free.
Are there any health benefits to these popsicles?
Yes, these popsicles have several health benefits. They are rich in vitamins and antioxidants from the berries. Greek yogurt adds protein and probiotics, which are good for digestion. The honey or maple syrup offers natural sweetness without refined sugars. Enjoying these popsicles can be a tasty way to cool down while getting nutrients.
Berry yogurt popsicles are easy and fun to make. We covered the best fresh ingredients, tips for texture, and ways to vary flavors. You can make popsicles that kids love and fit your diet needs. Store them correctly to enjoy later. These treats are not just tasty; they can be healthy, too. Try making them your way for a cool snack all summer long!