Blueberry Cheesecake Swirl Cookies Irresistible Treat

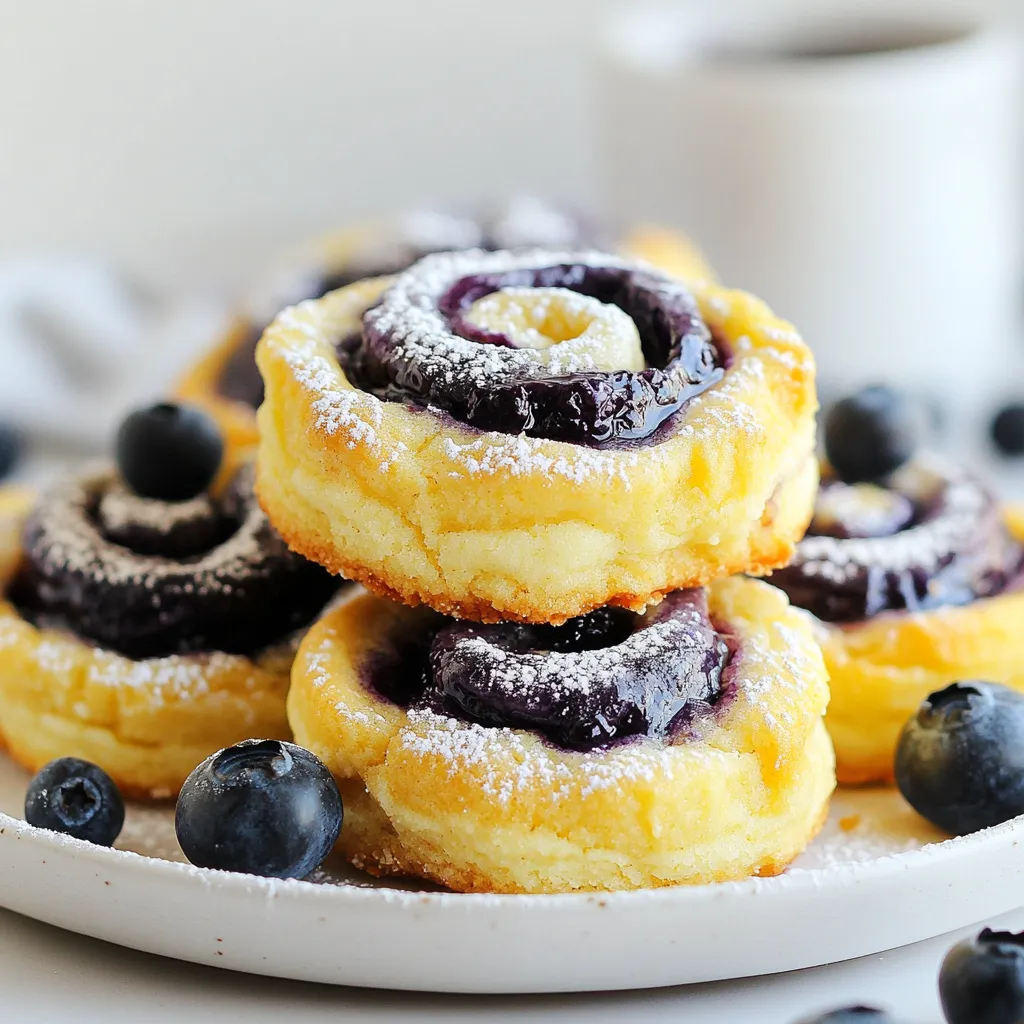
If you crave a sweet snack that brings joy with every bite, you need to try these Blueberry Cheesecake Swirl Cookies. Imagine soft, chewy cookies filled with a creamy cheesecake swirl and bursts of fresh blueberries. This treat combines all your favorite flavors into one delightful cookie. In this guide, I’ll walk you through easy steps to bake these irresistible cookies, share helpful tips, and explore fun variations to make them your own!
Why I Love This Recipe
- Delicious Flavor Combination: The mix of creamy cheesecake and fresh blueberries creates a delightful balance of flavors in every bite.
- Easy to Make: This recipe is straightforward and doesn’t require any advanced baking skills, making it perfect for bakers of all levels.
- Perfect for Any Occasion: These cookies are versatile enough to be enjoyed at gatherings, as a sweet snack, or even as a dessert treat.
- Beautiful Presentation: The striking blueberry swirl not only tastes great but also makes these cookies visually appealing.
Ingredients
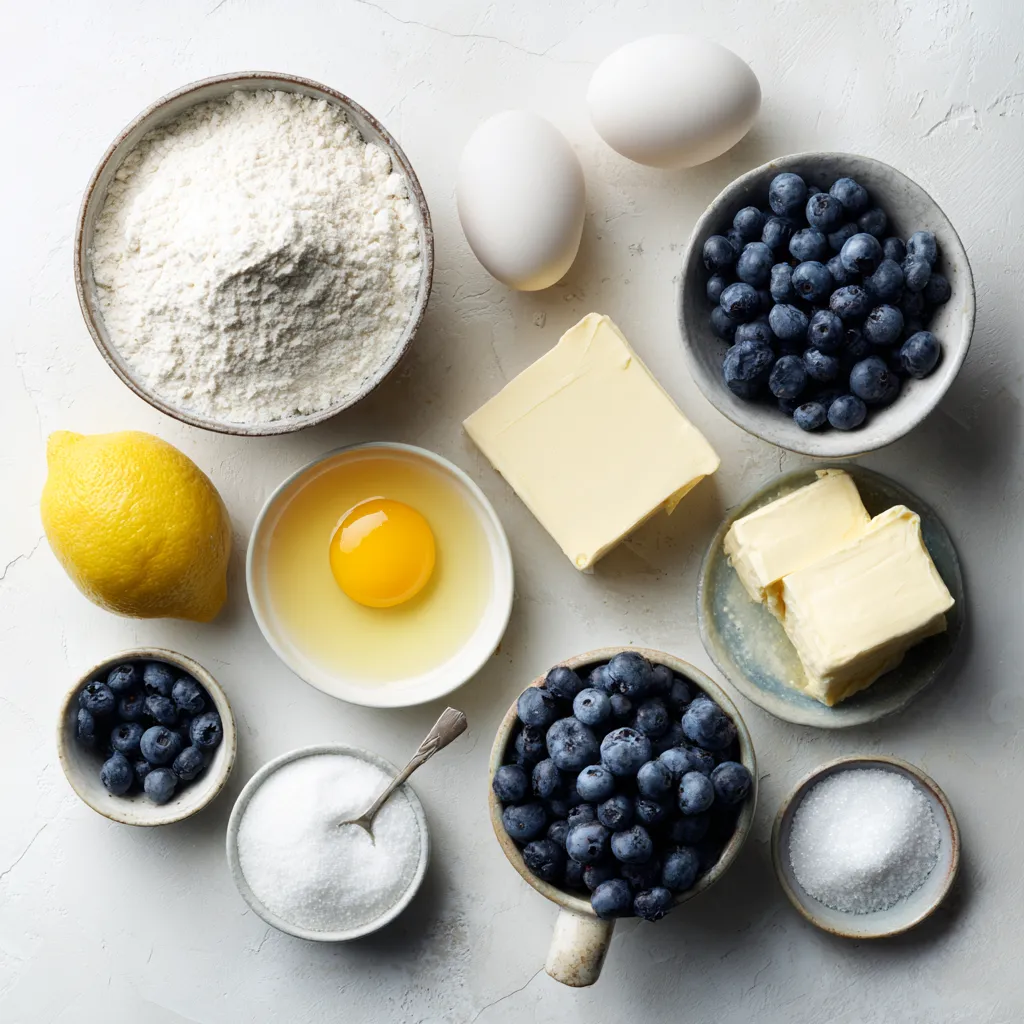
To make Blueberry Cheesecake Swirl Cookies, you need a few simple ingredients. Here’s what you’ll need:
– 1 cup all-purpose flour
– 1/2 teaspoon baking soda
– 1/4 teaspoon salt
– 1/4 cup unsalted butter, softened
– 1/4 cup cream cheese, softened
– 1/2 cup granulated sugar
– 1/2 teaspoon vanilla extract
– 1 large egg
– 1/2 cup fresh blueberries
– 1 tablespoon lemon juice
– 2 tablespoons powdered sugar (for blueberry swirl)
These ingredients work together to create a rich, creamy taste. The fresh blueberries add a burst of flavor and color. The cream cheese makes the cookies soft and chewy. Using quality butter and fresh berries improves the taste and texture. Each ingredient plays a key role in making this treat irresistible.

Step-by-Step Instructions
Prepping the Oven and Baking Sheet
Preheat your oven to 350°F (175°C). While the oven heats, prepare a baking sheet. Line it with parchment paper to stop cookies from sticking. This makes cleanup quick and easy.
Prepare the Dry Ingredients
In a medium bowl, sift together the all-purpose flour, baking soda, and salt. Sifting helps the flour mix well. Set this mixture aside for later.
Make the Cookie Dough
In a large bowl, combine the softened butter and cream cheese with the granulated sugar. Beat them together until light and fluffy, which takes about 2-3 minutes. Next, crack in one large egg and add the vanilla extract. Mix until smooth.
Gradually add the dry flour mixture to the wet ingredients. Stir gently until combined. Be careful not to overmix; this keeps your cookies soft and chewy.
Create the Blueberry Swirl
In a small bowl, mix the fresh blueberries, lemon juice, and powdered sugar. Use a fork to lightly mash the blueberries, making a chunky sauce. This will give your cookies a lovely swirl.
Gently fold half of the blueberry mixture into the cookie dough. Make sure it’s swirled but not fully mixed. You want to see those beautiful blue streaks.
Shaping and Baking the Cookies
Use a tablespoon to scoop dough onto your prepared baking sheet. Leave space between each scoop so they can spread. Next, take the remaining blueberry mixture and dollop it on top of each cookie. Use a toothpick to swirl it in a bit.
Place the baking sheet in the preheated oven. Bake for 10-12 minutes, or until the edges are light golden and the centers look set. When done, let the cookies cool on the baking sheet for about 5 minutes. Then, move them to a wire rack to cool completely. Enjoy these sweet treats warm!
Tips & Tricks
Perfect Consistency for Cookie Dough
To make great cookies, you must get the dough just right. Avoid overmixing the dough. When you mix too much, cookies can turn out tough. Aim for a smooth dough, but see some lumps. This means you did it right. The texture should feel soft and slightly sticky.
Enhancing Appearance
To make your cookies look even better, dust them with powdered sugar. This simple step adds a sweet touch. You can also present them with fresh blueberries. Scatter a few on the plate for color. It makes the cookies pop and looks inviting.
Baking Time Variations
Different ovens can change baking times. If your oven runs hot, check the cookies a minute early. For ovens that run cool, you might need a bit more time. The edges should turn golden, and the center should feel set. Adjust as needed for perfect cookies every time.
Pro Tips
- Use Fresh Blueberries: Fresh blueberries will provide the best flavor and texture for your cookies. If using frozen, make sure to thaw and drain them well to avoid excess moisture.
- Chill the Dough: For chewier cookies, consider chilling the dough for about 30 minutes before baking. This helps to prevent spreading and enhances the texture.
- Check for Doneness: Keep an eye on the cookies as they bake; the edges should be lightly golden while the centers remain soft. They will continue to firm up as they cool.
- Presentation is Key: For an elegant touch, dust the cooled cookies with powdered sugar and serve them on a beautiful platter adorned with fresh blueberries for a pop of color.

Variations
Substituting Ingredients
You can easily adapt this recipe to fit your needs.
– Gluten-free flour options: Use a 1:1 gluten-free flour blend. It works well.
– Dairy-free alternatives for cream cheese: Try using vegan cream cheese. It keeps the texture creamy.
Flavor Enhancements
Want to kick up the flavor? Here are some great ideas.
– Adding lemon zest or almond extract: A teaspoon of lemon zest adds brightness. Almond extract gives a warm, nutty taste.
– Mixing in other fruits like raspberries: Raspberries pair well with blueberries. They add a nice tartness to your cookies.
Adjusting for Seasonal Ingredients
You can enjoy these cookies all year round by using seasonal ingredients.
– Using frozen blueberries: Frozen blueberries work great. They save time and still taste yummy.
– Incorporating spices based on seasons: Add cinnamon in fall or nutmeg during winter for a cozy twist.
Storage Info
How to Store Cookies
To keep your Blueberry Cheesecake Swirl Cookies fresh, let them cool first. Place them on a wire rack to cool completely. Once cool, store the cookies in an airtight container. This will help keep them soft and tasty. You can keep them at room temperature for up to a week. If you want to keep them longer, consider freezing them.
Freezing Blueberry Cheesecake Swirl Cookies
Freezing these cookies is easy. First, let them cool completely. Next, place the cookies in a single layer on a baking sheet. Freeze them for about an hour. Once they are frozen, move them to a freezer bag. Make sure to remove as much air as you can. Seal the bag tightly. These cookies can stay frozen for up to three months. When you’re ready to eat one, let it thaw at room temperature.
Shelf Life of Cookies
For the best taste, eat your cookies within a week if stored at room temperature. They will taste best when fresh. If stored in the freezer, they can last for up to three months without losing flavor. Always check for any signs of freezer burn or changes in texture before eating. This ensures you enjoy every bite of your delicious cookies.
FAQs
What can I use instead of fresh blueberries?
If you don’t have fresh blueberries, you can use dried blueberries or blueberry preserves. Dried blueberries add a nice chewiness to your cookies. They also work well if you chop them into smaller pieces. Blueberry preserves can add extra sweetness and moisture. Swirl it into the dough for a tasty twist.
How do I know when the cookies are done?
You’ll know the cookies are done when the edges turn lightly golden. The centers should look set but not dry. A good test is to gently press the center with your finger. If it springs back, your cookies are ready. Trust your sense of smell too; they should smell sweet and delicious!
Can these cookies be made ahead of time?
Yes, you can make these cookies ahead of time. Prepare the cookie dough and chill it in the fridge for up to two days. This helps the flavors blend well. When you are ready, scoop the dough onto the baking sheet and bake. You can also bake the cookies and store them in an airtight container for up to a week.
These blueberry cheesecake swirl cookies are a tasty treat. We covered the key ingredients, step-by-step instructions, and helpful tips. You learned about variations, storage methods, and answers to common questions.
Try these cookies with your personal touch. Whether you choose to add zest or substitute ingredients, the results will be delicious. Enjoy baking and sharing these sweet delights with friends and famil

Blueberry Cheesecake Swirl Cookies
Ingredients
- 1 cup all-purpose flour
- 1/2 teaspoon baking soda
- 1/4 teaspoon salt
- 1/4 cup unsalted butter, softened
- 1/4 cup cream cheese, softened
- 1/2 cup granulated sugar
- 1/2 teaspoon vanilla extract
- 1 large egg
- 1/2 cup fresh blueberries
- 1 tablespoon lemon juice
- 2 tablespoons powdered sugar (for blueberry swirl)
Instructions
- Preheat your oven to 350°F (175°C) and line a baking sheet with parchment paper.
- In a medium-sized bowl, sift together the all-purpose flour, baking soda, and salt.
- In a large mixing bowl, combine the softened butter and cream cheese with the granulated sugar. Beat until light and fluffy.
- Crack the egg into the bowl, followed by the vanilla extract. Mix until smooth.
- Gradually incorporate the dry flour mixture into the wet ingredients, stirring gently until just combined.
- In a separate bowl, combine fresh blueberries with lemon juice and powdered sugar. Mash gently to create a chunky sauce.
- Fold half of the blueberry mixture into the cookie dough, ensuring it’s swirled but not fully combined.
- Scoop portions of the cookie dough onto the prepared baking sheet, leaving space between each mound.
- Dollop the remaining blueberry mixture on top of each cookie dough mound and lightly swirl it in.
- Bake for 10-12 minutes, or until the edges are lightly golden and the centers appear set.
- Allow the cookies to cool on the baking sheet for about 5 minutes, then transfer to a wire rack to cool completely.


. Enjoy mixing these ingredients for an easy and delicious treat! Start by placing the softened cream cheese and cookie butter into a mixing bowl. Use an electric mixer to beat them together on medium speed. You want the mixture to be smooth and creamy. This base creates a rich and tasty dip. Next, add the pumpkin puree to the bowl. Blend everything together on low speed. This helps to combine the flavors well. You should see a uniform texture. Gradually sift in the powdered sugar. Add it in small amounts to avoid lumps. Mix after each addition until fully incorporated. This step ensures your dip is just sweet enough without being overpowering. Now, stir in the vanilla extract, ground cinnamon, nutmeg, ginger powder, and a pinch of salt. Mixing these ingredients together makes the dip fragrant and flavorful. Keep blending until everything is well combined. Taste your dip. If you want it sweeter or spicier, adjust it to your liking. You can add a bit more powdered sugar or spices. Blend again until mixed well. Finally, scoop the dip into a serving bowl. Cover it with plastic wrap. Place it in the fridge for at least 30 minutes. Chilling enhances the flavors and makes it even better. For the full recipe, check out the details provided earlier. Softened cream cheese is key. It makes mixing easy and helps avoid lumps. If your cream cheese is cold, it won’t blend well. Leave it out for about 30 minutes before you start. When you mix, use an electric mixer on medium speed. This helps create a smooth and creamy dip. To prevent lumps, combine the cream cheese and cookie butter first. Mix until the texture is silky. Then, add the pumpkin puree slowly. Mixing on low speed at this stage helps keep the dip smooth. You might want to tweak the sweetness. If you like it sweeter, add more powdered sugar. Remember to mix well each time you add sugar. Taste as you go! Spices can also be adjusted. If you love cinnamon, add a bit more. For a spicy kick, try adding more ginger. Personalizing the flavors makes the dip your own. Serving bowl choice matters. Use a fall-themed bowl to match the season. It makes your dip look festive. For a fun twist, try a bowl with patterns or colors that pop. When arranging dippers, think about color and texture. Place ginger snaps on one side and apple slices on the other. This contrast creates a beautiful display. For a touch of elegance, use the back of a spoon to swirl the dip. This simple detail makes the dip look gourmet. For the complete recipe, check out the Full Recipe. {{image_4}} You can make Cookie Butter Pumpkin Dip even more exciting with different flavors. Adding extra spices can really enhance the taste. Try a dash of allspice or cloves for a warm kick. If you want a sweeter note, a bit of brown sugar will do the trick. You can also add a splash of maple syrup for a rich flavor. Seasonal flavors can change the game too. Consider mixing in some finely chopped cranberries or pecans for texture. These add a nice crunch and a burst of flavor. You can also fold in some caramel sauce for a sweet twist. Each of these suggestions creates a unique dip that is fun to explore. When it comes to dipping, the options are endless! For a healthy twist, try fresh vegetable sticks like carrots or celery. These add a nice crunch and balance the sweet dip. You can also use rice cakes for a low-calorie choice. For sweet pairings, think about using pretzels or graham crackers. Their saltiness pairs well with the dip’s sweetness. You might even enjoy chocolate-covered strawberries for a fun treat. Mixing sweet and savory dippers creates a fun tasting experience. If you have dietary needs, there are great options! For gluten-free dippers, use apple slices or gluten-free cookies. These are tasty and safe for everyone. You can also swap in gluten-free graham crackers for a sweet treat. For a vegan version, use dairy-free cream cheese. Many brands offer great options that taste just as good. You can also use coconut whipped cream instead of regular cream cheese. These swaps keep the dip creamy and delicious, while fitting various diets. For the full recipe, check out the Cookie Butter Pumpkin Dip recipe to create your own delightful version! To store your leftover Cookie Butter Pumpkin Dip, place it in an airtight container. This keeps it fresh and prevents it from absorbing other fridge smells. Use a glass or plastic container with a tight lid for the best results. Make sure to let the dip cool to room temperature before sealing it. This helps avoid condensation inside the container. If you want to save some dip for later, freezing works well. First, scoop the dip into a freezer-safe container. Leave some space at the top, as the dip may expand when frozen. Seal it tightly and label it with the date. To thaw, move it to the fridge for several hours or overnight before you serve it again. Stir well after thawing to restore the smooth texture. In the fridge, your dip can last about four to five days. Look for any changes in color or smell as signs of spoilage. If it has a watery layer on top or smells off, it's best to toss it. Enjoy this dip while it’s fresh for the best taste! Yes, you can make this dip ahead of time. Just prepare the dip and place it in a bowl. Cover it tightly with plastic wrap or a lid. Store it in the fridge for up to two days. This allows the flavors to blend well. It also makes your party prep easier. Just remember to give it a good stir before serving. If you need a substitute for cookie butter, try sunflower seed butter or almond butter. They add a nutty flavor. For a sweet touch, mix in some brown sugar or maple syrup. These options are great for those with nut allergies. Each choice will give the dip a unique twist! You can serve the dip warm if you prefer. To heat it, place the dip in a microwave-safe bowl. Heat it in short bursts, stirring in between. This helps keep the texture smooth. Warm dip pairs well with dippers like pretzels or warm bread. The best dippers include: - Ginger snaps - Apple slices - Graham crackers - Soft pretzels - Carrot sticks These options bring a nice mix of flavors and textures. You can even try cookies or biscotti for a fun twist! This dip is perfect for parties! It serves about 6 to 8 people. You can easily double the recipe for larger gatherings. Guests love the creamy texture and sweet flavor. Arrange the dip with a variety of dippers for a colorful spread. This will please any crowd! For the full recipe, check out the earlier sections. This dip brings great flavors and fun for everyone. By mixing pumpkin, cookie butter, and spices, you create a delicious treat. Remember to chill for the best taste. Get creative with dippers and toppings to impress your guests. Explore variations and alternatives based on your needs. With easy storage tips, you can enjoy this dip later. Now, you're ready to delight friends and family at any gathering!](https://joymealplan.com/wp-content/uploads/2025/07/ca44b838-8d60-4193-b164-21c1eb441ebf-768x768.webp)

