Boston Baked Cod Simple and Flavorful Recipe

If you’re craving a dish that’s both simple and bursting with flavor, Boston Baked Cod is your answer. This recipe combines tender cod fillets with a crispy breadcrumb topping, making it a perfect meal for any night. I’ll guide you step-by-step, revealing easy tips to elevate your dish. Ready to impress your family? Let’s dive into this delicious recipe that brings the taste of Boston to your table!
Why I Love This Recipe
- Fresh Ingredients: This recipe highlights the use of fresh cod and vibrant lemon, making each bite a burst of flavor.
- Easy to Prepare: With just a few simple steps, you can have a delicious meal ready in under 30 minutes.
- Crispy Topping: The breadcrumb and Parmesan crust creates a delightful texture contrast with the tender fish beneath.
- Versatile Serving Options: This dish pairs beautifully with a variety of sides, from salads to roasted veggies, enhancing its meal appeal.
Ingredients
List of Ingredients
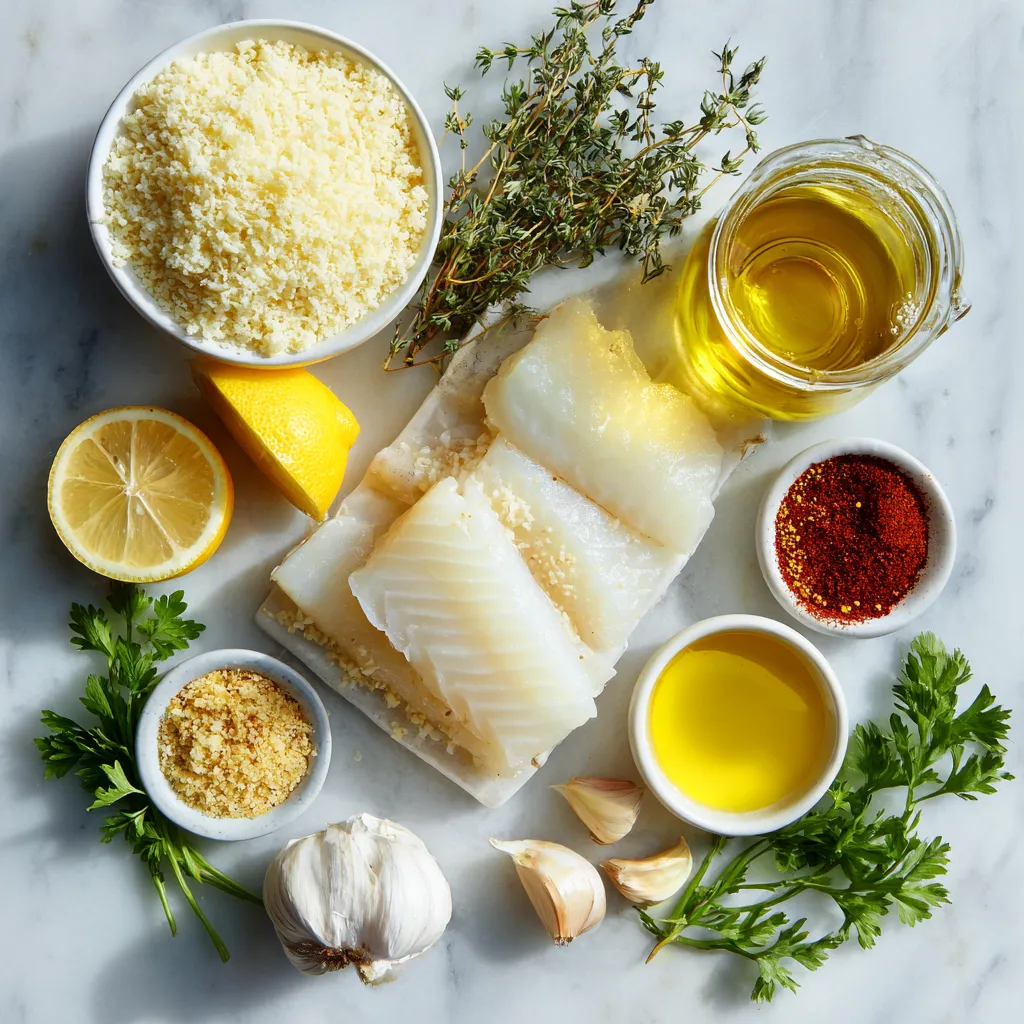
– 4 cod fillets (approximately 6 oz each)
– 1 cup soft breadcrumbs (preferably freshly made for the best texture)
– 1/4 cup finely grated Parmesan cheese
– 2 tablespoons unsalted butter, melted for richness
– 2 tablespoons extra virgin olive oil for flavor
– Zest and juice of 1 fresh lemon, to brighten the dish
– 2 cloves garlic, minced for aromatic depth
– 1 teaspoon dried thyme, or 1 tablespoon fresh thyme if available
– 1 teaspoon paprika for a hint of smokiness
– Salt and freshly ground black pepper, to taste
– Fresh parsley, chopped, for a vibrant garnish
When I cook Boston baked cod, I choose fresh ingredients. The cod fillets should be firm and bright. Fresh breadcrumbs deliver a texture that makes a big difference. I like to use freshly grated Parmesan for the best flavor.
Lemon adds a bright touch. I use both the zest and juice to really elevate the dish. Garlic brings in a wonderful aroma. Thyme adds a lovely earthiness. A dash of paprika gives it a nice smoky flavor.
I also ensure I have butter and olive oil on hand. Butter adds richness, while olive oil adds depth. Finally, I always keep fresh parsley ready. It enhances the dish’s color and freshness when I serve it.
This simple list of ingredients creates a dish that is both tasty and beautiful. I love sharing this recipe with friends and family. It’s easy to make and perfect for any occasion!

Step-by-Step Instructions
Preparing the Oven and Baking Dish
First, you need to preheat your oven to 400°F (200°C). This step is key for a great bake. While the oven heats, take a baking dish and grease it lightly. This helps the cod not stick and makes cleaning easier later.
Mixing the Breadcrumb Topping
Next, grab a medium bowl. In this bowl, combine the following ingredients:
– 1 cup soft breadcrumbs
– 1/4 cup finely grated Parmesan cheese
– 2 tablespoons melted unsalted butter
– 2 tablespoons extra virgin olive oil
– Zest and juice of 1 fresh lemon
– 2 cloves minced garlic
– 1 teaspoon dried thyme
– 1 teaspoon paprika
– Salt and freshly ground black pepper to taste
Mix everything well until the breadcrumbs are moist and hold together. You want a texture that is light but not dry.
Arranging and Baking the Cod
Now it’s time to arrange the cod. Place your four cod fillets in the greased dish. Make sure they have space between them for even cooking. Squeeze fresh lemon juice over each fillet, then sprinkle them with salt and pepper. This adds flavor. Next, take your breadcrumb mixture and spoon it over the cod. Press it down gently to form a nice crust.
Baking Process
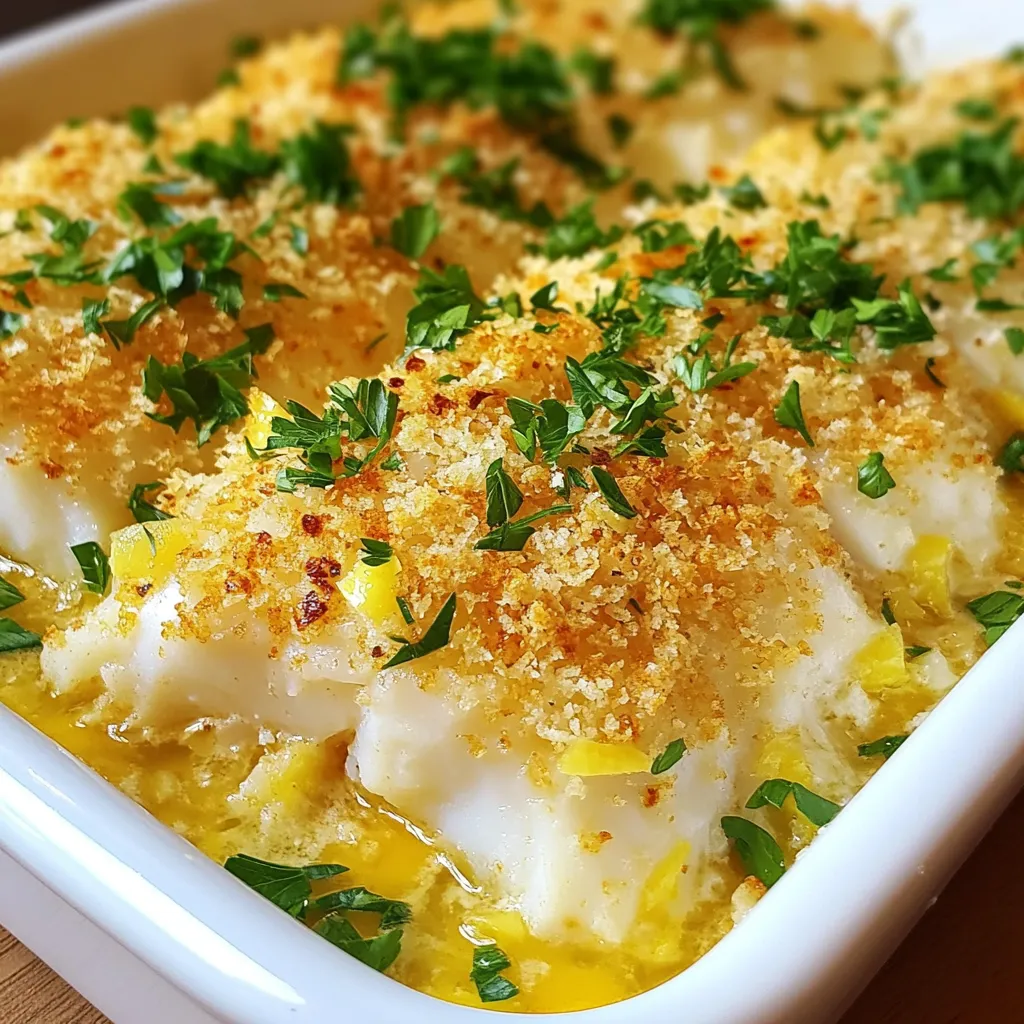
Put the baking dish in the preheated oven. Bake for about 15 to 20 minutes. Your cod is done when it turns opaque and flakes easily with a fork. The breadcrumb topping should be golden brown and crispy. Once baked, let it rest for a few minutes before serving. This helps the flavors settle nicely.
Tips & Tricks
Choosing the Right Cod
When you pick cod, fresh is best. Fresh cod should have a mild scent of the sea. Look for firm, moist fillets. The flesh should be bright white and translucent. If you choose frozen cod, check for no ice crystals. Ice can mean it was thawed and refrozen. Always check the label for quality markers.
Enhancing Flavor
To spice up your cod, consider adding more herbs. Fresh dill or parsley works great. You can also try a pinch of cayenne for heat. If you love citrus, add more lemon zest. A splash of white wine before baking can add depth too. Don’t shy away from experimenting; your taste buds will thank you!
Perfecting the Breadcrumb Topping
For a crispy crust, use fresh breadcrumbs. They hold moisture better and crisp up nicely. You can toast them lightly in a pan first for added crunch. If you want a twist, try panko breadcrumbs. They are larger and create a lighter texture. Mixing in some crushed nuts can add a delightful crunch as well.
Pro Tips
- Fresh Fish is Best: Always choose the freshest cod available for optimal flavor and texture. Look for clear, bright eyes and firm flesh when selecting your fillets.
- Breadcrumb Tips: For an even crunchier topping, consider toasting the breadcrumbs lightly in a skillet before mixing with the other ingredients. This adds an extra layer of flavor!
- Season Generously: Don’t skimp on seasoning the cod fillets. A good pinch of salt and pepper enhances the natural flavors of the fish and complements the breadcrumb topping.
- Serving Suggestions: Pair your baked cod with a light, citrusy salad or roasted asparagus for a fresh, balanced meal. A drizzle of additional lemon juice just before serving can brighten the dish even more.

Variations
Different Fish Substitutions
You can use other fish in this recipe. Haddock is a great choice. It has a light, flaky texture and mild flavor. Tilapia also works well. It’s affordable and easy to find. Both options give a similar taste to cod. You can even try salmon for a richer flavor. Each fish brings its unique twist to this dish.
Dietary Modifications
If you need gluten-free options, use gluten-free breadcrumbs. Many brands offer this choice. You can also make your own using gluten-free bread. For lower fat, substitute butter with olive oil. You can use less oil if you like. These swaps keep the dish delicious while fitting your needs.
Flavor Profile Changes
To change the flavor, think about adding capers or sun-dried tomatoes. Capers add a briny taste, while sun-dried tomatoes give a rich sweetness. You can also try different cheeses. Feta or goat cheese can offer a tangy twist. Each addition creates a new taste experience, making your baked cod fun and exciting.
Storage Info
Leftovers Storage
To store leftover baked cod, let it cool first. Place the cod in an airtight container. Use parchment paper between layers if stacking. This keeps the fish fresh and prevents sticking. Store in the fridge for up to three days. For best taste, eat it within 24 hours.
Reheating Tips
When reheating, keep the cod moist. You can use the oven or a skillet. To reheat in the oven, set it to 350°F (175°C). Cover the cod with foil to avoid drying out. Heat for about 10 minutes or until warm. If using a skillet, add a splash of water. Cover and heat over medium heat for about 5 minutes. This helps keep the fish tender and juicy.
FAQs
How long to bake Boston Baked Cod?
Bake Boston Baked Cod for about 15 to 20 minutes at 400°F (200°C). The fish should become opaque and flake easily with a fork. The topping should be golden brown and crispy. This time ensures that the cod cooks perfectly, keeping it moist and flavorful.
Can I use dried herbs instead of fresh?
Yes, you can use dried herbs instead of fresh. Dried thyme works well, but use less—about one teaspoon. Fresh herbs have more flavor, so adjust the amounts if you switch. Dried herbs can enhance the taste, but fresh gives a brighter note to your dish.
Is Boston Baked Cod healthy?
Boston Baked Cod is a healthy meal choice. Cod is low in calories and high in protein. The recipe uses olive oil and lemon, which are good for your heart. The dish also includes garlic and fresh herbs, adding flavor without extra calories. This makes it a smart option for many diets.
What to serve with Boston Baked Cod?
Serve Boston Baked Cod with roasted vegetables for a colorful plate. A fresh green salad pairs nicely too. You can also add rice or quinoa for extra texture. A lemon wedge on the side brightens up the meal, enhancing the fish’s flavors. Enjoy your meal!
This blog post showed how to prepare delicious Boston Baked Cod. We covered the key ingredients, step-by-step instructions, and helpful tips. You learned about choosing quality cod, enhancing flavor, and making the perfect breadcrumb topping. Remember, you can try different fish or modify for dietary needs. Storing and reheating leftovers was also discussed, ensuring taste and freshness. This dish is easy, tasty, and can impress anyone at the table. Enjoy baking and making this healthy meal a part of your routin

Boston Baked Cod Delight
Ingredients
- 4 fillets cod fillets (approximately 6 oz each)
- 1 cup soft breadcrumbs
- 0.25 cup finely grated Parmesan cheese
- 2 tablespoons unsalted butter, melted
- 2 tablespoons extra virgin olive oil
- 1 whole fresh lemon (zest and juice)
- 2 cloves garlic, minced
- 1 teaspoon dried thyme
- 1 teaspoon paprika
- to taste salt
- to taste freshly ground black pepper
- for garnish fresh parsley, chopped
Instructions
- Begin by preheating your oven to 400°F (200°C) to ensure it’s hot enough for perfect baking.
- In a medium mixing bowl, combine the soft breadcrumbs, grated Parmesan cheese, melted butter, olive oil, lemon zest, minced garlic, dried thyme, paprika, and a generous pinch of salt and black pepper. Stir thoroughly until the breadcrumb mixture is uniformly moist and cohesive.
- Arrange the cod fillets in a lightly greased baking dish, ensuring they are evenly spaced for optimal cooking. Squeeze fresh lemon juice over each fillet for a zesty kick, followed by a sprinkle of salt and pepper to season them well.
- Take the breadcrumb mixture and generously spoon it over the top of each cod fillet, pressing down gently to secure it in place and create a flavorful crust.
- Place the baking dish into the preheated oven and bake for approximately 15-20 minutes. You'll know it's ready when the cod is opaque and flakes easily with a fork, and the topping is beautifully golden brown and crispy.
- Once baked to perfection, remove the dish from the oven and let it rest for a few minutes to allow the flavors to settle. Just before serving, garnish with freshly chopped parsley for a pop of color and freshness.


![- 1 pound boneless chicken thighs, cut into bite-sized pieces - 1 cup all-purpose flour - 2 large eggs, beaten - 1 cup panko breadcrumbs - 1 cup freshly squeezed orange juice - Zest of 1 medium orange - 1/4 cup honey - 2 tablespoons soy sauce - Salt and freshly ground pepper to taste - Oil for frying - 1 tablespoon cornstarch I love using chicken thighs for this dish. They stay juicy and tender. The all-purpose flour creates a great base for the breading. Beating the eggs helps the breadcrumbs stick. Panko breadcrumbs give that extra crunch. For the orange sauce, fresh juice is the best choice. It gives a bright flavor. The zest adds even more orange goodness. Honey brings a nice sweetness. Low-sodium soy sauce keeps the salt level balanced. Don’t forget the salt and pepper! They enhance the chicken's taste. Oil is key for frying; it makes everything crispy. Cornstarch helps thicken the sauce so it coats the chicken well. If you want the full recipe, you can find it above. Enjoy making this dish! First, season the chicken pieces with salt and pepper. This adds flavor and enhances the dish. Next, create a breading station. Set up three bowls: one with all-purpose flour, another with beaten eggs, and the last with panko breadcrumbs mixed with cornstarch. The cornstarch adds extra crispiness to the coating. Now it's time for the fun part. Take a piece of chicken and dredge it in the flour. Make sure to shake off any extra flour. After that, dip it into the beaten eggs, ensuring it is fully coated. Then roll the chicken in the panko breadcrumbs. Press gently to help the crumbs stick. Place the breaded chicken on a wire rack to rest for at least ten minutes. This resting time is crucial. It helps the coating stay on during frying. In a medium saucepan, pour in the fresh orange juice. Then add the orange zest, honey, soy sauce, rice vinegar, minced ginger, and minced garlic. Stir everything together. Heat the pan over medium heat until it simmers. This allows the flavors to blend nicely. To thicken the sauce, stir in the cornstarch mixed with cold water. Keep stirring for two to three minutes. You'll notice the sauce thickens and gets shiny. Once it's just right, remove the saucepan from heat. Set the orange sauce aside for later. For the complete recipe, check out the [Full Recipe]. To get that perfect crispy texture, start by picking the right frying oil. Use oils with high smoke points like canola or peanut oil. These oils can handle high heat without burning. Double frying is also key. After the first fry, let the chicken rest. Then, fry it again for a few minutes. This makes the chicken extra crunchy. When it comes to orange juice, always choose fresh over bottled. Fresh juice has a bright taste that really shines. Adding orange zest gives your dish an extra zing. Zest is the outer peel of the orange. It holds a lot of flavor, so don’t skip it! For garnishes, sesame seeds and chopped green onions are great choices. They add color and a nice crunch. Pair your crispy orange chicken with steamed rice or stir-fried veggies. These sides balance the dish and make it even more satisfying. For the full recipe, check out the details above! {{image_4}} You can bake the chicken instead of frying it. Baking reduces oil and calories. To bake, coat the chicken as usual, then place it on a lined baking sheet. Bake at 400°F for about 20-25 minutes. This method gives a crispy texture without frying. Adjust the sauce for a low-sodium option. Use low-sodium soy sauce to cut the salt. This change keeps the flavor but makes it healthier. You can use tofu or shrimp instead of chicken. For tofu, press it to remove moisture, then cut it into cubes. Coat and cook it the same way as chicken. Shrimp cooks quickly, so reduce the frying time to 2-3 minutes until they turn pink. For vegetarians, replace chicken with veggies. Bell peppers, broccoli, or snap peas work well. Coat these in the same way and fry until crispy. Want some heat? Add chili flakes or hot sauce to the orange sauce. Start with a teaspoon and adjust to your taste. You can also use different peppers. Try jalapeños or serranos for a fresh kick. These peppers add flavor and heat to the dish. To keep your crispy orange chicken fresh, refrigerate it promptly. Place the chicken in an airtight container. This method helps prevent moisture loss and keeps the chicken tasty. Make sure to cool the chicken to room temperature before sealing. This step avoids condensation that can make the chicken soggy. When it’s time to enjoy leftovers, you have two main options: oven or microwave. The oven is best for keeping the chicken crispy. Preheat it to 350°F (175°C). Spread the chicken on a baking sheet and heat for about 10-15 minutes. For a quicker method, use the microwave but be cautious. Heat in short bursts to prevent sogginess. If you choose this method, you can add a paper towel on top to absorb moisture. Freezing is a great option for long-term storage. To freeze, first allow the chicken to cool completely. Then place it in a freezer-safe bag or container. Remove as much air as possible to avoid freezer burn. The chicken stays good for about 2-3 months. When you're ready to eat it, thaw in the fridge overnight. Reheat as mentioned above for the best results. Yes, you can use chicken breast. However, thighs have more fat. This fat gives extra flavor. Chicken thighs stay juicy, while breasts can dry out. If you use breasts, be careful not to overcook them. They cook faster than thighs. To thicken the sauce, add more cornstarch. Mix one tablespoon of cornstarch with two tablespoons of cold water. Stir this mixture into the sauce while it simmers. Cook for a few minutes until thick. For a thinner sauce, add more orange juice or water. Just remember to adjust the flavor as needed. You can use maple syrup or agave nectar instead of honey. Brown sugar is another option. If you want a sugar-free choice, try stevia or monk fruit sweetener. These alternatives change the taste slightly, but they work. Yes, you can make it ahead. Cook the chicken and sauce separately. Store them in the fridge in airtight containers. When you’re ready to eat, reheat the chicken in the oven. This keeps it crispy. Then, heat the sauce on the stove. Toss them together just before serving. Crispy Orange Chicken is a popular dish in Chinese-American cuisine. It combines sweet and savory flavors. The dish likely came from Hunan cuisine, which uses oranges in cooking. It gained fame in the U.S. in the 1980s. Many enjoy its crunchy texture and bright taste. This blog post covered the key steps to making Crispy Orange Chicken. We discussed the main ingredients, such as chicken, flour, and a tasty orange sauce. I shared tips to achieve a crispy texture and offered serving ideas. You learned about healthier options and variations like spicy orange chicken. Proper storage and reheating tips were also included for your convenience. In summary, this dish is fun to make and enjoy. Don't hesitate to get creative with flavors and substitutions. Happy cooking!](https://joymealplan.com/wp-content/uploads/2025/06/e5d29336-8dbd-4ed1-97b7-adaf34762187-768x768.webp)


![- 1 lb boneless, skinless chicken breasts - 2 bell peppers (red and green) - 1 medium yellow onion - Olive oil and spices The main ingredients are simple yet flavorful. I use boneless, skinless chicken breasts because they cook evenly. Bell peppers add color and sweetness, while the onion provides a tasty base. Olive oil helps the spices stick and adds richness. - Chili powder - Ground cumin - Garlic powder - Smoked paprika - Onion powder The seasoning blend makes this dish special. Chili powder gives a nice kick. Ground cumin adds warmth, while garlic and onion powders boost the flavor. Smoked paprika brings depth with its smoky taste. - Flour tortillas - Fresh cilantro - Lime wedges for serving To enjoy the fajitas, I use small flour tortillas that hold the filling well. Fresh cilantro adds a bright touch, and lime wedges bring a zesty finish. These extras make the meal even better. For the full recipe, check out the [Full Recipe]. - Set the oven to 425°F (220°C). - Line a sheet pan with parchment paper. - In a bowl, whisk together olive oil and spices. - Coat the chicken with the marinade well. - Add the sliced bell peppers and onion to the chicken. - Spread the mixture evenly across the sheet pan. - Bake for 20-25 minutes, stirring halfway through. This recipe makes it easy to prepare a tasty meal. You can enjoy it with warm tortillas. For the full recipe, check out the details provided earlier. To make the best sheet pan chicken fajitas, marinate the chicken longer if you can. Letting it soak in flavors for more time makes a big difference. A meat thermometer is also very handy. It helps you check if your chicken is fully cooked. Aim for 165°F (74°C) for safety. A fajita bar is a fun way to serve these. Lay out all the toppings for everyone to enjoy. Think about adding sour cream, salsa, or guacamole. To warm the tortillas, heat them in a dry skillet for about 30 seconds on each side. You can also wrap them in foil and place them in the oven for the last five minutes of cooking. Make your presentation pop with colorful toppings. Fresh avocado, diced tomatoes, and shredded cheese can make your dish look great. Don't forget to garnish with lime wedges and cilantro. These small touches bring out the flavors and make the dish more inviting. Enjoy the full recipe for more details on how to create this tasty meal! {{image_4}} You can switch the chicken for shrimp or tofu. Shrimp cooks fast and adds a nice flavor. Tofu is great for a plant-based option. If you want to use chicken, try different cuts like thighs. Thighs are juicy and full of flavor. If you want a meatless meal, replace chicken with mixed vegetables. Bell peppers, zucchini, and corn work well. Add beans for protein. Black beans or pinto beans add creaminess and taste. This keeps your meal hearty and filling. Want to spice things up? Add jalapeños for heat. They bring a nice kick that many love. You can also mix in different herbs and spices. Try oregano, cilantro, or smoked paprika for variety. Each adds unique flavors to your dish. Explore these options to find your favorite twist on this recipe! For the full recipe, check the link. After you enjoy your sheet pan chicken fajitas, store any leftovers in an airtight container. This keeps the flavors fresh. You can refrigerate them for up to 3 days. Make sure to let them cool before sealing to avoid steam buildup. To freeze the fajita mix, place it in a freezer-safe bag or container. Remove as much air as possible to prevent freezer burn. You can keep it frozen for up to 3 months. For thawing, move it to the fridge overnight. If you're in a hurry, use the microwave's defrost setting. To reheat without drying out your fajitas, use the oven. Preheat it to 350°F (175°C) and warm the fajitas in a covered dish for about 10-15 minutes. You can also use a skillet over low heat, adding a splash of water to create steam. This keeps everything juicy. Get creative with leftovers! Use them in tacos, wraps, or salads for a quick meal. You can even mix them into scrambled eggs for a tasty breakfast. For the full recipe, check it out above. Yes, you can use frozen chicken for this recipe. Just follow these guidelines: - Thawing: Always thaw the chicken before marinating. You can do this overnight in the fridge or use the microwave's defrost setting. - Cooking Time: If you skip thawing and bake from frozen, increase the cooking time by 5-10 minutes. - Check Doneness: Use a meat thermometer to ensure the chicken reaches 165°F (74°C). There are many tasty sides to pair with your fajitas. Here are some great options: - Rice: Cilantro lime rice adds a fresh touch. - Beans: Black beans or refried beans are both hearty and flavorful. - Salad: A simple green salad with lime vinaigrette complements the fajitas well. - Chips and Salsa: Serve with tortilla chips and your favorite salsa for a crunchy side. Want extra heat? Here are some tips to spice up your fajitas: - Add Jalapeños: Sliced fresh jalapeños can give a nice kick. - Use Hot Sauce: Drizzle your favorite hot sauce over the fajitas before serving. - Increase Spice Mix: Add more chili powder or a pinch of cayenne pepper to the marinade for more heat. For the complete recipe, check the Full Recipe section. In this blog post, we covered a tasty sheet pan chicken fajitas recipe. You learned about the key ingredients and how to prepare them. I shared tips to make your fajitas perfect, including variations for different diets. Storing leftovers and reheating them properly helps reduce waste. Remember, these fajitas are easy to customize and fun to serve. Enjoy making them with family or friends, and let your creativity shine. Your next meal can be delicious and simple!](https://joymealplan.com/wp-content/uploads/2025/06/bce38261-6b1a-4600-b2d8-c9c563997242-768x768.webp)

