Buffalo Cauliflower Bites Flavorful and Crispy Snack

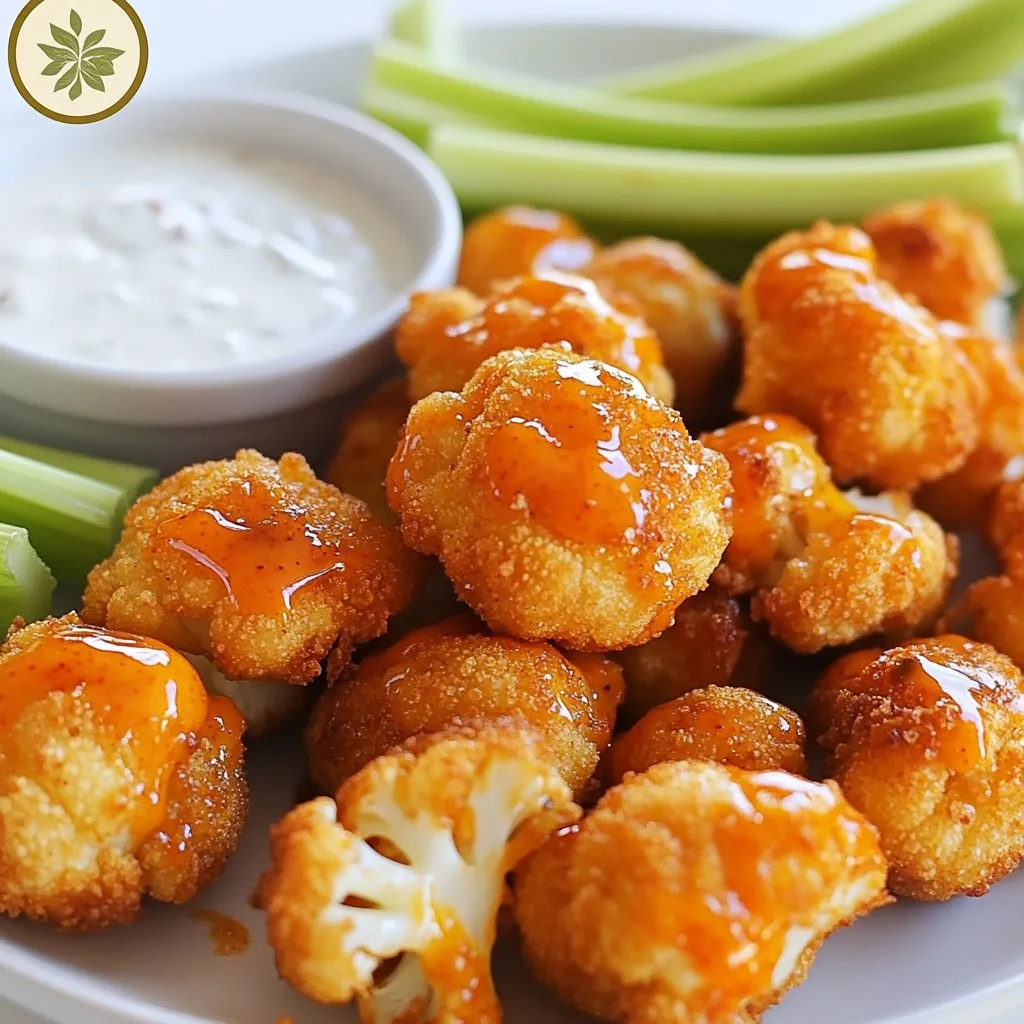
Looking for a bold snack that’s both tasty and fun to make? Buffalo cauliflower bites are your answer. They offer the classic wing flavor without the meat, so everyone can enjoy them. In this guide, I’ll show you how to prepare crispy, flavorful bites that stand out. Get ready to impress your friends and family with this quick, healthy appetizer that’s perfect for any gathering!
Why I Love This Recipe
- Healthy Alternative: These buffalo cauliflower bites are a guilt-free way to enjoy a classic favorite without the extra calories of chicken wings.
- Easy to Make: This recipe requires minimal ingredients and steps, making it perfect for busy weeknights or last-minute gatherings.
- Flavor Packed: With the perfect blend of spices and the kick of buffalo sauce, these bites are sure to satisfy your taste buds.
- Versatile Serving Options: Serve them as an appetizer, snack, or even a main dish paired with veggies and dipping sauces for a complete meal.
Ingredients
Complete list of ingredients
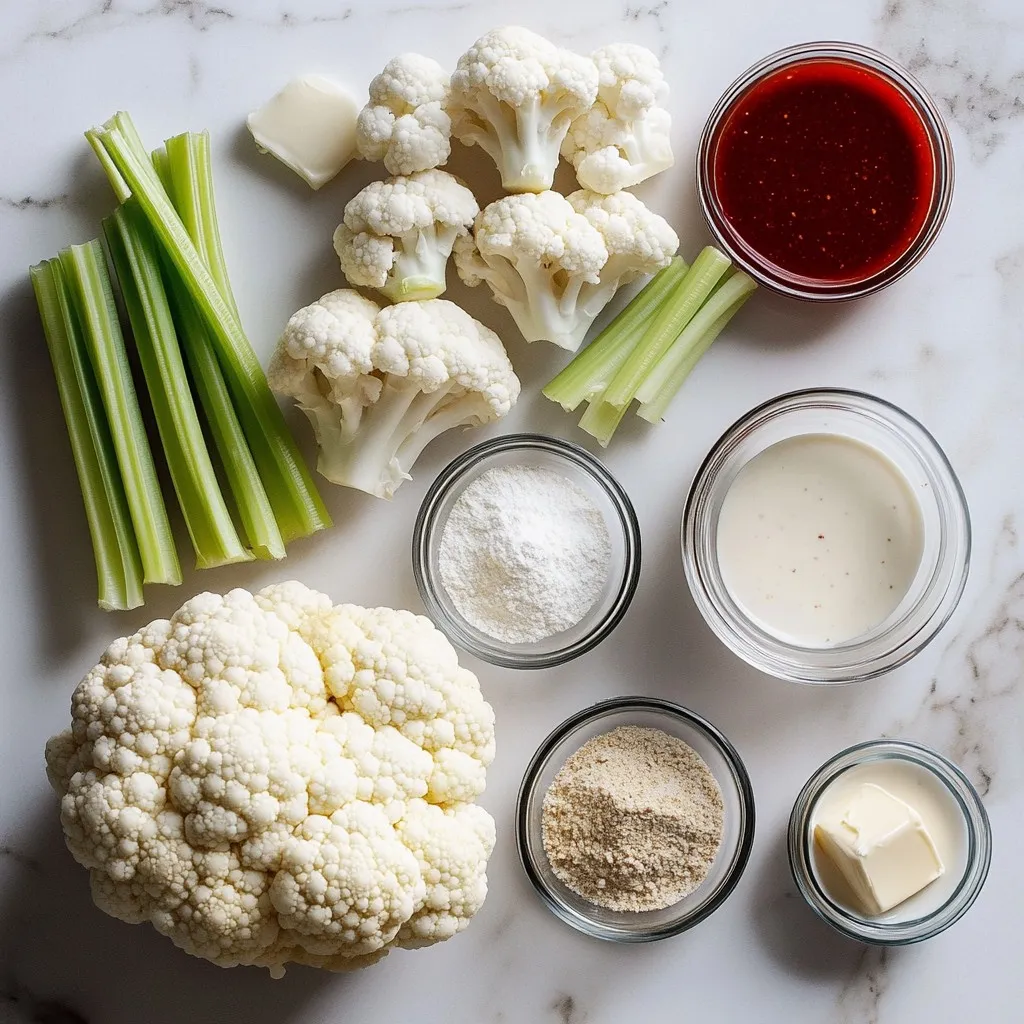
To make tasty buffalo cauliflower bites, gather these ingredients:
– 1 large head of cauliflower, cut into bite-sized florets
– 1 cup all-purpose flour
– 1 cup water
– 1 teaspoon garlic powder
– 1 teaspoon onion powder
– 1 teaspoon smoked paprika
– 1 teaspoon salt
– 1/2 teaspoon freshly ground black pepper
– 1 cup buffalo sauce (store-bought or homemade)
– 2 tablespoons unsalted butter, melted
– Fresh celery sticks and ranch dressing for serving (optional)
Optional ingredients for customization
You can add your own twist with these optional ingredients:
– Extra spices like cayenne pepper for heat
– Nutritional yeast for a cheesy taste
– Fresh herbs like parsley for garnish
– Different sauces like BBQ or teriyaki for a unique flavor
Recommended brands for buffalo sauce
Choosing the right buffalo sauce can elevate your dish. Here are some trusted brands:
– Frank’s RedHot Original Cayenne Pepper Sauce
– Crystal Hot Sauce
– Tabasco Buffalo Sauce
– Louisiana Hot Sauce
These brands offer great flavor and heat, perfect for your bites.

Step-by-Step Instructions
Preheating the oven
First, you need to preheat the oven to 450°F (230°C). This high heat helps the bites get crispy. While waiting, line a baking sheet with parchment paper. This makes cleanup easy and keeps the bites from sticking.
Preparing the batter
In a large bowl, mix together the flour, water, garlic powder, onion powder, smoked paprika, salt, and black pepper. Whisk these ingredients until the batter is smooth. You want a consistency that coats the cauliflower well.
Coating the cauliflower bites
Next, take each cauliflower floret and dip it into the batter. Make sure to cover it fully. Let any extra batter drip off. Place the coated florets in a single layer on the lined baking sheet. Space them out to allow for even cooking.
Baking instructions
Now, put the baking sheet in the oven. Bake the cauliflower bites for about 20 minutes. Look for them to turn golden brown and feel crispy to the touch.
Preparing and applying buffalo sauce
While the cauliflower bakes, make the buffalo sauce. In another bowl, combine the buffalo sauce and melted butter. Mix these together until they blend well. This adds flavor and richness to your bites.
Final baking process
After 20 minutes, take the baking sheet out of the oven. Drizzle the buffalo sauce over the cauliflower. Use a spatula or tongs to toss them gently, ensuring each bite is coated. Return the baking sheet to the oven for another 10-15 minutes. This helps the sauce thicken and stick, making them even tastier.
Tips & Tricks
Best practices for a crispy texture
To get the best crispy texture, use a hot oven. Preheat your oven to 450°F (230°C). This high heat helps to create a crunchy surface on the cauliflower bites. Make sure to space the florets apart on the baking sheet. This allows hot air to circulate around each piece. For extra crunch, try using a light coating of oil on the florets before baking.
How to avoid soggy bites
Soggy bites happen when moisture builds up. To prevent this, make sure your batter is not too thick. A smooth and thin batter coats the florets better. After dipping, let the excess batter drip off before you place them on the baking sheet. Baking them in a single layer is also key. Avoid crowding the baking sheet so the heat can reach all sides of the cauliflower.
Ways to enhance flavor
To amp up the flavor, add different spices to your batter. Consider using cayenne pepper for a kick or Italian herbs for a twist. Mixing in some nutritional yeast can also give a cheesy taste without dairy. Tossing the baked bites in the buffalo sauce right after they come out of the oven will help the sauce stick better and enhance the overall flavor. Lastly, serve with fresh celery sticks and ranch dressing for a refreshing contrast.
Pro Tips
- Choose the Right Cauliflower: Select a fresh, firm head of cauliflower with tightly packed florets for the best texture and flavor.
- Dipping Technique: Ensure each floret is thoroughly coated with batter for a crispy exterior. Shake off excess batter to prevent sogginess.
- Buffalo Sauce Variation: For a milder flavor, mix in a bit of honey or maple syrup with the buffalo sauce to balance the heat.
- Serving Suggestions: Pair with a variety of dips like blue cheese or yogurt sauce for an extra layer of flavor and to cater to different taste preferences.

Variations
Gluten-free version
You can make buffalo cauliflower bites gluten-free easily. Instead of all-purpose flour, use gluten-free flour. Rice flour or almond flour work well. Mix it with water, garlic powder, onion powder, smoked paprika, salt, and black pepper. The taste remains great, and you can enjoy crispy bites without gluten.
Spicy buffalo cauliflower bites
If you love heat, add more spice! Mix in cayenne pepper or hot sauce into your batter. Adjust the amount to match your spice level. This change will make your bites fiery and exciting. You can also use a hotter buffalo sauce for an extra kick.
Alternative sauces and seasonings
Buffalo sauce is classic, but you can switch it up. Try BBQ sauce for a sweet twist. Toss the bites in sriracha for a zingy flavor. You can even use teriyaki sauce for a unique Asian flair. Experimenting with different sauces and seasonings can create your own favorite version.
Storage Info
How to store leftovers
To store your leftover buffalo cauliflower bites, let them cool first. Place them in an airtight container. They will stay fresh for up to three days in the fridge. If you want to keep them longer, consider freezing them.
Reheating methods for optimal taste
For the best taste, reheat the cauliflower bites in the oven. Preheat it to 350°F (175°C). Spread the bites on a baking sheet and heat for about 10-15 minutes. This way, they stay crispy. You can also use an air fryer at 350°F (175°C) for 5-7 minutes. Both methods keep the flavors strong.
Freezing buffalo cauliflower bites
To freeze your buffalo cauliflower bites, make sure they are cool. Place them in a single layer on a baking sheet and freeze for about an hour. Once frozen, transfer them to a freezer bag or container. They can last up to three months. When you’re ready to eat, bake them straight from the freezer.
FAQs
Can I make buffalo cauliflower bites ahead of time?
Yes, you can prepare buffalo cauliflower bites ahead of time. You can make the batter and coat the cauliflower. Store them in the fridge for up to 24 hours. Bake them when you are ready to serve. This way, you’ll have a tasty snack ready in no time.
How do I make buffalo cauliflower bites vegan?
To make buffalo cauliflower bites vegan, simply use a plant-based butter instead of unsalted butter. You can also use a gluten-free flour if needed. The rest of the recipe stays the same. Enjoy the same crispy goodness without animal products.
What can I serve with buffalo cauliflower bites?
You can serve buffalo cauliflower bites with fresh celery sticks. They add a nice crunch and balance the spice. Ranch dressing or blue cheese dressing also pairs well. These dips help cool down the heat and enhance the flavor.
How spicy are buffalo cauliflower bites?
Buffalo cauliflower bites have a medium level of spice. The buffalo sauce you choose can change the heat. If you want less spice, pick a milder sauce or mix it with a little ketchup. For more heat, use a spicier sauce or add cayenne pepper to the batter.
We covered how to make tasty buffalo cauliflower bites. You learned about the ingredients, cooking steps, and tips for crispiness. I shared variations to suit different diets and ways to store leftovers.
Now you have all you need to enjoy this dish. Experiment with flavors and find your favorite twist. Whether you make them spicy or gluten-free, these bites are a hit. Enjoy your cookin

Buffalo Cauliflower Bites
Ingredients
- 1 large head cauliflower, cut into bite-sized florets
- 1 cup all-purpose flour
- 1 cup water
- 1 teaspoon garlic powder
- 1 teaspoon onion powder
- 1 teaspoon smoked paprika
- 1 teaspoon salt
- 1/2 teaspoon freshly ground black pepper
- 1 cup buffalo sauce
- 2 tablespoons unsalted butter, melted
- to taste fresh celery sticks and ranch dressing for serving (optional)
Instructions
- Begin by preheating your oven to 450°F (230°C). Line a baking sheet with parchment paper to prevent sticking and to facilitate cleanup.
- In a large mixing bowl, combine the all-purpose flour, water, garlic powder, onion powder, smoked paprika, salt, and black pepper. Whisk the ingredients together until you achieve a smooth and lump-free batter.
- Take each cauliflower floret and dip it into the batter, ensuring it is fully coated. Allow the excess batter to drip off before placing the florets on the lined baking sheet in a single layer, spaced apart to ensure even cooking.
- Place the baking sheet in the oven and bake the cauliflower bites for approximately 20 minutes, or until they are golden brown and crispy to the touch.
- While the cauliflower is baking, prepare the buffalo sauce. In a separate bowl, mix together the buffalo sauce and melted unsalted butter until thoroughly blended.
- After the initial baking time, carefully remove the cauliflower bites from the oven. Drizzle the buffalo sauce mixture over them, using a spatula or tongs to gently toss them until they are evenly coated in the sauce.
- Return the coated cauliflower bites to the oven and bake for an additional 10-15 minutes. This step allows the sauce to thicken and become sticky, enhancing the flavor and texture.
- Once done, serve the buffalo cauliflower bites hot, accompanied by fresh celery sticks and ranch dressing on the side for dipping, if desired.


![- 1 ripe mango, diced into small cubes - 2 ripe avocados, diced into small cubes - 1 small red onion, finely chopped - 1 jalapeño, minced - 1/4 cup fresh cilantro, finely chopped - Juice of 2 limes - Salt and pepper to taste - Optional: 1/2 teaspoon ground cumin To create a vibrant mango avocado salsa, you need fresh, tasty ingredients. First, pick a ripe mango. A ripe mango should feel slightly soft when you press it. Next, choose ripe avocados. They should also yield slightly to gentle pressure. The red onion adds a nice crunch and color. Finely chop it for the best texture. The jalapeño brings the heat. If you want less spice, remove the seeds. Fresh cilantro adds a bright flavor. Always choose fresh herbs for the best taste. Lime juice helps balance the sweetness of the fruits. It also keeps the avocados from browning. Salt and pepper enhance all the flavors. If you like a warm taste, add ground cumin. You can switch things up based on your taste. Try different types of onions, like white or green. They each bring a unique flavor. You can also add black beans or corn for extra texture and nutrition. If you love spice, add more jalapeño or try other peppers. Each choice lets you make this salsa your own. Explore and enjoy the creative process. Check out the Full Recipe for more details! - Start with a ripe mango. Cut it into small cubes. Place the mango in a large mixing bowl. - Next, take two ripe avocados. Dice them into small cubes, too. Add them gently to the bowl. - Now, grab a small red onion. Finely chop it and mix it into the bowl. - For some heat, use a jalapeño. Deseed it and mince it based on your spice level. - Chop 1/4 cup of fresh cilantro. This herb adds a bright flavor to the salsa. - Finally, squeeze the juice of two limes into the bowl. This keeps the avocados fresh. - Combine all the fresh ingredients carefully. Use a gentle folding motion. - This method keeps the avocados and mango intact. You want a nice texture in your salsa. - Pour in the lime juice and season with salt and pepper. If you like, add 1/2 teaspoon of ground cumin. - Mix everything together until well blended. Make sure not to break the avocado pieces. - Before serving, taste your salsa. Adjust the flavors if needed. - Add a pinch of salt or more lime juice for brightness. - Check the texture. It should be fresh and chunky, not mushy. You can find the Full Recipe for more details. Enjoy this fresh and vibrant salsa! Choosing the best mango and avocado is key. Look for a mango that feels slightly soft when you squeeze it. The skin should be mostly yellow with some red. For avocados, choose ones that yield to gentle pressure. They should feel soft but not mushy. Knowing when fruits are perfectly ripe matters. A ripe mango has a sweet smell at the stem end. The avocado should be dark green or nearly black. Check both fruits daily if you buy them unripe. To store salsa and preserve freshness, cover it tightly with plastic wrap. Press the wrap down to touch the salsa. This limits air exposure, keeping it bright. You can also store it in an airtight container. Best practices for flavor development overnight include letting the salsa sit in the fridge for at least an hour. This allows the flavors to marry. The lime juice helps keep the avocados from browning. Serve the salsa in a vibrant bowl for eye-catching appeal. A colorful dish makes the salsa pop on your table. Garnish with a sprig of cilantro on top for extra flair. Ideal accompaniments include crispy tortilla chips for dipping. You can also serve it with grilled meats like chicken or fish. Mango avocado salsa adds a fresh kick to any meal. Don’t forget to check the [Full Recipe] for more details! {{image_4}} You can change the fruits in this salsa. Try adding diced pineapple or peach for a sweet twist. These fruits bring a bright flavor and can make your salsa unique. If you want a vegan option, you can use black beans or corn. They add protein and make the salsa heartier. Many cultures have their own takes on salsa. You can add ingredients like mango or cilantro to reflect those flavors. For a spicy kick, adjust the jalapeño or add other peppers. For example, try using serrano peppers for more heat. Each region adds a special touch that can excite your taste buds. This salsa shines as a dip or topping. Serve it with crispy tortilla chips for a fun snack. You can also use it on grilled chicken or fish for a fresh meal. It adds color and flavor to your plate. Get creative with how you serve it, and enjoy the burst of flavors. For the full recipe, check out the complete guide above! To keep your Mango Avocado Salsa fresh, store it in the fridge. Place it in an airtight container. This helps prevent exposure to air, which can cause browning. Your salsa will last about 2 to 3 days in the fridge. Look for signs of spoilage, like an off smell or brown color in the avocados. If you see these signs, it's best to toss it out. Can you freeze Mango Avocado Salsa? Yes, but it's not the best option. Freezing can change the texture of avocados. If you choose to freeze it, do so right after making it. Use a freezer-safe container, leaving some space at the top for expansion. When you thaw it, the salsa might be watery. To fix this, drain any excess liquid before serving. Choose the best storage container for your salsa. Glass or BPA-free plastic containers work well. Airtight options are ideal because they keep air out. This helps maintain flavor and freshness. Using the right container can make a big difference in how long your salsa lasts. Mango Avocado Salsa stays fresh in the fridge for about 2 to 3 days. After that, the avocados may turn brown. You can freeze it, but it’s best to eat it fresh. If you freeze it, use it within a month for the best taste. Yes, you can swap ingredients based on your needs. If you're allergic to avocados, try using diced cucumbers instead. If you don’t like cilantro, fresh parsley works too. For a milder taste, skip the jalapeño or use sweet bell peppers. This salsa pairs well with many dishes. Serve it with tortilla chips for a crunchy snack. It’s also great on grilled chicken or fish. Try it on tacos or as a topping for burrito bowls for added flavor. The spice level depends on how much jalapeño you use. If you remove the seeds and ribs, it will be milder. If you like heat, add more jalapeño or try a spicier pepper. Adjusting the amount gives you control over the spice. Yes, you can prep it ahead! If you want to make it a day before, do so. Just add lime juice to keep the avocados bright. Store it in an airtight container in the fridge. This will help the flavors blend nicely. For the best taste, mix in the avocado right before serving. For the full recipe, check out the [Full Recipe]. Mango Avocado Salsa combines fresh ingredients for a tasty dish. We covered how to pick ripe fruits and mix flavors. You learned about variations, storage tips, and serving ideas. This salsa is perfect for gatherings or a light snack. It’s simple to make and adjust to your taste. Enjoy making it and share the joy of fresh flavors with others!](https://joymealplan.com/wp-content/uploads/2025/07/8dfe7157-a149-4f91-a822-36a2fad97dae-768x768.webp)
![To make classic deviled eggs, gather these simple ingredients: - 6 large eggs - 3 tablespoons creamy mayonnaise - 1 teaspoon Dijon mustard - 1 teaspoon apple cider vinegar - 1/4 teaspoon fine salt - 1/4 teaspoon smoked paprika (plus extra for garnish) - Fresh chives, finely chopped (for garnish) You can add some extra flavor to your deviled eggs with these fun options: - A few dashes of your favorite hot sauce - Pickle relish for a tangy twist - Chopped olives for a salty kick - Crumbled bacon for a smoky crunch Having the right tools makes cooking easier. Here’s what you’ll need: - Medium-sized saucepan - Large bowl for ice water - Sharp knife for slicing - Mixing bowl for the yolk filling - Fork for mashing yolks - Piping bag with a star tip (optional) - Serving platter for presentation These ingredients and tools will set you up for a delicious batch of deviled eggs. For the full recipe and instructions, check out the [Full Recipe]. To start, you need six large eggs. Place them in a medium saucepan. Cover the eggs with cold water by at least one inch. Set the heat to medium-high and watch for a boil. When the water bubbles, cover the pot with a lid. Turn off the heat and let the eggs sit for ten to twelve minutes. This resting time will cook the yolks just right. After that, move the eggs to a bowl of ice water. Let them cool for at least five minutes. This step makes peeling easier and keeps the eggs fresh. Once the eggs are cool, gently tap each one on a flat surface. Roll the eggs to crack the shells, then peel them under running water. This helps remove the shells cleanly. Slice each egg in half lengthwise. Carefully take out the yolks and put them in a mixing bowl. Set the empty egg whites aside on a serving platter. Now, mash the yolks with a fork until they are crumbly. Add three tablespoons of creamy mayonnaise, one teaspoon of Dijon mustard, one teaspoon of apple cider vinegar, a quarter teaspoon of fine salt, and a quarter teaspoon of smoked paprika. Mix until the filling is smooth. If you like spice, add a few dashes of your favorite hot sauce. Next, it’s time to fill the egg whites. You can use a spoon or a piping bag. If you use a piping bag with a star tip, it will look fancy. Fill each hollowed egg white with the yolk mixture. Make sure to fill them well. To finish, sprinkle extra smoked paprika on top for color. Chop some fresh chives and add them as a garnish. This adds a nice touch and fresh flavor. Now you have a perfect batch of classic deviled eggs! For more details, refer to the Full Recipe. To get the best hard-boiled eggs, start with fresh eggs. Place the eggs in a saucepan and cover them with cold water. Bring the water to a rolling boil over medium-high heat. Once boiling, cover the pot and turn off the heat. Let the eggs sit for 10 to 12 minutes. This method gives you a creamy yolk with no green ring. After cooking, cool the eggs quickly in ice water. This step makes peeling easier. For a creamy filling, mash the yolks well with a fork. The more you mash, the smoother the mix. Add the mayonnaise, mustard, vinegar, and spices slowly. Mix until everything blends perfectly. If you want a spicy twist, add hot sauce to taste. For a more gourmet touch, consider using a piping bag. It will make the filling look fancy and neat. Presentation is key for deviled eggs. Arrange them on a colorful platter for a festive look. You can sprinkle extra smoked paprika on top for color. Adding finely chopped chives gives a fresh touch. For an extra pop, consider garnishing with microgreens or edible flowers. These small touches will impress your guests and make your dish stand out. For more details on making these delightful eggs, check the Full Recipe. {{image_4}} To add heat, mix some hot sauce into the yolk filling. You can use any hot sauce you like. Sriracha gives a sweet and spicy kick. For a smoky flavor, try chipotle sauce. Adjust the amount to suit your taste. You can also add diced jalapeños for texture and extra spice. If you want to skip the classic flavors, try avocado instead of mayo. Mash ripe avocado with the yolks. This adds creaminess and a fresh flavor. You can also mix in Greek yogurt for a tangy twist. For a herbal note, add finely chopped herbs like dill or parsley. Get creative with your deviled eggs! You can mix in ingredients like bacon bits for crunch. A hint of curry powder adds warmth and a new taste. For a sweet touch, mix in a little honey or relish. Try adding lemon zest for a bright flavor boost. Each twist gives your deviled eggs a new personality. For the full recipe, check out Devilishly Delectable Deviled Eggs. Store leftover deviled eggs in an airtight container. This keeps them fresh and safe to eat. Place a piece of plastic wrap over the filling to avoid drying out. You can also place a damp paper towel on top to help maintain moisture. Consume deviled eggs within three days for the best taste. For fresh deviled eggs, follow these tips: - Keep eggs in their shells until you're ready to cook. - Use the freshest eggs possible; check the expiration date. - After making the filling, store it separately from the egg whites if you don't serve right away. This keeps both parts fresh longer. - Refrigerate eggs promptly after cooking; don’t leave them out for more than two hours. Freezing deviled eggs is not the best option. The texture changes, making them watery upon thawing. If you want to freeze the filling, do so in a sealed bag. When you're ready to use it, thaw in the fridge overnight. Then, refill fresh egg whites and serve. Enjoy your eggs fresh for the best flavor! For detailed steps, check the Full Recipe. The prep time for Classic Deviled Eggs is about 15 minutes. You can easily manage this time. While the eggs cook, you can gather your other ingredients. This helps to keep things quick and easy. Yes, you can make deviled eggs ahead of time. Prepare them a day before your event. Just store them in the fridge until you are ready to serve. This keeps them fresh and tasty. If you want to skip mayonnaise, try using Greek yogurt. It adds creaminess and a tangy flavor. Another option is avocado, which gives a smooth texture. You could also use sour cream for a rich taste. Each option brings its unique twist to the classic recipe. For the full recipe, check out my detailed instructions. Deviled eggs are easy and fun to make. We covered the classic recipe, tips, and fun variations. Remember to use fresh eggs for the best taste. You can try adding flavors like spices or herbs for a twist. Store them properly to keep them fresh. Enjoy your deviled eggs at your next gathering. They are sure to impress everyone!](https://joymealplan.com/wp-content/uploads/2025/06/26f62450-2f64-4ac8-86b4-50d05502cb9e-768x768.webp)
