Butternut Squash and Goat Cheese Galette Delight

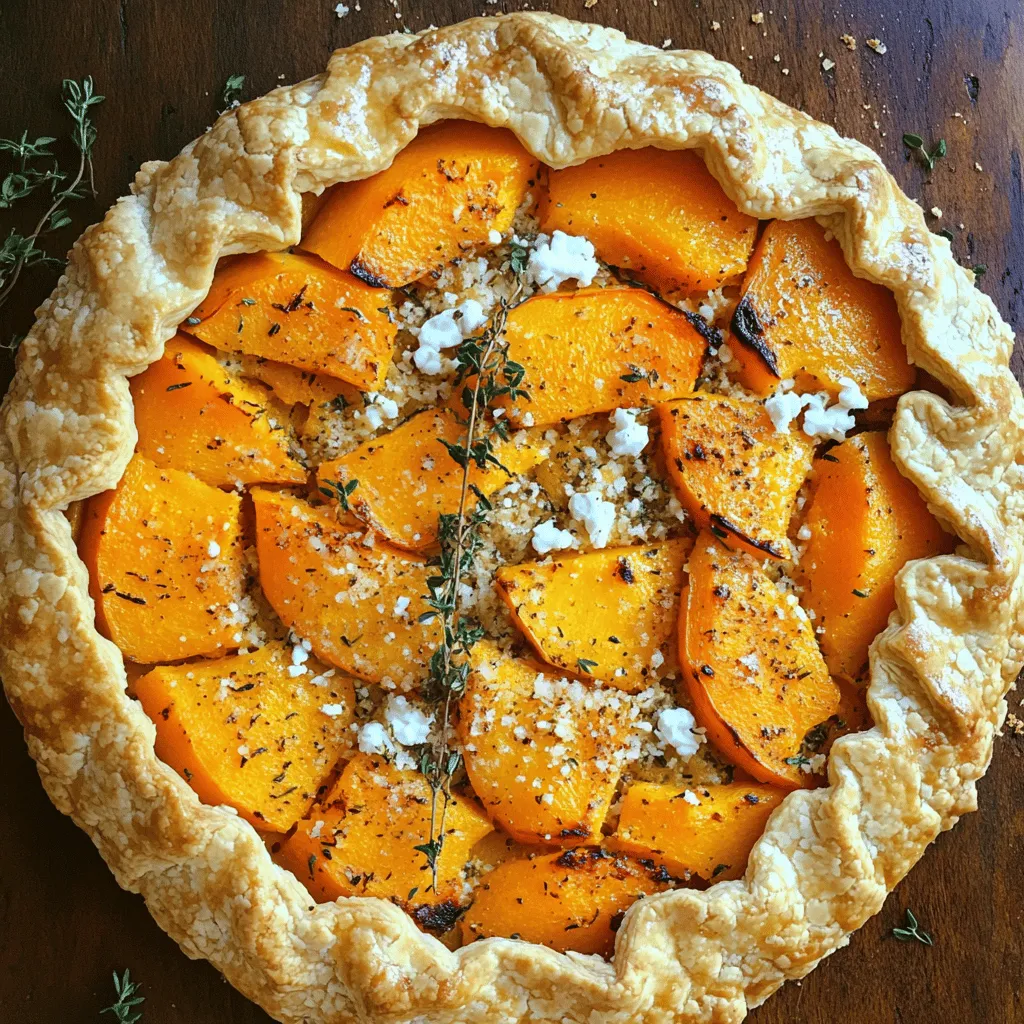
Looking for a crowd-pleasing dish to impress at your next gathering? This Butternut Squash and Goat Cheese Galette is a perfect blend of sweet and savory. With creamy goat cheese, roasted butternut squash, and a flaky crust, it’s sure to delight your taste buds. Follow my easy guide, packed with tips and variations, to make this delicious galette. Let’s dive in and bring this delightful recipe to your table!
Ingredients
Main Ingredients
– 1 medium butternut squash, peeled and thinly sliced
– 1 cup fresh goat cheese, crumbled
– 1 pre-made pie crust (or homemade if preferred)
Seasoning and Garnishing
– 2 tablespoons extra virgin olive oil
– 1 tablespoon fresh thyme leaves (plus extra for garnish)
– 1 tablespoon pure maple syrup
– Sea salt and freshly cracked black pepper to taste
– 1 egg (for egg wash)
– 2 tablespoons freshly grated Parmesan cheese
Step-by-Step Instructions
Preparation Steps
1. Preheat your oven to 400°F (200°C). This will help roast the squash well.
2. In a large bowl, mix the butternut squash slices with olive oil, thyme, maple syrup, salt, and pepper. Toss until the squash is well coated.
Cooking Steps
1. Spread the squash on a baking sheet in a single layer. Roast for about 25 minutes, until tender and a bit caramelized. Let it cool for a few minutes.
2. Roll out the pie crust on a floured surface into a 12-inch circle. Place it on a parchment-lined baking sheet.
3. Place the roasted squash in the center of the crust, leaving a 1.5-inch border.
4. Sprinkle the crumbled goat cheese evenly over the squash.
Baking
1. Fold the edges of the crust over the filling, pleating it to create a rustic look.
2. Beat the egg and brush it over the crust for a golden finish. Sprinkle with Parmesan cheese.
3. Bake the galette for 30-35 minutes, until the crust is deep golden brown and the cheese is slightly melted.
4. Let the galette cool for a few minutes. Slice it into wedges and garnish with extra thyme leaves.
Presentation Tips
Serve the galette warm on a wooden board. Add a touch of olive oil for a beautiful display.
Tips & Tricks
Perfecting the Galette
To roll out the pie crust, use a lightly floured surface. Start from the center and work your way outwards. Keep turning the dough to ensure an even circle. Aim for about 12 inches in diameter. If the dough sticks, add more flour as needed.
For the best texture of roasted squash, slice it thinly. Thin slices cook evenly and caramelize nicely. Toss the squash with olive oil, thyme, maple syrup, sea salt, and pepper before roasting. This helps enhance the sweet and savory flavors. Roast at 400°F for about 25 minutes until tender and slightly caramelized.
Serving Suggestions
The galette pairs well with a simple green salad. A light vinaigrette complements the rich flavors. You might also serve it with a side of roasted vegetables for added color and taste.
For an elegant display, serve the galette on a wooden board or a nice platter. Garnish with fresh thyme leaves and a drizzle of olive oil. This adds a pop of color and makes it more inviting.
Variations
Ingredient Substitutions
You can mix up the cheese in this galette. Feta cheese adds a tangy twist, while ricotta gives a creamy texture. Each cheese brings its own flavor, so choose what you like best.
You can also add seasonal veggies to the galette. Try adding spinach, kale, or roasted red peppers. These veggies add color and taste, making each bite exciting. Think about what’s fresh in your area.
Dietary Alternatives
If you need a gluten-free option, use a gluten-free crust. Many stores sell these, or you can make one from almond or rice flour. This will keep the dish tasty for everyone.
For a vegan version, swap out the goat cheese. You can use cashew cheese or tofu instead. This keeps the filling creamy while making it plant-based. Use a plant-based egg wash or leave it out for a simple finish.

Storage Info
Storing Leftovers
To keep your galette fresh, store it in an airtight container. Wrap it tightly in plastic wrap or aluminum foil if you don’t have a container. This helps keep moisture in and prevents it from drying out.
The leftover galette stays fresh in the fridge for about three days. If you want to keep it longer, consider freezing it. Just slice it first for easy serving later.
Reheating Tips
When it’s time to enjoy your leftovers, you have a few good options for reheating. You can use the oven, which helps keep the crust crispy. Preheat your oven to 350°F (175°C). Place the galette on a baking sheet and heat it for about 10-15 minutes.
You can also use a microwave for quick reheating. However, this might make the crust a bit soft. If you go this route, heat it in short 30-second bursts. Check often to avoid overheating.
To maintain the best flavor and texture, always cover the galette loosely with foil in the oven. This keeps the top from burning while the inside warms up nicely.
FAQs
What is a galette and how is it different from a pie?
A galette is a free-form pastry. It has a rustic look, while a pie is more structured. The galette’s edges fold over the filling, allowing the center to show. This makes it easy to prepare and very forgiving.
Can I make the galette ahead of time?
Yes, you can make the galette ahead. Prepare it until the egg wash step. Cover it and store it in the fridge. Bake it when you are ready to serve. This way, it stays fresh and delicious.
What can I serve with butternut squash and goat cheese galette?
This galette pairs well with a simple salad. A mixed greens salad with a light vinaigrette works great. You can also serve it with roasted vegetables or a warm soup. These sides complement the flavors nicely.
How can I make this recipe more savory or sweet?
To make it savory, add caramelized onions or sautéed mushrooms. For a sweeter twist, you can mix in a bit more maple syrup or add dried cranberries. Both options will enhance the taste and richness of the dish.
Are there other dishes that use similar ingredients?
Yes, you can use butternut squash and goat cheese in many dishes. Try them in risottos, soups, or pasta. They also work well in salads or as pizza toppings. The flavors blend beautifully in various recipes.
In this blog post, we explored how to make a butternut squash and goat cheese galette. We covered ingredients, cooking steps, and tips for the perfect dish. Remember, you can customize the recipe with different cheeses or veggies. Store leftovers properly to keep them fresh, and don’t forget the reheating tips. This galette is an easy yet elegant dish for any occasion. I hope you try it out and enjoy every bite!


![- Tortilla chips - Black beans - Corn kernels - Cherry tomatoes - Avocado - Cheddar cheese (or dairy-free alternative) - Pickled jalapeños - Red onion - Fresh cilantro - Olive oil - Ground cumin - Smoked paprika - Salt and pepper - Optional toppings: Sour cream or Greek yogurt, lime wedges To make loaded veggie nachos, gather fresh and flavorful ingredients. I love using crispy tortilla chips as the base. They hold all the toppings without getting soggy. Black beans add protein and texture. Rinsing and draining them keeps the flavors bright. Corn kernels bring sweetness and crunch. I often use fresh corn when it’s in season, but canned works well too. Next, halved cherry tomatoes burst with flavor. Diced avocado brings creaminess. I prefer ripe avocados for the best taste. Cheddar cheese is a must for gooey goodness. You can use a dairy-free version if needed. Pickled jalapeños give a nice kick, so add as many as you like. Red onion adds a sharp taste and crunch. Fresh cilantro brings brightness. I love the fresh herb flavor it adds. For the dressing, use olive oil, ground cumin, and smoked paprika. They bring warmth and depth. Lastly, don’t forget salt and pepper to enhance all the flavors. You can serve these nachos with optional toppings like sour cream or Greek yogurt. Lime wedges add a zesty finish. For the full recipe, check out the Ultimate Loaded Veggie Nachos. Start by preheating your oven to 350°F (175°C). This temperature helps the cheese melt just right. While the oven warms up, grab a mixing bowl for the veggies. Combine 1 cup of black beans, 1 cup of corn, 1 cup of halved cherry tomatoes, 1 ripe diced avocado, and 1/4 cup of chopped red onion. Drizzle 1 tablespoon of olive oil over this mix. Sprinkle in 1 teaspoon of ground cumin, 1 teaspoon of smoked paprika, and add salt and pepper to taste. Gently toss to blend the flavors. Now take a large baking sheet. Spread an even layer of tortilla chips across it. Make sure they are not crowded. This helps the chips stay crisp. Next, generously spoon the veggie mixture over the chips. Try to cover as many chips as you can. This way, each bite is packed with flavor. Sprinkle 1 cup of shredded cheddar cheese evenly over the veggie-covered chips. If you like spice, add pickled jalapeños on top. Place the baking sheet in your preheated oven. Bake for about 10 to 15 minutes. Watch closely until the cheese is melted and bubbly, but not burnt. Once baked, carefully take the nachos out of the oven. Garnish with 1/4 cup of freshly chopped cilantro. Serve them with lime wedges on the side. For a creamy touch, add sour cream or Greek yogurt. These extra touches make every bite a treat. Serve them on a large platter or in bowls. Enjoy this savory delight with friends or family! For the full recipe, check the detailed instructions above. Choose the right cheese for your nachos. I love using cheddar, but you can try Monterey Jack or a dairy-free alternative. These cheeses melt well and add rich flavor. For the best texture, shred your cheese fresh from the block. Pre-shredded cheese often has anti-clumping agents that can affect melting. When baking, keep an eye on the nachos. You want the cheese to bubble and slightly brown, which usually takes 10 to 15 minutes at 350°F. To kick up the flavor, think about adding spices. A pinch of chili powder or a dash of hot sauce can do wonders. If you enjoy tang, drizzle some lime juice over the nachos before serving. Fresh herbs like cilantro or green onions can also brighten the dish. Chopped jalapeños, fresh or pickled, add heat and flavor. Experiment with different combinations to find your favorite mix. I often serve nachos on a large platter, letting everyone dig in. For individual servings, use small bowls. This makes for a fun, personal touch. Pair your nachos with drinks like soda, beer, or a margarita for a complete experience. Dips like guacamole or salsa work great on the side too. They add extra flavor and keep the meal exciting. Remember to keep lime wedges handy for a fresh burst of flavor. For the complete recipe, check out the [Full Recipe]. {{image_4}} You can easily make loaded veggie nachos vegan. First, swap the cheddar cheese for a dairy-free cheese. Look for brands made from nuts or soy. These options melt well and taste great. For extra vegan toppings, try using cashew cream instead of sour cream. You can also add sliced black olives, diced bell peppers, or fresh spinach. These ingredients boost flavor and nutrients. To make gluten-free nachos, choose tortilla chips marked gluten-free. Many brands offer this option. Always check the label to ensure safety. You can also use other bases like baked sweet potatoes or zucchini slices. These alternatives add a unique twist and keep things healthy. Get creative with your toppings! You can add other veggies like mushrooms, bell peppers, or even roasted zucchini. For proteins, consider topping with lentils, chickpeas, or tofu. Specialty toppings can add unique flavors. Try fresh herbs like basil or mint, or drizzle with hot sauce for a kick. You can also scatter some pomegranate seeds for a sweet touch. After enjoying your loaded veggie nachos, store any leftovers properly. This helps maintain their taste and texture. Start by letting the nachos cool down. Place them in an airtight container. If you have extra toppings, like sour cream or avocado, store those separately. Use a small bowl or a bag to keep them fresh. Refrigerate the container within two hours. The nachos will stay good for about three days. To reheat your nachos, use the oven for best results. Preheat it to 350°F (175°C). Spread the nachos on a baking sheet in a single layer. Heat them for about 10 minutes. This helps revive their crunch. If you’re in a hurry, the microwave works too. Use a microwave-safe plate and heat for 30 seconds at a time. Keep an eye on them to avoid sogginess. Enjoy your nachos as if they were just made! Making homemade tortilla chips is easy and fun! Start with corn tortillas. Cut each tortilla into six triangles. Heat oil in a pan over medium heat. When the oil is hot, add a few triangles. Fry them until they turn golden brown. Remove them and place them on paper towels to drain excess oil. Sprinkle with salt while they are hot. Enjoy your fresh chips with loaded veggie nachos! Yes, you can prepare some parts in advance. You can chop the veggies and mix them a few hours before cooking. Store the veggie mixture in the fridge. However, I recommend adding the chips and cheese just before baking. This keeps the chips crispy and delicious! You can get creative with toppings! Try adding: - Sliced black olives - Diced bell peppers - Sliced radishes - Fresh spinach - Grilled chicken or beef - Different types of cheese like pepper jack or feta These options add fun flavors and textures to your nachos. Freezing nachos is tricky. I do not recommend freezing fully assembled nachos. The chips become soggy when thawed. However, you can freeze the veggie mixture and cheese separately. When you’re ready to eat, simply bake fresh chips and top them with the thawed mixture. It’s a great way to enjoy nachos anytime! For the full recipe, check out the Ultimate Loaded Veggie Nachos. In this blog post, I covered how to make delicious nachos, highlighting key ingredients and simple steps. You learned about assembling layers and baking for the best results. I shared tips for perfect cheese melting, flavor boosts, and customizable options to fit your needs. Don't forget storage advice and reheating methods to enjoy leftovers. Nachos are easy to make and adapt, so get creative and enjoy! Your nacho journey starts here, and I hope you relish every bite.](https://joymealplan.com/wp-content/uploads/2025/06/0185d0b5-b46a-4930-af15-477191a5be30-768x768.webp)
