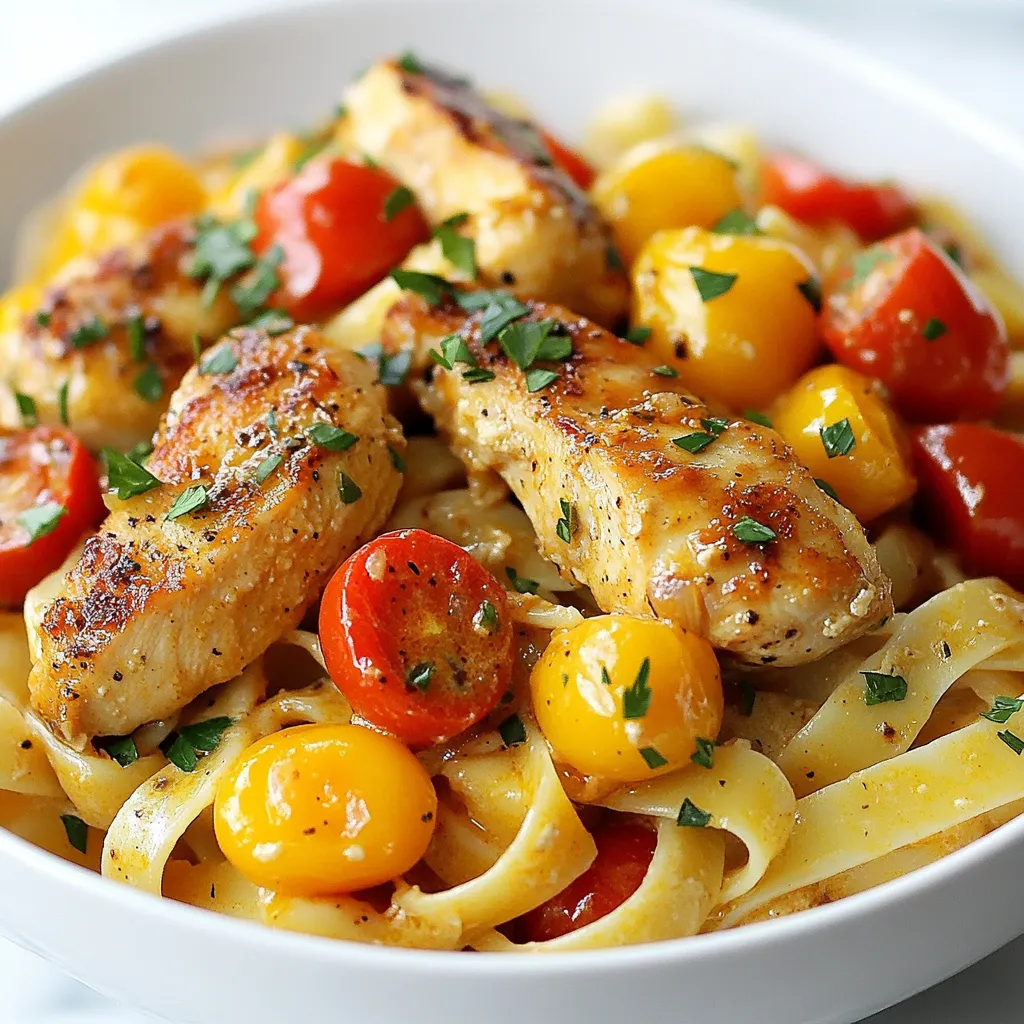
Welcome to a tasty journey with my Cajun Chicken Pasta recipe! If you crave bold flavors and a dish that’s quick to cook, you’re in the right place. In just a few simple steps, you can whip up a meal that’s rich, creamy, and full of zest. Get ready to impress your family and friends with this easy, flavorful dish that’s perfect for any night. Let’s dive into what you need and how to make it!
Why I Love This Recipe
- Bold Flavors: This dish packs a punch with its spicy Cajun seasoning, creating a delightful taste sensation that excites the palate.
- Creamy Texture: The addition of heavy cream results in a rich, velvety sauce that coats the pasta beautifully, making every bite comforting.
- Quick and Easy: With a total preparation time of just 30 minutes, this recipe is perfect for a weeknight dinner without sacrificing flavor.
- Colorful Presentation: The vibrant colors of the bell pepper, cherry tomatoes, and fresh parsley make this dish visually appealing, enhancing the dining experience.
Ingredients
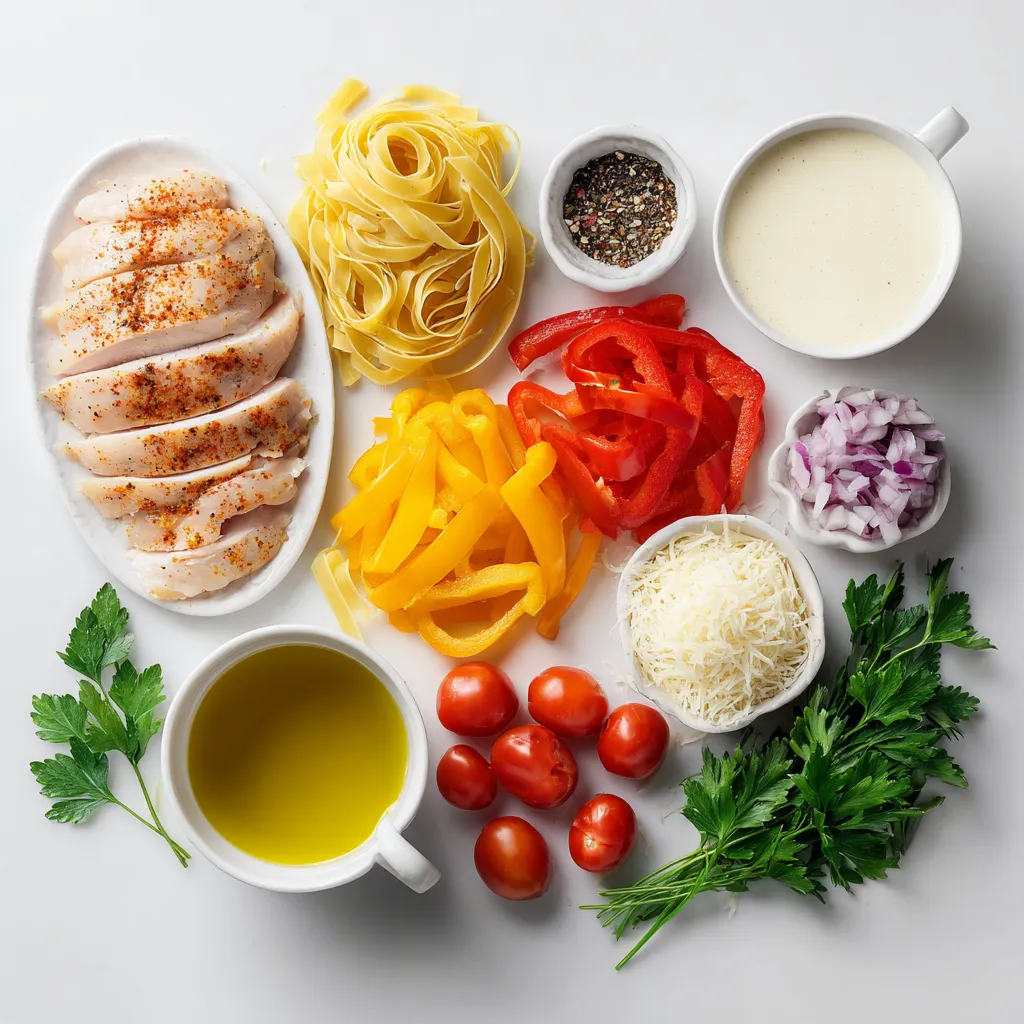
List of Ingredients
– Chicken and Seasoning
– 2 boneless, skinless chicken breasts, thinly sliced
– 2 tablespoons Cajun seasoning
– 2 tablespoons extra virgin olive oil
– Vegetables
– 1 bell pepper, sliced (choose between vibrant red or sunny yellow)
– 1 medium onion, finely diced
– 3 cloves garlic, minced
– 1 cup cherry tomatoes, halved
– Dairy and Pasta
– 1 cup heavy cream (or use half-and-half for a lighter version)
– 8 ounces fettuccine pasta
– 1/2 cup freshly grated Parmesan cheese
– Salt and black pepper to taste
– Fresh parsley, coarsely chopped (for garnish)
Gather these ingredients before you start cooking. The chicken gives great protein, while the seasoning adds a kick. The vegetables bring freshness and color. Heavy cream makes the sauce rich, and pasta serves as a perfect base. Each ingredient plays a role in the flavor, making your meal exciting.
Step-by-Step Instructions
Cooking the Pasta
Preparing the Pasta and Reserving Water
Start by filling a large pot with water. Add salt to the water for flavor. Bring the water to a boil. Once boiling, add the fettuccine. Cook it for 8 to 10 minutes. You want it al dente, which means it should be firm, not soft. After cooking, take out 1/2 cup of pasta water. Drain the rest and toss the pasta lightly in a bowl.
Ensuring Optimal Al Dente Texture
To achieve that perfect al dente texture, watch the time closely. Stir the pasta occasionally while it cooks. This prevents it from sticking together. Taste a piece before draining. It should have a slight bite to it.
Preparing the Chicken
Seasoning the Chicken
In a medium bowl, take your thinly sliced chicken breasts. Sprinkle 2 tablespoons of Cajun seasoning over them. Toss the chicken pieces well. Make sure each piece is coated evenly. This seasoning adds a spicy kick to your dish.
Cooking the Chicken to Perfection
Heat a large skillet over medium-high heat. Drizzle in 2 tablespoons of extra virgin olive oil. Once the oil is hot, add the seasoned chicken. Sauté for 5 to 7 minutes. Stir occasionally to cook evenly. The chicken should turn golden-brown and be fully cooked. Once done, move the chicken to a plate and set it aside.
Sautéing the Vegetables
Cooking Onions and Bell Peppers
Using the same skillet, add the diced onion and sliced bell pepper. Sauté them for about 3 to 4 minutes. You want the veggies to soften but not lose their crunch. Stir them often to cook evenly.
Adding Garlic and Cherry Tomatoes
Next, add the minced garlic and halved cherry tomatoes to the skillet. Cook for another 2 minutes. The garlic will become fragrant, and the tomatoes will soften. This mix adds great flavor to your pasta.
Creating the Cajun Sauce
Incorporating Heavy Cream and Parmesan
Now, pour in 1 cup of heavy cream. Stir well to combine it with the vegetables. Let it simmer gently. Then, return the cooked chicken to the skillet. Sprinkle in 1/2 cup of freshly grated Parmesan cheese. Stir until everything is mixed well.
Adjusting Sauce Consistency with Pasta Water
Taste the sauce and season with salt and black pepper. If it feels too thick, add some reserved pasta water. This will help you get the right creamy texture you want.
Combining and Serving
Tossing the Pasta with Sauce
Add the cooked fettuccine to the skillet. Toss everything together well. Make sure each pasta strand is coated in the creamy sauce. This step is key for flavor.
Plating the Dish with Garnish
To serve, spoon the pasta into bowls. Create a nest of fettuccine topped with the creamy sauce. Finally, garnish with coarsely chopped fresh parsley. This adds a nice pop of color and freshness.
Tips & Tricks
Best Practices for Seasoning Chicken
Choosing the Right Cajun Seasoning
Pick a Cajun seasoning that suits your taste. Look for blends that include paprika, cayenne, and garlic. Many brands have different heat levels. Start with a mild mix if you prefer less spice. You can always add more!
How to Achieve Balanced Flavor
When seasoning your chicken, use about two tablespoons of Cajun mix. This ensures each bite has a kick. Mix the seasoning well with the chicken to coat it evenly. This step makes all the difference in flavor.
Cooking Tips for Perfect Pasta
Avoiding Overcooked Pasta
Always cook your pasta until it is al dente. This means it should still have a firm bite. Check the package for cooking times. Remember to test it a minute or two before the time is up.
Techniques for Preventing Sticking
To keep pasta from sticking, toss it lightly with olive oil after draining. You can also add a little of the reserved pasta water. This helps the sauce cling better later on.
Cream Sauce Alternatives
Using Half-and-Half for a Lighter Version
If you want a lighter sauce, substitute half-and-half for heavy cream. It gives a creamy texture without the extra calories. Just use the same amount as the cream in the recipe.
Dairy-Free Options and Suggestions
For a dairy-free version, try coconut cream or cashew cream. Both add a rich taste and work well with Cajun flavors. Make sure to adjust the seasoning slightly, as these options can change the taste.
Pro Tips
- Perfectly Cooked Pasta: Always cook your pasta until al dente for the best texture. It will continue to cook slightly when mixed with the sauce, ensuring it doesn’t become mushy.
- Enhance the Flavor: If you want to amplify the Cajun kick, consider marinating the chicken in the seasoning for at least 30 minutes before cooking.
- Vegetable Variations: Feel free to add other vegetables like zucchini or mushrooms to the mix for extra flavor and nutrition.
- Garnish for Presentation: A sprinkle of freshly grated lemon zest along with parsley can brighten the dish and add a pop of freshness.
Variations
Adding Extra Proteins
You can easily switch up the proteins in Cajun chicken pasta. Shrimp is a great choice. Just sauté it like the chicken. Add it during the last few minutes of cooking. You’ll get a lovely, spicy flavor. You can also use sausage. Choose a smoked or andouille sausage for a kick. Slice it and add it with the veggies. It will add a hearty texture.
If you want a vegetarian option, use tofu or chickpeas. Tofu absorbs flavors well. Cook it until it’s golden brown. Chickpeas add protein and a nice bite. You can toss them in towards the end of cooking.
Flavor Enhancements
To jazz up your dish, add more spices and herbs. A pinch of cayenne pepper gives heat. Oregano and thyme also work well. Fresh herbs like basil or cilantro can brighten the dish. Add them just before serving for the best flavor.
If you like it hot, adjust the heat level. Use more Cajun seasoning or add hot sauce. You can mix in some crushed red pepper flakes for extra kick. Just remember to taste as you go!
Pasta Alternatives
You have many choices for pasta types. Fettuccine is classic, but penne works great too. If you want shapes, try farfalle or rotini. Each type gives a different bite.
For gluten-free options, use brown rice pasta or chickpea pasta. Both taste great with the creamy sauce. They also provide added nutrition. Just check the cooking time, as it may differ from regular pasta.
Storage Info
Storing Leftovers
To keep your Cajun chicken pasta fresh, use good methods for storage. After the meal, let the pasta cool to room temperature. Then, put it in an airtight container. This helps prevent the pasta from drying out. You can store it in the fridge for up to three days.
If you want to save it longer, consider freezing. First, let the pasta cool completely. Then, place it in a freezer-safe container. You can also use freezer bags. Make sure to remove as much air as possible. This will help keep the pasta fresh. It can stay in the freezer for up to three months.
Reheating Tips
When it’s time to eat your leftovers, reheating them well matters. For the best taste and texture, I recommend using the stove top. Just add the pasta to a skillet over medium heat. Add a splash of water or cream to help it warm up evenly. Stir frequently until it’s hot.
If you need a quick option, the microwave works too. Place the pasta in a microwave-safe bowl and cover it. Heat in short bursts, stirring in between. This helps prevent hot spots. Just be careful not to overcook it, as this can make the pasta tough.
Enjoying this dish later is easy when you store and reheat it right!
FAQs
What is Cajun Chicken Pasta?
Cajun Chicken Pasta is a creamy and spicy dish that blends Cajun flavors with pasta. It usually features chicken, bell peppers, and a rich cream sauce. This dish comes from Louisiana, inspired by Cajun cooking, which is known for bold spices. The mix of flavors makes it a favorite for many.
Can I make this recipe in advance?
Yes, you can prep Cajun Chicken Pasta ahead of time. Cook the chicken and veggies, then store them in the fridge. Cook the pasta separately when you’re ready to eat. Combine everything just before serving. This helps keep the pasta from getting mushy.
What to serve with Cajun Chicken Pasta?
Cajun Chicken Pasta pairs well with several sides. Here are some great options:
– Garlic bread for a crunchy contrast.
– A fresh green salad to balance the creaminess.
– Steamed vegetables like broccoli or green beans for added nutrition.
– A light wine, such as Sauvignon Blanc, enhances the meal nicely.
This blog post covered how to make Cajun Chicken Pasta, from ingredients to serving suggestions. You learned about key components like chicken, pasta, and vegetables. We discussed step-by-step cooking methods and provided helpful tips for flavor and texture. Remember, you can customize this dish with proteins and flavors you love. Enjoy your cooking journey and make this dish your own. Exploring different variations will unleash your creativity in the kitchen! Dive in and savor every bite of your delicious creatio


