Caramel Apple Bread Pudding Delightful and Simple Dish

Are you ready to impress your friends and family with a warm, flavorful treat? Caramel Apple Bread Pudding is the perfect blend of sweet and simple. In this guide, I will share easy steps to create this delightful dessert. Whether you’re a novice or a pro, you’ll find tips on ingredients, baking, and serving that will make your dish a hit. Let’s dive into this comforting recipe!
Ingredients
Essential Ingredients for Caramel Apple Bread Pudding
To create a tasty caramel apple bread pudding, you need a few key ingredients. Here’s what you’ll need:
– 6 cups of day-old bread, cubed
– 2 large apples, peeled and diced
– 4 large eggs
– 2 cups whole milk
– 1 cup heavy cream
– 1 cup brown sugar, packed
– 1 tablespoon pure vanilla extract
– 1 teaspoon ground cinnamon
– 1/2 teaspoon grated nutmeg
– 1/4 teaspoon salt
– 1/2 cup caramel sauce
– Whipped cream or vanilla ice cream, for serving (optional)
These ingredients work together to create a rich, sweet, and comforting dessert.
Recommended Bread Types for Optimal Flavor
Choosing the right bread makes a big difference in flavor. I suggest using brioche or challah. Both types are soft and rich, which helps absorb the egg and milk mixture. They add a lovely texture and taste to the pudding. If you can’t find these, any sturdy bread will do, as long as it is a bit stale.
Suggested Apple Varieties for Best Results
For the apples, I recommend using Granny Smith apples. They offer a nice tartness that balances the sweetness of the bread pudding. Their firm texture holds up well during baking. You could also use Honeycrisp or Fuji apples for a sweeter twist. Each variety brings its own flavor, so feel free to mix and match!
Step-by-Step Instructions
Preparation Steps Before Baking
1. First, gather all your ingredients. You will need:
– 6 cups of day-old bread, cubed
– 2 large apples, peeled and diced
– 4 large eggs
– 2 cups whole milk
– 1 cup heavy cream
– 1 cup brown sugar
– 1 tablespoon pure vanilla extract
– 1 teaspoon ground cinnamon
– 1/2 teaspoon grated nutmeg
– 1/4 teaspoon salt
– 1/2 cup caramel sauce
– Whipped cream or vanilla ice cream (optional)
2. Preheat your oven to 350°F (175°C). Grease a 9×13-inch baking dish with butter or non-stick spray.
3. In a large bowl, whisk the eggs, milk, heavy cream, brown sugar, vanilla, cinnamon, nutmeg, and salt until smooth.
4. Add the cubed bread to the egg mixture. Gently fold the bread to soak it well. Let it sit for 10 minutes.
5. Fold in the diced apples, ensuring they are evenly mixed into the bread.
Baking Instructions and Tips for Success
1. Pour the soaked bread mixture into the greased baking dish. Drizzle half of the caramel sauce over the top.
2. Place the dish in the preheated oven. Bake for 45-50 minutes. The pudding should turn golden brown.
3. Check for doneness by inserting a knife in the center. It should come out clean.
4. If the top browns too fast, cover it lightly with foil.
Cooling and Serving Suggestions
1. Remove the dish from the oven. Let it cool for about 10 minutes before serving.
2. Just before serving, drizzle the remaining caramel sauce over the bread pudding.
3. Serve warm with whipped cream or a scoop of vanilla ice cream.
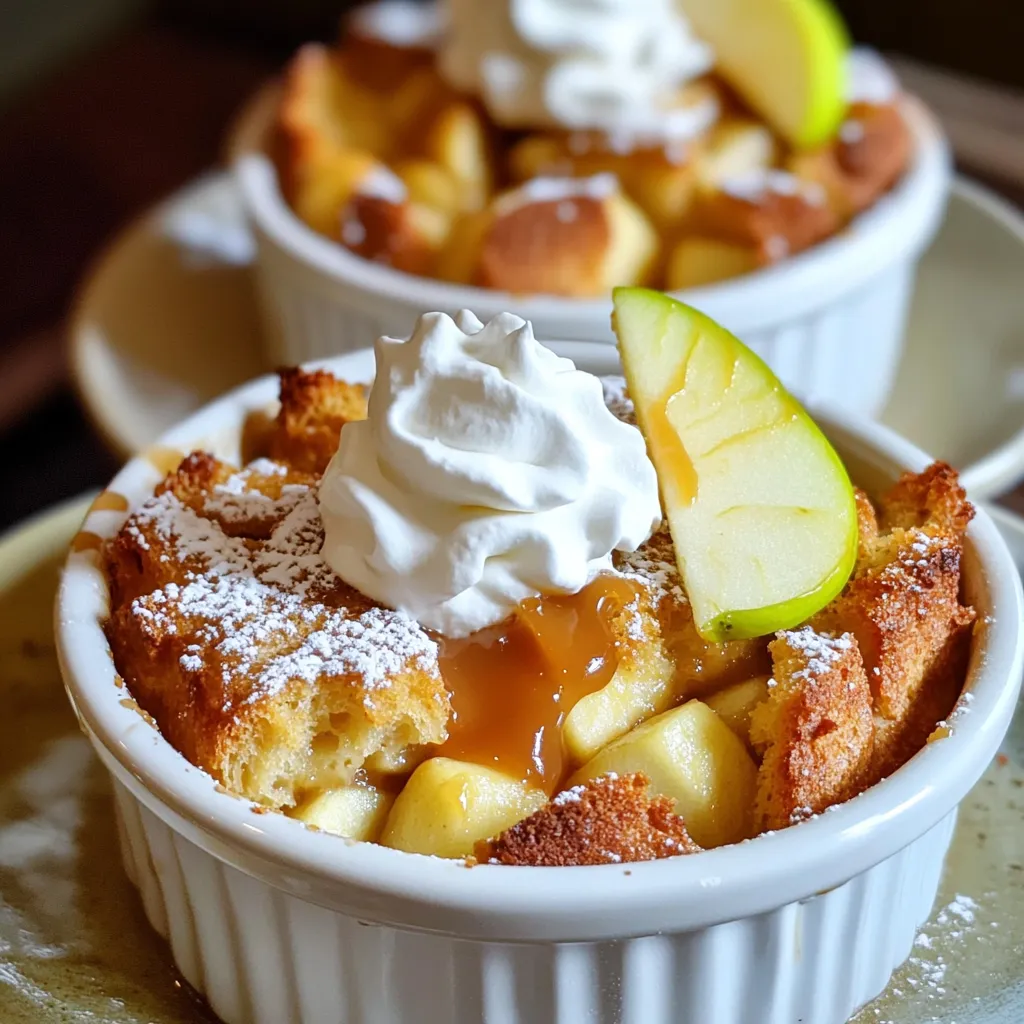
4. For a fun touch, serve in ramekins with a slice of apple on top. Enjoy!
Tips & Tricks
Common Mistakes to Avoid
When making caramel apple bread pudding, simple errors can ruin the dish. Avoid using fresh bread; stale bread absorbs the liquid better. If your bread is fresh, toast it lightly first. Don’t skip soaking the bread long enough. Let it sit for at least 10 minutes. This helps the bread soak up all those lovely flavors.
How to Perfectly Soak the Bread
To soak the bread just right, mix the eggs and milk first. Then, fold in the cubed bread gently. Make sure every piece gets wet. You can use a spatula to help. After mixing, let it sit. This step is key. The longer it sits, the better it tastes. Ten minutes is a good start, but you can go longer if you want.
Enhancements for Extra Flavor: Spices and Add-ins
Want to boost the taste? Add more spices! A pinch of ginger or allspice can add warmth. You can also mix in nuts for crunch. Chopped pecans or walnuts work well. Dried fruit, like raisins, adds sweetness, too. Experiment with what you love to make it your own!

Variations
Gluten-Free Adjustments for the Recipe
To make this dish gluten-free, you can swap regular bread for gluten-free bread. Look for a high-quality gluten-free bread that holds up well. Brioche or challah are great choices, but ensure they are gluten-free. You can also check for gluten-free bread crumbs if you want a different texture.
Vegan Substitutions for Ingredients
You can easily make this bread pudding vegan. Replace the eggs with a mixture of flaxseed meal and water. Use non-dairy milk, like almond or oat milk, in place of whole milk. For heavy cream, coconut cream works well. Finally, choose a vegan caramel sauce to keep it all plant-based.
Seasonal Variations Using Different Fruits
While apples shine in this recipe, feel free to mix it up with seasonal fruits. In summer, use ripe peaches or berries for a fresh twist. In fall, pears or figs can add a lovely flavor. Each fruit brings its own taste and sweetness, making this dish fun and versatile.
Storage Info
How to Store Leftover Bread Pudding
To keep your caramel apple bread pudding fresh, let it cool first. Then, cover it tightly with plastic wrap or aluminum foil. You can also place it in an airtight container. Store it in the fridge for up to four days. This helps maintain its soft texture and rich flavor.
Best Practices for Reheating
When you’re ready to enjoy your leftovers, preheat your oven to 350°F (175°C). Place the bread pudding in an oven-safe dish. Add a splash of milk or cream to keep it moist. Cover it with foil to prevent it from drying out. Heat for about 15-20 minutes, or until warmed through. You can also use a microwave for a quick option. Heat individual servings for 30 seconds to 1 minute, checking frequently.
Freezing Instructions for Long-term Storage
You can freeze caramel apple bread pudding for up to three months. First, let it cool completely. Cut it into portions for easy serving. Wrap each piece in plastic wrap, then place it in a freezer-safe bag or container. When you’re ready to eat, thaw it in the fridge overnight. Reheat it in the oven or microwave as described above. This way, you can enjoy a taste of fall anytime!
FAQs
Can I make Caramel Apple Bread Pudding ahead of time?
Yes, you can prepare this bread pudding in advance. Mix the ingredients and pour it into the baking dish. Cover it with plastic wrap and place it in the fridge overnight. This helps the bread soak up the flavors. When you’re ready, bake it the next day. Just add a few extra minutes to the baking time.
What type of caramel sauce is best to use?
I recommend using either store-bought or homemade caramel. Store-bought is quick and easy. Look for a sauce with simple ingredients for the best flavor. If you have time, making homemade caramel adds a personal touch. Either way, the caramel sauce brings a rich sweetness to the dish.
How do I know when the bread pudding is done baking?
To check if your bread pudding is done, insert a knife in the center. If it comes out clean, it’s ready. The top should be golden brown. The pudding should feel firm but slightly jiggly. Let it cool for about ten minutes before serving. This helps it set nicely and makes it easier to cut.
Caramel apple bread pudding is fun and easy to make. We covered essential ingredients, including the best bread and apples to use. The step-by-step guide helps ensure perfect results every time. I shared tips to avoid common mistakes and enhance flavors. You can even personalize the recipe with gluten-free or vegan options. Proper storage tips keep leftovers fresh for later. Remember, you can make this ahead of time for convenience. Enjoy this warm, delicious treat anytime you want!


![- 1 cup glutinous (sticky) rice - 1 ½ cups coconut milk - 1 ripe mango, peeled and thinly sliced - ¼ cup granulated sugar - ¼ teaspoon salt Glutinous rice gives Mango Sticky Rice its unique texture. It sticks together and becomes chewy when cooked. The coconut milk adds a rich and creamy flavor to the dish. Using ripe mango is key; its sweetness and juiciness balance the rice. - 1 tablespoon sesame seeds (toasted, optional) - Fresh mint leaves for garnish (optional) Toasted sesame seeds provide a nice crunch. Fresh mint leaves add a pop of color and a refreshing taste. Both are great if you want to elevate your dish. - Calories per Serving: Approximately 300 calories - Key Nutrients: Carbohydrates, fats, fiber, vitamin C, and iron Mango Sticky Rice is a delightful dessert. While it is not low-calorie, it offers some nutrients. The rice provides energy, and mango adds vitamins. Enjoy it as an occasional treat! For the complete recipe, check out the Full Recipe. Rinsing and Soaking the Rice Start by rinsing the sticky rice under cold water. Keep rinsing until the water runs clear. This step removes excess starch. It's key for the right texture. After rinsing, soak the rice in water for 4 hours. If you can, soak it overnight. This helps the rice absorb water and cook better. Steaming Process After soaking, drain the rice. Place it in a steamer lined with cheesecloth or a steaming basket. Steam the rice over simmering water for 25 to 30 minutes. You want it to become translucent and tender. This process makes the rice fluffy and sticky, perfect for the dish. Combining Ingredients While the rice steams, prepare the coconut milk mixture. In a medium saucepan, mix coconut milk, sugar, and salt. Stir the mixture over low to medium heat. Keep stirring until the sugar dissolves. Be careful not to boil it; you want a smooth texture. Cooking Technique Once the sugar is dissolved, take the saucepan off the heat. This step ensures the coconut milk stays creamy. Set it aside until the rice is ready. This coconut milk will add a rich flavor to the sticky rice. Mixing Rice and Coconut Milk When the sticky rice is cooked, transfer it to a large bowl. Gradually pour in about 1 cup of the warm coconut milk mixture. Use a gentle folding motion to mix it in. Make sure every grain of rice is coated. Let it sit for 15 to 20 minutes. This allows the rice to absorb the coconut flavor. Plating Suggestions To serve, scoop a generous amount of sticky rice onto a plate. Arrange thin slices of ripe mango on top. Drizzle some extra coconut milk over it. For added crunch, sprinkle toasted sesame seeds on top. You can also garnish with fresh mint leaves for a pop of color. This makes the dish look as good as it tastes! For the complete method, check the Full Recipe. Appearance and Aroma Indicators When choosing mangoes, look for smooth skin. The color should be bright and rich. A ripe mango feels slightly soft when gently squeezed. It should also have a sweet aroma near the stem. This smell tells you it's ready to eat. Ideal Varieties for the Dish For this dessert, I recommend using the Ataulfo or Haden mango. Ataulfo mangoes have a creamy texture and sweet taste. Haden mangoes are juicy and fragrant, adding great flavor to your dish. Both work well with the sticky rice. Toasting Sticky Rice Option Toasting the sticky rice can bring out a nutty taste. Before soaking, heat it in a pan over low heat. Stir it for a few minutes until it turns golden. This step adds depth to the flavor of your dessert. Alternative Sweeteners While granulated sugar is common, you can try other sweeteners. Honey or agave syrup can add unique flavors. Coconut sugar offers a caramel-like taste. Each option can change the dish’s final taste, so feel free to experiment. Serving Style Variations For a fun twist, try serving the sticky rice in small bowls. You can layer the mango slices on top. This makes each serving look special. You can also use a ring mold to shape the rice for a more elegant look. Creative Garnishing Tips Garnishing can elevate your dessert. Sprinkle toasted sesame seeds for crunch. Add fresh mint leaves for color and flavor. You can also drizzle a bit of coconut milk on top for a beautiful finish. These small touches make your dish more appealing. For the complete recipe, check out the [Full Recipe]. {{image_4}} Mango sticky rice shines in Thai cuisine. Each region has its own twist. In northern Thailand, you might find a version with black sticky rice. This adds a nutty flavor and a stunning dark color. Southern styles often emphasize sweetness with extra coconut milk. Other cuisines influence this dish too. In Vietnam, they serve a similar treat called "xôi xoài." It features a sweeter coconut sauce and often includes mung beans. Exploring these variations lets you enjoy mango sticky rice in new ways. If you want vegan options, just use coconut milk. This recipe is already dairy-free. You can also make it gluten-free, since glutinous rice has no gluten. For low-sugar options, try using a sugar substitute. Many people enjoy using stevia or monk fruit. These keep the sweetness without the added calories. Want to make your mango sticky rice unique? You can add food coloring to the rice. This gives it a fun pop of color. Just a few drops will do! Incorporating fruits and nuts is another way to change up the flavor. Add some chopped mango or berries for extra fruitiness. You could also sprinkle in some toasted coconut or nuts for crunch. This adds texture and makes your dish even more delightful. For the full recipe, check out the Mango Paradise Sticky Rice section. When you have leftover mango sticky rice, you want to keep it fresh. Here are some tips: - Refrigeration Tips: Store the sticky rice in an airtight container. It will stay good in the fridge for about 3 to 4 days. Always let the rice cool to room temperature before sealing it to avoid condensation. - Freezing Sticky Rice: If you want to keep it longer, consider freezing. Wrap the sticky rice tightly in plastic wrap. Then place it in a freezer bag. This way, it can last up to 3 months. You can enjoy your mango sticky rice again with these methods: - Microwave vs. Stovetop: The microwave is quick and easy. Place the rice in a bowl, add a splash of water, and cover it. Heat in short bursts until warm. The stovetop can be better for texture. Add a little coconut milk to a pot, then heat the rice gently over low heat. - Maintaining Texture and Flavor: When reheating, stir the rice often. This helps it warm evenly. Adding coconut milk will also keep it creamy and flavorful. You should know how long your mango sticky rice lasts: - How Long Can You Store It? In the fridge, it lasts 3 to 4 days. In the freezer, it can be good for up to 3 months. - Signs of Spoilage: Check for off smells or a change in color. If you see mold or a strange texture, it’s best to throw it away. Always trust your senses! Mango sticky rice is a sweet dessert from Thailand. It features glutinous rice cooked in creamy coconut milk. This dish is very popular in Thai cuisine, often enjoyed as a treat during festivals or special occasions. The soft, sweet rice pairs perfectly with ripe mango slices. The dish represents a delightful mix of flavors and textures. You should not use regular rice. Regular rice will not give the same sticky texture. Glutinous rice is key to achieving that chewy bite. If you cannot find glutinous rice, look for sushi rice as an alternative. It has a similar texture but may not be as sticky. You can easily change the sweetness of your mango sticky rice. To do this, modify the amount of sugar you use. Start with less sugar and add more to taste. If you want alternatives to granulated sugar, try using honey or maple syrup. These can add unique flavors while still sweetening your dish. Mango sticky rice is a simple, yet delicious dessert. It requires just three main ingredients: sticky rice, coconut milk, and fresh mango. You can add garnishes like sesame seeds or mint for that extra touch. Follow the easy steps for preparation and assembly to create this flavorful dish. Remember to choose ripe mangoes for the best taste. With tips on storage and variations, you can enjoy this treat anytime. Experiment with flavors and enjoy the process. Your mango sticky rice will shine with every bite!](https://joymealplan.com/wp-content/uploads/2025/06/5d335504-2931-49f8-8062-6f7285d5d66d-768x768.webp)