Cheddar Jalapeño Cornbread Muffins Easy Flavor Boost

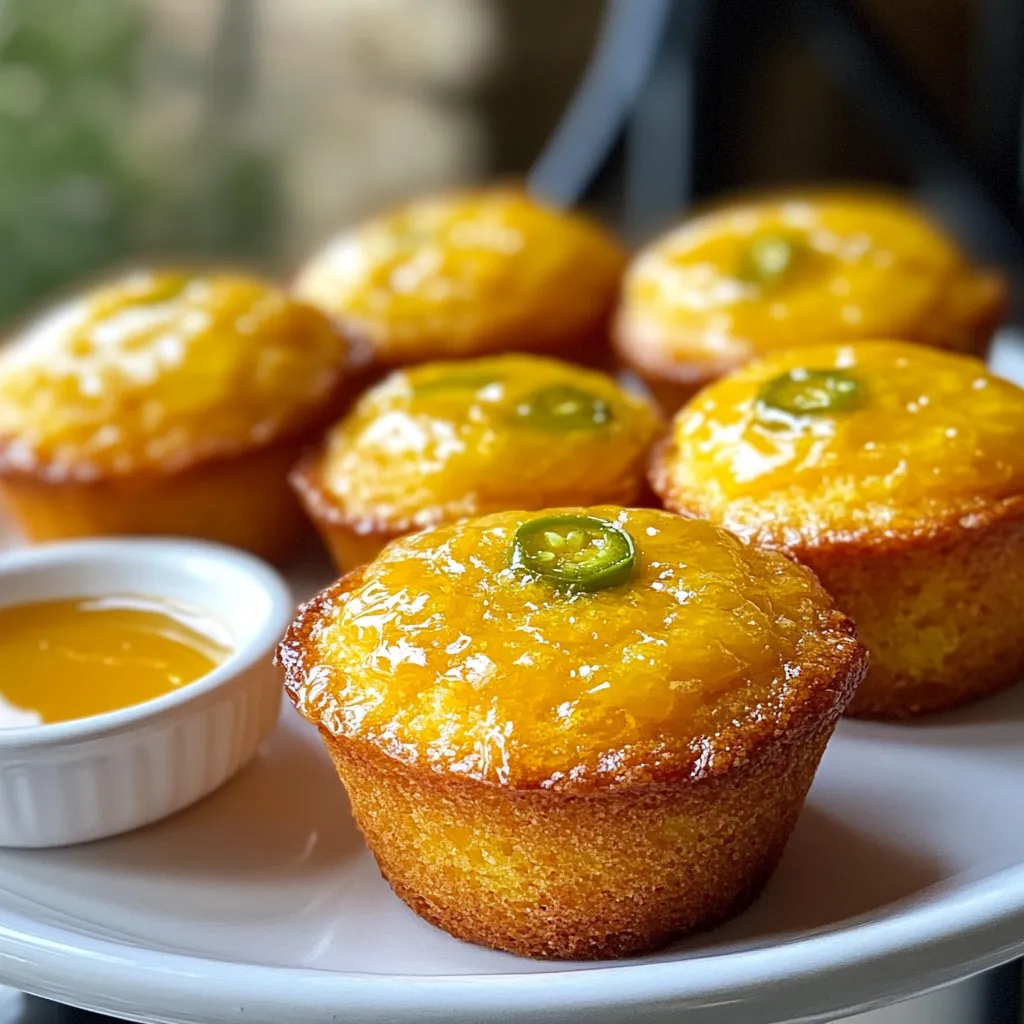
Get ready to spice up your baking with Cheddar Jalapeño Cornbread Muffins! These tasty treats combine the rich flavor of cheese with the kick of jalapeños. Perfect for breakfast or as a side dish, they’re easy to make and sure to impress. In this post, I’ll share simple steps, tips, and tricks for creating the best cornbread muffins you’ve ever tasted. Let’s get baking and add some flavor to your kitchen!
Why I Love This Recipe
- Flavor Explosion: The combination of sharp cheddar cheese and spicy jalapeños creates a delightful flavor profile that balances cheesy goodness with a spicy kick.
- Quick and Easy: In just 30 minutes, you can whip up a batch of these delicious muffins, making them perfect for a quick breakfast or snack.
- Versatile Treat: These muffins are great on their own or can be served with honey butter or a spicy dip, allowing for a variety of serving options.
- Perfect for Any Occasion: Whether it’s a casual family dinner or a festive gathering, these cornbread muffins add a special touch to any meal.
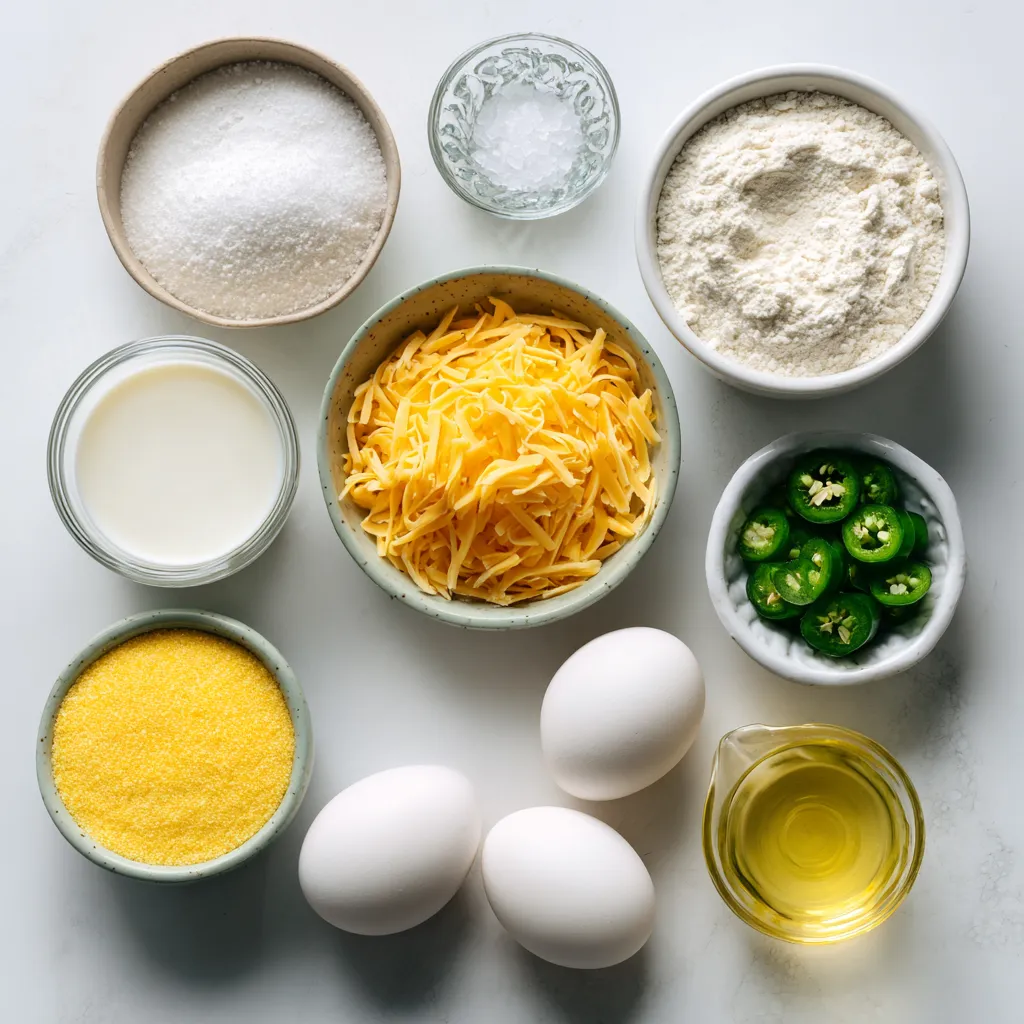
Ingredients
Dry Ingredients
– 1 cup cornmeal
– 1 cup all-purpose flour
– 1 tablespoon baking powder
– 1/2 teaspoon salt
Wet Ingredients
– 1 cup buttermilk (room temperature)
– 1/4 cup vegetable oil
– 2 large eggs (lightly beaten)
Add-ins
– 1/2 cup shredded sharp cheddar cheese
– 1/2 cup finely chopped jalapeños (fresh for a kick or pickled for tang)
– 1/4 cup granulated sugar
You need a mix of dry and wet items to make these muffins. First, cornmeal and flour form the base. Baking powder helps them rise. A pinch of salt balances the flavors.
For the wet part, buttermilk adds moisture and tang. Vegetable oil keeps the muffins soft. Eggs help bind everything.
Now, let’s boost the flavor. Sharp cheddar cheese adds a rich taste. Jalapeños give heat and freshness. A little sugar rounds it all out. This mix makes your muffins tasty and unique!

Step-by-Step Instructions
Preparing the Oven and Muffin Tin
First, you need to preheat your oven to 400°F (200°C). This step is key for baking. While the oven heats, prepare your muffin tin. You can do this by lining it with paper liners or greasing each cup with cooking spray or butter. This helps the muffins come out easily.
Mixing Dry Ingredients
Next, take a large mixing bowl and combine the cornmeal, all-purpose flour, baking powder, and salt. Whisk these dry ingredients well. You want to make sure there are no lumps left. This mix is the base for your muffins.
Mixing Wet Ingredients
In another bowl, whisk together the buttermilk, vegetable oil, and eggs. Make sure this mixture looks creamy and uniform. This blend adds moisture and richness to your muffins.
Combining Ingredients
Now, pour the wet ingredients into the bowl with your dry mix. Gently fold them together using a spatula or wooden spoon. Be careful not to overmix. It’s okay if there are a few lumps. Overmixing makes the muffins tough and not fluffy.
Baking the Muffins
Using a spoon or muffin scoop, fill each prepared muffin cup about two-thirds full. This allows space for rising. Place the muffin tin in your preheated oven and bake for 15-18 minutes. Check for doneness by inserting a toothpick into the center. If it comes out clean, your muffins are ready! After baking, let them cool in the pan for about 5 minutes before transferring them to a wire rack.
Tips & Tricks
Achieving the Perfect Muffin Texture
To get the best texture, avoid overmixing. Mix the wet and dry ingredients until they just come together. A few lumps are okay. This keeps the muffins light and fluffy.
Check for doneness by looking for a golden top. Insert a toothpick into the center. If it comes out clean, your muffins are ready. If it has batter on it, bake for a few more minutes.
Flavor Enhancements
Serve your muffins warm with honey butter for a sweet kick. A spicy dip can also add extra flavor. Try mixing sour cream with hot sauce for a quick dip.
For garnishing, place a slice of jalapeño on top of each muffin. This adds color and shows off the spicy flavor inside.
Troubleshooting Common Issues
If your muffins do not rise, check your baking powder. It should be fresh and active. If it’s old, it may not work well.
To adjust the spice levels, use fewer jalapeños or choose mild ones. You can also add a bit of sugar to balance heat. Taste the batter before baking to find your perfect level.
Pro Tips
- Use Fresh Jalapeños: For an extra kick, opt for fresh jalapeños instead of pickled ones. Adjust the amount based on your heat preference!
- Room Temperature Ingredients: Ensure your buttermilk and eggs are at room temperature before mixing. This helps create a smoother batter and fluffier muffins.
- Avoid Overmixing: When combining wet and dry ingredients, mix just until combined. Overmixing can lead to dense, tough muffins.
- Storage Tips: Store leftover muffins in an airtight container at room temperature for up to 2 days, or freeze for longer storage. Reheat in the oven for the best texture!

Variations
Cheese Alternatives
If you want to switch up the cheese, try Monterey Jack cheese. It melts well and adds a creamy texture. For those who prefer plant-based options, vegan cheese works too. Look for a brand that melts nicely for the best results.
Spice Level Adjustments
You can adjust the spice level of your muffins easily. Use mild jalapeños for a gentle kick, or opt for hot peppers if you want more heat. You can also add spices like cayenne or smoked paprika to enhance the flavor. Just a pinch can make a big difference!
Add-ins for More Flavor
Want to make your muffins even tastier? Stir in some corn kernels for a sweet crunch. Fresh herbs like chives or cilantro can add a fresh taste. These add-ins will elevate your cornbread muffins to new heights!
Storage Info
Storing Muffins
You can store your Cheddar Jalapeño Cornbread Muffins at room temperature. Keep them in a sealed container. This keeps them fresh for about two days. If you want longer storage, place them in the fridge. They can last up to a week in the fridge. Just remember to let them cool completely before storage.
Freezing Muffins
Freezing these muffins is a great way to save them for later. Wrap each muffin in plastic wrap. Then, place them in a freezer bag. This helps prevent freezer burn. You can freeze them for up to three months. When you want to enjoy a muffin, take it out of the freezer. Let it thaw at room temperature or microwave it for a few seconds. For best results, reheat them in the oven at 350°F. This makes them warm and crispy again.
Shelf Life
At room temperature, the muffins last about two days. In the fridge, they can stay fresh for about a week. If you freeze them, you have up to three months. Make sure to check them for any signs of spoilage. If they smell off or have mold, it’s best to toss them. Storing them correctly helps keep their delicious flavor intact.
FAQs
Can I make Cheddar Jalapeño Cornbread Muffins ahead of time?
Yes, you can make these muffins ahead of time. Bake them and let them cool completely. Store them in an airtight container at room temperature for up to two days. For longer storage, freeze them for up to three months. Just thaw them in the fridge overnight before serving.
Can I substitute buttermilk?
Yes, you can use regular milk or milk with vinegar as a substitute. To make a quick buttermilk, mix 1 cup of milk with 1 tablespoon of vinegar or lemon juice. Let it sit for five minutes before using. This will give you a similar tangy flavor.
How do I know when the muffins are done baking?
Besides the toothpick test, look for golden brown tops and a firm texture. Gently press the top; if it springs back, they are done. You can also listen for a slight crackling sound as they bake.
What can I serve with these muffins?
These muffins pair well with honey butter or spicy dips. Try serving them with chili, soup, or a fresh salad. You can also enjoy them with a slice of cheese or avocado for a tasty snack.
You can make delicious Cheddar Jalapeño Cornbread Muffins easily. We covered the key ingredients, from dry to wet. Mixing them correctly is crucial for great texture. Remember to preheat the oven and prepare your muffin tin well.
Use tips to enhance flavor and solve common baking issues. Feel free to explore variations to suit your taste. Lastly, proper storage helps keep them fresh. Enjoy your baking and the tasty result

Cheddar Jalapeño Cornbread Muffins
Ingredients
- 1 cup cornmeal
- 1 cup all-purpose flour
- 1 tablespoon baking powder
- 1/2 teaspoon salt
- 1/2 cup shredded sharp cheddar cheese
- 1/2 cup jalapeños, finely chopped
- 1/4 cup granulated sugar
- 1 cup buttermilk
- 1/4 cup vegetable oil
- 2 large eggs, lightly beaten
Instructions
- Begin by preheating your oven to 400°F (200°C). Prepare a muffin tin by lining it with paper liners or lightly greasing each cup with cooking spray or butter to prevent sticking.
- In a large mixing bowl, combine the cornmeal, all-purpose flour, baking powder, and salt. Using a whisk, blend these dry ingredients thoroughly until there are no lumps.
- Add the granulated sugar, shredded cheddar cheese, and finely chopped jalapeños to your dry mixture. Stir them in gently to ensure they are evenly distributed throughout the flour mixture.
- In a separate bowl, whisk together the buttermilk, vegetable oil, and lightly beaten eggs until the mixture looks uniform and creamy.
- Pour the wet ingredients into the bowl with the dry ingredients. Carefully fold everything together with a spatula or wooden spoon until the dry ingredients are just moistened. Aim for a few lumps; overmixing can lead to tough muffins.
- Using a spoon or a muffin scoop, divide the batter evenly into the prepared muffin cups, filling each one about two-thirds full to allow for rising.
- Place the muffin tin in the preheated oven and bake for 15-18 minutes. They are done when the tops are golden brown and a toothpick inserted into the center comes out clean.
- Once baked, remove the muffins from the oven and let them cool in the pan for about 5 minutes. Afterward, carefully transfer the muffins to a wire rack to cool completely.


. {{image_4}} Vegetarian Mini Quiche Cups For a tasty vegetarian option, use only veggies. You can add spinach, mushrooms, and bell peppers. Mix in some cheese for creaminess. This keeps the dish light yet filling. You can also use fresh herbs like basil or oregano for extra flavor. Try to use seasonal veggies for the best taste. Meat Lovers' Option If you love meat, this option is for you. Use diced ham, crispy bacon, or cooked sausage. Combine these with your favorite cheese and veggies. This mix gives a hearty bite to each quiche cup. You will enjoy the rich, savory flavors in every bite. Gluten-Free Crust Alternatives If you need a gluten-free crust, use almond flour or cornmeal. You can also find ready-made gluten-free pie crusts at the store. Another idea is to make a crustless quiche. Just pour the filling into greased muffin tins. This way, you skip the crust but keep all the flavor. Dairy-Free Ingredient Swaps For a dairy-free version, use plant-based milk like almond or soy. Swap regular cheese for dairy-free cheese options. Nutritional yeast can add a cheesy flavor without dairy. Try these swaps to enjoy mini quiche cups without dairy. It keeps the recipe tasty and friendly for all diets. For the full recipe, check out the details in the previous section. To keep your mini quiche cups fresh, proper storage is key. - Refrigerating Leftovers: Place any leftover mini quiche cups in an airtight container. They will stay fresh for up to 3 days in the fridge. Just make sure they cool down before sealing. You can also wrap them tightly in plastic wrap for extra protection. - Freezing for Long-Term Storage: If you want to save them longer, freezing works well. First, let the quiche cups cool completely. Then, place them on a baking sheet and freeze until solid. After that, transfer them to a freezer-safe bag or container. They can last up to 2 months in the freezer. Remember to label the container with the date you made them. When you're ready to enjoy your mini quiche cups again, follow these tips for the best results. - Best Methods for Serving Again: The oven is the best way to reheat quiche cups. Preheat your oven to 350°F (175°C). Place the cups on a baking sheet and heat for about 10-15 minutes. This method keeps the crust crisp and the filling warm. - Retaining Flavor and Texture: Avoid using a microwave if you can. Microwaving can make the crust soggy and the filling rubbery. If you must use a microwave, heat them in short bursts of 30 seconds. Check often to ensure they don’t overcook. Following these tips will help you enjoy your mini quiche cups just like fresh! For the full recipe, check the [Full Recipe]. Bake Mini Quiche Cups for 18 to 20 minutes at 375°F (190°C). The tops should turn golden brown. You want the centers set but still moist. Keep an eye on them in the last few minutes. Each oven heats a bit differently. Yes, you can make Mini Quiche Cups ahead of time. Prepare them and store in the fridge for up to two days. You can also freeze them for up to a month. Just be sure to cool them completely before storing. To reheat, place them in the oven at 350°F (175°C) until warm. Great ingredients include: - 6 large eggs - 1 cup milk (whole or 2%) - 1 cup shredded cheese (like cheddar or mozzarella) - 1 cup diced vegetables (bell peppers, spinach, or mushrooms) - 1/2 cup cooked ham or crispy bacon (optional) - Garlic powder and onion powder for flavor These create a tasty base for your quiche cups. You can mix and match fillings easily. Try different cheeses or veggies. For a spicy kick, add jalapeños. If you love herbs, include fresh basil or thyme. Think about seasonal produce too. This makes your quiche cups unique and fun. Mini quiche cups are fun and easy to make. You can mix eggs, dairy, cheese, meats, and veggies to create tasty treats. Remember to preheat your oven and choose the right crust. I shared tips on filling them just right and baking them perfectly. Explore variations like vegetarian or gluten-free options, and learn how to store leftovers. With these steps and ideas, you have all you need for quiche success. Enjoy making your own mini quiche cups! They’ll be a hit with everyone.](https://joymealplan.com/wp-content/uploads/2025/06/d5cf7460-7b4e-43b3-accb-372b25b26cc9-768x768.webp)
![- Preheat the oven to 400°F (200°C). - Rinse and trim the asparagus. First, I set my oven to 400°F (200°C). This temperature roasts the asparagus just right. Next, I rinse the asparagus under cold water. I clean each stalk well. To trim, I gently bend the end until it snaps. This removes the tough part. If you prefer, use a knife for a clean cut. - Mix garlic, olive oil, lemon zest, lemon juice, and seasonings. Now, let’s make the marinade! In a small bowl, I combine minced garlic, olive oil, lemon zest, and lemon juice. I add sea salt, black pepper, and red pepper flakes for a little heat. Whisk all these together until well mixed. This marinade brings a burst of flavor to our asparagus. - Toss asparagus in marinade. - Roast asparagus for 12-15 minutes in preheated oven. Next, I lay the asparagus on a baking sheet. I drizzle the marinade over them, making sure each spear gets coated. I use my hands or a spoon to toss gently. Then, I spread them out in a single layer. I place the tray in the hot oven. I roast the asparagus for 12-15 minutes. Halfway through, I give them a stir. This helps them cook evenly. When done, they should be tender with a bit of crispness. If you want, sprinkle grated Parmesan cheese over the asparagus in the last two minutes of roasting. It melts nicely and adds richness. Once finished, I take them out and garnish with fresh parsley. This adds color and makes the dish pop! For the complete recipe, check out the [Full Recipe]. How do you tell when asparagus is done cooking? Look for a bright green color. The stalks should be tender but still firm. You can also poke them with a fork to check for tenderness. If they bend easily but don’t break, they’re perfect! Want to boost the flavor? Try adding fresh herbs like thyme or basil. You can also use spices like garlic powder or onion powder. If you like a kick, sprinkle red pepper flakes on top. Just a pinch adds great heat without overpowering the dish. How can you serve Garlic Lemon Asparagus? First, arrange the asparagus on a nice platter. Keep them in a single layer for a neat look. You can sprinkle some extra lemon zest on top for brightness. Finally, add fresh parsley for a splash of color. This makes your dish pop and look tasty! For the full recipe, check out the complete guide. {{image_4}} You can cook Garlic Lemon Asparagus in different ways. Each method gives a unique taste. - Grilling: This adds a smoky flavor. You will get nice grill marks. But you should watch it closely. It cooks fast and may burn. - Roasting: This method brings out the natural sweetness. You will get a tender inside with a slight crisp. It takes a short time at high heat, which is perfect for busy cooks. - Sautéing on the stovetop: This is quick and easy. Heat oil in a pan, add the asparagus, and cook for a few minutes. You get a fresh taste and a bright green color. You can switch ingredients to suit your taste or diet. - Cheese Options: If you want a vegan dish, skip the Parmesan. You can use nutritional yeast for a cheesy taste without dairy. Feta cheese is also a great option if you want a different flavor. - Citrus Variations: Instead of lemon, try lime or orange. Each fruit brings its own twist. Lime gives a tangy kick, while orange adds sweetness. Many people have different diets. You can easily adapt this dish. - Gluten-Free: This recipe is already gluten-free. Just make sure any added ingredients are too. - Dairy-Free: Skip the cheese or use a dairy-free alternative. This keeps the dish light and fresh. - Low-Carb: Asparagus is low in carbs, making it perfect for health-conscious eaters. You can enjoy it without worries about carbs. Try these variations to make Garlic Lemon Asparagus your own! For the complete recipe, check the [Full Recipe]. To keep your Garlic Lemon Asparagus fresh, follow these tips: - Refrigeration: Place leftovers in an airtight container. This helps keep moisture in and prevents odors from other foods. Store them in the fridge for best results. - Freezing: If you want to save them longer, consider freezing. First, blanch the asparagus in boiling water for two minutes. Then cool them in ice water. Drain and place in freezer bags. Remove air to avoid freezer burn. When it's time to enjoy them again, you should reheat properly. - Reheating: For the best taste, heat in a skillet over medium heat. Add a splash of olive oil to keep them moist. Stir occasionally for even heating. You can also reheat them in the oven at 350°F (175°C) for about 10 minutes. Garlic Lemon Asparagus lasts about 3 to 5 days in the fridge. - Check for freshness: Look for any signs of spoilage, like discoloration or a sour smell. If they seem off, it's best to toss them. To maintain texture after storage, try these tips: - Avoid overcrowding in the container. This helps air circulate and keeps them crisp. - When reheating, don't overcook them. This keeps their vibrant color and crunch. Following these steps will help you enjoy your Garlic Lemon Asparagus longer, keeping the flavors fresh and delicious! For the complete preparation guide, check the Full Recipe. What are the health benefits of asparagus? Asparagus is low in calories and high in nutrients. It is rich in vitamins A, C, E, and K. This vegetable also has folate, which helps with cell growth. Asparagus is a good source of fiber, aiding digestion. Plus, it has antioxidants that fight free radicals in the body. Can I prepare Garlic Lemon Asparagus in advance? Yes, you can prepare Garlic Lemon Asparagus in advance. You can wash and trim the asparagus a day before. Mix the marinade and store it in the fridge. When you are ready to eat, toss the asparagus in the marinade and roast them. This helps the flavors meld well. Can I use frozen asparagus for this recipe? Yes, you can use frozen asparagus for this recipe. However, fresh asparagus will taste better. If using frozen, thaw them first. Drain excess water to avoid sogginess. Then proceed with the marinade and roasting steps. How can I make this recipe spicier? To make this recipe spicier, add more red pepper flakes. You can also add sliced fresh jalapeños or a dash of hot sauce. Mix these into the marinade for an extra kick. Start with a small amount and adjust to your taste. What dishes pair well with Garlic Lemon Asparagus? Garlic Lemon Asparagus pairs well with many dishes. It complements grilled chicken, fish, or steak. You can also serve it with pasta or rice. A light salad also works nicely with this dish. How can I incorporate this recipe into a meal prep plan? Incorporate Garlic Lemon Asparagus into your meal prep by adding it to your favorite meals. Roast a big batch and store it in the fridge. Use it as a side dish throughout the week. It can add color and flavor to your meals. In this blog post, we covered a simple yet delicious Garlic Lemon Asparagus recipe. We explored fresh ingredients, step-by-step cooking instructions, and useful tips for perfecting your dish. You learned about different cooking methods and diet modifications, plus how to store leftovers. Garlic Lemon Asparagus is a versatile side that enhances any meal. Try it out and enjoy creating your own flavors!](https://joymealplan.com/wp-content/uploads/2025/07/a67e5927-9a3c-4503-bb74-543c28219cb2-768x768.webp)


