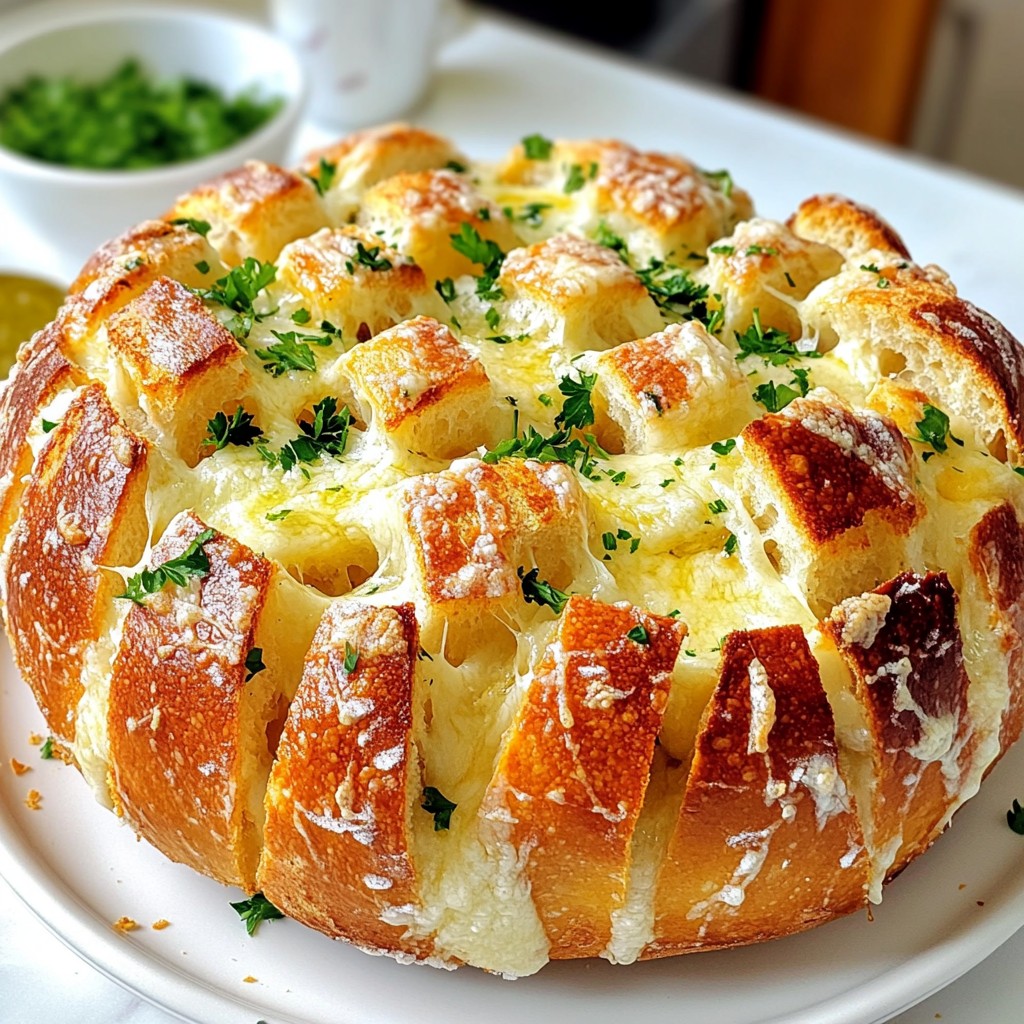
Are you ready to impress your friends and family with a warm, cheesy delight? Cheesy Garlic Pull Apart Bread is the perfect blend of gooey cheese and rich garlic flavor. This easy recipe will have your kitchen smelling amazing. With just a few simple ingredients and straightforward steps, you can create a crowd-pleaser everyone will love. Let's dive into the cheesy goodness and make your gatherings unforgettable!
Why I Love This Recipe
- Irresistible Flavor: The combination of garlic, butter, and melted cheese creates a mouthwatering experience that is hard to resist.
- Perfect for Sharing: This pull-apart bread is designed for sharing, making it an ideal appetizer for gatherings or parties.
- Easy to Make: With simple ingredients and straightforward instructions, this recipe is beginner-friendly and quick to prepare.
- Customizable: You can easily add your favorite herbs, spices, or additional cheeses to make this recipe your own.
Ingredients
Main Ingredients
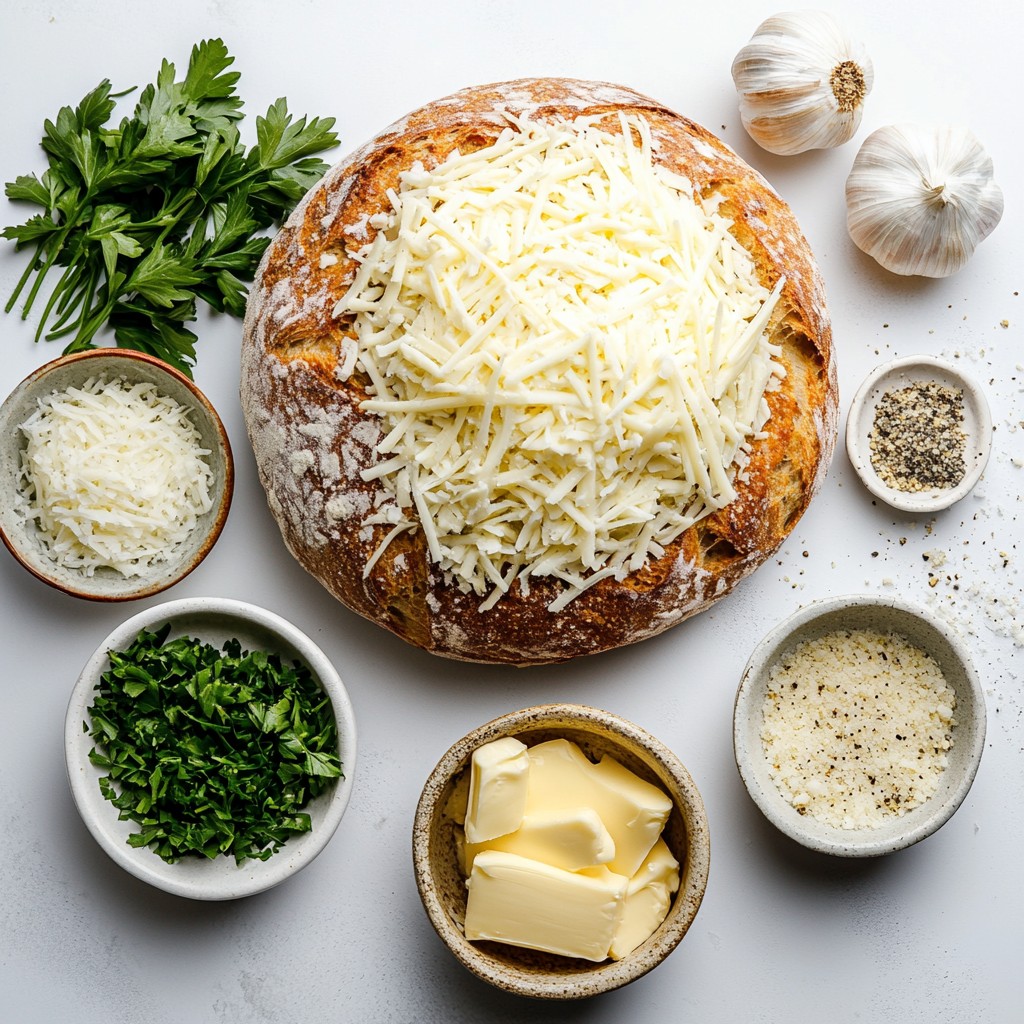
For this cheesy garlic pull-apart bread, you need a few key items:
- Bread: I love using a large round loaf of sourdough or ciabatta. Both have a nice crust and soft inside.
- Cheese: Shredded mozzarella and parmesan cheese are perfect for that gooey, cheesy pull.
- Garlic and Herbs: You will need 4 cloves of minced garlic and 2 tablespoons of fresh parsley. The garlic gives a rich flavor, while parsley adds a fresh touch.
Optional Ingredients
You can boost flavor with some optional add-ins:
- Add-ins: Think about adding cooked bacon bits or sun-dried tomatoes for a savory twist.
- Alternative Cheeses: Try switching mozzarella with cheddar or pepper jack for extra kick. Or use vegan cheese for a plant-based option.
- Spices: A sprinkle of red pepper flakes can add a nice heat. Italian seasoning works well too for an herby flavor.
Step-by-Step Instructions
Preparation Steps
1. Preheating the oven: Start by setting your oven to 350°F (175°C). This helps the bread bake evenly.
2. Cutting the loaf method: Use a serrated knife to cut the bread. Cut it into a grid pattern. Be careful not to slice all the way through the bottom crust. Aim for 1-inch squares. This keeps the bread connected for easy pulling later.
Mixing and Infusing Flavors
1. Garlic butter preparation: In a mixing bowl, combine ½ cup melted unsalted butter, 4 cloves minced garlic, 2 tablespoons chopped parsley, 1 teaspoon Italian seasoning, and a pinch of salt and pepper. Mix well until combined.
2. Application technique for butter mixture: Gently pull apart the bread sections. Use a brush or spoon to drizzle the garlic butter mixture into each gap. Make sure every part of the bread gets flavor.
Baking Process
1. Wrapping and baking instructions: Wrap the entire loaf in aluminum foil. Place it on a baking sheet to catch drips. Bake for 15-20 minutes. This warms the bread and blends the flavors.
2. Final steps for achieving perfect cheese consistency: After 20 minutes, remove the foil. Bake for another 10-15 minutes. This step makes the cheese bubbly and golden brown. Let the bread cool for a few minutes before serving. Enjoy the warm, cheesy goodness!
Tips & Tricks
Best Practices for Cutting Bread
To cut your bread without breaking it, use a serrated knife. This knife helps you slice through the crust easily. Hold the bread steady with one hand. Make long, slow cuts to avoid tearing. Aim for about 1-inch squares. This size is perfect for pulling apart.
When you cut the bread, keep it connected at the bottom. This way, the pieces stay together. After cutting, gently pull apart each section. This allows you to add the butter and cheese evenly. The flavors will spread better this way.
Achieving Optimal Cheese Melting
For perfect cheese melting, the oven's temperature matters. Preheat it to 350°F (175°C). This ensures even cooking and melting. If the oven is too hot, the cheese may burn.
Timing is also key. Bake the bread wrapped in foil for 15-20 minutes. Then, remove the foil and bake for another 10-15 minutes. This lets the cheese bubble and brown nicely. Check on the bread to see when the cheese is golden and bubbly.
Plating Suggestions
For serving, place the bread on a large, colorful plate. This makes it look more inviting. You can also use a wooden board for a rustic touch.
Dipping sauces enhance the flavor. Try a marinara sauce or a garlic aioli. These sauces pair well with the cheesy bread. They add a fun twist to each bite.
Pro Tips
- Choose the Right Bread: For the best flavor and texture, opt for a crusty bread like sourdough or ciabatta. These types hold up well to the cheesy filling and provide a delightful crunch.
- Infuse More Flavor: Add crushed red pepper flakes or a bit of lemon zest to the garlic butter mixture for an extra kick of flavor. This can elevate the taste profile of the bread.
- Experiment with Cheeses: Feel free to mix in different types of cheese such as cheddar or gouda for a unique twist. Combining cheeses can enhance the overall flavor and create a gooey texture.
- Serve Fresh: This bread is best enjoyed fresh out of the oven. If you have leftovers, reheat them briefly in the oven to revive that melty cheese and crispy crust.
Variations
Cheese Variation Ideas
You can customize your cheesy garlic pull apart bread with different cheeses. Try using cheddar for a sharp kick or gouda for a smoky flavor. Mixing mozzarella and parmesan gives a nice blend of creaminess and saltiness. If you're vegan, you can use plant-based cheese. Brands now offer great options that melt well. This way, you can still enjoy the cheesy goodness while sticking to your diet.
Flavor Twist Options
Want to spice things up? Add red pepper flakes to the garlic butter for heat. You can also mix in sautéed onions or bell peppers for extra flavor. Chopped spinach or sun-dried tomatoes work well too. If you want protein, consider adding cooked bacon or diced ham. These additions will make your bread even more delicious and fun to pull apart.
Gluten-Free Adaptations
If you're gluten-free, you can still enjoy this dish! Look for gluten-free bread options like gluten-free ciabatta. Make sure the bread is sturdy enough to hold the cheese and butter. You can also use gluten-free flour to make your own bread at home. When adapting, it’s key to ensure that your cheese and other ingredients are gluten-free. Enjoy this tasty treat without worry!
Storage Info
Short-Term Storage
To store your cheesy garlic pull apart bread, wrap it in plastic wrap. This keeps it fresh for about two days at room temperature. You can also place it in an airtight container. If you want to reheat it, preheat your oven to 350°F (175°C). Place the bread on a baking sheet and warm it for about 10-15 minutes. This brings back that gooey cheese and soft bread feel.
Long-Term Storage
If you need to keep it longer, freezing is a great option. First, let the bread cool completely. Then, wrap it tightly in aluminum foil. Place the wrapped bread in a freezer bag. Be sure to squeeze out all the air. You can freeze it for up to three months. When you're ready to enjoy it, thaw it in the fridge overnight. Reheat it in the oven to restore its texture.
Preventing Stale Bread
To keep your bread fresh, store it in a cool, dry place. Avoid direct sunlight, as this can cause it to dry out. You can also place a slice of apple or a piece of bread in the bag with it. This adds moisture and helps maintain freshness. If your bread does get stale, you can revive it by lightly steaming it or warming it with a damp cloth in the microwave for a few seconds.
FAQs
Common Questions
How do I know when the bread is done baking? You can tell the bread is done when the cheese is bubbly and golden brown. The crust should look crisp, and the bread will smell amazing. You can also tap the bottom of the loaf; it should sound hollow.
Can I make this recipe ahead of time? Yes, you can prep the bread ahead. Cut it and add the garlic butter mix. Wrap it in foil and store it in the fridge. Bake it when you are ready to serve to keep it fresh.
Troubleshooting
Why did my cheese not melt properly? If the cheese didn’t melt, it may be because the oven temperature was too low. Always preheat the oven to 350°F. Also, using fresh cheese helps it melt better than pre-shredded types.
How can I make it less greasy? To reduce grease, use less butter in the garlic mix. You can also drain some melted butter before adding it to the bread. Another tip is to sprinkle less cheese or use low-fat options.
Serving Suggestions
What meals pair well with cheesy garlic pull apart bread? This bread goes great with soups and salads. It makes a delicious side for pasta dishes, too. Try it with a fresh tomato soup or a creamy Alfredo pasta.
Can I use this recipe for a different type of bread? Absolutely! You can use any round bread. Try focaccia or a bagel for a twist. Just keep the same cutting and filling method to enjoy the cheesy goodness.
This post covered all you need to make cheesy garlic pull-apart bread. We explored ingredient choices like bread types and cheese selections. I shared simple preparation steps, baking tips, and creative variations to try. Remember, store your leftovers properly to keep them fresh. Experiment with flavors and enjoy this dish at any meal. Happy cooking!


