Chicken Pot Pie Pasta Comforting and Creamy Dish

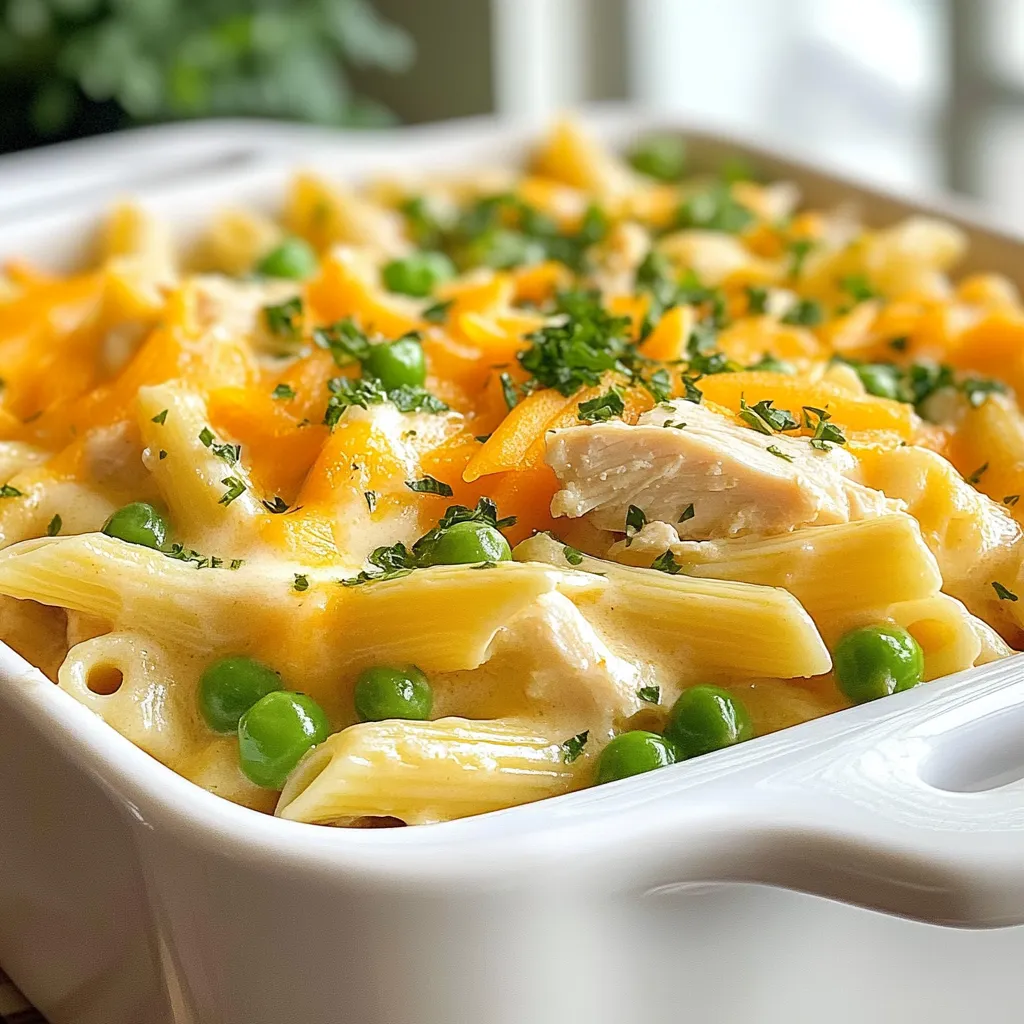
Craving comfort food that warms your heart? Look no further! Chicken Pot Pie Pasta offers all the cozy flavors of your favorite pie in a creamy, pasta dish. It’s simple to make and loaded with tender chicken, fresh vegetables, and rich sauce. In this recipe, I’ll guide you step-by-step to whip up this satisfying meal that’s perfect for any night. Get ready to fill your kitchen with delicious aromas!
Why I Love This Recipe
- Comfort Food Redefined: This dish combines the classic flavors of chicken pot pie in a convenient pasta form, making it the ultimate comfort food.
- Quick and Easy: With a total time of just 30 minutes, this recipe is perfect for busy weeknights when you want a hearty meal without the fuss.
- Customizable Ingredients: Feel free to swap the vegetables or use leftover chicken, allowing for endless variations and personal touches.
- Cheesy Goodness: Add cheddar cheese on top for that extra gooey texture that elevates the dish and makes it even more satisfying.
Ingredients
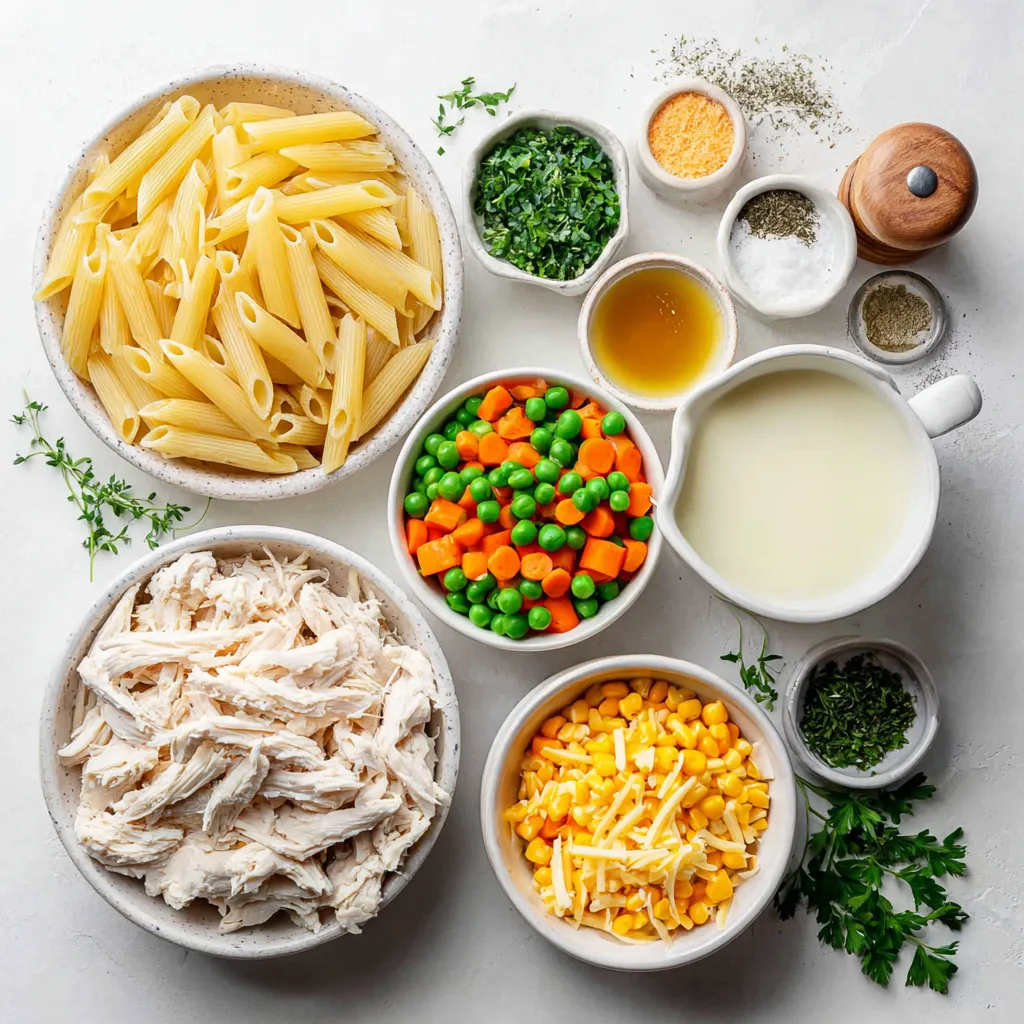
When I make Chicken Pot Pie Pasta, I love using simple, fresh ingredients. Here’s what you need:
– 2 cups cooked pasta (penne or rigatoni)
– 2 cups cooked chicken, shredded
– 1 cup frozen mixed vegetables (peas, carrots, corn)
– 1 cup chicken broth
– 1 cup heavy cream
– 1 teaspoon onion powder
– 1 teaspoon garlic powder
– 1 teaspoon dried thyme
– 2 tablespoons olive oil
– Salt and pepper, to taste
– 1/2 cup shredded cheddar cheese (optional for extra creaminess)
– Fresh parsley, chopped (for garnish)
Each ingredient plays a key role. The pasta gives a hearty base. The chicken adds protein and flavor. Mixed veggies bring color and nutrients. Chicken broth and cream make the dish creamy and rich. The spices enhance taste with warm notes. Finally, cheese adds a delicious finish.
With these ingredients ready, you can enjoy a comforting meal that’s quick to prepare.

Step-by-Step Instructions
Preparing the Pasta
First, grab a large pot. Fill it with salted water and bring it to a boil. Once boiling, add 2 cups of your pasta. I like penne or rigatoni for this dish. Cook until al dente, as the package says. Once done, drain the pasta well and set it aside in a large mixing bowl.
Sautéing the Chicken
Next, take a spacious skillet and heat 2 tablespoons of olive oil over medium heat. Wait until the oil shimmers. Then, add 2 cups of shredded chicken to the skillet. Sauté the chicken for about 2-3 minutes. Stir often until the chicken is warm and gets a slight golden color.
Adding the Vegetables and Sauce
Now, it’s time to add flavor. Toss in 1 cup of frozen mixed vegetables. These can be peas, carrots, and corn. Cook for around 5 minutes, stirring frequently. Once the veggies are tender, pour in 1 cup of chicken broth and 1 cup of heavy cream. Stir well to mix everything. Add 1 teaspoon each of onion powder, garlic powder, and dried thyme. Season with salt and pepper to taste. Bring this mixture to a gentle simmer. Let the flavors mingle.
Combining Pasta with Sauce
Now, add the cooked pasta to the skillet. Toss everything together so the pasta gets coated in the creamy sauce. Let it cook on low heat for 3-4 minutes. This helps the flavors meld nicely.
Adding Cheese (Optional)
If you love cheese, sprinkle 1/2 cup of shredded cheddar cheese on top. Cover the skillet for a minute or two. This will help the cheese melt without overcooking the pasta.
Garnishing and Serving
Finally, remove the skillet from heat. Garnish your dish with fresh chopped parsley for a nice touch. For presentation, serve the pasta in shallow bowls. A sprinkle of extra parsley and some freshly ground black pepper can make it look inviting. Enjoy your meal!
Tips & Tricks
Cooking Tips
To make sure your pasta is al dente, start with salted water. Bring the water to a rolling boil. Cook the pasta just until it is firm to the bite. This usually takes about 1-2 minutes less than the package says. Once done, drain it quickly and set it aside.
When sautéing chicken, use a spacious skillet. Heat olive oil over medium heat until it shimmers. Add the shredded chicken and stir often. Cook for 2-3 minutes until it gets warm and slightly golden. This step keeps the chicken juicy and flavorful.
Flavor Enhancements
To boost flavor, consider adding other seasonings. Try paprika for a smoky taste, or rosemary for a fresh note. You could also add a pinch of cayenne for heat.
For homemade broth, simmer chicken bones with herbs and veggies. This makes a rich base for your dish. Using homemade broth adds depth to the flavor, making each bite special.
Presentation Tips
Serve your chicken pot pie pasta in shallow bowls. This style gives it a rustic look. A sprinkle of fresh parsley adds a touch of color and brightness.
For extra appeal, use garnishes like cracked black pepper. You can also drizzle a bit of olive oil on top. These simple touches make the dish look inviting and delicious.
Pro Tips
- Use Rotisserie Chicken: For a quicker preparation, consider using store-bought rotisserie chicken. It saves time and adds great flavor!
- Customize Your Veggies: Feel free to swap in your favorite vegetables or whatever you have on hand. Broccoli, bell peppers, or spinach work beautifully.
- Thicken the Sauce: If you prefer a thicker sauce, mix 1 tablespoon of cornstarch with cold water and stir it into the mixture before simmering.
- Make It Ahead: This dish stores well in the fridge for a couple of days. You can easily reheat it for a quick meal!

Variations
Protein Swaps
You can swap chicken for turkey. This works great if you have leftovers. Rotisserie chicken is also a quick and tasty option. Just shred it and mix it in. For a vegetarian twist, use plant-based proteins. Chickpeas or lentils add a nice texture and flavor.
Vegetable Alternatives
Feel free to customize the dish with seasonal veggies. Fresh carrots, green beans, or spinach work well. You can also use your favorite herbs for extra taste. Fresh thyme or parsley can brighten up the meal. Just add them right before serving for the best flavor.
Different Cheese Options
Cheese can change the whole dish. Cheddar cheese gives a rich flavor, but try mozzarella for a stretchier bite. Crumbled feta or goat cheese can add a tangy twist. If you want vegan cheese, look for options made from nuts or soy. They melt nicely and can still add creaminess to your pasta.
Storage Information
Refrigeration Tips
To store your Chicken Pot Pie Pasta, use an airtight container. This helps keep it fresh. You want to avoid any air getting in. The pasta will stay good for about three days. Remember to let it cool before sealing. If you need to reheat, use the stove or microwave.
Freezing Instructions
For longer storage, you can freeze Chicken Pot Pie Pasta. First, let it cool completely. Then, place it in a freezer-safe container. It can last for up to three months in the freezer. When you’re ready to eat, thaw it overnight in the fridge. Reheat it on the stove for the best taste. Stir it well to keep it creamy. You can also add a splash of broth if it looks dry. Enjoy your comforting meal later!
FAQs
How can I make this Chicken Pot Pie Pasta gluten-free?
You can easily make this dish gluten-free. Simply swap regular pasta for gluten-free pasta. Many brands offer great options. Look for penne or rigatoni that has a gluten-free label. You can also use gluten-free chicken broth. Always check labels to ensure all ingredients are safe.
What type of cheese works best for this recipe?
For a creamy texture, shredded cheddar cheese works best. It melts well and adds a rich flavor. You can also try mozzarella for a stretchier cheese. If you prefer something sharper, gouda or Monterey jack are great choices too. Feel free to mix different cheeses for a unique taste.
Can I use uncooked pasta instead of cooked?
Using uncooked pasta is possible, but you’ll need to adjust cooking times. Start by adding the uncooked pasta to the skillet with the broth and cream. Increase the liquid amount to cover the pasta well. Cook it for about 10-15 minutes, or until tender. Stir frequently to prevent sticking.
How do I adjust cooking times for different vegetables?
Different vegetables cook at different rates. For example, carrots take longer than peas. To adjust, add firmer veggies first, like carrots, and let them cook for a few minutes. Then, add quick-cooking vegetables, like peas, later. This way, all veggies will be tender and perfect.
Can this recipe be made in advance? If so, how?
Yes, you can make this dish in advance. Prepare it fully but leave out the cheese topping. Store the mix in an airtight container in the fridge for up to 3 days. When ready to serve, reheat it in a skillet. Add cheese right before serving for the best melt.
This blog post covered a hearty Chicken Pot Pie Pasta recipe. We detailed the ingredients, step-by-step instructions, and tips for perfecting each element. I shared ideas for variations and how to store leftovers.
You can easily customize this dish to fit your taste. Whether you swap proteins or use different veggies, the options are endless. Enjoy making this comforting meal that brings warmth to your table. Happy cookin

Chicken Pot Pie Pasta
Ingredients
- 2 cups cooked pasta (penne or rigatoni)
- 2 cups cooked chicken, shredded
- 1 cup frozen mixed vegetables (peas, carrots, corn)
- 1 cup chicken broth
- 1 cup heavy cream
- 1 teaspoon onion powder
- 1 teaspoon garlic powder
- 1 teaspoon dried thyme
- 2 tablespoons olive oil
- to taste salt and pepper
- 0.5 cup shredded cheddar cheese (optional)
- for garnish fresh parsley, chopped
Instructions
- Fill a large pot with salted water and bring it to a boil. Add the pasta and cook according to the package instructions until al dente. Once cooked, drain the pasta and set it aside in a large mixing bowl.
- In a spacious skillet, heat the olive oil over medium heat. Once the oil is shimmering, add the shredded chicken. Sauté for about 2-3 minutes, stirring occasionally, until the chicken is heated through and slightly golden.
- Incorporate the frozen mixed vegetables into the skillet with the chicken. Cook for approximately 5 minutes, stirring frequently, until the vegetables are heated and tender.
- Slowly pour in the chicken broth and heavy cream, stirring well to combine. Sprinkle in the onion powder, garlic powder, dried thyme, and season with salt and pepper to taste. Bring the mixture to a gentle simmer, allowing the flavors to blend beautifully.
- Add the cooked pasta to the skillet with the creamy chicken and vegetable mixture. Toss everything thoroughly to ensure that the pasta is well coated in the sauce. Let it cook for an additional 3-4 minutes on low heat, allowing all the flavors to meld together.
- If you like a cheesy finish, sprinkle the shredded cheddar cheese evenly over the top of the pasta. Cover the skillet for a minute or two to allow the cheese to melt slightly without overcooking.
- Once everything is heated through and the cheese has melted, remove the skillet from heat. Garnish the dish with fresh chopped parsley for a pop of color and serve warm.


![- 1 block firm tofu - 1/4 cup cornstarch - 2 tablespoons vegetable oil - 1 cup cooked brown rice - 1 cup broccoli florets - 1 cup snap peas - 1 medium carrot, julienned - 1 red bell pepper, sliced into thin strips - 1/4 cup teriyaki sauce - 1 tablespoon sesame seeds - 2 green onions, sliced thinly - Optional: lime wedges for serving This recipe for crispy teriyaki tofu bowls highlights delicious flavors and fresh veggies. You start with firm tofu because it holds its shape well when cooked. Make sure to press and drain it thoroughly before cooking. This step removes extra moisture and helps achieve that perfect crunch. Next, you coat the tofu cubes in cornstarch. This coating is key for creating a crispy exterior. The cornstarch absorbs moisture and forms a crunchy crust when you sauté the tofu. For the veggies, I love using broccoli, snap peas, carrots, and red bell pepper. These not only add color but also provide a mix of textures and flavors. They pair wonderfully with the savory teriyaki sauce. Speaking of the sauce, you can use store-bought teriyaki sauce for ease or make your own at home. Either way, the sauce adds a sweet and salty kick to the dish. Adding sesame seeds and sliced green onions on top gives the bowls a nice finish. If you want a bit of zing, serve lime wedges on the side. For the full recipe, refer to the earlier section. Enjoy making these tasty crispy teriyaki tofu bowls! Start by pressing the tofu. This step removes extra moisture. Slice the tofu into bite-sized cubes. I like to use a sharp knife for clean cuts. Next, coat the tofu. Sprinkle cornstarch over the cubes in a bowl. Toss the tofu gently until each piece is coated. This coating helps achieve a crispy texture when cooking. Heat vegetable oil in a large non-stick skillet. Use medium-high heat for the perfect crisp. Once hot, add the tofu. Cook for about 8-10 minutes. Turn the cubes to cook evenly. Watch for a golden-brown color on all sides. This is how you get that crunch that everyone loves. While the tofu cooks, steam the broccoli and snap peas. Use a steamer basket over boiling water. Steam for about 3-4 minutes. You want the veggies to be bright and tender-crisp. This keeps their color and nutrients intact. For added crunch, prepare other vegetables like carrots and bell peppers as you go. Once the tofu is crispy, lower the heat. Pour teriyaki sauce over the tofu. Stir gently to coat each piece. Allow it to cook for 1-2 more minutes. This gives the sauce time to thicken and stick to the tofu. The flavor will be rich and delicious. In each serving bowl, start with a layer of brown rice. Top it with the crispy teriyaki tofu. Add the steamed broccoli, snap peas, julienned carrots, and red bell pepper slices. The colors will make your dish pop. Finally, garnish with sesame seeds and sliced green onions. This adds a nice touch and extra flavor. For an optional zest, serve lime wedges on the side. For the full recipe, check out [Full Recipe]. To make your tofu crispy, drying is key. After pressing the tofu, pat it dry well. This helps remove extra moisture. Less moisture means a better fry and a crispier texture. The oil temperature matters too. Heat your vegetable oil over medium-high heat. If the oil is too cool, the tofu will soak up oil instead of becoming crispy. A good test is to drop a small piece of tofu in the oil. If it sizzles, you're ready to fry. To make your teriyaki tofu even tastier, consider adding spices or marinades. You can sprinkle garlic powder or ginger for extra flavor. Marinating the tofu for at least 15 minutes can also deepen its taste. Choosing the right teriyaki sauce is crucial. You can buy sauce or make your own for a fresher taste. A sauce with a balance of sweet and salty works best. Look for options with natural ingredients for a healthier dish. When serving your teriyaki tofu, pair it with sides that complement the dish. Steamed rice works great, but you can also try quinoa for a nutty flavor. Adding a side salad can enhance the meal's freshness. You can customize your bowl to fit your tastes. Try swapping out vegetables based on what you like. Add more crunch with sliced radishes or extra color with yellow bell peppers. Enjoy the freedom to make it your own! For the full recipe, refer to the section above. {{image_4}} If you want to switch up the protein, tofu isn’t your only choice. You can use chicken or tempeh instead. Both options add great flavor and texture. For chicken, choose boneless, skinless thighs for juiciness. Cut them into bite-sized pieces and cook them like the tofu. Tempeh, made from fermented soybeans, offers a nutty taste. Simply slice it and coat it in cornstarch, just like the tofu. You can make your bowls even better with seasonal veggies. In spring, try asparagus or green beans. In summer, add zucchini or bell peppers. Fall offers butternut squash or Brussels sprouts. You can also mix in leafy greens like spinach or kale. They add nutrients and a vibrant color. Mushrooms are another great choice. They bring umami and a meaty bite. While store-bought teriyaki sauce is tasty, making your own is fun and easy. Combine soy sauce, honey, garlic, and ginger for a fresh taste. Simmer it until it thickens. Other sauces can work too. Try a spicy chili sauce for heat or a peanut sauce for creaminess. Each option brings its own unique flavor to your crispy tofu bowls. For the full recipe, check out the Crispy Teriyaki Tofu Bowls. To store your leftover crispy teriyaki tofu bowls, place them in an airtight container. Make sure the bowl cools down to room temperature before sealing it. This helps keep the tofu crispy and the veggies fresh. You can store these bowls in the fridge for up to three days. If you plan to enjoy them later, it's best to keep the sauce separate until you're ready to eat. For the best texture when reheating, use an oven or a skillet. Preheat your oven to 350°F (175°C) and place the tofu bowls on a baking sheet. Heat for about 10 to 15 minutes until warmed through. If using a skillet, add a splash of water to prevent sticking and cover it. This method helps retain the crispiness of the tofu and keeps the veggies tender. You can freeze these tofu bowls for later use. To do this, let the bowls cool completely. Place the tofu and veggies in a freezer-safe container. Avoid freezing the rice, as it can become mushy. These bowls can last up to three months in the freezer. When you're ready to enjoy them, thaw in the fridge overnight and reheat using the methods above. To make tofu crispy, follow these key steps: - Press the tofu: Remove as much water as you can. - Cube the tofu: Cut it into even, bite-sized pieces. - Dry the tofu: Pat each piece with a paper towel. - Coat with cornstarch: Sprinkle cornstarch evenly over the tofu. - Heat the oil: Use a hot skillet with vegetable oil. - Cook until golden: Sauté the tofu for about 8-10 minutes, turning it often. These steps help create a crispy texture that you will love. Yes, you can easily make this dish vegan. Here are some simple swaps: - Use plant-based teriyaki sauce: Check labels for non-vegan ingredients. - Add more vegetables: Use any fresh veggies you enjoy. - Try different grains: Substitute brown rice with quinoa or farro. These changes keep the dish tasty and vegan-friendly. Store your leftover teriyaki tofu bowls with these tips: - Use airtight containers: Keep air out to maintain freshness. - Refrigerate: Store in the fridge for up to 3 days. - Separate the sauce: Keep the sauce separate to avoid sogginess. These steps help retain taste and texture. Serve your teriyaki bowls in an eye-catching way. Here are some ideas: - Layer the ingredients: Start with a base of rice, then tofu, and veggies on top. - Garnish well: Add sesame seeds and green onions for flair. - Use lime wedges: Serve with lime on the side for a zesty kick. These tips make your dish look appealing and delicious. You can find the full recipe [here](#). This guide covered making teriyaki tofu bowls from start to finish. You learned about key ingredients and how to prepare everything for a tasty meal. We shared tips for crispy tofu and ideas for variations. Remember, adjust the dish to fit your taste and enjoy it fresh or stored for later. This meal is healthy, fun, and easy to customize. Dive in and have fun cooking!](https://joymealplan.com/wp-content/uploads/2025/06/6f569fa0-62f8-4b7a-b8f1-a73cdf9881a3-768x768.webp)


