Chocolate Dipped Pretzel Rods Simple and Fun Treat

Who doesn’t love a sweet and salty treat? Chocolate dipped pretzel rods are fun to make and eat! With just a few simple ingredients, you can whip up this tasty snack in no time. Whether you’re hosting a party or looking for a fun project with kids, these pretzel rods will impress. Join me as I walk you through an easy recipe that anyone can enjoy!
Ingredients
To make chocolate dipped pretzel rods, gather these simple ingredients:
– 1 cup pretzel rods
– 1 cup dark chocolate chips (milk chocolate can be used as an alternative)
– 1 tablespoon coconut oil (optional)
– 1/4 cup colorful sprinkles or crushed nuts (optional)
– Sea salt flakes (optional)
These ingredients create a fun and tasty treat. The pretzel rods add a nice crunch. The dark chocolate gives a rich flavor. You can use milk chocolate if you prefer something sweeter. Coconut oil helps the chocolate melt smoothly. Sprinkles or nuts add a colorful touch. Sea salt gives a nice salty contrast to the sweet chocolate.Enjoy making this fun treat!
Step-by-Step Instructions
Preparing Your Workspace
Start by gathering all your tools and ingredients. You need a baking sheet, parchment paper, and a microwave-safe bowl. Line the baking sheet with parchment paper. This step stops the pretzel rods from sticking later on. Make sure your area is clean. A tidy workspace makes cooking easier and more fun!
Melting the Chocolate
In your microwave-safe bowl, mix the chocolate chips with coconut oil if you want. The coconut oil helps the chocolate melt smoother and shine brighter. Microwave the bowl in 30-second bursts. After each burst, take it out and stir. Keep going until the chocolate is smooth and fully melted. This usually takes about 1 to 2 minutes. Be careful not to burn the chocolate!
Dipping and Decorating Pretzel Rods
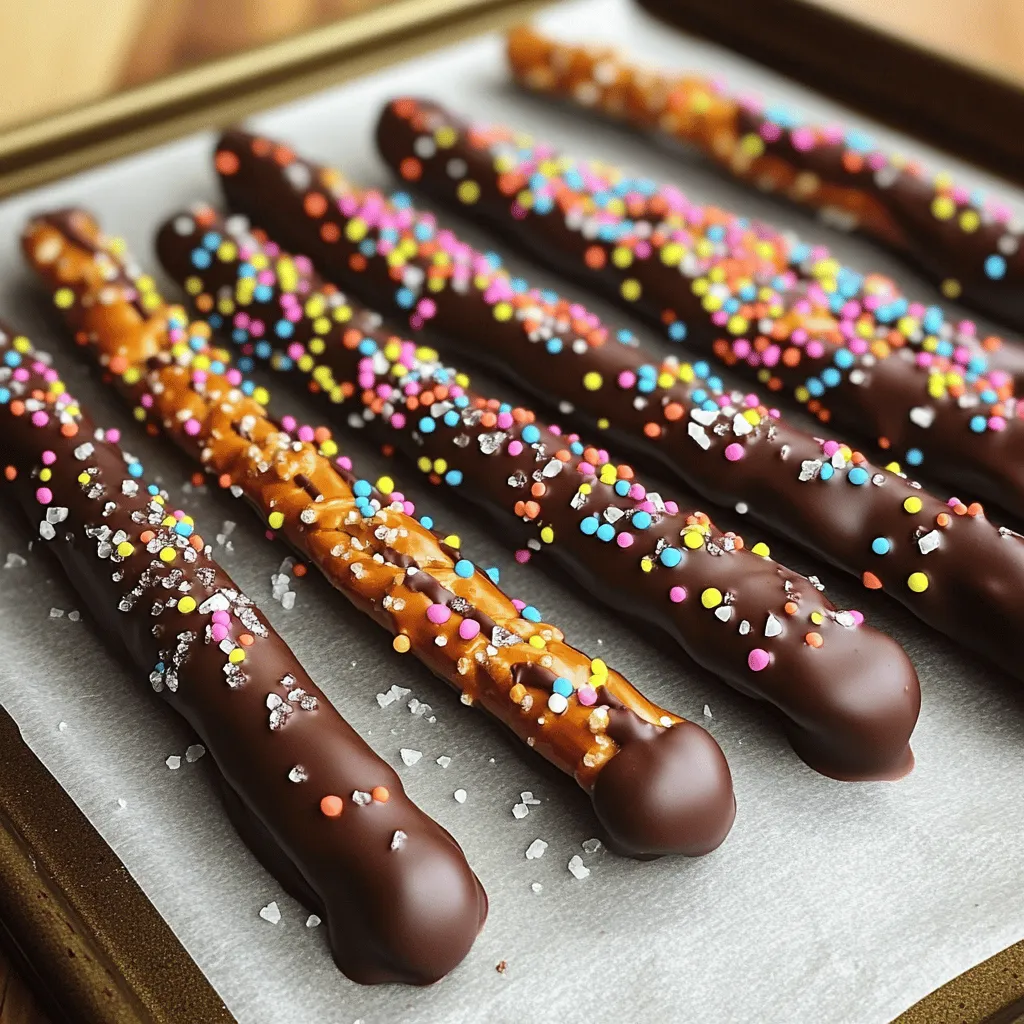
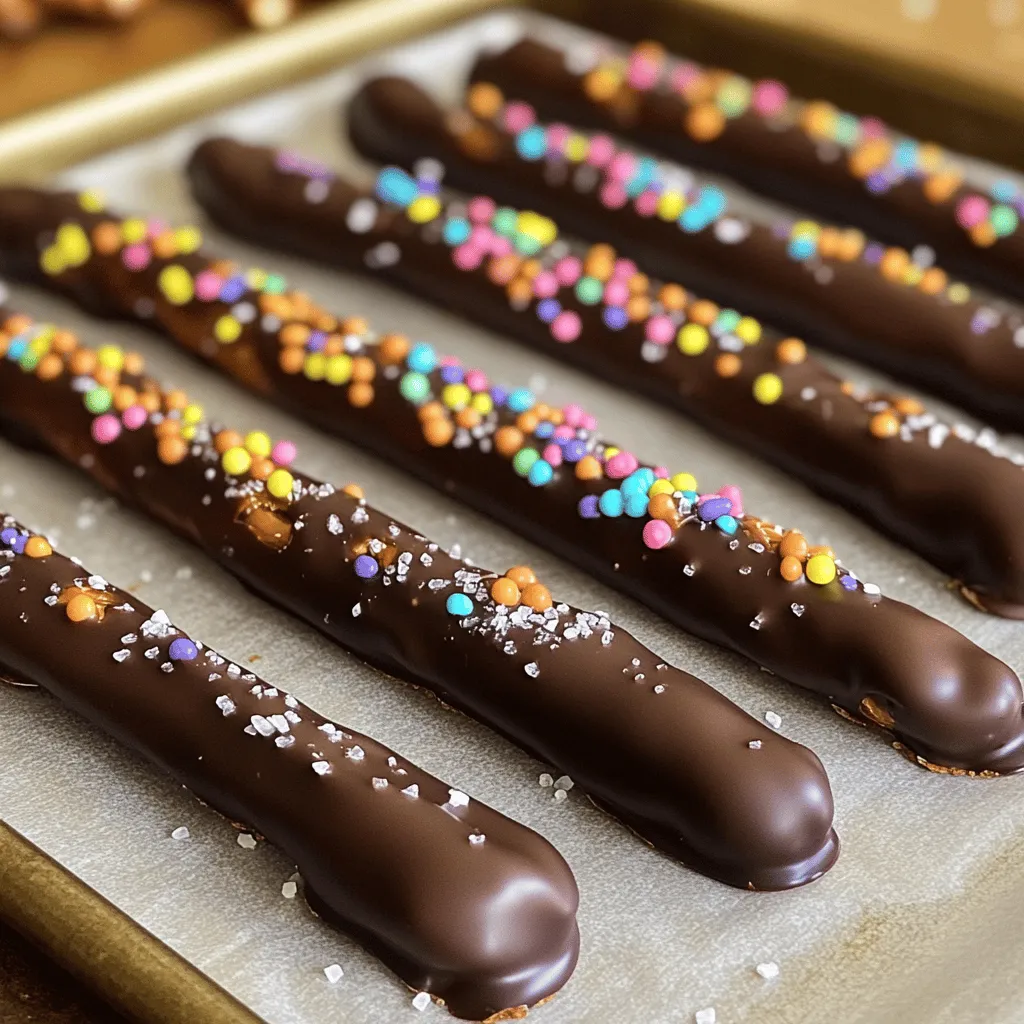
Grab a pretzel rod and dip it into the melted chocolate. Aim to coat about two-thirds of the rod. Let any extra chocolate drip back into the bowl. If you want to add sprinkles or nuts, do it now. You can dip the wet chocolate into the toppings or sprinkle them on top. Make sure to do this quickly while the chocolate is still soft.
Setting the Chocolate
Place each dipped pretzel rod on the lined baking sheet. If you like, sprinkle a bit of sea salt on top. This adds a nice sweet and salty taste. Once all the rods are dipped, pop the baking sheet into the fridge. Let them chill for about 30 minutes. This helps the chocolate harden fully. When they are done, you can enjoy or gift them to someone special.
Tips & Tricks
Achieving the Perfect Chocolate Consistency
To get smooth chocolate, use dark chocolate chips. You can also add one tablespoon of coconut oil. This makes the chocolate creamy. Microwave the chocolate in short bursts. Stir after each 30 seconds. This helps it melt evenly. Avoid overheating the chocolate. You want it silky, not burnt.
Best Practices for Using Toppings
Toppings add fun and flavor. Use colorful sprinkles or crushed nuts for a pop. Apply them right after dipping the pretzel rods. The chocolate should still be wet. This helps the toppings stick well. Don’t be shy; cover them well. You can also sprinkle sea salt for a sweet and salty mix.
How to Package for Gifting
Packaging makes your treat look special. Use clear cellophane bags for a nice touch. Tie them with a colorful ribbon. This makes a great gift for friends or family. You can also add a tag with a sweet note. Your chocolate-dipped pretzel rods will look lovely and thoughtful.

Variations
Flavor Alternatives for Chocolate Dipped Pretzel Rods
You can play with flavors when making chocolate dipped pretzel rods. Try using white chocolate or milk chocolate instead of dark chocolate. Each type gives a unique taste. You can also add flavored oils like almond or mint to the melted chocolate. This adds a fun twist to your treats.
Seasonal Decorations and Toppings
Seasonal fun can brighten up your pretzel rods. For Halloween, use orange and black sprinkles. During Christmas, red and green sprinkles work wonders. You can also drizzle colorful candy melts over the chocolate. This gives your rods a festive look. Don’t forget to use crushed candy canes in winter for a minty touch!
Pairing Ideas with Dip or Treat Options
Pair your chocolate dipped pretzel rods with other snacks. They go great with a hot cup of cocoa or coffee. You could also serve them with fruit dips like caramel or peanut butter. These combos make a delightful snack spread for parties. If you want a crunchy treat, try serving them with popcorn. The salty and sweet mix is a hit!
Storage Info
Best Practices for Storing Dipped Pretzel Rods
To keep your chocolate dipped pretzel rods fresh, store them in an airtight container. Use wax paper or parchment paper to separate the rods. This prevents them from sticking together. Place the container in a cool, dry place. Avoid areas near heat sources or direct sunlight, as heat can melt the chocolate.
How Long Do They Last?
When stored properly, chocolate dipped pretzel rods last about two weeks. The chocolate may start to lose its shine after a few days, but the taste remains great. For the best flavor and texture, enjoy them within the first week.
Freezing Tips for Long-Term Storage
If you want to keep your dipped pretzel rods longer, freezing is a great option. Wrap each pretzel rod in plastic wrap or foil. Place them in a freezer-safe bag or container. When you’re ready to enjoy them, take them out and let them thaw at room temperature. Avoid refreezing once they have thawed. This keeps the chocolate smooth and tasty.
FAQs
Can I use white chocolate instead of dark chocolate?
Yes, you can use white chocolate. It melts well and tastes sweet. You can dip the pretzel rods in white chocolate just like dark chocolate. This gives a nice change in flavor and looks great too. Try adding colorful sprinkles on top for a fun look.
How do I keep the chocolate from hardening too quickly?
To keep the chocolate smooth, work in small batches. Melt only what you need at a time. If the chocolate starts to harden, you can reheat it gently in the microwave. Just use short bursts of heat and stir often. Adding a little coconut oil can also help keep it smooth.
Where can I buy pre-made chocolate dipped pretzel rods?
You can find pre-made chocolate dipped pretzel rods at many stores. Look in the candy aisle or the bakery section. Some online retailers also sell them. This saves time if you want a quick treat.
Making chocolate-dipped pretzel rods is simple and fun. You start with basic ingredients like pretzel rods and chocolate chips. Then, you melt, dip, and decorate your treats. I shared tips to help you achieve a smooth chocolate consistency and ideas for fun toppings. You also learned how to store your creations to keep them fresh. Try different flavors and seasonal designs for variety. Enjoy this tasty snack and share it with friends!


![- 1 cup grated zucchini, well-drained - 1 cup rolled oats - 1/2 cup almond butter (or any preferred nut butter) - 1/4 cup honey or maple syrup - 1/2 cup dark chocolate chips - 1/4 cup shredded coconut - 1 teaspoon vanilla extract - 1/2 teaspoon ground cinnamon - Pinch of salt What is the nutritional value of zucchini? Zucchini is low in calories and high in vitamins. It has vitamin C and potassium. These nutrients help your body stay healthy and energized. What are the benefits of oats in energy bites? Oats give you energy and keep you full. They have fiber, which helps your digestion. Oats also provide vitamins and minerals that support your health. What are the advantages of using nut butter? Nut butter adds healthy fats and protein. This keeps you satisfied longer. It also adds a creamy texture and rich flavor to your energy bites. Nut butter is a great way to boost nutrition in snacks. These ingredients work together to create tasty bites. You get energy, flavor, and health benefits in each bite. You can find the full recipe to make these energy bites in just a few simple steps. To make great energy bites, you need to drain the zucchini well. Start by grating one cup of zucchini. Then, place it in a clean kitchen towel. Wrap it tightly and squeeze hard to get rid of extra moisture. This step is key. If the zucchini is too wet, your bites will be soggy. Next, grab a large mixing bowl. Add the well-drained zucchini, one cup of rolled oats, half a cup of almond butter, and a quarter cup of honey or maple syrup. Toss in half a cup of dark chocolate chips, a quarter cup of shredded coconut, one teaspoon of vanilla extract, half a teaspoon of ground cinnamon, and a pinch of salt. Mix everything together well. The blend should feel sticky and hold together well when pressed. Once mixed, it’s time to shape your bites. Use your hands to scoop about a tablespoon of the mixture. Roll it into a ball. Keep rolling until all the mixture is formed into bites. You want them to be about one inch in size. This size is perfect for snacking and easy to pop in your mouth. Now, refrigeration is important. Place the energy bites on a tray lined with parchment paper. Chill them in the fridge for at least 30 minutes. This helps them firm up and makes them easy to handle. The chilling time is vital for the perfect texture. After they are set, you can store them in an airtight container in the fridge. They will stay fresh and tasty for days. For the complete recipe, make sure to check the [Full Recipe]. - Over-squeezing zucchini: This may lead to dry energy bites. Remove just enough moisture to keep them moist yet firm. - Insufficient mixing of ingredients: A well-mixed blend ensures even flavor and texture. Take your time and mix until all ingredients are combined. - Suggestions for additional spices or additives: Try adding a pinch of nutmeg or a splash of almond extract for extra depth. You can also mix in some chopped nuts or dried fruit for a fun twist. - How to adjust firmness if the mixture is too sticky: If your mix feels too sticky, add more oats or shredded coconut. This will help the bites hold their shape. - Pairing ideas with other healthy snacks: Serve your energy bites with fresh fruit or yogurt for a balanced snack. They also pair well with nuts or seeds for extra crunch. - Creative ways to serve to guests: Arrange energy bites on a colorful platter. You can even use cupcake liners for individual servings. Add some dark chocolate drizzles on top for an elegant touch! {{image_4}} You can easily adapt the ingredients in these energy bites. If you need a nut-free option, try using sunflower seed butter. It works well and adds a nice flavor. You can also use tahini for a different twist. For sweeteners, you can swap honey or maple syrup with agave nectar or date syrup. Each sweetener offers a unique taste and sweetness level. Adding fruit or nuts can change the taste of your bites. Try adding dried cranberries or chopped apricots for a fruity touch. You can also mix in chopped walnuts or pecans for extra crunch. If you want to boost protein, add a scoop of your favorite protein powder. This makes the bites more filling and nutritious. You can modify these energy bites for different seasons. For summer, add fresh berries like blueberries or strawberries for a bright flavor. In winter, try adding spices like nutmeg or cloves for a cozy taste. For holidays, mix in festive ingredients like pumpkin puree or crushed peppermint. These small changes can make your energy bites perfect for any occasion. To keep your energy bites fresh, store them in an airtight container. This helps prevent moisture and keeps the bites from drying out. I recommend using glass containers as they seal well and do not absorb odors. Place the container in your fridge for the best results. The cold temperature helps maintain their texture and flavor. If you want to keep your energy bites for a longer time, freezing is a great option. To freeze, arrange the bites in a single layer on a baking sheet. Place the sheet in the freezer for about an hour. Once they are firm, transfer them to a freezer-safe bag or container. This method keeps them from sticking together. To thaw, just take out the desired number of bites and leave them at room temperature for about 15 minutes. They will be soft and ready to enjoy without losing their texture. In the fridge, your energy bites can stay fresh for about one week. Look for changes in color or smell as signs of spoilage. If they smell off or look dried out, it is best to toss them. Enjoying these bites fresh ensures you get the most flavor and nutrients. For long-term storage, consider freezing them as mentioned earlier. Yes, you can. Nut butter adds creaminess and flavor. Here are some tasty alternatives: - Peanut butter - Cashew butter - Sunflower seed butter (great for nut-free diets) - Hazelnut butter Each option brings a unique taste. Peanut butter gives a strong flavor, while cashew butter is mild and creamy. These energy bites stay fresh for up to one week in the fridge. Store them in an airtight container. They will keep their taste and texture well. If you want them to last longer, freeze them. They can last up to three months in the freezer. Just thaw in the fridge before eating. You can use other sweeteners! Here are some options: - Agave nectar - Coconut sugar - Stevia or monk fruit sweetener (for a low-calorie option) Each sweetener will change the taste slightly. Honey and maple syrup add a rich flavor. The other sweeteners are good, but may not have the same depth. Adjust the amount based on your taste preferences. This article covered the ingredients to make tasty No Bake Zucchini Energy Bites. We explored essential ingredients, their health benefits, and step-by-step instructions. I shared tips to avoid common mistakes and how to enhance flavor. You can also try different variations and learn the best ways to store these bites. In conclusion, these energy bites are easy to make and fun to customize. Enjoy the healthy benefits while delighting your taste buds!](https://joymealplan.com/wp-content/uploads/2025/06/d3b2a771-bd72-42e5-81fa-55c54917d2aa-768x768.webp)


