Chocolate Peanut Butter Cheesecake Rich and Creamy Treat

If you’re craving a dessert that combines the rich flavors of chocolate and peanut butter, you’re in for a treat! This Chocolate Peanut Butter Cheesecake is creamy, dreamy, and oh-so-delicious. With a decadent crust, a fluffy filling, and a luscious ganache, it’s a dessert that will impress not just you, but everyone who tastes it. Ready to dive in? Let’s whip up this irresistible cheesecake together!
Why I Love This Recipe
- Rich Flavor Combination: This cheesecake perfectly balances the rich flavors of chocolate and peanut butter, creating a decadent treat that’s hard to resist.
- No-Bake Delight: With minimal baking required, this recipe allows you to enjoy a creamy cheesecake without the hassle of a traditional baking process.
- Impressive Presentation: The glossy chocolate ganache and optional peanut garnish make for an eye-catching dessert that looks as good as it tastes.
- Customizable Toppings: You can easily personalize this cheesecake with your favorite toppings, whether it’s whipped cream, extra chocolate, or different nuts.
Ingredients
Main Ingredients for Cheesecake
– 2 cups cream cheese, softened
– 1 cup creamy peanut butter
– 2 cups heavy cream, cold
The main ingredients for this cheesecake are simple yet rich. Cream cheese gives the cheesecake its base. It adds a creamy texture and tangy flavor. The peanut butter brings that nutty sweetness we all love. It pairs perfectly with the cream cheese. Heavy cream is essential for that light, fluffy texture. When whipped, it adds volume and airiness.
Crust Components
– 1 ½ cups chocolate graham cracker crumbs
– ½ cup unsalted butter, melted
For the crust, I use chocolate graham cracker crumbs. These crumbs provide a sweet and chocolatey base. Mixing them with melted unsalted butter helps bind everything together. This crust is easy to make and adds a nice crunch.
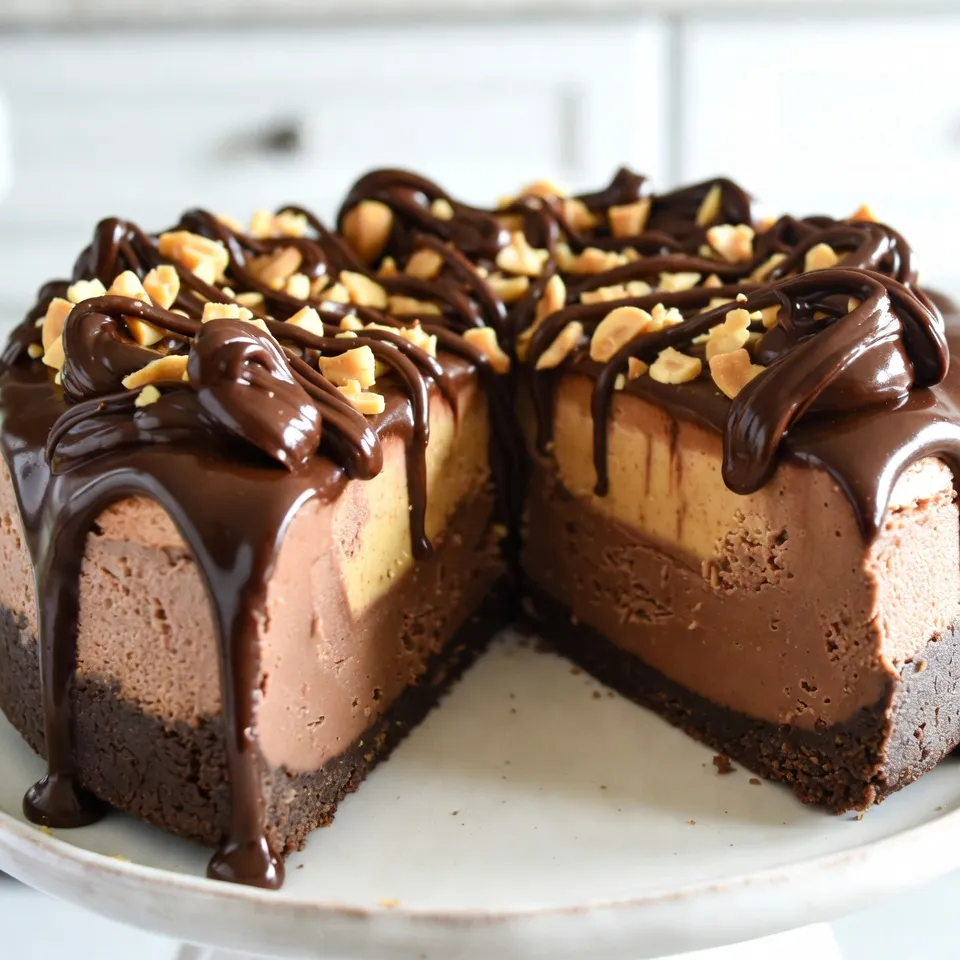
Ganache and Optional Garnishes
– ½ cup semi-sweet chocolate chips
– Chopped salted peanuts
To finish, I make a simple chocolate ganache. Melt semi-sweet chocolate chips over low heat until smooth. This ganache adds a glossy, rich chocolate layer on top. For an extra touch, sprinkle chopped salted peanuts. They add crunch and a salty contrast. This makes the dessert even more enjoyable.
This cheesecake truly combines rich flavors with a creamy texture. Every bite is a treat!

Step-by-Step Instructions
Preparing the Crust
To start, take a mixing bowl. Combine 1 ½ cups of chocolate graham cracker crumbs and ½ cup of melted unsalted butter. Stir until the crumbs feel moist. Next, press this mixture firmly into the bottom of a 9-inch springform pan. Make sure it is even and solid. Place the pan in the fridge to chill while you work on the filling.
Making the Cheesecake Filling
In a large bowl, mix 2 cups of softened cream cheese and 1 cup of creamy peanut butter. Use an electric mixer on medium speed. Beat until the mixture is smooth and creamy. Gradually add in 1 cup of powdered sugar. Mix well after each addition. Finally, stir in 1 teaspoon of pure vanilla extract to blend everything nicely.
Whipping the Heavy Cream
Now, take another chilled bowl. Pour in 2 cups of cold heavy cream. Use an electric mixer to whip it until stiff peaks form. This process takes a few minutes. Once whipped, gently fold the whipped cream into your peanut butter mixture. Use a spatula and be careful to keep the cream light and airy.
Assembling the Cheesecake
Pour the lightened peanut butter cheesecake filling over the chilled crust in the springform pan. Use a spatula to smooth the top evenly. Cover the cheesecake and refrigerate for at least 4 hours. It needs to set and feel firm when touched.
Making the Chocolate Ganache
In a small saucepan, melt ½ cup of semi-sweet chocolate chips over low heat. Stir constantly until it is smooth. Once melted, remove it from the heat. Let the ganache cool slightly so it thickens. Drizzle the ganache over the set cheesecake, allowing it to cascade down the sides.
Final Touches Before Serving
If you want an extra touch, sprinkle some chopped salted peanuts on top. This adds a nice crunch. Carefully remove the cheesecake from the springform pan. Slice it into wedges and serve on dessert plates. Enjoy your rich and creamy chocolate peanut butter cheesecake!
Tips & Tricks
Perfecting the Cheesecake Texture
Using room temperature ingredients is very important. Soft cream cheese mixes easily. It helps create a smooth texture. Take the cream cheese and peanut butter out of the fridge first. Let them warm up for about 30 minutes. This makes a big difference.
When whipping the cream, use a cold bowl. It helps the cream whip faster. Beat until stiff peaks form. Then, gently fold it into the peanut butter mix. Use a spatula and be kind. You want to keep that lovely airiness. This makes the cheesecake light and fluffy.
Crust Modifications
Not a fan of chocolate graham crackers? You can use regular graham crackers instead. They still taste great! For a gluten-free option, try using gluten-free graham crackers. They work well and keep the flavor.
Another option is to make a nut crust. Blend nuts like almonds or pecans with butter. This gives a nice crunch and flavor to your cheesecake.
Serving Suggestions
Presentation matters! Serve each slice on a pretty plate. Drizzle more chocolate ganache on top. A sprinkle of chopped peanuts adds a nice touch too. For an extra treat, add a dollop of whipped cream alongside.
Pair your cheesecake with coffee or milk. They both balance the rich flavors. You can also serve it with a fresh fruit like strawberries. This adds a bright contrast to the creamy cheesecake.
Pro Tips
- Chill the Bowl: Before whipping the heavy cream, place your mixing bowl in the freezer for about 10 minutes. This will help the cream whip faster and achieve a better consistency.
- Room Temperature Ingredients: Ensure that the cream cheese and peanut butter are at room temperature before mixing. This helps them blend smoothly without lumps.
- Use High-Quality Chocolate: For the ganache, opt for high-quality semi-sweet chocolate chips. The flavor difference will elevate your cheesecake.
- Let It Set: For the best texture, allow the cheesecake to set overnight in the refrigerator. This ensures it is fully firm and enhances the flavors.

Variations
Flavor Enhancements
You can make your cheesecake more fun by trying different nut butters. Almond butter or cashew butter can add a new taste. Each nut butter brings its unique flavor, making the cheesecake special. You can also add chocolate pieces into the filling. Chunks of dark chocolate or milk chocolate can make each bite exciting. Just fold them in before you chill the cheesecake.
Cheesecake Types
There are two main types of chocolate peanut butter cheesecake: no-bake and baked. A no-bake cheesecake is quick and easy. It sets in the fridge and is super creamy. A baked cheesecake has a firmer texture and a rich taste. You can also make mini cheesecakes. They are perfect for parties or snacks. Just use a muffin tin instead of a springform pan.
Seasonal Variations
You can change your cheesecake with seasonal ingredients. In the fall, try adding pumpkin puree for a warm flavor. A touch of cinnamon can enhance the taste too. For winter, you might add peppermint extract. It gives a fresh twist. These seasonal variations can make your cheesecake a hit at any gathering.
Storage Info
Best Practices for Storing Cheesecake
To keep your cheesecake fresh, refrigerate it right after serving. Cover it well with plastic wrap or foil. This helps prevent it from drying out or absorbing other smells. If you want to freeze it, slice the cheesecake first. Wrap each slice in plastic wrap, then in foil. This keeps each piece fresh and easy to grab later.
Shelf Life
Homemade chocolate peanut butter cheesecake stays fresh in the fridge for about five days. If you freeze it, it lasts up to three months. Check for signs of spoilage. If you see any mold or smell something sour, it’s best to toss it. Fresh cheesecake should smell sweet and nutty.
Reheating Tips
To enjoy your cheesecake cold, just take it out of the fridge. If you prefer it a bit warm, place it in the oven at a low temperature. Start at 200°F for about ten minutes. This warms it gently without cooking it more. Never use the microwave, as it can make the texture grainy.
FAQs
Can I make Chocolate Peanut Butter Cheesecake in advance?
Yes, you can make this cheesecake ahead of time. I suggest preparing it one or two days before you serve it. This gives the flavors more time to blend. Chill it in the fridge for at least four hours. If you can, let it sit overnight. It will taste even better!
Is it possible to use sugar substitutes?
You can use sugar substitutes if needed. Options like stevia or erythritol work well. Just make sure to check the package for correct amounts. Some substitutes are sweeter than sugar, so use less. This way, your cheesecake stays sweet without extra sugar.
How to fix a cracked cheesecake?
A cracked cheesecake can be fixed or prevented. To prevent cracks, don’t overmix the batter. Also, bake at a low temperature. If your cheesecake cracks, don’t worry! You can cover it with ganache or whipped cream. This makes it look nice and hides the cracks.
What to serve with Chocolate Peanut Butter Cheesecake?
Many desserts pair well with this cheesecake. You can serve it with a scoop of vanilla ice cream. Fresh berries also add a nice touch. For drinks, try coffee or a rich dessert wine. These options balance the sweet and creamy flavors.
Can I use crunchy peanut butter instead of creamy?
You can use crunchy peanut butter, but it will change the texture. Crunchy peanut butter adds a nice bite. It makes the cheesecake less smooth but still tasty. If you love the texture, go ahead and use it!
This guide walks you through making a delicious Chocolate Peanut Butter Cheesecake. You learned about the key ingredients, like cream cheese and chocolate. Detailed steps helped you prepare the crust and filling, whip cream, and create ganache. I shared tips to perfect the texture and suggested variations.
Enjoy experimenting with flavors and toppings. Remember to store cheesecake properly to keep it fresh. Happy bakin

Decadent Chocolate Peanut Butter Cheesecake
Ingredients
- 1.5 cups chocolate graham cracker crumbs
- 0.5 cups unsalted butter, melted
- 2 cups cream cheese, softened at room temperature
- 1 cups creamy peanut butter
- 1 cups powdered sugar
- 1 teaspoon pure vanilla extract
- 2 cups heavy cream, cold
- 0.5 cups semi-sweet chocolate chips
- 1 pinch salt
- optional chopped salted peanuts for garnish
Instructions
- Prepare the Crust: In a mixing bowl, combine the chocolate graham cracker crumbs and melted butter. Stir until the crumbs are evenly moistened. Press this mixture firmly and evenly into the bottom of a 9-inch springform pan to form a solid crust. Place the pan in the refrigerator to chill while you prepare the filling.
- Make the Cheesecake Filling: In a large mixing bowl, combine the softened cream cheese and creamy peanut butter. Use an electric mixer to beat the mixture on medium speed until it reaches a smooth and creamy consistency. Gradually add in the powdered sugar, mixing well after each addition, then stir in the vanilla extract to combine.
- Whip the Heavy Cream: In a separate chilled mixing bowl, use an electric mixer to whip the cold heavy cream until stiff peaks form—this may take a few minutes. Once whipped, gently fold the whipped cream into the peanut butter mixture using a spatula, being careful to maintain the lightness of the whipped cream.
- Layer the Cheesecake: Pour the lightened peanut butter cheesecake filling over the chilled crust in the springform pan. Use a spatula to gently smooth the top for an even finish. Cover and refrigerate the cheesecake for a minimum of 4 hours or until it is fully set and firm to the touch.
- Prepare the Chocolate Ganache: In a small saucepan over low heat, melt the semi-sweet chocolate chips, stirring constantly until smooth. Remove from heat and allow the ganache to cool slightly, which will thicken it. Drizzle the ganache over the set cheesecake, letting it cascade attractively down the sides.
- Garnish and Serve: If desired, sprinkle the chopped salted peanuts on top for an added crunch and flavor contrast. Carefully release and remove the cheesecake from the springform pan. Slice into wedges and serve.


![- 1 cup pumpkin puree - 1 ½ cups crushed graham crackers - ½ teaspoon pumpkin spice - ½ cup powdered sugar - 1 teaspoon vanilla extract - 8 oz dark chocolate - 1 tablespoon coconut oil - Flaky sea salt To create chocolate covered pumpkin truffles, you need simple yet flavorful ingredients. Start with pumpkin puree, either canned or homemade. This is the base for your truffles. Next, grab crushed graham crackers. They give the truffles a unique texture and sweetness. Pumpkin spice adds warmth and flavor. You can adjust the amount if you want a stronger taste. Powdered sugar sweetens the mixture, making each bite a delight. Vanilla extract rounds out the flavor profile beautifully. For the chocolate coating, use dark chocolate. It contrasts nicely with the sweetness of the truffles. Adding coconut oil to the chocolate helps it melt smoothly. Finally, a sprinkle of flaky sea salt on top enhances the flavor, making each truffle even more irresistible. - Mixing bowl - Spoon or spatula - Measuring cups and spoons - Parchment paper - Baking sheet - Double boiler or microwave-safe bowl You will need a few tools to make these truffles. A mixing bowl is essential for combining your ingredients. A spoon or spatula helps you mix everything well. Measuring cups and spoons ensure that your ingredients are precise. Parchment paper is key for lining your baking sheet. It keeps the truffles from sticking. You also need a baking sheet to hold the truffles while they chill. Finally, a double boiler or a microwave-safe bowl helps melt the chocolate evenly. With these ingredients and tools, you're ready to create chocolate covered pumpkin truffles that everyone will love. For the complete recipe, check out the Full Recipe link. Start by mixing the pumpkin puree with the dry ingredients. In a large bowl, add: - 1 cup pumpkin puree - 1 ½ cups crushed graham crackers - ½ teaspoon pumpkin spice - ½ cup powdered sugar - 1 teaspoon vanilla extract Use a spatula or wooden spoon to blend these together. Mix until you have a smooth, dough-like consistency. The mixture should be firm enough to hold its shape. Next, it’s time to shape the truffles. With clean hands, scoop out tablespoon-sized portions. Roll each portion into a ball, about 1 inch in diameter. Place the balls on a parchment-lined baking sheet. Make sure to space them apart. This helps them keep their shape. After shaping, cover the baking sheet with plastic wrap and chill in the fridge for about 30 minutes. While the truffles chill, let’s melt the chocolate. You can use a double boiler or the microwave. If you choose the double boiler, place a heatproof bowl over a pot of simmering water. Stir the chocolate and coconut oil together until smooth. If using the microwave, heat in 20-second bursts, stirring in between. Make sure the chocolate is silky before dipping. Once the truffles are chilled, it’s time to coat them. Dip each ball into the melted chocolate. Make sure it’s fully covered. Use a fork to lift it out, letting the excess chocolate drip back into the bowl. Place the coated truffles back on the parchment-lined sheet. While the chocolate is still wet, sprinkle a pinch of flaky sea salt on each truffle. This adds a burst of flavor that balances the sweetness. Let the truffles sit at room temperature until the chocolate sets. You can speed up this process by placing them in the fridge for about 15-20 minutes. Now, your delicious chocolate-covered pumpkin truffles are ready to enjoy. You can find the full recipe above for more details on each step. Chilling the truffles is key. It helps them hold their shape better when you dip them. After you roll the truffles, place them in the fridge for about 30 minutes. This step makes a big difference in texture. To roll smooth truffles, make sure your hands are clean and dry. Use a light touch as you form the balls. If your mixture is sticky, wet your hands slightly. This helps shape them without making a mess. Melting chocolate can be tricky. To melt chocolate evenly, I recommend using a double boiler. Fill a pot with a bit of water, then place a heatproof bowl on top. Stir the chocolate as it melts. This method prevents burning. If you want a nice shine, add a tablespoon of coconut oil to the chocolate. It will make your truffles look glossy and appealing. Get creative when it comes to serving. You can sprinkle a little cinnamon on top for extra flavor. Pumpkin seeds also add a nice crunch and look great on a dessert table. These truffles pair well with coffee or a spiced chai. Consider serving them at your next fall gathering or holiday party. They will surely impress your guests! For the full recipe, check the main section. {{image_4}} You can easily change the taste of your truffles. Try adding almond extract for a nutty twist. A bit of orange zest will give your truffles a fresh, fruity kick. You can also swap out the pumpkin spice for cinnamon or nutmeg. Each spice brings a new flavor to your truffles. If you need gluten-free options, look for gluten-free graham crackers. Many brands offer these, and they work just as well. For those who prefer dairy-free treats, use dairy-free chocolate for the coating. There are great dairy-free chocolate chips available that melt nicely. Want to make your truffles extra special? Roll them in crushed nuts like pecans or walnuts. This adds a nice crunch. You can also use colorful sprinkles for a fun look. If dark chocolate isn’t your thing, try coating the truffles in white chocolate instead. It adds a sweet, creamy flavor that pairs well with pumpkin. For the full recipe, check out the [Full Recipe]. To keep your chocolate covered pumpkin truffles fresh, store them in the fridge. The cool temperature helps maintain their texture and flavor. Place the truffles in an airtight container to prevent them from drying out. This way, they can stay yummy for up to one week. If you want to enjoy them longer, try to avoid leaving them out at room temperature for too long. If you want to save some truffles for later, freezing is a great option. First, place the truffles on a baking sheet, making sure they don’t touch. Freeze them for about an hour until they are firm. Once frozen, transfer the truffles to a freezer-safe bag or container. They can last for up to three months in the freezer. When you’re ready to enjoy them, simply take out the number of truffles you want. Let them thaw in the fridge for a few hours or at room temperature for about 30 minutes. Avoid using heat to thaw, as this can ruin their texture. Now they're ready to be devoured! Chocolate covered pumpkin truffles can last about one week in the fridge. Store them in an airtight container to keep them fresh. After a week, check for signs of spoilage, such as a change in smell or texture. If they feel sticky or smell off, it's best to toss them. Yes, you can easily make these truffles vegan! Use dairy-free chocolate instead of dark chocolate. Swap the coconut oil for a plant-based butter or more coconut oil. This keeps the rich flavor while making it suitable for a vegan diet. These truffles shine at holiday gatherings and parties. They also make great gifts for friends and family. Their festive look and delicious taste fit well with autumn themes. Serve them during Halloween, Thanksgiving, or any cozy get-together. Yes, you can find chocolate covered pumpkin truffles at many bakeries. Look for local shops that specialize in gourmet treats. Some popular brands also offer these truffles online. You can enjoy them without all the fuss of making them at home. For a homemade touch, check out the Full Recipe for a delightful DIY version! Creating chocolate covered pumpkin truffles is simple and fun. We covered key ingredients like pumpkin puree, graham crackers, and dark chocolate. You learned tools needed, step-by-step instructions, and tips for easy truffle-making. We also looked at flavors, variations, storage, and common questions. These truffles make a perfect treat for any occasion. Enjoy making these delightful bites and share them with friends! You’ll impress everyone with your tasty skills.](https://joymealplan.com/wp-content/uploads/2025/07/35417da5-91a5-48e5-8a48-b090ca73d24b-768x768.webp)
