Chocolate Peanut Butter Oat Squares No Bake Delight

Craving a sweet treat that’s both simple and satisfying? Look no further! My Chocolate Peanut Butter Oat Squares No Bake Delight are a deliciously easy way to whip up a snack. With just a handful of wholesome ingredients, you can create a rich, chewy square that hits the spot without any baking. Perfect for busy days, these squares are ready in no time and pack a flavor punch. Let’s dive in and make your taste buds happy!
Ingredients
List of Ingredients
– 1 cup rolled oats
– 1 cup natural peanut butter
– 1/2 cup honey or maple syrup
– 1/2 cup dark chocolate chips
– 1/4 cup unsweetened cocoa powder
– 1/2 teaspoon vanilla extract
– A pinch of salt
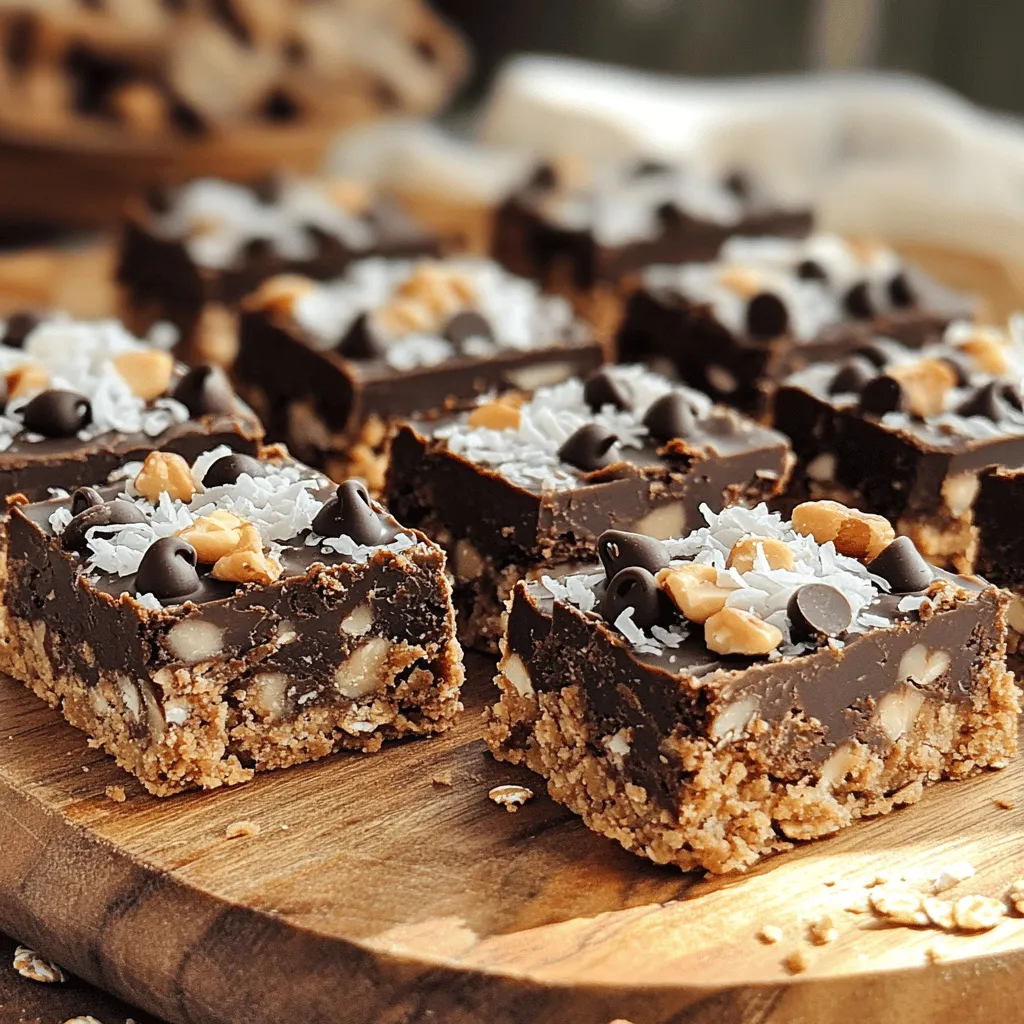
– Optional toppings: chopped nuts, shredded coconut, or extra chocolate chips
When making chocolate peanut butter oat squares, the quality of your ingredients matters. I love using natural peanut butter because it has no added sugar or oils. It gives a rich, nutty taste that pairs well with chocolate. You can choose honey or maple syrup based on your preference. Both add sweetness and moisture to the mix.
Rolled oats are the base of this recipe. They provide fiber and a satisfying texture. Dark chocolate chips add a touch of sweetness and richness. I prefer using unsweetened cocoa powder for a deep chocolate flavor without extra sugar.
Do not forget the vanilla extract! It enhances the overall taste. A pinch of salt balances the sweetness and makes the flavors pop.
For toppings, get creative! Chopped nuts add crunch, while shredded coconut offers a tropical twist. Extra chocolate chips can make the squares even more decadent.
Step-by-Step Instructions
Preparing the Dry Mixture
In a large bowl, combine 1 cup rolled oats, 1/4 cup cocoa powder, and a pinch of salt. Stir well to mix them evenly. This mix adds a rich chocolate flavor to the oats. It’s important to blend it thoroughly to ensure every bite is tasty.
Making the Peanut Butter Mixture
In a small saucepan over low heat, warm 1 cup of natural peanut butter and 1/2 cup honey (or maple syrup) together. Stir continuously until the mixture is smooth. This step makes the peanut butter easier to mix with the oats. Once smooth, remove it from the heat, and stir in 1/2 teaspoon vanilla extract for extra flavor.
Combining Ingredients
Pour the warm peanut butter mixture over the dry oat blend in the large bowl. Mix everything together until it is fully combined. You want the oats to be completely coated. If it feels a bit dry, keep mixing until it starts to clump together.
Pressing the Mixture into the Pan
Line an 8×8-inch baking pan with parchment paper. Make sure the paper hangs over the sides for easy lifting later. Firmly press the mixture into the bottom of the pan. You can use a spatula or your hands to pack it down well. This step is key for making sure the squares hold together.
Chilling the Squares
Place the pan in the refrigerator for at least 2 hours. This time allows the squares to set properly. Chilling helps the mixture firm up, making it easier to cut into squares later.
Cutting and Serving
Once chilled, lift the mixture out of the pan using the parchment paper. Place it on a cutting board and cut it into squares. You can make them as big or small as you like. These squares are perfect for snacks or desserts!
Tips & Tricks
Ensuring the Right Texture
To create compact squares that hold together, start by mixing the dry ingredients well. Mix the rolled oats, cocoa powder, and salt in a large bowl. This step helps ensure an even flavor. When you add the warm peanut butter mixture, it is key to mix thoroughly. You want every oat coated in that delicious blend. After combining, press the mixture firmly into your pan. This compaction helps the squares stay together when cut. If they crumble, they may need more pressing.
Sweetener Substitutions
You can use different sweeteners in this recipe. While honey is great, maple syrup works too. Agave syrup is another option if you prefer it. Each sweetener brings a unique taste. Maple syrup adds a slight nuttiness. Agave is milder and less intense. You can try each and see which you like best. Just keep the same amount when swapping sweeteners.
Enhancing Flavor
To make these squares even better, consider adding spices. A dash of cinnamon can give warmth. Nutmeg adds a cozy feel too. You can even try adding a pinch of sea salt to enhance the chocolate flavor. If you want a fruit twist, try adding dried fruits like raisins or cranberries. These options bring fun new flavors to your squares and can make them unique.

Variations
Nut-Free Option
If you want to make these squares nut-free, use sunflower seed butter instead. Sunflower seed butter has a similar creamy texture and rich taste. It also offers a safe option for those with nut allergies. Just substitute the peanut butter with an equal amount of sunflower seed butter. The rest of the recipe stays the same. You’ll still enjoy a tasty treat!
Vegan Version
To keep this recipe vegan, ensure you use maple syrup instead of honey. Maple syrup adds sweetness and keeps the squares plant-based. Use dark chocolate chips that are labeled vegan. This way, you can enjoy these chocolate peanut butter oat squares without any animal products. These small changes make a big difference.
Gluten-Free Adaptations
For a gluten-free version, make sure to choose certified gluten-free oats. Regular oats may contain gluten due to cross-contamination. Check the packaging for a gluten-free label. This simple swap allows everyone to enjoy these squares, regardless of dietary needs. You can still savor the same great flavors while sticking to gluten-free guidelines.
Storage Info
Best Practices for Storing
Store your Chocolate Peanut Butter Oat Squares in the fridge for the best taste. Use an airtight container to keep them fresh. If you want to keep them longer, freeze the squares. Wrap each square in plastic wrap or foil. Then, place them in a freezer-safe bag.
Shelf Life
These delicious squares can last up to a week in the fridge. In the freezer, they maintain their flavor for about three months. You can enjoy them as a quick snack or dessert any time.
Reheating Tips
To enjoy your frozen squares, simply take one out and let it thaw at room temperature. If you prefer a warm treat, microwave it for about 10 to 15 seconds. This makes the chocolate soft and melty, enhancing the taste. Enjoy your tasty snack!
FAQs
Can I use creamy or crunchy peanut butter?
You can use either creamy or crunchy peanut butter. Creamy peanut butter gives a smooth texture to the squares. It blends well and makes the mixture easy to press. On the other hand, crunchy peanut butter adds a fun bite. It gives the squares some crunch and extra flavor. If you want a more classic taste, go with creamy. If you like texture, try crunchy.
How can I make these squares healthier?
To make these squares healthier, you can reduce the honey or maple syrup. Try cutting it to 1/3 cup instead of 1/2 cup. You can also add protein. Mixing in some protein powder can boost the health factor. Another option is to use nut butter that contains added protein. Lastly, consider adding seeds or nuts for healthy fats.
What should I do if the mixture is too dry?
If the mixture feels too dry, don’t worry! You can add a little more honey or maple syrup. Start with a tablespoon, and mix it in well. If it’s still dry, try adding a splash of water or milk. This will help bind the oats and chocolate. Make sure to mix well until you get the right texture.
These no-bake chocolate peanut butter squares are easy to make and tasty. We covered key ingredients, step-by-step instructions, and tips for great results. You can customize them to fit your needs, like making them vegan or nut-free. Store them well to keep them fresh and enjoy them later. With these simple steps, you can create a delicious treat that everyone will love. Try it out and enjoy your sweet creation!


![- 1 cup pumpkin puree - 1 ½ cups crushed graham crackers - ½ teaspoon pumpkin spice - ½ cup powdered sugar - 1 teaspoon vanilla extract - 8 oz dark chocolate - 1 tablespoon coconut oil - Flaky sea salt To create chocolate covered pumpkin truffles, you need simple yet flavorful ingredients. Start with pumpkin puree, either canned or homemade. This is the base for your truffles. Next, grab crushed graham crackers. They give the truffles a unique texture and sweetness. Pumpkin spice adds warmth and flavor. You can adjust the amount if you want a stronger taste. Powdered sugar sweetens the mixture, making each bite a delight. Vanilla extract rounds out the flavor profile beautifully. For the chocolate coating, use dark chocolate. It contrasts nicely with the sweetness of the truffles. Adding coconut oil to the chocolate helps it melt smoothly. Finally, a sprinkle of flaky sea salt on top enhances the flavor, making each truffle even more irresistible. - Mixing bowl - Spoon or spatula - Measuring cups and spoons - Parchment paper - Baking sheet - Double boiler or microwave-safe bowl You will need a few tools to make these truffles. A mixing bowl is essential for combining your ingredients. A spoon or spatula helps you mix everything well. Measuring cups and spoons ensure that your ingredients are precise. Parchment paper is key for lining your baking sheet. It keeps the truffles from sticking. You also need a baking sheet to hold the truffles while they chill. Finally, a double boiler or a microwave-safe bowl helps melt the chocolate evenly. With these ingredients and tools, you're ready to create chocolate covered pumpkin truffles that everyone will love. For the complete recipe, check out the Full Recipe link. Start by mixing the pumpkin puree with the dry ingredients. In a large bowl, add: - 1 cup pumpkin puree - 1 ½ cups crushed graham crackers - ½ teaspoon pumpkin spice - ½ cup powdered sugar - 1 teaspoon vanilla extract Use a spatula or wooden spoon to blend these together. Mix until you have a smooth, dough-like consistency. The mixture should be firm enough to hold its shape. Next, it’s time to shape the truffles. With clean hands, scoop out tablespoon-sized portions. Roll each portion into a ball, about 1 inch in diameter. Place the balls on a parchment-lined baking sheet. Make sure to space them apart. This helps them keep their shape. After shaping, cover the baking sheet with plastic wrap and chill in the fridge for about 30 minutes. While the truffles chill, let’s melt the chocolate. You can use a double boiler or the microwave. If you choose the double boiler, place a heatproof bowl over a pot of simmering water. Stir the chocolate and coconut oil together until smooth. If using the microwave, heat in 20-second bursts, stirring in between. Make sure the chocolate is silky before dipping. Once the truffles are chilled, it’s time to coat them. Dip each ball into the melted chocolate. Make sure it’s fully covered. Use a fork to lift it out, letting the excess chocolate drip back into the bowl. Place the coated truffles back on the parchment-lined sheet. While the chocolate is still wet, sprinkle a pinch of flaky sea salt on each truffle. This adds a burst of flavor that balances the sweetness. Let the truffles sit at room temperature until the chocolate sets. You can speed up this process by placing them in the fridge for about 15-20 minutes. Now, your delicious chocolate-covered pumpkin truffles are ready to enjoy. You can find the full recipe above for more details on each step. Chilling the truffles is key. It helps them hold their shape better when you dip them. After you roll the truffles, place them in the fridge for about 30 minutes. This step makes a big difference in texture. To roll smooth truffles, make sure your hands are clean and dry. Use a light touch as you form the balls. If your mixture is sticky, wet your hands slightly. This helps shape them without making a mess. Melting chocolate can be tricky. To melt chocolate evenly, I recommend using a double boiler. Fill a pot with a bit of water, then place a heatproof bowl on top. Stir the chocolate as it melts. This method prevents burning. If you want a nice shine, add a tablespoon of coconut oil to the chocolate. It will make your truffles look glossy and appealing. Get creative when it comes to serving. You can sprinkle a little cinnamon on top for extra flavor. Pumpkin seeds also add a nice crunch and look great on a dessert table. These truffles pair well with coffee or a spiced chai. Consider serving them at your next fall gathering or holiday party. They will surely impress your guests! For the full recipe, check the main section. {{image_4}} You can easily change the taste of your truffles. Try adding almond extract for a nutty twist. A bit of orange zest will give your truffles a fresh, fruity kick. You can also swap out the pumpkin spice for cinnamon or nutmeg. Each spice brings a new flavor to your truffles. If you need gluten-free options, look for gluten-free graham crackers. Many brands offer these, and they work just as well. For those who prefer dairy-free treats, use dairy-free chocolate for the coating. There are great dairy-free chocolate chips available that melt nicely. Want to make your truffles extra special? Roll them in crushed nuts like pecans or walnuts. This adds a nice crunch. You can also use colorful sprinkles for a fun look. If dark chocolate isn’t your thing, try coating the truffles in white chocolate instead. It adds a sweet, creamy flavor that pairs well with pumpkin. For the full recipe, check out the [Full Recipe]. To keep your chocolate covered pumpkin truffles fresh, store them in the fridge. The cool temperature helps maintain their texture and flavor. Place the truffles in an airtight container to prevent them from drying out. This way, they can stay yummy for up to one week. If you want to enjoy them longer, try to avoid leaving them out at room temperature for too long. If you want to save some truffles for later, freezing is a great option. First, place the truffles on a baking sheet, making sure they don’t touch. Freeze them for about an hour until they are firm. Once frozen, transfer the truffles to a freezer-safe bag or container. They can last for up to three months in the freezer. When you’re ready to enjoy them, simply take out the number of truffles you want. Let them thaw in the fridge for a few hours or at room temperature for about 30 minutes. Avoid using heat to thaw, as this can ruin their texture. Now they're ready to be devoured! Chocolate covered pumpkin truffles can last about one week in the fridge. Store them in an airtight container to keep them fresh. After a week, check for signs of spoilage, such as a change in smell or texture. If they feel sticky or smell off, it's best to toss them. Yes, you can easily make these truffles vegan! Use dairy-free chocolate instead of dark chocolate. Swap the coconut oil for a plant-based butter or more coconut oil. This keeps the rich flavor while making it suitable for a vegan diet. These truffles shine at holiday gatherings and parties. They also make great gifts for friends and family. Their festive look and delicious taste fit well with autumn themes. Serve them during Halloween, Thanksgiving, or any cozy get-together. Yes, you can find chocolate covered pumpkin truffles at many bakeries. Look for local shops that specialize in gourmet treats. Some popular brands also offer these truffles online. You can enjoy them without all the fuss of making them at home. For a homemade touch, check out the Full Recipe for a delightful DIY version! Creating chocolate covered pumpkin truffles is simple and fun. We covered key ingredients like pumpkin puree, graham crackers, and dark chocolate. You learned tools needed, step-by-step instructions, and tips for easy truffle-making. We also looked at flavors, variations, storage, and common questions. These truffles make a perfect treat for any occasion. Enjoy making these delightful bites and share them with friends! You’ll impress everyone with your tasty skills.](https://joymealplan.com/wp-content/uploads/2025/07/35417da5-91a5-48e5-8a48-b090ca73d24b-768x768.webp)


