Cinnamon Sugar Sweet Potato Fries Irresistible Treat

Are you ready for a snack that’s sweet, crispy, and totally irresistible? Cinnamon Sugar Sweet Potato Fries are the perfect mix of flavors and textures. With just a few simple ingredients, you can whip up this delightful treat that everyone will love. I’ll guide you step-by-step to make these fries a tasty addition to your menu. Let’s dive in and transform sweet potatoes into pure happiness!
Ingredients
Main Ingredients
– 2 large sweet potatoes
– 2 tablespoons extra virgin olive oil
– 1 tablespoon granulated sugar
– 1 teaspoon ground cinnamon
– 1/2 teaspoon fine sea salt
Sweet potatoes are the star of this dish. They offer a natural sweetness and a vibrant color. Olive oil helps the fries crisp up in the oven. Granulated sugar and ground cinnamon create that sweet, warm flavor we crave. Sea salt enhances all the tastes and balances the sweetness.
Optional Ingredients
– Pinch of cayenne pepper for added heat
– Dipping options like Greek yogurt or honey
If you want a kick, add a pinch of cayenne pepper. It gives the fries a fun twist. Dipping options like Greek yogurt or honey make great pairings. They add creaminess or extra sweetness, making each bite even better.
Step-by-Step Instructions
Preparation Steps
1. Preheat your oven to 425°F (220°C). This step helps the fries cook evenly.
2. Prepare the baking sheet by lining it with parchment paper. This makes cleanup quick and easy.
Mixing Ingredients
1. Coat the sweet potatoes with olive oil. Place the sliced fries in a large bowl. Drizzle 2 tablespoons of olive oil over them. Use your hands or a spatula to mix until all fries are covered.
2. Combine the cinnamon-sugar seasoning. In a small bowl, mix 1 tablespoon of granulated sugar, 1 teaspoon of ground cinnamon, and 1/2 teaspoon of fine sea salt. If you like a kick, add a pinch of cayenne pepper. Stir until well blended.
Baking Process
1. Arrange the fries on the baking sheet. Spread the oiled sweet potato fries in a single layer. Make sure not to crowd them for the best crispiness.
2. Baking time and flipping. Place the baking sheet in the oven. Bake for 25-30 minutes. Halfway through, flip the fries with a spatula for even cooking. Bake until they are golden brown and crispy.
Tips & Tricks
Achieving Perfect Crispiness
To get crispy sweet potato fries, you must avoid overcrowding on the baking sheet. If you pile them up, they will steam instead of crisp. Spread them out in a single layer. This allows hot air to circulate and turn them golden.
Flipping the fries halfway through baking is also key. This action ensures both sides cook evenly. Use a spatula to turn them gently. This helps them brown and become crunchy.
Flavor Enhancements
You can adjust sweetness by changing sugar levels. If you like it sweeter, add more sugar. For less sweetness, reduce the amount.
Experimenting with spices can open new flavor doors. Try adding nutmeg or a dash of vanilla. You can also mix in a pinch of cayenne pepper for a spicy kick. These small tweaks can create a unique treat every time.

Variations
Flavor Variations
You can change up the flavor of your sweet potato fries. Adding spices like nutmeg or vanilla can give them a new twist. Nutmeg adds warmth, while vanilla brings out the sweetness. Both can enhance the cinnamon flavor. Try using alternative sweeteners, too. Instead of granulated sugar, you could use honey or maple syrup. They will still add sweetness and taste great.
Dietary Modifications
These sweet potato fries can fit many diets. They are naturally vegan and gluten-free. To make lower-calorie options, use less olive oil or a cooking spray. You can also bake them longer for crispiness, which can help cut calories. Enjoy these fries in a way that suits your needs!
Storage Info
Storing Leftovers
To keep your cinnamon sugar sweet potato fries fresh, use an airtight container. Glass containers work well, but plastic ones are fine too. Store the fries in the fridge for up to three days. After this time, they may lose their flavor and texture.
Reheating Tips
To enjoy your fries again, reheating them properly is key. Use an oven or air fryer to keep them crispy. Preheat your oven to 400°F (200°C) and spread the fries on a baking sheet. Bake for about 10 minutes. If you prefer an air fryer, set it to 350°F (175°C) for about 5-7 minutes. Avoid the microwave, as it can make the fries soggy. To keep them crispy, do not cover them while reheating.
FAQs
How do I cut sweet potatoes for fries?
To cut sweet potatoes for fries, start by peeling them. Then, slice each sweet potato into thin strips. Aim for about 1/4 inch thick. This size helps them cook evenly and become crispy. Make sure each piece is similar in size for the best results.
Can I use other types of potatoes?
Yes, you can use other types of potatoes. Russet potatoes and Yukon Gold potatoes work well. Each type offers a different flavor and texture. Sweet potatoes provide a subtle sweetness, while other potatoes give a more savory taste.
What is the best way to serve cinnamon sugar sweet potato fries?
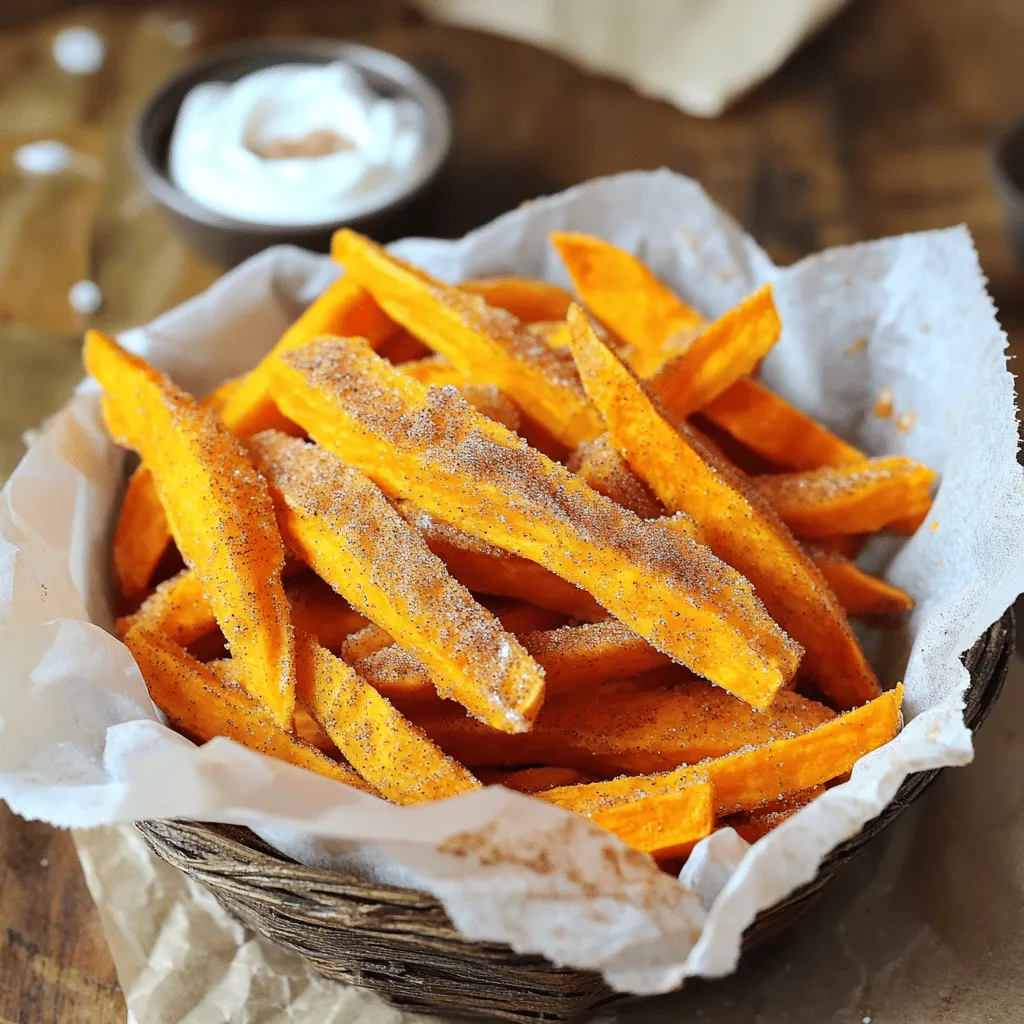
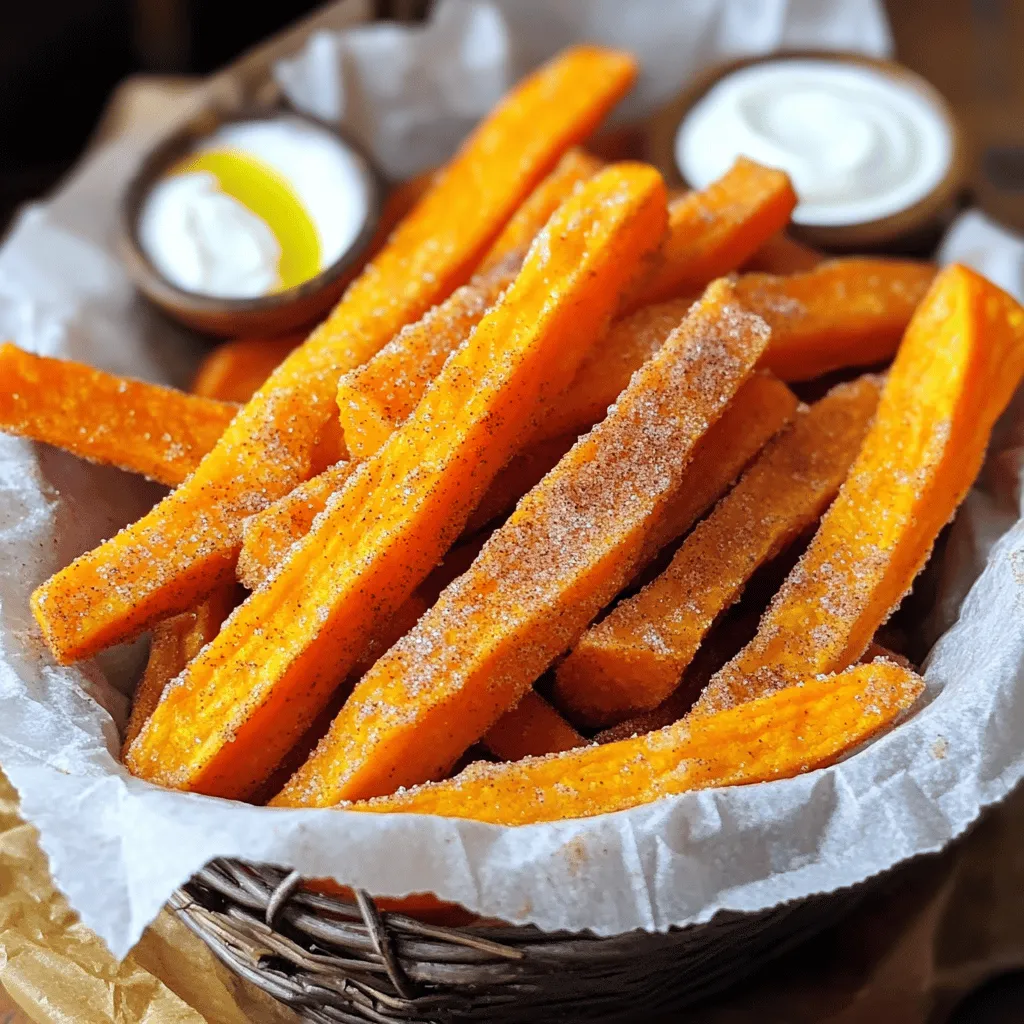
Serve cinnamon sugar sweet potato fries in a cone or a basket. This makes them look fun and inviting. For dipping, try creamy Greek yogurt or a drizzle of honey. This adds a nice touch and enhances the sweet flavor.
How do I make sweet potato fries healthier?
To make sweet potato fries healthier, use less oil. You can also bake them instead of frying. Try air frying for a crispy result with less fat. Adding spices like paprika or garlic powder can boost flavor without extra calories.
Can I make these fries ahead of time?
You can prepare sweet potato fries ahead of time. Cut and season them, then store in the fridge for a few hours. Keep them in an airtight container. When ready, bake them for a fresh taste. This keeps them crispy and delicious.
In this blog post, we explored how to make delicious sweet potato fries. We covered key ingredients, from sweet potatoes to spices, and detailed each step of the preparation and baking process. I shared tips for achieving the perfect crispiness and suggested fun flavor variations. Lastly, we discussed storage and reheating strategies.
These fries are not just tasty; they can fit different diets, too. Enjoy experimenting with them for a healthy snack that everyone will love!


![- 6 large eggs - 1 cup fresh spinach, roughly chopped - 1/2 bell pepper, diced - 1/2 cup cherry tomatoes, halved - 1/4 cup red onion, finely minced - 1/2 cup feta cheese, crumbled - Seasonings and oil These ingredients make a tasty breakfast that is also healthy. The eggs provide protein, while the veggies add color and nutrients. You can use any bell pepper you like for a fun twist. You can swap out the spinach for other greens like kale or Swiss chard. Zucchini and mushrooms also work well in this recipe. If feta isn’t your favorite, try cheddar or goat cheese for a different taste. Each muffin has about 100 calories. They offer around 8 grams of protein, 7 grams of fat, and 2 grams of carbs. This makes them a great option for a filling breakfast. If you want the full recipe, check out [Full Recipe]. 1. Preheat your oven to 350°F (175°C). This ensures even cooking. 2. Grease your muffin tin using cooking spray or olive oil. This helps the muffins release easily. 1. In a large bowl, crack the 6 eggs. Whisk them vigorously until mixed well. 2. Fold in the chopped spinach, diced bell pepper, halved cherry tomatoes, and minced red onion. Make sure the veggies spread evenly. 3. Add the crumbled feta cheese for extra flavor. Mix in garlic powder, dried oregano, salt, and black pepper. Stir until everything is well combined. 1. Carefully pour the egg-veggie mix into the muffin tin. Fill each cup about three-quarters full. 2. Place the muffin tin in the oven and bake for 18-20 minutes. Check for doneness by pressing lightly on the tops. They should feel firm and slightly golden. 3. After baking, let the muffins cool in the tin for about 5 minutes. Use a butter knife to run around the edges. This helps them come out easily. Then, transfer them to a wire rack to cool completely. For the full recipe, check the earlier sections. Enjoy these tasty muffins as a quick breakfast! To get the perfect texture in your veggie muffins, cook them until they are just firm. If you bake them too long, they can become dry. Use a toothpick to check doneness. Stick it in the center, and if it comes out clean, they are ready. Do not overfill the muffin cups. Fill them about three-quarters full. This gives the muffins room to rise without spilling over. If you overfill, you will have a messy oven and uneven muffins. To keep your muffins fresh, store them in an airtight container in the fridge. They can last up to a week this way. If you want to keep them longer, consider freezing them. Wrap each muffin in plastic wrap and place them in a freezer bag. They will last for about three months in the freezer. When you want to enjoy a muffin, take it out and reheat it. You can warm it in the microwave for about 30 seconds or until hot. If you prefer a crispy edge, heat it in an oven at 350°F for 10 minutes. These muffins pair well with many toppings. Try them with fresh salsa for a zesty kick. Avocado adds creaminess and healthy fats. For a fun twist, serve them with a dollop of Greek yogurt. For a great presentation, arrange the muffins on a colorful platter. Garnish with freshly chopped herbs like parsley or basil. This adds a nice pop of color and makes the dish more inviting. Enjoy your veggie-packed egg muffins! {{image_4}} You can easily modify these muffins for different diets. For gluten-free options, just use gluten-free flour or a gluten-free muffin mix. This makes them safe for those with gluten sensitivities. If you're looking for a vegan alternative, replace eggs with chickpea flour or a plant-based egg substitute. This keeps the muffins tasty and healthy while meeting vegan needs. Want to add more flavor? Consider spices like cumin or smoked paprika. Fresh herbs like basil or parsley also work well. They can really wake up the taste of the muffins. For creative mix-ins, think about adding cooked bacon or sausage for extra protein. You can also try different cheeses, like cheddar or goat cheese, to change the taste. You can make mini muffins or standard size muffins. Mini muffins are great for snacks or kids. They bake faster, so check them at about 12-15 minutes. For standard muffins, stick to the 18-20 minute baking time. Just keep an eye on them, so they don't overcook. Adjusting the size helps you serve the muffins just how you like them. For the full recipe, you can refer back to the main section. Veggie packed egg muffins are small, baked dishes made with eggs and vegetables. They are light, nutritious, and perfect for breakfast. These muffins are easy to make and customizable. You can add your favorite veggies and cheeses. They provide protein from eggs and fiber from vegetables. This makes them a healthy choice for busy mornings. Veggie muffins last about 4 to 5 days in the fridge. Store them in an airtight container to keep them fresh. Signs of spoilage include a sour smell or mold. If you see either, throw them away. Always check before eating leftovers to ensure safety. Yes, you can freeze veggie packed egg muffins. Allow them to cool completely first. Place them in a freezer-safe bag or container. They can last up to 3 months in the freezer. To thaw, simply place them in the fridge overnight. You can also heat them in the microwave for a quick meal. Veggie packed egg muffins are easy to make and healthy. First, you prep your ingredients. The recipe takes about 10 minutes to prep and 18-20 minutes to cook. You can make 12 muffins in total. 1. Prep the oven: Preheat it to 350°F (175°C). 2. Grease the muffin tin: Use cooking spray or olive oil. 3. Whisk the eggs: Crack 6 large eggs into a bowl. Mix them well. 4. Add veggies: Mix in 1 cup of spinach, 1/2 diced bell pepper, 1/2 cup cherry tomatoes, and 1/4 cup red onion. 5. Season and add cheese: Add 1/2 cup of feta cheese, 1 tsp garlic powder, 1 tsp oregano, and salt and pepper. 6. Fill the muffin tin: Pour the mix into the cups, filling them about three-quarters full. 7. Bake: Put the tin in the oven for 18-20 minutes. Check if they are firm and golden. 8. Cool and serve: Let them cool for 5 minutes before removing them from the tin. These muffins are perfect for a quick breakfast or snack. Enjoy them warm or store them for later. This blog post covered how to make veggie-packed egg muffins. We discussed ingredients, nutritional info, and step-by-step instructions. You learned about tips for perfect muffins and various fun variations. With clear directions, you can create tasty muffins that fit your diet. I hope you feel inspired to try making these muffins. They are good for breakfast, snacks, or meal prep. Enjoy experimenting with flavors and share your results!](https://joymealplan.com/wp-content/uploads/2025/07/ffbefcb5-f112-4a21-bd30-7331a5bc5463-768x768.webp)

![- 1 pound sirloin steak, cut into bite-sized cubes - 4 tablespoons unsalted butter - 4 cloves garlic, minced - Fresh herbs: rosemary and thyme - Salt and pepper for seasoning - Olive oil and soy sauce To make easy garlic butter steak bites, you need fresh and simple ingredients. The star of this dish is the sirloin steak. It’s tender and juicy, perfect for bite-sized pieces. The butter, garlic, and herbs create a rich sauce. You can taste the freshness in every bite. Using unsalted butter allows you to control the salt. Fresh rosemary and thyme add a nice touch of flavor. They give the steak bites a lovely aroma. Don’t forget to season well with salt and pepper. This step is key for great taste. - Fresh parsley, finely chopped Garnishing with parsley adds color and a hint of freshness. It makes your dish look more appealing. Plus, it gives a slight herbal taste that complements the steak. You can also use other herbs if you prefer. Thyme or chives can work well too. For the full recipe, check the details below. Enjoy cooking these steak bites! To start, heat the olive oil in a large skillet. Use medium-high heat until it shimmers slightly. This heat is key for a great sear. High heat helps lock in the juices and gives a nice crust. Next, season the steak cubes well. Use salt and freshly cracked black pepper. Make sure each piece is coated evenly. This step adds flavor and makes your bites tasty. Place the seasoned steak in the hot skillet in a single layer. Avoid overcrowding the pan. Let the steak sear undisturbed for about 2-3 minutes. This develops a rich, brown crust. Flip the cubes carefully using tongs or a spatula. Cook for another 2-3 minutes for medium-rare. Feel free to adjust the time for your desired doneness. Once done, remove the steak and set it aside. In the same skillet, lower the heat to medium. Add the butter and let it melt fully. Once melted, stir in the minced garlic, chopped rosemary, and thyme. Sauté for 1-2 minutes until fragrant. Be careful not to let the garlic burn. Now, return the seared steak bites to the skillet. Pour in the soy sauce and toss everything together. Make sure the steak is well-coated in the rich garlic butter sauce. Cook for another minute to heat through. This step blends the flavors beautifully. For the complete process, check the [Full Recipe]. To get steak bites just right, adjust the cooking time. For rare steak, aim for about 2 minutes per side. Medium-rare needs about 3 minutes per side. For medium, increase the time to 4 minutes. Always check the internal temperature. - Rare: 125°F (51°C) - Medium-rare: 135°F (57°C) - Medium: 145°F (63°C) Using a meat thermometer helps you avoid overcooking. If you want your steak well-done, cook it for about 5 minutes per side. Remember, everyone has different tastes. You can boost flavor with fresh herbs. Try using basil, oregano, or parsley. Each adds a unique twist. Fresh herbs bring bright tastes to the dish. You can also add a splash of vinegar or citrus. A bit of lemon juice or balsamic vinegar adds a nice zing. This lifts the flavors and makes the dish pop. For a different taste, think about garlic butter sauce variations. You can use shallots or different types of onions. Feel free to experiment and find what you like best. Check the [Full Recipe] for more details! {{image_4}} You can switch things up by using chicken or shrimp. They cook quickly, just like steak. For chicken, cut it into bite-sized pieces. Use boneless, skinless thighs or breasts for the best flavor and tenderness. Cook the chicken until golden and fully cooked, about 5-7 minutes. For shrimp, use large, peeled shrimp. They only need about 3-4 minutes to cook. Add them to the skillet after the garlic butter melts. Toss them until they turn pink and opaque. Adjust your cooking times based on the protein you choose. Remember, the key is to not overcook. If you need gluten-free options, swap soy sauce with tamari or coconut aminos. Both options provide savory flavor without gluten. You can also use homemade sauces with gluten-free ingredients. For low-carb adaptations, skip the soy sauce and focus on the garlic butter. Add more herbs for flavor. You can also serve these bites with low-carb veggies like zucchini noodles or cauliflower rice. These changes keep your meal tasty and fit your diet. To store your garlic butter steak bites, follow these steps: - Let the steak bites cool to room temperature. - Place them in an airtight container. - Keep them in the fridge for up to three days. This method helps keep the steak juicy and flavorful. Use glass or plastic containers with tight lids. They help prevent moisture loss and odors from mixing. When it comes to reheating, you want to avoid overcooking the steak. Here’s how to do it right: - Use a microwave on low power for a quick reheat. - Heat in 30-second intervals, checking often. - For better results, use a stovetop. - Heat a non-stick skillet over low heat. - Add a splash of water or broth to steam the bites. - Stir gently until warmed through. This method keeps your steak bites tender and tasty. To check if steak bites are done, look for a nice brown color. They should feel firm but slightly springy when pressed. A meat thermometer can help too. For medium-rare, aim for 130°F to 135°F. For medium, target 140°F to 145°F. If you like them well done, go for 160°F. This way, you can get your perfect level of doneness every time. Yes, you can make these steak bites ahead of time! Cook the steak bites and let them cool. Store them in an airtight container in the fridge for up to three days. For best taste, reheat them in a skillet. This keeps the flavors fresh and the texture intact. Garlic butter steak bites pair well with many sides. Here are some tasty options: - Roasted vegetables - Mashed potatoes - Rice pilaf - A fresh green salad - Garlic bread These sides balance the rich taste of the steak bites and create a full meal experience. Absolutely! This recipe is great for meal prep. You can portion out the steak bites into meal containers. Add your favorite sides for a balanced meal. Just make sure to store them in the fridge. When you are ready to eat, reheat them as needed. Enjoy a quick, tasty meal all week long! This blog post shared a simple, tasty recipe for garlic butter steak bites. We covered the essential ingredients, step-by-step cooking instructions, and tips for perfect doneness. I also discussed variations using different proteins and dietary adjustments, plus how to store leftovers effectively. Cooking steak bites can be fun and satisfying. With the right techniques, you can impress any guest. Enjoy making these delicious bites, and feel free to experiment with flavors and sides!](https://joymealplan.com/wp-content/uploads/2025/07/6c147bbf-aecd-4f40-83f0-60b5a859338f-768x768.webp)

