Coconut Almond Joy Energy Bites Delicious Snack Option

Looking for a tasty snack that fuels your day? Coconut Almond Joy Energy Bites are the perfect answer! These sweet treats are packed with wholesome ingredients like rolled oats, almond butter, and dark chocolate, making them a healthy choice. In this post, I’ll share easy steps for making them, plus tips for customizing and storing your bites. Get ready to satisfy your snack cravings with this delicious and nutritious recipe!
Why I Love This Recipe
- Quick and Easy: This recipe comes together in just 15 minutes, making it a perfect choice for a speedy snack or energy boost.
- Nutritious Ingredients: Packed with wholesome oats, almond butter, and coconut, these bites provide a great source of energy and nutrients.
- Customizable: You can easily tailor the recipe to your taste by adding your favorite nuts, seeds, or dried fruits for unique flavors.
- Perfect for Meal Prep: These energy bites store well in the fridge or freezer, making them a convenient option for on-the-go snacking throughout the week.
Ingredients
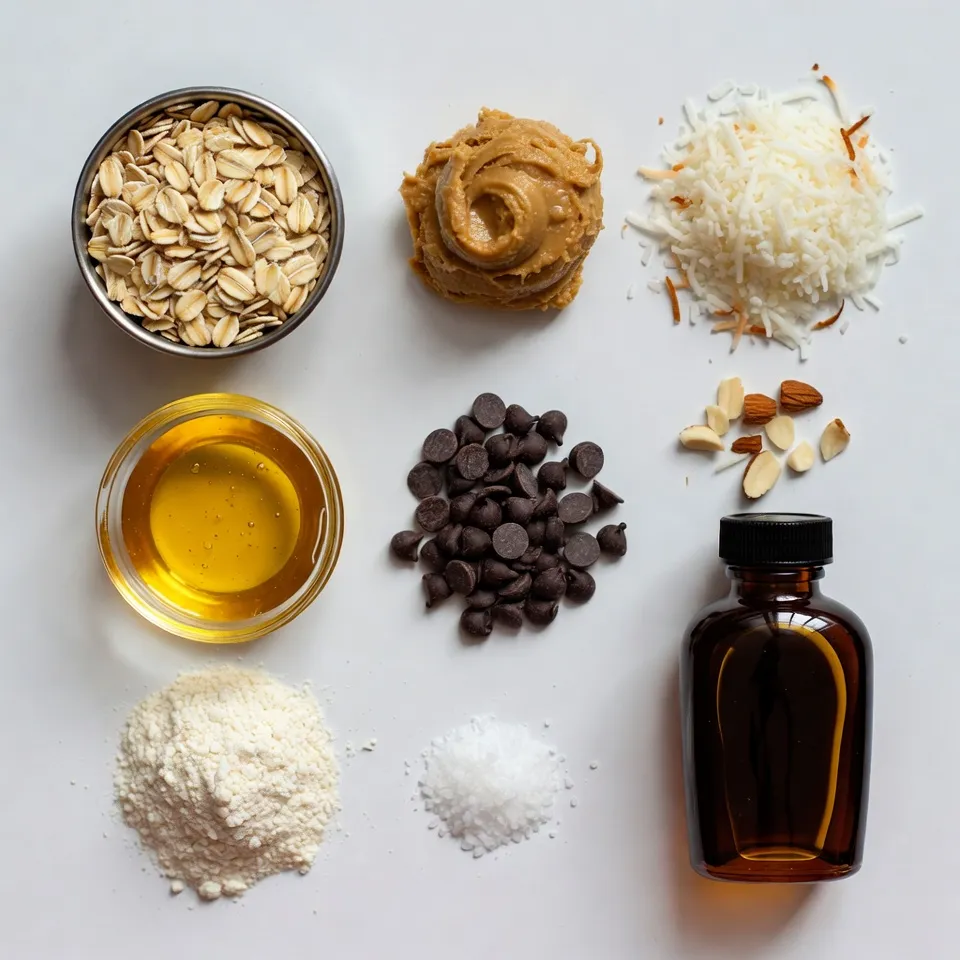
List of Main Ingredients
– 1 cup rolled oats
– 1/2 cup creamy almond butter
– 1/2 cup unsweetened shredded coconut
– 1/4 cup honey or maple syrup
– 1/4 cup dark or semi-sweet chocolate chips
– 1/4 cup almond flour
– 1/4 teaspoon sea salt
– 1/2 teaspoon pure vanilla extract
– Optional: 1/4 cup chopped almonds
For Coconut Almond Joy Energy Bites, these ingredients shine. Rolled oats offer a great base. They are chewy and filling. Creamy almond butter adds protein and healthy fats. Unsweetened shredded coconut brings a tropical twist. Honey or maple syrup sweetens the bites naturally. Dark chocolate chips provide a rich taste. Almond flour improves texture and adds nutrients. A pinch of sea salt enhances the flavors. Pure vanilla extract rounds out the taste. For a fun crunch, chopped almonds are optional.
These ingredients work together to create a healthy snack. They offer energy and joy in every bite. Each ingredient plays a role in taste and nutrition. You can feel good about eating these bites.

Step-by-Step Instructions
Preparing the Dry Ingredients
Start by taking a large mixing bowl. In that bowl, combine the following dry ingredients:
– 1 cup rolled oats
– 1/4 cup almond flour
– 1/2 cup unsweetened shredded coconut
– 1/4 teaspoon sea salt
Stir everything together well using a spoon or spatula. Make sure the dry ingredients mix evenly. This step sets the base for our yummy energy bites.
Combining the Wet Ingredients
In another bowl, whisk these wet ingredients together:
– 1/2 cup creamy almond butter
– 1/4 cup honey or maple syrup
– 1/2 teaspoon pure vanilla extract
Keep whisking until the mixture is smooth. It should blend well and look creamy. This mix adds sweetness and flavor to the energy bites.
Forming the Energy Bites
Now, pour the smooth almond butter mix into the bowl with the dry ingredients. Don’t forget to add:
– 1/4 cup dark or semi-sweet chocolate chips
– Optional: 1/4 cup chopped almonds
Use a spatula or your hands to mix everything together. You want all the ingredients to combine well. The mixture should hold together like a dough.
Next, scoop tablespoon-sized portions of the mixture. Roll each portion into a round ball. Place the balls on a parchment-lined baking sheet. This helps with easy removal later.
After forming all the bites, place the baking sheet in the fridge. Let them chill for about 30 minutes. This makes them firm and easier to eat.
Once chilled, store the energy bites in an airtight container. Enjoy them fresh, or keep them in the fridge for up to a week. You can also freeze them for longer storage!
Tips & Tricks
Achieving the Perfect Texture
To get the mixture to hold together well, start with the right ingredients. Use creamy almond butter as your base. It binds the dry ingredients together. Make sure your oats are rolled oats, not instant. They provide the right texture. You can also add a pinch more almond flour if you find it too wet. Mixing should be thorough but gentle. Avoid over-mixing, as that can break down the ingredients.
Customization Ideas
You can change these energy bites to fit your taste. Add different nuts like walnuts or pecans for variety. Dried fruits like raisins or cranberries also work well. If you want a sweeter bite, add more honey or maple syrup. For a less sweet taste, cut back on the syrup. This way, you can create your unique flavor.
Common Mistakes to Avoid
One common mistake is over-mixing the ingredients. This can make the texture off and hard to shape. Another mistake is not chilling the mixture long enough. Chilling helps the bites firm up. Make sure to refrigerate them for at least 30 minutes. This makes them easier to handle and enhances the flavor.
Pro Tips
- Chill for Better Texture: Refrigerating the energy bites for at least 30 minutes helps them firm up, making them easier to handle and enhancing their texture.
- Customize Your Ingredients: Feel free to swap in your favorite nuts, seeds, or dried fruits for a personalized flavor profile and added nutrition.
- Make Them Last: Store the energy bites in an airtight container in the fridge for up to a week, or freeze them for longer storage to keep them fresh.
- Perfect Portioning: Use a cookie scoop or measuring spoon to ensure evenly sized bites, making it easier to track portions and share with friends!

Variations
Chocolate Coconut Almond Variation
You can boost the chocolate flavor in these bites. Start by adding cocoa powder. Mix in 2 tablespoons of unsweetened cocoa powder with the dry ingredients. This gives a rich chocolate taste. You can also swap regular chocolate chips for dark chocolate chips. This adds a deeper taste and pairs well with coconut. For a fun twist, melt some chocolate and drizzle it on top after chilling. This makes them look fancy and adds extra flavor.
Healthier Options
If you want to make these bites healthier, consider substitutes. For honey, use agave syrup or maple syrup. Both options are lower in calories and still sweet. You can also replace almond butter with sunflower seed butter. This is great if you have nut allergies. Each substitute keeps the bites tasty while making them lighter.
Different Flavor Profiles
You can create unique flavors by adding spices. Try adding 1/2 teaspoon of cinnamon or nutmeg to the dry mix. Cinnamon gives a warm flavor, while nutmeg has a nutty taste. You could also experiment with cardamom for a different twist. These spices enhance the bites and make them special. Don’t be afraid to try your favorite spices and see what you like!
Storage Info
Storing in the Refrigerator
To keep your Coconut Almond Joy Energy Bites fresh, store them in an airtight container. I recommend using a glass or plastic container with a tight lid. Place a piece of parchment paper between layers if you stack them. This helps prevent sticking. They will stay good in the fridge for about a week. Make sure to label the container with the date you made them. This way, you will know how fresh they are.
Freezing for Long-term Storage
If you want to keep these bites longer, freezing is the way to go. Start by placing the energy bites on a baking sheet. Make sure they are not touching each other. Freeze them for about an hour until they are firm. Once frozen, transfer the bites to a freezer-safe bag or container. Squeeze out as much air as you can. They can last in the freezer for up to three months. When you’re ready to enjoy them, just take out what you need and let them thaw at room temperature.
Shelf Life
In the refrigerator, your energy bites will stay fresh for up to one week. If stored correctly in the freezer, they can last for about three months. This gives you a great snack option ready at any time! Always check for any signs of spoilage before eating. If they smell off or look strange, it’s best to throw them out.
FAQs
How long do Coconut Almond Joy Energy Bites last?
These energy bites stay fresh in the fridge for about a week. Store them in an airtight container. If you want to keep them longer, freeze them. They can last for up to three months in the freezer. Just make sure to thaw them before eating.
Can I use different nut butters?
Yes, you can use different nut butters. Peanut butter works well and adds a nice flavor. Cashew butter is another great choice. If you want a nut-free option, try sunflower seed butter. Each nut butter gives a unique taste, so feel free to experiment!
Are these energy bites vegan?
Yes, these energy bites can be vegan. Use maple syrup instead of honey. All the other ingredients are plant-based. If you need a nut-free option, choose sunflower seed butter and avoid the chopped almonds. This way, you can enjoy a tasty snack while sticking to a vegan diet!
Making Coconut Almond Joy Energy Bites is simple and fun. You use healthy ingredients like oats, almond butter, and chocolate chips. I shared tips for perfect texture and lots of ways to customize. You can also store them easily for later.
These bites are great for a quick snack any time. Experiment with flavors and stay healthy while enjoying tasty treats. Give them a try and enjoy the energy boos

Coconut Almond Joy Energy Bites
Ingredients
- 1 cup rolled oats
- 0.5 cup creamy almond butter
- 0.5 cup unsweetened shredded coconut
- 0.25 cup honey or maple syrup
- 0.25 cup dark or semi-sweet chocolate chips
- 0.25 cup almond flour
- 0.25 teaspoon sea salt
- 0.5 teaspoon pure vanilla extract
- 0.25 cup chopped almonds (optional)
Instructions
- In a large mixing bowl, combine the rolled oats, almond flour, shredded coconut, and sea salt. Stir together with a spoon or spatula until the dry ingredients are evenly mixed.
- In a separate bowl, whisk together the almond butter, honey (or maple syrup), and vanilla extract until the mixture is smooth and well blended.
- Pour the wet almond butter mixture into the bowl with the dry ingredients. Add the chocolate chips and, if using, the chopped almonds.
- Using a spatula or your hands, mix all the ingredients together until everything is fully combined and the mixture holds together well.
- With your hands, scoop out tablespoon-sized portions of the mixture. Roll each portion into a round ball and place them on a parchment-lined baking sheet for easy removal.
- Once all the bites are formed, transfer the baking sheet to the refrigerator. Allow them to chill for about 30 minutes so they become firm and easier to handle.
- After chilling, store the energy bites in an airtight container. They are best enjoyed fresh but will keep in the refrigerator for up to a week or can be frozen for longer storage.


![- Ripe avocados: Choose avocados that feel soft but not mushy. Ripe avocados add creaminess. They bring healthy fats and nutrients to the mousse. When selecting avocados, look for dark green skin. A little give when pressed is a good sign. Avoid avocados with large dark spots or cracks. - Cocoa powder: The type of cocoa powder you use matters. Choose high-quality, unsweetened cocoa for the best flavor. Dutch-processed cocoa has a smooth taste. Regular cocoa has a rich chocolate flavor. Both are great choices. - Sweeteners: Maple syrup and agave syrup are both tasty options. Maple syrup gives a unique flavor. It adds a slight caramel note. Agave syrup is milder and sweeter. It blends well without changing the taste much. You can adjust the sweetness based on your preference. - Non-dairy milk options: You can use almond, coconut, or oat milk. Almond milk is light and nutty. Coconut milk adds creaminess and a hint of tropical flavor. Oat milk is thick and wholesome. Any of these choices work well to create a smooth texture. - Flavor enhancers: Vanilla extract adds warmth and depth. A little cinnamon gives an extra layer of flavor. Both options are simple and enhance the chocolate taste. You can try adding a pinch to see what you like best. - Garnish suggestions: Dark chocolate shavings are a rich topping. They add elegance and extra chocolate flavor. Fresh berries like raspberries or strawberries bring brightness. Their color and tartness balance the rich mousse perfectly. These garnishes make the dish even more appealing. You can find the full recipe at the beginning of this article. First, you need to prepare your avocados. To peel and pit them easily, slice the avocado in half. Twist the halves apart. Use a spoon to scoop out the pit. Then, scoop the green flesh into a bowl. Next, measure your ingredients. For this mousse, you will need: - 2 ripe avocados, peeled and pitted - 1/2 cup unsweetened cocoa powder - 1/3 cup maple syrup (or agave syrup) - 1/4 cup almond milk (or any non-dairy milk of your choice) - 1 teaspoon vanilla extract - 1/4 teaspoon sea salt - A pinch of cinnamon (optional) Combine all these ingredients in a food processor. Now, let’s blend for that creamy texture. Start blending on high speed. Stop occasionally to scrape down the sides. This ensures everything mixes well. Blend until it’s smooth. Taste your mousse after blending. If you desire more sweetness, add extra maple syrup. Blend again to mix in the syrup. Adjust to your liking for the best flavor. Chilling the mousse is very important. It allows the flavors to develop and the mousse to thicken. Cover the individual dishes with plastic wrap. Chill them in the fridge for at least 30 minutes. For serving, get creative! Garnish your mousse with dark chocolate shavings or fresh berries. This adds a pop of color and texture. You can serve it in small bowls or glasses for a fun touch. Enjoy your rich and creamy vegan chocolate avocado mousse! - Over-blending the mousse: Blending too long makes it thin. Blend just until smooth. You want a creamy texture, not soup. - Using unripe avocados: Unripe avocados are hard and bitter. Always pick ripe ones. They should feel slightly soft. - Balancing sweetness: Taste your mousse before serving. If it's too bitter, add more maple syrup. Start with a little more. Keep tasting until it’s just right. - Experimenting with additional flavorings: You can try adding a pinch of espresso or a drop of peppermint extract. These flavors can make the mousse even more exciting. - Best food processors for smooth blending: Look for a powerful food processor. A 600-watt model works well. It blends the ingredients evenly and quickly. - Storage containers for chilling the mousse: Use small bowls with lids. This keeps the mousse fresh. Glass containers are a great choice. They help keep the mousse cool and tasty. For the full recipe, check out the [Full Recipe]. {{image_4}} You can make your Vegan Chocolate Avocado Mousse even more fun by adding nut butters. Try almond or peanut butter for a rich and creamy taste. These nut butters enhance the texture and add healthy fats. You can also infuse flavors like coffee or mint. A splash of coffee brings a deep, bold taste. Mint adds a refreshing twist that brightens up the dessert. Both options create a unique mousse that surprises and delights. For those with dietary needs, gluten-free variations are easy to make. All the ingredients in this mousse are naturally gluten-free. This makes it a great choice for anyone avoiding gluten. You can also opt for sugar-free alternatives. Using stevia or monk fruit keeps the mousse sweet without added sugar. These substitutes do not change the creamy texture. You can enjoy a guilt-free treat that still tastes amazing. Transform your mousse into parfaits for a stunning dessert. Layer the mousse with fresh fruits or granola in clear cups. This adds color and texture, making your dessert look beautiful. You can use the mousse as a filling for cakes or other desserts. It works well between layers of cake or as a filling for tart shells. This gives you a chance to be creative with your presentation. For the complete recipe, check out the Full Recipe section. To keep your Vegan Chocolate Avocado Mousse fresh, follow these steps: - Chill the mousse: After making it, cover your mousse with plastic wrap or a lid. This helps prevent air from getting in. - Use airtight containers: Store the mousse in airtight containers. This keeps it from absorbing other flavors in the fridge. - Refrigerate promptly: Place it in the fridge as soon as it's ready. This helps maintain its creamy texture. The mousse stays fresh for about 3 to 5 days in the fridge. Always check for any changes in smell or texture before serving. Can you freeze Vegan Chocolate Avocado Mousse? Yes, you can! Freezing is a great option if you want to store it longer. - Portion it out: Divide the mousse into small portions before freezing. This makes it easy to thaw only what you need. - Use freezer-safe containers: Make sure to use containers that are safe for freezing. This prevents freezer burn. When you're ready to enjoy it again, follow these steps to thaw: - Thaw in the fridge: Place the frozen mousse in the fridge overnight. This keeps it at a safe temperature while it thaws. - Stir before serving: After thawing, give the mousse a quick stir. This helps regain its smooth texture. By following these storage and freezing tips, you can enjoy your Vegan Chocolate Avocado Mousse at its best. For the complete recipe, check out the Full Recipe section. Yes, you can use different sweeteners. Honey or agave syrup works well too. Each sweetener changes the taste slightly. Honey adds a floral note, while agave is milder. You can experiment to find your favorite. Just keep the amount similar to maple syrup for the best results. This mousse stays fresh for about three days in the fridge. Store it in an airtight container to keep it from drying out. The mousse may thicken as it sits, so stirring it gently can help restore its creamy texture. Enjoy it within this timeframe for the best flavor and quality. Yes, this dessert is quite healthy! Avocados are full of good fats and nutrients. They can boost heart health and provide fiber. Cocoa powder is also rich in antioxidants, adding to the health benefits. This mousse is a guilt-free treat that satisfies your sweet tooth while nourishing your body. Absolutely! To make it nut-free, choose oat milk or soy milk instead of almond milk. Both options work well and keep the mousse creamy. Ensure your cocoa powder is also nut-free. With these swaps, you can enjoy this tasty dessert without any nut allergy concerns. Vegan Chocolate Avocado Mousse is simple and fun to make. You learned about key ingredients like ripe avocados, cocoa powder, and sweeteners. I shared tips on preparation, blending, and storing your mousse. Mixing in flavors or making parfaits adds creativity. Remember, use ripe avocados for the best taste. This mousse is healthy and easily customizable for different diets. Enjoy your tasty treat, and don't hesitate to share your own variations!](https://joymealplan.com/wp-content/uploads/2025/06/f08f53b2-ba89-49fb-bc73-48bd2b3a08b2-768x768.webp)


