Craving a warm, comforting bowl of soup? Dive into my Coconut Curry Chickpea Soup! This dish is packed with bold flavors and hearty ingredients that will satisfy your taste buds. You’ll find simple ingredients like coconut milk, chickpeas, and fresh veggies. I will guide you through easy steps to create this delicious soup. Let’s get cooking and bring some vibrant flavors to your kitchen!
Ingredients
Detailed List of Ingredients
– 1 tablespoon coconut oil
– 1 medium onion, diced
– 3 cloves garlic, minced
– 1 tablespoon fresh ginger, grated
– 2 teaspoons curry powder
– 1 teaspoon turmeric powder
– 1 can (14 oz) coconut milk
– 4 cups vegetable broth
– 1 can (15 oz) chickpeas, drained and rinsed
– 1 large carrot, diced
– 1 bell pepper (red or yellow), diced
– 1 cup fresh spinach, roughly chopped
– Salt and freshly cracked pepper to taste
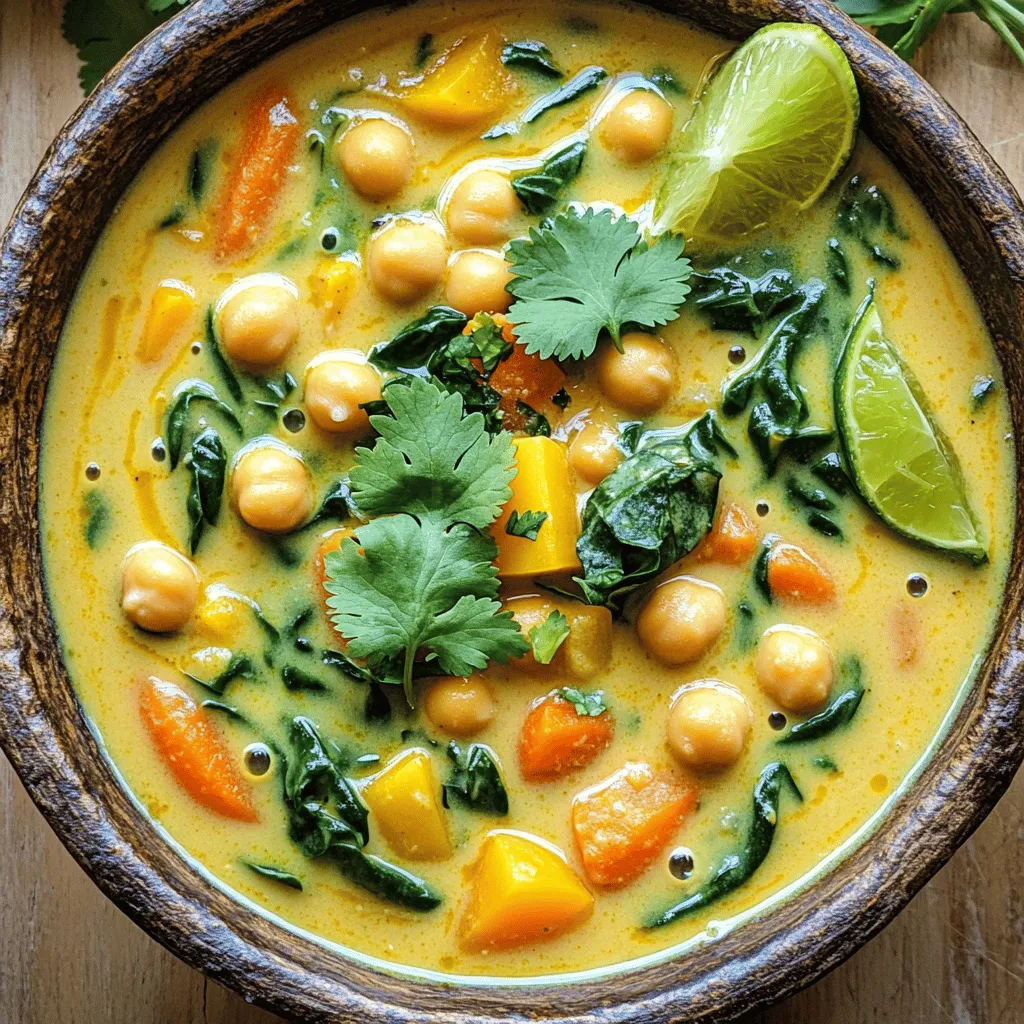
– Fresh cilantro leaves, for garnish
– Lime wedges, for serving
Each ingredient plays a key role in making the soup rich and tasty. I love using coconut oil because it gives a nice, creamy base. The onion brings sweetness, while garlic and ginger add warmth. Curry powder and turmeric not only add color but also depth.
The coconut milk makes the soup creamy. Vegetable broth gives it a good savory flavor. Chickpeas add protein and texture. Carrots and bell peppers bring crunch and sweetness. Fresh spinach adds a pop of green and nutrients.
Seasoning with salt and pepper is important for balance. Finally, cilantro and lime juice brighten the dish. Together, these ingredients create a hearty and flavorful soup that warms the soul.
Step-by-Step Instructions
Preparing the Base
1. Start by heating 1 tablespoon of coconut oil in a large pot over medium heat. Wait until it melts and shimmers.
2. Add 1 medium diced onion. Sauté for 5 minutes until the onion turns soft and clear.
3. Next, stir in 3 minced garlic cloves and 1 tablespoon of grated fresh ginger. Sauté for another 2-3 minutes until fragrant.
Adding Spices
1. Sprinkle in 2 teaspoons of curry powder and 1 teaspoon of turmeric powder. Mix well to coat the onions.
2. Let the spices bloom in the heat for about 1 minute. This brings out their rich flavors.
Combining Ingredients
1. Gradually pour in 1 can of coconut milk and 4 cups of vegetable broth. Stir to combine everything well.
2. Increase the heat slightly and bring the mixture to a gentle simmer. This allows the flavors to meld perfectly.
3. Add 1 can of chickpeas, drained and rinsed, along with 1 diced carrot and 1 diced bell pepper. Cook for 10-15 minutes until the veggies are tender.
Final Touches
1. Gently fold in 1 cup of roughly chopped fresh spinach. Cook for about 2 minutes until the spinach wilts.
2. Taste your soup and season with salt and freshly cracked pepper to your liking.
3. Serve your soup hot, garnished with fresh cilantro leaves and lime wedges on the side. Enjoy the pop of color and flavor!
Tips & Tricks
Perfecting Flavor
To make your Coconut Curry Chickpea Soup shine, focus on balancing spices. Start with a solid base of coconut oil, onion, garlic, and ginger. Sauté these ingredients well; this brings out the flavors. Use a medium heat to cook the onion until soft and translucent. This step takes about five minutes.
Next, add curry and turmeric powders. These spices need a minute to bloom in the heat. This helps release their full flavor. Stir them well with the onion mixture for even seasoning.
Cooking Time Optimization
Want to save time? Use pre-cooked chickpeas or canned ones, like in this recipe. They are quick and easy. You can also chop your veggies ahead of time. This makes cooking faster when you’re ready to make your soup.
If you need to speed things up further, consider using frozen vegetables. They cook quickly and help you skip some prep work.
Presentation Tips
For a beautiful presentation, serve your soup in deep bowls. Top with fresh cilantro for a pop of green. Add lime wedges on the side for color and taste. Guests can squeeze lime over the soup for extra zing. This not only looks great but also enhances the flavor. Enjoy serving this hearty dish!

Variations
Ingredient Swaps
You can easily switch up the veggies in this soup. Try adding zucchini, sweet potatoes, or even kale. Each will bring a new taste and texture. If chickpeas are not your favorite, you can use lentils or black beans. These will still give you that hearty feel.
If you need a coconut milk substitute, consider using almond milk or cashew cream. These will slightly change the flavor but still keep the soup creamy and rich.
Spice Adjustments
Want a milder flavor? Reduce the curry powder or add more coconut milk. You can also try sweet spices like cinnamon for a unique twist. For a spicier kick, add red pepper flakes or diced jalapeños. These will heat things up and make the soup exciting.
Consider adding fresh herbs like basil or mint. They add fresh notes that contrast well with the curry flavor.
Dietary Modifications
This recipe is already vegan and gluten-free. If you want to boost the protein, add some quinoa or tofu. These options keep the dish filling and healthy.
You can also make this soup lower in fat. Use light coconut milk or reduce the amount of oil. These changes keep the flavor without adding too many calories. Enjoy experimenting with your own variations!
Storage Info
Refrigeration Guidelines
To store leftovers, let the soup cool first. Use an airtight container to keep it fresh. Refrigerate the soup for up to three days. When you want to reheat, pour the soup into a pot. Heat it over medium heat. Stir often to avoid sticking. You can also use the microwave. Heat in short bursts and stir in between.
Freezing Instructions
If you want to save some soup for later, freezing works great. Let the soup cool completely before you freeze it. Use freezer-safe containers or bags. Leave some space at the top for expansion. The soup will stay good for about three months. When you are ready to eat it, take it out and thaw it in the fridge overnight. You can also thaw it in the microwave. Reheat it in a pot the same way you would with refrigerated soup. This keeps all the tasty flavors intact.
FAQs
Common Questions About Coconut Curry Chickpea Soup
Can I make this soup ahead of time?
Yes, you can make this soup ahead of time. It tastes even better the next day. Let the soup cool and store it in the fridge. When ready to eat, just heat it up on the stove.
What can I serve with Coconut Curry Chickpea Soup?
You can serve this soup with rice or bread. A side of naan or crusty bread pairs well. You might also enjoy a fresh salad with it.
Can I substitute chickpeas with another protein?
Yes, you can use other proteins. Tofu or lentils work well in this soup. For meat lovers, shredded chicken is also a good choice.
How long does this soup last in the refrigerator?
This soup lasts about 3 to 4 days in the fridge. Make sure it is in a sealed container to keep it fresh. Before eating, check for any signs of spoilage.
This blog post detailed how to make a tasty Coconut Curry Chickpea Soup. We covered ingredients, step-by-step instructions, helpful tips, and fun variations. Each step helps you enjoy cooking this dish. You can easily adjust spices for your taste. Remember to store leftovers safely for future meals. Cooking should be fun, and this soup is perfect for every season. Enjoy your cooking and share this recipe with friends!


