Copycat Olive Garden Zuppa Toscana Flavorful Comfort Soup

If you love Olive Garden’s Zuppa Toscana, you’ll want to try my copycat recipe! This flavorful soup combines savory Italian sausage, crispy bacon, and tender potatoes in a rich broth. With easy steps and simple ingredients, you can recreate this comforting dish at home. Whether it’s a rainy day or a cozy night in, this soup will warm your soul. Ready to dive into the recipe? Let’s get cooking!
Why I Love This Recipe
- Comforting Flavor: This creamy soup captures the essence of cozy comfort food with its rich flavors and satisfying texture.
- Quick and Easy: This recipe comes together in just 45 minutes, making it perfect for a weeknight dinner.
- Customizable Ingredients: Feel free to adjust the heat level or swap out ingredients to suit your taste and dietary needs.
- Perfect for Sharing: Whether it’s a family gathering or a cozy dinner with friends, this soup is ideal for sharing and creating memories.
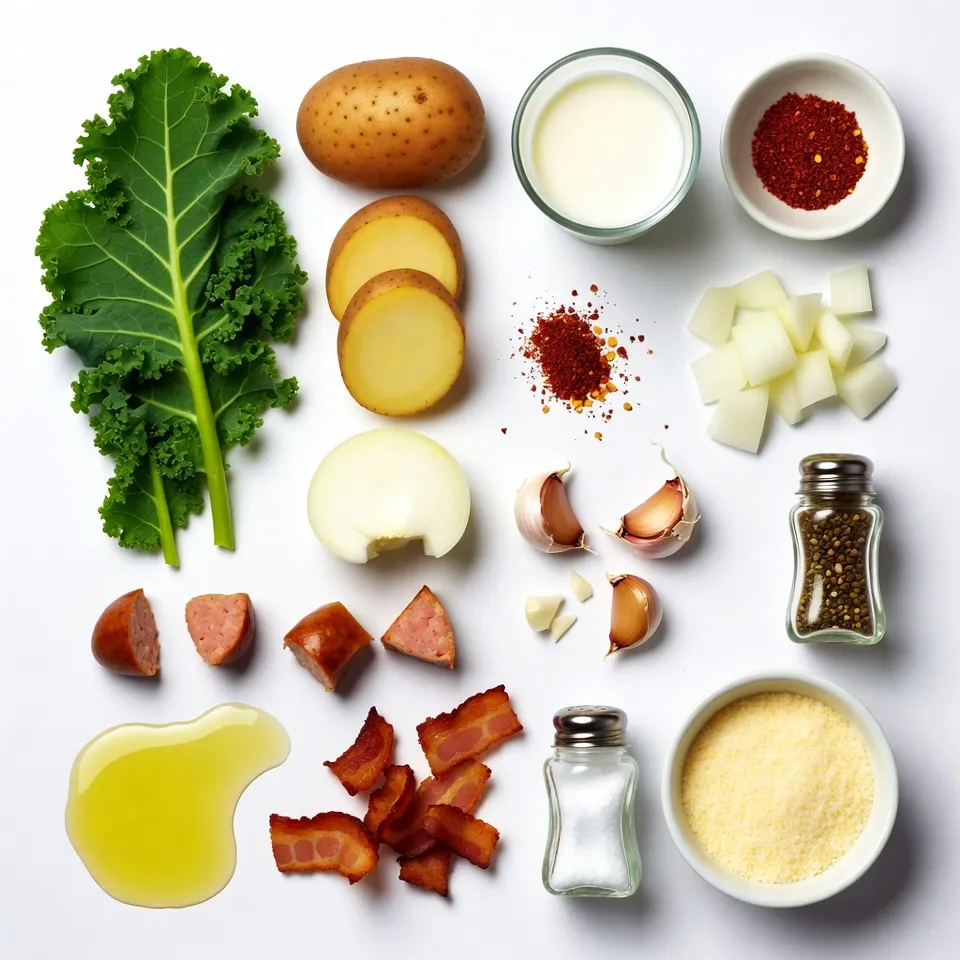
Ingredients
Main Ingredients
– 1 pound Italian sausage
– 4 slices of bacon
– 1 large onion
– 3 cloves garlic
Broth and Vegetables
– 6 cups chicken broth
– 3 large russet potatoes
– 2 cups kale
Seasonings and Final Touches
– 1 cup heavy cream
– 1 teaspoon red pepper flakes
– Salt and pepper to taste
– Olive oil
– Grated Parmesan cheese
To create the perfect copycat Olive Garden Zuppa Toscana, you need fresh and tasty ingredients. Start with one pound of Italian sausage, either mild or spicy, depending on how much heat you like. Next, add four slices of bacon, finely chopped, to give the soup a rich flavor.
For the base, you will need one large onion, diced, and three cloves of garlic, minced. These two ingredients add depth to the soup.
Next, grab six cups of chicken broth to create a flavorful liquid base. Then, three large russet potatoes should be washed and thinly sliced. Their creaminess enhances the texture of the soup. Finally, add two cups of kale, which adds a nice color and nutrition.
For the finishing touch, use one cup of heavy cream for a rich, velvety texture. A teaspoon of red pepper flakes will give the soup a little kick. Don’t forget to season with salt and pepper to taste, and drizzle in some olive oil for cooking. Grated Parmesan cheese will top off the dish, adding extra flavor.
With these ingredients, you are set to make a delicious bowl of comfort soup that rivals the restaurant version!

Step-by-Step Instructions
Preparation Steps
– Cook bacon until crispy.
– Brown the Italian sausage.
To start, heat a drizzle of olive oil in a large pot over medium heat. Add the finely chopped bacon. Cook it until crispy and golden brown, about 5-7 minutes. Use a slotted spoon to transfer the crispy bacon to a paper towel-lined plate. Keep the tasty drippings in the pot.
Next, add the Italian sausage in the same pot. Break it into smaller pieces as it cooks. Cook for about 5-7 minutes until browned and fully cooked. Set the sausage aside with the bacon.
Cooking the Vegetables
– Sauté onions and garlic.
– Add chicken broth and potatoes.
Now, add the diced onion to the pot. Sauté it for about 3-4 minutes until it turns translucent. Stir in the minced garlic and cook for an additional minute. This will make the garlic fragrant.
Carefully pour in the chicken broth. Use a wooden spoon to scrape up any browned bits at the bottom of the pot. This adds great flavor to your soup. Next, add the thinly sliced potatoes to the broth. Bring it to a rolling boil. Once boiling, reduce the heat to medium-low and let it simmer for about 15-20 minutes. The potatoes should be tender when pierced with a fork.
Final Assembly
– Incorporate sausage and bacon.
– Add kale and heavy cream.
Now, stir in the cooked sausage, crispy bacon, and red pepper flakes. Let the soup simmer for another 5 minutes. This helps meld all the flavors together.
Next, add the chopped kale and heavy cream to the pot. Stir well and allow the soup to heat through for another 5 minutes. Taste the soup and add salt and pepper if needed. Once it’s heated, turn off the heat. Let the soup rest for a few minutes for the flavors to blend even more.
Your comforting Zuppa Toscana is now ready to enjoy!
Tips & Tricks
Achieving the Perfect Flavor
To get the best flavor in your Zuppa Toscana, start by adjusting the seasoning. You can add more salt or red pepper flakes if you like heat. Taste often as you cook. This helps you find your ideal balance. Sautéing ingredients adds depth to our soup. The bacon and sausage create a rich base. Cook these until they are golden and crispy. This step makes every spoonful delicious.
Texture and Consistency
Cooking the potatoes just right is key. Slice them thin and let them simmer until tender. They should break apart easily but not turn mushy. For a creamy finish, add the heavy cream at the end. This gives your soup that smooth, velvety texture we all love. Stir gently to mix everything well, but don’t overdo it.
Serving Suggestions
When serving, use warm bowls to keep the soup hot. Top each bowl with grated Parmesan cheese. A sprinkle of black pepper also adds a nice touch. Pair your soup with crusty bread for dipping. This makes for a comforting and filling meal. You can also add a fresh salad on the side for a complete dinner.
Pro Tips
- Choose the Right Sausage: Use mild Italian sausage for a subtle flavor or spicy for an extra kick. You can also mix both for a balanced taste.
- Perfect Potato Texture: Make sure to slice the potatoes evenly to ensure they cook uniformly. Thinner slices will cook faster and create a creamier texture.
- Enhance Flavor with Fresh Herbs: Consider adding a sprinkle of fresh thyme or rosemary towards the end of cooking for an aromatic boost.
- Let it Rest: Allow the soup to sit for a few minutes after cooking before serving. This helps the flavors meld together beautifully.

Variations
Substitute Ingredients
You can switch out the Italian sausage for turkey sausage. This change offers a lighter flavor. If you want a twist, try chicken sausage. For greens, kale is classic, but you can use spinach or Swiss chard. Both will add a fresh taste.
Dietary Adjustments
To make this soup gluten-free, choose gluten-free broth and check the sausage label. Many brands offer gluten-free options. For a vegan version, skip the meat and use plant-based sausage. Substitute coconut cream for the heavy cream. This adds richness without dairy.
Flavor Additions
Feel free to play with spices. Add thyme or oregano for extra depth. A squeeze of lemon can brighten the soup. You can also toss in veggies like carrots or celery. These will bring more color and nutrients. Experimenting makes this soup your own.
Storage Info
Refrigeration Guidelines
To store leftovers of your Zuppa Toscana, let it cool first. Use an airtight container. Place it in the fridge. It will stay fresh for about three to four days. When you’re ready to eat, just scoop out what you need.
Freezing Instructions
For freezing, pour the cooled soup into freezer-safe bags or containers. Leave some space at the top for expansion. You can freeze it for up to three months. To reheat, thaw it overnight in the fridge. Heat it slowly on the stove. This keeps the flavors intact.
Shelf Life
In the fridge, your soup lasts about four days. Look for signs of spoilage, like an off smell or mold. If you see either, it’s best to toss it out. Always trust your senses when it comes to food safety.
FAQs
How can I make Zuppa Toscana spicier?
To add more heat, you can adjust the red pepper flakes. Start with one teaspoon and add more to taste. If you want more spice, try using hot Italian sausage instead of mild. This change brings a rich flavor and a kick to the soup.
Can I use different types of potatoes?
Yes, you can use other potatoes. Yukon Gold or red potatoes work well. Just remember, these types may cook differently. Cut them into thin slices for even cooking. This keeps the texture soft but not mushy.
What is the best way to reheat leftovers?
You can reheat leftovers in two ways. For the microwave, use a microwave-safe bowl. Heat in short bursts, stirring often. If using the stove, warm on low heat. Stir frequently to keep the soup creamy. This prevents sticking and burning.
This blog post covered how to make a delicious Zuppa Toscana. We discussed key ingredients, including Italian sausage, bacon, and cream. The step-by-step instructions made it easy to follow along. I shared tips to boost flavor and perfect texture. You can adjust ingredients to fit your needs, whether gluten-free or vegan. Finally, I detailed storage tips for leftovers and answers to common questions. Enjoy your cooking, and don’t hesitate to experiment with this hearty dis

Creamy Copycat Zuppa Toscana
Ingredients
- 1 pound Italian sausage
- 4 slices bacon, finely chopped
- 1 large onion, diced
- 3 cloves garlic, minced
- 6 cups chicken broth
- 3 large russet potatoes, washed and thinly sliced
- 1 cup heavy cream
- 2 cups kale, stems removed and chopped
- 1 teaspoon red pepper flakes
- to taste salt and pepper
- for cooking drizzle olive oil
- for serving grated Parmesan cheese
Instructions
- In a large pot, heat a drizzle of olive oil over medium heat. Add the finely chopped bacon and cook, stirring occasionally, until the bacon is crispy and golden brown, about 5-7 minutes. Once done, use a slotted spoon to transfer the bacon to a paper towel-lined plate, leaving the delicious drippings in the pot.
- In the same pot, add the Italian sausage. Use a spatula to break it into smaller pieces as it cooks. Cook for about 5-7 minutes, or until browned and fully cooked. Remove the sausage from the pot and set it aside with the crispy bacon.
- Add the diced onion to the pot and sauté for about 3-4 minutes, or until the onion becomes translucent. Stir in the minced garlic and cook for an additional 1 minute, allowing the garlic to become fragrant without burning.
- Carefully pour in the chicken broth, using a wooden spoon to scrape the bottom of the pot to lift any browned bits, enhancing the flavor of the soup.
- Add the thinly sliced potatoes to the broth and bring the mixture to a rolling boil. Once boiling, reduce the heat to medium-low and simmer for about 15-20 minutes, or until the potatoes are tender when pierced with a fork.
- Stir in the cooked sausage, crispy bacon, and red pepper flakes. Let the soup simmer for an additional 5 minutes to meld the flavors together.
- Incorporate the chopped kale and heavy cream into the pot. Stir well, allowing the soup to heat through for another 5 minutes. Taste the soup and season with salt and pepper as desired.
- Once heated, turn off the heat and let the soup rest for a few minutes, allowing the flavors to become even more harmonious before serving.


![- 1 pound boneless, skinless chicken breasts - Marinade: 1 cup buttermilk - Breading elements: 1 cup panko breadcrumbs, 1/2 cup all-purpose flour - Seasonings: 1 teaspoon garlic powder, 1 teaspoon onion powder, 1 teaspoon smoked paprika, 1/2 teaspoon salt, 1/2 teaspoon black pepper, 1/4 teaspoon cayenne pepper (optional) - Cooking oil: 2 tablespoons extra virgin olive oil - Garnish: Fresh parsley, finely chopped I love using fresh, simple ingredients for my crispy baked chicken tenders. The chicken breasts are the star here. I always choose boneless and skinless for easy handling. This keeps them juicy and tender. For the marinade, I use buttermilk. It helps to make the chicken soft and adds great flavor. Soak the chicken for at least 30 minutes. You can go up to two hours for the best taste. Next comes the breading. I prefer panko breadcrumbs because they give the best crunch. The all-purpose flour helps the breadcrumbs stick. Mixing garlic powder, onion powder, smoked paprika, salt, and pepper adds a nice depth of flavor. I add cayenne pepper for those who like a bit of heat. It’s optional, but it gives a great kick. Finally, a drizzle of extra virgin olive oil helps the tenders bake to a golden brown. You can finish with fresh parsley for a pop of color. Want the full recipe? Check out the [Full Recipe]. It’s a delicious way to enjoy chicken! First, set your oven to 425°F (220°C). While it heats up, grab a baking sheet. Line it with parchment paper. This will help the chicken not stick. It also makes cleanup easy. Take a big bowl and pour in the buttermilk. Add the chicken strips. Make sure they are all covered. Cover the bowl with plastic wrap. Let it sit for at least 30 minutes. For even more flavor, you can marinate it for up to 2 hours in the fridge. In another shallow dish, mix the flour, garlic powder, onion powder, smoked paprika, salt, black pepper, and cayenne pepper. Whisk it well. In a separate bowl, place the panko breadcrumbs. This is what will give your chicken that crunchy outside. After marinating, take the chicken out of the buttermilk. Let the excess drip off. Next, coat each piece in the flour mixture. Make sure each strip is covered. Gently shake off the extra flour. For extra crunch, dip the chicken back into the buttermilk. Then, roll it in the panko breadcrumbs. Press down a bit to help the crumbs stick. Arrange the coated chicken on the lined baking sheet. Drizzle a little olive oil on top. This helps it get golden brown. Bake the chicken for 20-25 minutes. Check with a meat thermometer. It should reach 165°F (75°C). Once the chicken is baked, take it out of the oven. Let it rest for about 5 minutes. This helps keep the juices in. Finally, garnish with fresh parsley. It adds a nice touch. Serve hot with your favorite sauces. Don't forget to check the Full Recipe for all the details! For the crispiest chicken tenders, use panko breadcrumbs. Panko adds a light and airy crunch that regular breadcrumbs can't match. Their larger flakes create a wonderful texture. To take it up a notch, use the double-dipping technique. First, coat the chicken in flour, then dip it back into the buttermilk before rolling it in panko. This extra layer of breading will give you an amazing crunch. To make your chicken tenders more flavorful, add spices to the breading mix. Garlic powder, onion powder, and smoked paprika all work great. Feel free to adjust the amounts to fit your taste. You can also try different marinades. A simple mix of lemon juice and herbs can change the flavor profile entirely. Experiment with your favorites to find the perfect taste. If you want a healthier option, consider using an air fryer. It cooks the chicken tenders with less oil while still keeping them crispy. Adjust the cooking time to about 12-15 minutes at 400°F (200°C). Another great tip is to place the chicken tenders on a wire rack. This allows hot air to circulate around the tenders, leading to even cooking and a crispier finish. {{image_4}} You can easily change the flavor of your chicken tenders. Here are two fun ideas: - Lemon pepper chicken tenders: Add lemon zest and black pepper to the flour mix. This gives a bright and zesty taste that wakes up your meal. - BBQ chicken tenders: Brush the tenders with your favorite BBQ sauce before baking. This adds a sweet and tangy flavor that kids love. If you have dietary needs, you can still enjoy these tenders: - Gluten-free options: Use gluten-free breadcrumbs instead of regular. This way, everyone can enjoy the meal without any worry. - Low-carb alternatives: Swap regular flour with almond flour or coconut flour. Both options give you a nice crunch while keeping carbs low. Pair your chicken tenders with tasty sides and dips: - Suggested dipping sauces: Try ranch dressing, honey mustard, or spicy sriracha. Each adds a unique kick to your tenders. - Side dish pairings: Serve them with a fresh salad, crispy fries, or steamed veggies. These sides complete your meal and add more nutrition. For more ideas, check out the Full Recipe to explore different flavors and tips! To keep your chicken tenders fresh, store them right. First, let the cooked tenders cool. Then, place them in an airtight container. You can store them in the fridge for up to three days. If you want to keep them longer, freezing is a great option. Use containers that seal tightly. Glass or plastic containers work well. If you use plastic wrap, make sure it hugs the tenders closely. This way, they won’t dry out. When you want to enjoy your leftovers, reheating is key. The best way to keep them crispy is to use the oven. Preheat your oven to 375°F (190°C) and bake for about 10 to 15 minutes. This method makes the chicken hot and crispy again. You can also use an air fryer. Set it to 375°F (190°C) and heat for about 5 to 7 minutes. This method is quick and gives great results. You can freeze both uncooked and cooked chicken tenders. For uncooked tenders, place them on a baking sheet to freeze individually first. Once they are frozen, transfer them to a freezer bag. This keeps them from sticking together. For cooked tenders, let them cool, then store them in an airtight container. They can last up to three months in the freezer. When you are ready to eat, just reheat them as mentioned earlier. For more detailed cooking methods, check the Full Recipe. Bake chicken tenders for 20 to 25 minutes at 425°F. This time gives them a golden color and keeps them juicy. Always check their internal temperature; it should reach 165°F for safety. Yes, you can make these chicken tenders ahead of time. Prepare them fully and store them in the fridge for up to 24 hours. When you're ready to eat, just pop them in the oven to reheat. This way, you save time while still enjoying a tasty meal. If you don't have buttermilk, use regular milk with a splash of vinegar or lemon juice. Let it sit for about five minutes. This method mimics buttermilk's acidity and helps tenderize the chicken just as well. Check chicken tenders with a meat thermometer. They are done when they hit 165°F inside. If you don’t have a thermometer, cut one open. The meat should be white, not pink, and the juices should run clear. Yes, chicken thighs work well in this recipe. They are more flavorful and juicy than breasts. Just cut them into strips like you would with the chicken breasts. The cooking time may be similar, so keep an eye on them. Crispy baked chicken tenders are easy and tasty. You start with simple ingredients, like chicken, buttermilk, and spices. The steps are clear, from marinating to baking. I shared tips for extra crunch and tasty flavors. Finally, you can personalize these tenders with countless variations and sides. Whether it's for a family dinner or meal prep, these tenders will impress. Enjoy making them and exploring your options!](https://joymealplan.com/wp-content/uploads/2025/06/4bfc5954-182f-42e7-9a90-e67bfbd9568b-768x768.webp)


