
When winter rolls in, there’s nothing quite like a warm bowl of soup. My Cozy Winter Squash Soup is the perfect blend of butternut and acorn squash, flavored with onion, garlic, and creamy coconut milk. In this post, I’ll guide you through a simple recipe that warms your soul and pleases your taste buds. Get ready to cozy up with this comforting dish that’s as easy to make as it is delicious!
Why I Love This Recipe
- Comforting Flavors: This soup combines the natural sweetness of winter squashes with warm spices, creating a cozy and inviting dish perfect for chilly days.
- Easy to Make: With simple ingredients and straightforward steps, this recipe is accessible for cooks of all skill levels, making it a go-to for busy weeknights.
- Nutrient-Rich: Butternut and acorn squashes are packed with vitamins and minerals, making this soup not only delicious but also a healthy choice for your family.
- Customizable: You can easily adjust the spices or add your favorite toppings, such as nuts or herbs, to make this soup uniquely yours!
Ingredients
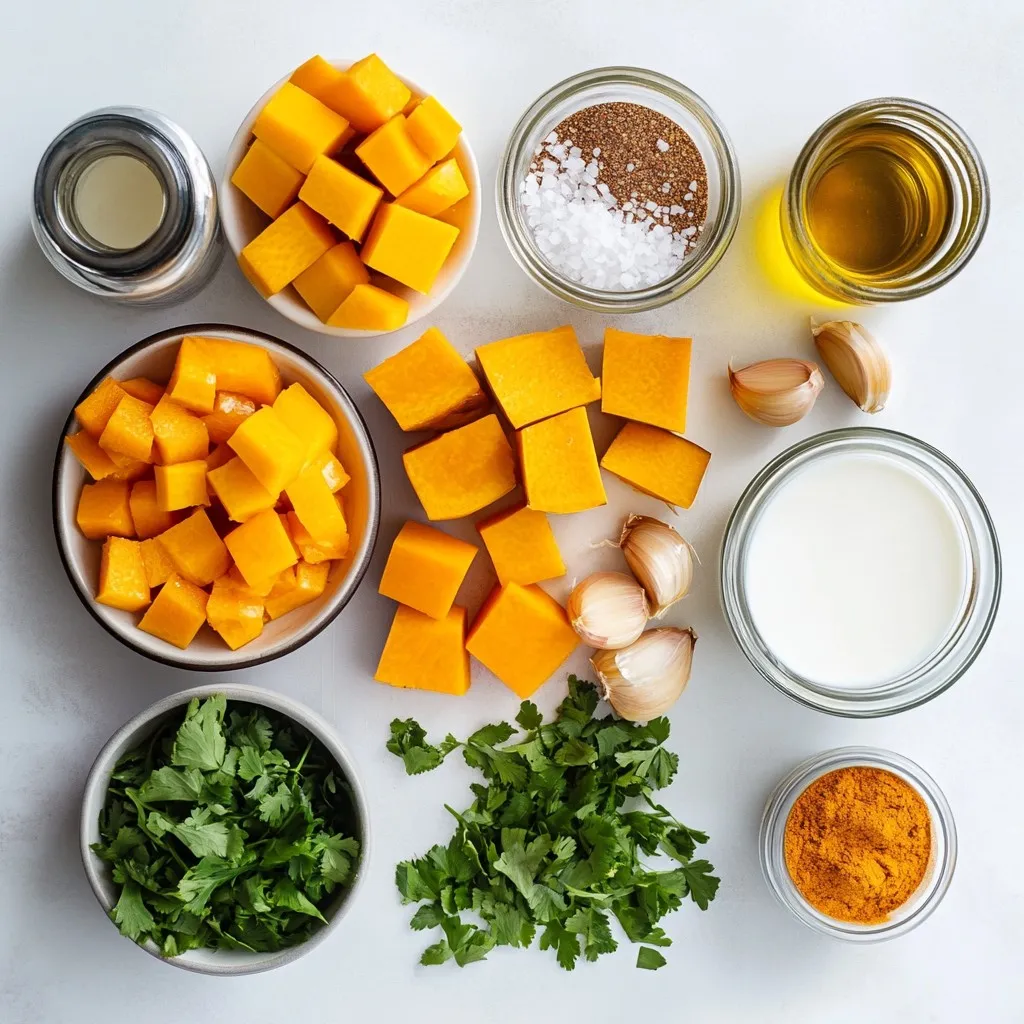
Main Ingredients
– 1 medium butternut squash, peeled and cubed
– 1 medium acorn squash, peeled and cubed
– 1 medium onion, finely chopped
– 2 cloves of garlic, minced
– 1 tablespoon olive oil
– 4 cups vegetable broth
– 1 can (14 oz) coconut milk
– 1 teaspoon ground ginger
– 1 teaspoon ground cinnamon
– Salt and freshly ground black pepper to taste
For this cozy winter squash soup, I focus on key ingredients that bring warmth and flavor. Butternut squash and acorn squash are my stars. They add a rich, sweet taste. Onions and garlic give the soup a nice base. The coconut milk makes it creamy and adds a hint of sweetness.
The vegetable broth ties everything together. It’s important for the soup’s depth. I use ground ginger and cinnamon to enhance the flavor. These spices create that inviting, cozy feel we crave in winter.
Optional Garnishes
– Toasted pumpkin seeds
– Chopped fresh parsley
– Coconut cream drizzle
Garnishes elevate the soup’s look and taste. I love adding toasted pumpkin seeds for crunch. They also add a nice nutty flavor. Fresh parsley brings a pop of color and freshness. If you want a rich finish, drizzle some coconut cream on top. These simple touches make each bowl feel special.
Step-by-Step Instructions
Preparation Steps
1. Heat 1 tablespoon of olive oil in a large pot over medium heat.
2. Add 1 finely chopped onion to the pot.
3. Sauté the onion for about 5 minutes. Make sure it becomes soft and clear.
4. Next, add 2 minced cloves of garlic. Cook for 1 more minute. Stir often to keep the garlic from burning.
5. Carefully add 1 medium butternut squash and 1 medium acorn squash. Make sure they are peeled and cubed. Stir well to mix with the onion and garlic.
Cooking Process
1. Pour in 4 cups of vegetable broth. Stir everything together.
2. Bring the mixture to a boil. Once it boils, lower the heat to a simmer.
3. Cover the pot and let it simmer for about 20 minutes. The squash should be soft enough to pierce with a fork.
4. After simmering, take the pot off the heat. Use an immersion blender to puree the soup right in the pot. If you don’t have one, carefully transfer the soup to a regular blender. Remember to vent the lid to avoid splatter.
Final Touches
1. Once pureed, return the soup to the pot if needed.
2. Stir in 1 can of coconut milk, 1 teaspoon of ground ginger, and 1 teaspoon of ground cinnamon.
3. Taste the soup and add salt and pepper as you like.
4. Gently heat the soup on low, stirring often, until it is warm.
5. Serve the hot soup in bowls. Garnish with toasted pumpkin seeds, fresh parsley, or a swirl of coconut cream if you wish.
Tips & Tricks
Achieving the Perfect Consistency
To get your soup just right, choose the right tool. An immersion blender is great for blending soup right in the pot. It saves time and cuts down on mess. If you don’t have one, a regular blender works. Just be careful with hot soup. Blend it in small batches and leave the lid slightly open to avoid splatters.
You may want a thicker or thinner soup. If it’s too thick, add more vegetable broth or coconut milk. If it’s too runny, let it simmer longer without the lid. This helps it thicken up nicely.
Flavor Enhancements
Add herbs or spices to make your soup shine. Fresh thyme or sage can bring out great flavors. You can sprinkle them in while the soup simmers. Ground ginger and cinnamon add warmth and depth. Adjust these to suit your taste.
Balancing sweetness is key. The squash brings natural sweetness, but you may want to add salt or pepper. Taste your soup before serving. This way, you can adjust the seasoning to make it just right. Don’t be shy—seasoning can change everything!
Pro Tips
- Use Fresh Spices: To enhance the flavor of your soup, opt for fresh ground spices rather than pre-ground. This will give your soup a more robust and vibrant taste.
- Texture Preference: If you prefer a chunkier soup, reserve some of the squash cubes before blending and stir them back into the soup after pureeing.
- Adjusting Consistency: If the soup is too thick for your liking, thin it out with additional vegetable broth or water until it reaches your desired consistency.
- Flavor Boost: For an extra layer of flavor, consider adding a splash of apple cider vinegar or a squeeze of lemon juice just before serving to brighten the taste.
Variations
Different Squash Options
You can easily swap butternut squash for pumpkin in this recipe. Pumpkin gives a rich taste and adds a nice color. You can also experiment with other squashes like kabocha or delicata. Each type brings its own flavor. These small changes can make your soup unique every time.
Adding Proteins or Grains
Want to make your soup heartier? Try adding lentils or beans. They boost protein and make the meal filling. You can also serve the soup with crusty bread or a side of quinoa. This adds texture and makes it more satisfying. Enjoying different options keeps the soup exciting and flavorful.
Storage Info
Storing Leftovers
After making cozy winter squash soup, you may have some leftovers. Store them in the fridge. Use an airtight container. Your soup will stay fresh for about 3 to 4 days.
If you want to keep it longer, try freezing it. Pour the soup into freezer-safe containers. Leave some space at the top, as it will expand when frozen. It can last for up to 3 months in the freezer.
Reheating Methods
To reheat your soup, use a pot on the stove. Heat it over low to medium heat. Stir often to help it warm evenly. This helps keep the soup’s texture and flavor.
You can also use a microwave. Place the soup in a microwave-safe bowl. Heat in short bursts, stirring in between. This way, it heats well without getting too hot or uneven.
FAQs
Can I make this soup ahead of time?
Yes, you can make this soup ahead of time. It tastes even better the next day. After cooking, let it cool. Then, store it in an airtight container in the fridge. It will stay fresh for about three to four days. When you are ready to eat, just reheat it on the stove over low heat, stirring often.
How can I make it dairy-free?
This recipe is already dairy-free thanks to coconut milk. If you want to add creaminess, you can use more coconut milk. You can also add cashew cream for extra richness. Blend soaked cashews with water until smooth. This will give you a nice creamy texture without any dairy.
What can I serve with winter squash soup?
– Pairing suggestions for sides or salads
I love pairing this soup with warm crusty bread. A simple green salad also works well. You can add some nuts or seeds for crunch.
– Complements for flavor balance
A drizzle of balsamic glaze adds a nice tang. You could also serve it with a side of roasted vegetables. These pair well with the sweet squash flavor.
This blog post outlined how to make a creamy winter squash soup. You learned about essential ingredients like butternut squash and onion. We detailed each step, from prepping to garnishing. Tips on achieving the right texture and adding flavors helped enhance your dish. Don’t shy away from variations or storage options; they keep your soup fresh and tasty. Remember, experimenting makes cooking fun. Enjoy your delicious soup, and share it with friends and famil


