Cranberry Orange Muffins Fresh and Flavorful Treat

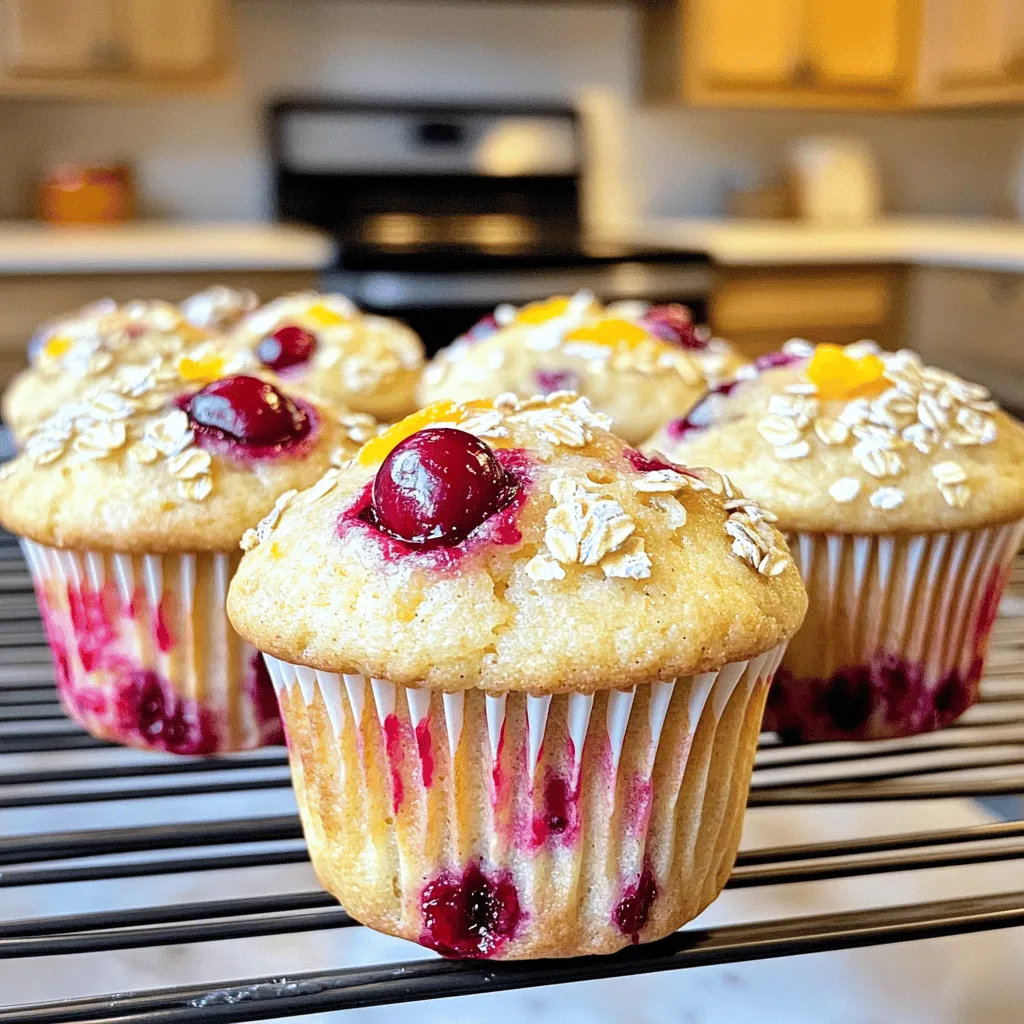
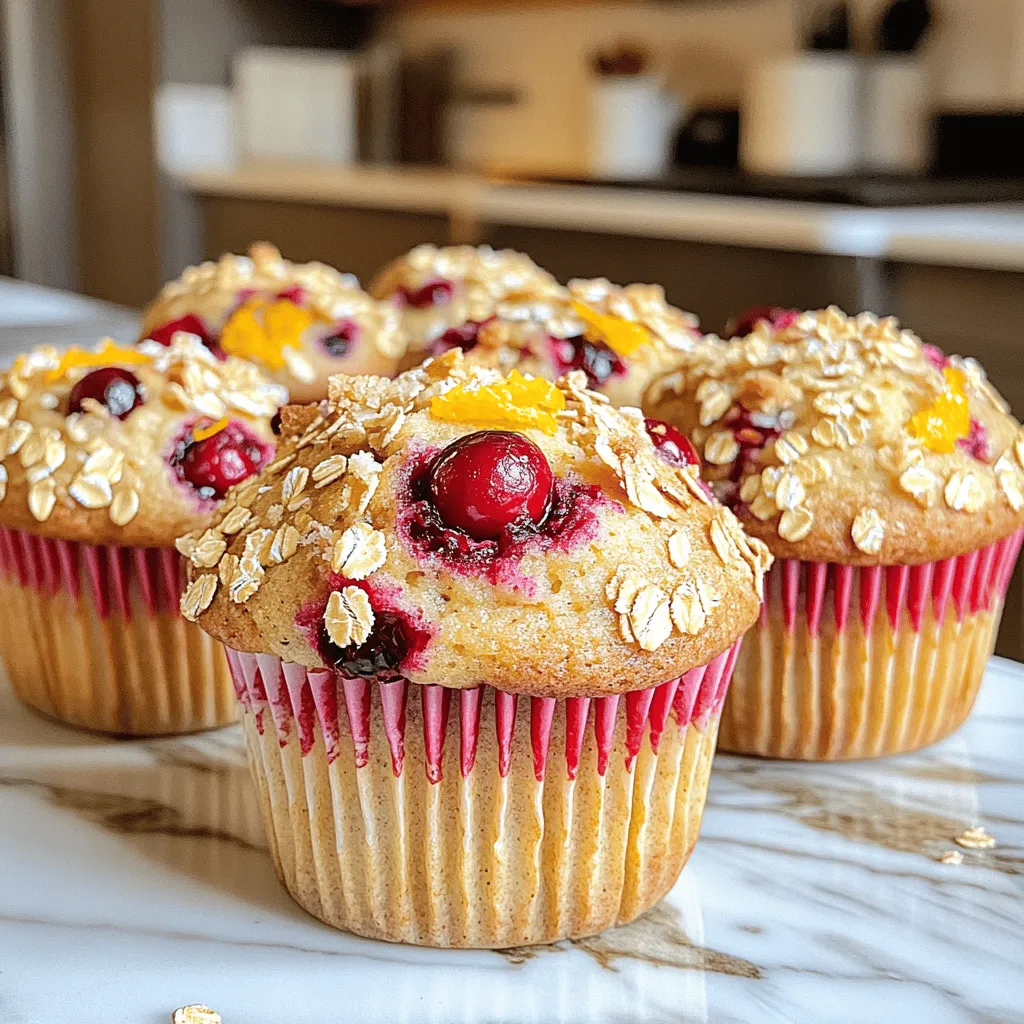
Get ready to delight your taste buds with fresh and flavorful cranberry orange muffins! This easy recipe blends tart cranberries with zesty orange for a delicious treat. Whether you enjoy them for breakfast, snack time, or dessert, these muffins will impress everyone. Follow my simple steps and tips for the best results. Your kitchen will smell amazing, and your family will be asking for more! Let’s dive into the fun of baking!
Ingredients
To make delicious cranberry orange muffins, gather these fresh ingredients:
– 2 cups all-purpose flour
– 1 cup fresh cranberries, halved
– 1 large orange, zested and juiced
– 3/4 cup granulated sugar
– 1/2 cup unsalted butter, melted and cooled slightly
– 1/2 cup buttermilk, at room temperature
– 2 large eggs, at room temperature
– 2 teaspoons baking powder
– 1 teaspoon baking soda
– 1/2 teaspoon salt
– 1 teaspoon vanilla extract
– 1/4 cup rolled oats (for topping)
Each ingredient plays an important role. The all-purpose flour gives structure, while fresh cranberries add tartness. The orange zest and juice provide bright flavor and aroma. Butter keeps the muffins rich and moist. Buttermilk adds a nice tang and helps the muffins rise well.
Baking powder and baking soda are your leavening agents, making the muffins rise. Salt enhances all the flavors. The vanilla extract adds warmth, and rolled oats on top give a nice crunch.You’ll create a treat that’s perfect for breakfast or a snack!
Step-by-Step Instructions
Prepping the Oven and Muffin Tin
– Preheat the oven to 375°F (190°C).
– Prepare the muffin tin with liners or cooking spray.
Start by preheating your oven. This step is key to getting perfect muffins. While your oven heats up, grab your muffin tin. You can use paper liners or a light coat of cooking spray. Either choice makes it easy to remove the muffins later.
Mixing Dry Ingredients
– Combine flour, baking powder, baking soda, and salt.
In a large mixing bowl, add the all-purpose flour. Then, sprinkle in the baking powder, baking soda, and salt. Whisk these dry ingredients together until they blend well. This helps your muffins rise evenly.
Mixing Wet Ingredients
– Cream together butter and sugar, then add eggs, buttermilk, orange juice, and vanilla.
In another bowl, melt your butter and mix it with the sugar. Use a whisk or an electric mixer to combine them until creamy. Now, crack in the eggs and pour in the buttermilk, orange juice, and vanilla extract. Mix them well until the mixture is smooth.
Combining Mixtures
– Fold cranberries and zest into the wet mixture and incorporate dry ingredients.
Take your halved cranberries and orange zest. Gently fold them into the wet mixture. This step adds bursts of flavor. Next, add the dry ingredients to the wet mix. Stir gently until just combined. Do not overmix; a few lumps are okay.
Filling Muffin Tins and Topping
– Fill muffin cups and sprinkle with rolled oats.
Using a spoon or an ice cream scoop, fill each muffin cup about 3/4 full with batter. This gives your muffins room to rise. Once filled, sprinkle rolled oats on top of each muffin. This adds a nice crunch.
Baking
– Bake for 18-20 minutes and check for doneness.
Place your muffin tin in the preheated oven. Bake for 18 to 20 minutes. To check if they are done, insert a toothpick into the center of a muffin. If it comes out clean, they are ready. Let them cool in the pan for a few minutes before transferring them to a wire rack.
Tips & Tricks
Perfecting Texture
To get light and fluffy muffins, avoid overmixing the batter. When you mix too much, the muffins can become dense and tough. Instead, stir until just combined, leaving some lumps in the batter.
The temperature of your ingredients matters. Use room temperature eggs and buttermilk. This helps create a smooth batter and ensures even baking. If you forget to take them out before cooking, just place them in warm water for a few minutes.
Additional Flavor Enhancements
To take your muffins to the next level, consider adding spices. A pinch of cinnamon or nutmeg can create a warm and cozy flavor. These spices blend well with cranberries and orange.
You can also switch up the sweetener. Instead of regular sugar, try honey or maple syrup. These options add a different taste and can make your muffins even more special.

Variations
Ingredient Substitutions
You can easily swap fresh cranberries for frozen ones. Frozen cranberries work just fine. They may add a little more moisture. If you use them, do not thaw them first. Just toss them in the batter while still frozen.
Buttermilk is a key ingredient, but you can replace it with yogurt. Greek yogurt works well for this recipe. You can also use dairy-free options like almond milk mixed with a bit of vinegar. This gives a similar tangy flavor.
Muffin Size and Shape
You can make mini muffins instead of standard-sized ones. Mini muffins bake faster, usually around 10 to 12 minutes. This is perfect for a bite-sized treat. If you want a different shape, consider making a Cranberry Orange loaf. Just pour the batter into a loaf pan and bake for about 50 to 60 minutes.
Flavor Add-ins
Want to mix things up? Adding chocolate chips is a great option. They add a sweet surprise to each bite. You can also throw in some nuts like walnuts or pecans for crunch. This adds texture and flavor to your muffins.
Storage Info
Storing Muffins
To keep your cranberry orange muffins fresh, store them in an airtight container. Place the container at room temperature for up to three days. If you need extra time, put them in the fridge. Just remember, the cold can change the texture a bit. For long-term storage, freeze the muffins. Wrap each muffin in plastic wrap, then put them in a freezer bag. This keeps them tasty for about three months.
Reheating Tips
When you want to enjoy a warm muffin, you have a few choices. You can use the microwave for quick heating. Just warm them for about 15-20 seconds. This works well, but the muffin might become a bit soft. For a crispier texture, use the oven. Preheat it to 350°F (175°C) and heat the muffins for about 5-10 minutes. This method keeps the outside nice and crunchy while warming the inside.
FAQs
How can I make these muffins healthier?
You can make these muffins healthier by reducing the sugar. Try using half the amount or substituting with honey or maple syrup. Another option is to use whole grain flour instead of all-purpose flour. Whole grain flour adds fiber and nutrients, making the muffins more filling.
Can I use dried cranberries instead of fresh?
Yes, you can use dried cranberries. They will add sweetness, but they may change the muffin’s flavor and moisture. Fresh cranberries give a tart burst, while dried ones are sweeter and chewier. If using dried cranberries, consider reducing the sugar in the recipe.
How long will the muffins last?
These muffins will last about 3 to 5 days at room temperature. Keep them in an airtight container. Signs of spoilage include a dry texture or mold. If they smell off or look strange, throw them away.
Can I freeze these muffins?
Absolutely! To freeze, let the muffins cool completely. Wrap each muffin tightly in plastic wrap and place them in a freezer bag. They will last for up to three months. To thaw, take them out and leave them at room temperature or warm them in the microwave.
What can I serve with Cranberry Orange Muffins?
These muffins pair well with tea or coffee. You can also serve them with a light spread of butter or cream cheese. For a fun twist, try them with a dollop of orange marmalade. Enjoy the fresh, bright flavors!
These cranberry orange muffins are easy to make and delicious. We’ve covered all the ingredients you need and simple steps for baking. You can customize them with spices or different fruits, too. Remember to check their doneness and store them well. With these tips, you’ll always have fresh muffins ready. Enjoy the process and let your creativity shine in the kitchen!


![To make this tasty casserole, you need some key items: - 1 loaf of brioche or challah bread, cut into 1-inch cubes - 6 large eggs - 2 cups whole milk - 1 cup heavy cream - 1/2 cup pure maple syrup - 1 teaspoon vanilla extract - 1 teaspoon ground cinnamon - 1/4 teaspoon salt - 1 cup fresh strawberries, sliced (or any berries of your choice) - Butter, for greasing the baking dish - Powdered sugar, for dusting (optional) These ingredients create a rich and creamy base that fills each bite with flavor. The bread soaks in the egg mixture, adding softness and taste. You can tweak the recipe to fit your taste. Here are some ideas: - Other fruits like blueberries, raspberries, or bananas - Nuts for added crunch, like walnuts or pecans - Chocolate chips for a sweet twist - Different spices like nutmeg or ginger - Yogurt or sour cream for tanginess Feel free to mix and match! Customizing makes this dish even more fun and tasty. If you lack some ingredients, here are easy swaps: - Use almond milk or oat milk instead of whole milk for a dairy-free option. - Swap heavy cream with half-and-half if you want a lighter touch. - Try agave syrup instead of maple syrup for a different sweet flavor. - For gluten-free, use gluten-free bread, ensuring it’s sturdy enough to hold up. These substitutions keep the dish good while catering to your needs. Don't hesitate to experiment! For the full recipe, check out the detailed instructions. First, set your oven to 350°F (175°C). Grab a 9x13-inch baking dish. Grease it well with butter. This step helps prevent the casserole from sticking. Make sure every corner gets some butter. In a large bowl, crack six eggs. Add two cups of whole milk and one cup of heavy cream. Pour in half a cup of pure maple syrup. Next, add one teaspoon of vanilla extract and one teaspoon of ground cinnamon. Sprinkle in a bit of salt, about one-fourth teaspoon. Whisk all these ingredients together until smooth. It should look creamy and well-mixed. Now, take your loaf of brioche or challah bread. Cut it into one-inch cubes. Gently fold these cubes into your egg mixture. Use a spatula to coat each piece. Let this sit for about ten minutes so the bread can soak it up well. After ten minutes, fold in one cup of sliced strawberries. Make sure they spread evenly in the mix. Pour everything into your greased baking dish. Spread it out evenly with a spatula. Now, place it in the oven. Bake for 45 to 50 minutes. The top should turn golden brown. Finally, let it cool for five to ten minutes. Dust with powdered sugar if you'd like. Enjoy your lovely Easy Baked French Toast Casserole! For the full recipe, check [Full Recipe]. To get a creamy custard, mix eggs and milk well. Use whole milk for richness. Heavy cream adds more creaminess. Whisk until the mixture is smooth. Let the bread soak for at least 10 minutes. This helps it absorb the custard. The bread should feel soft but not mushy. You can prepare this dish a day before. Just mix the custard and soak the bread. Cover it and store in the fridge overnight. This lets the bread soak up all the flavors. In the morning, just pop it in the oven. It saves you time and effort! Serve your casserole warm for the best taste. Cut it into squares for easy serving. Top with fresh berries or a drizzle of maple syrup. A dusting of powdered sugar adds a nice touch. You could also add a dollop of whipped cream. This makes it look fancy and inviting! For the full recipe, check out the details above. {{image_4}} You can change the fruit in your casserole. I love using fresh strawberries. They add sweetness and color. You can also use blueberries, raspberries, or blackberries. Apples work well too. Cut them into small pieces and mix them in. For a tasty twist, add bananas. They become soft and sweet after baking. Want to amp up the flavor? Try adding spices like nutmeg or ginger. A pinch of each can give your casserole a warm taste. You can also use different extracts. Almond extract adds a nice touch, while orange zest can brighten the dish. Just remember, a little goes a long way! If you're looking for healthier choices, you can make your casserole low-fat. Use low-fat milk and cream. You can also swap the brioche for whole grain bread. For a gluten-free version, use gluten-free bread. It tastes great and keeps the dish light. Don't worry; it will still be delicious! For the full recipe, check out the delightful baked French toast casserole. Enjoy trying out these variations! To store leftovers, let the casserole cool completely. Then, cover it tightly with plastic wrap or foil. You can also place it in an airtight container. This keeps it fresh for up to three days in the fridge. If you have leftover slices, it’s best to separate them with parchment paper to avoid sticking. When you are ready to eat, preheat your oven to 350°F (175°C). Place the casserole in an oven-safe dish. Cover it with foil to prevent it from drying out. Heat it for about 20 to 25 minutes, or until it is warm all the way through. You can also microwave individual pieces for quick reheating. Just be sure to cover them to keep moisture in. If you want to keep the casserole longer, freezing is a great option. First, cool it completely. Then, cut it into portions and wrap each one in plastic wrap. Place the wrapped pieces in a freezer-safe bag or container. This keeps them fresh for up to three months. When you are ready to eat, thaw in the fridge overnight. Then, reheat as mentioned above. Enjoy a tasty meal even after some time! Yes, you can make this dish ahead of time! You can prepare it the night before. Just mix the egg base and soak the bread. Cover it and place it in the fridge. In the morning, bake it fresh. This helps the flavors blend well. For the best taste, use brioche or challah bread. These breads soak up the egg mixture well. They also give a soft texture and rich flavor. You can also try French bread or even sourdough. You’ll know it’s done when the top is golden brown. The center should feel firm, not jiggly. You can use a toothpick to check. If it comes out clean, it’s ready to serve! Yes, you can make this casserole dairy-free! Use almond milk or oat milk instead of regular milk. Replace heavy cream with coconut cream or a dairy-free alternative. This keeps the dish tasty and creamy. Serve it warm for the best experience. You can top it with fresh berries or a drizzle of maple syrup. Dusting powdered sugar on top adds a nice touch. This dish is perfect for breakfast or brunch! For the full recipe, check the section above. This baked French toast casserole is easy and customizable. You learned about essential ingredients, how to prepare the dish, and great tips for success. Remember, you can add fruits or spices for flavor. Storage and reheating options make leftovers simple, too. Whether you serve it for breakfast or brunch, this dish shines. Enjoy making it your own and sharing it with others!](https://joymealplan.com/wp-content/uploads/2025/06/5fa2b09d-6300-4549-87d2-c50cfd6f4f67-768x768.webp)
![- 2 cups plain Greek yogurt - 1 cup low-sugar granola - 2 cups assorted mixed berries (strawberries, blueberries, raspberries) - 2 tablespoons honey or maple syrup - 1 tablespoon chia seeds - 1 teaspoon pure vanilla extract To make Healthy Greek Yogurt Parfaits, you will need a few key ingredients. First, Greek yogurt is your base. It is thick and creamy, packed with protein. Next, granola adds crunch and flavor. Choose low-sugar granola for a healthier option. Mixed berries bring color and freshness. You can use strawberries, blueberries, and raspberries. Feel free to mix and match! If you want extra sweetness, consider honey or maple syrup. Chia seeds add nutrition and texture. Pure vanilla extract enhances the flavor of the yogurt. For the full recipe, you can check the details above. First, take a medium mixing bowl. Add 2 cups of plain Greek yogurt. Then, pour in 1 teaspoon of pure vanilla extract. This gives the yogurt a lovely flavor. If you like it sweet, add 2 tablespoons of honey or maple syrup. Mix everything well until it is smooth and creamy. Next, rinse your berries under cold water. Use 2 cups of assorted mixed berries, like strawberries, blueberries, and raspberries. If you use large strawberries, slice them into smaller pieces. This makes them easier to layer and eat. Now, grab a clear serving glass or bowl. Start by adding a layer of your yogurt mixture at the bottom. Next, sprinkle in a layer of 1 cup of low-sugar granola. This adds a nice crunch. Then, add a layer of mixed berries for color. Continue layering the yogurt, granola, and berries until you reach the top. End with a scoop of yogurt. You can sprinkle some granola on top for extra texture. If you want, add 1 tablespoon of chia seeds on the very top. For a fun touch, garnish with fresh mint leaves. Serve your parfaits right away. This keeps the granola crunchy. If you need to make them ahead of time, you can refrigerate them for up to an hour. But remember, the granola may get soft. For the full recipe, check the details above. To achieve a smooth yogurt consistency, I recommend using full-fat Greek yogurt. It has a creamier texture that enhances the parfait. Mix the yogurt with pure vanilla extract. This adds flavor and helps blend the yogurt. If you want to sweeten it, add honey or maple syrup. Start with a little and taste. This way, you can find the right balance for your palate. Serving your parfaits in clear glassware makes a big difference. It allows the beautiful layers to shine through. You can use mason jars or small cups for a fun touch. For toppings, think beyond granola and berries. Try adding a sprinkle of nuts for crunch. Coconut flakes also add a nice twist. You can even use a dollop of nut butter for extra flavor. These small changes can make your parfaits look and taste gourmet. For more details, check the Full Recipe. {{image_4}} You can make a vegan version of Greek yogurt parfaits. Use plant-based yogurt instead of Greek yogurt. Look for brands that use almond, coconut, or soy. These will give you a creamy base. For sweeteners, try agave syrup or maple syrup. Both add a nice touch of sweetness without dairy. You can also use fresh fruit puree for extra flavor. Toppings can be just as fun. Use nuts, seeds, or vegan granola. You can mix in dark chocolate chips or dried fruits too. Each choice makes the parfait unique. If you need gluten-free parfaits, choose gluten-free granola. Many brands offer this now, so check the labels. You want to make sure it says gluten-free to avoid any issues. For the yogurt, Greek yogurt is naturally gluten-free. The mixed berries are also great since they are gluten-free. You can add nuts, chia seeds, or coconut flakes for extra crunch and health benefits. These gluten-free options keep your parfait tasty and safe for all diets. Enjoy exploring different flavors and textures! You can make Greek yogurt parfaits ahead of time. If you plan to serve them later, layer the yogurt, granola, and mixed berries. However, add the granola just before serving. This keeps it crunchy. If you want to refrigerate the parfaits, do so for up to one hour. This short time helps maintain the texture. To store leftovers, place them in an airtight container. This will keep the parfait fresh. You can store them in the fridge for up to two days. After that, the quality may drop. The granola will soften, but the yogurt and berries will still taste good. Enjoy every bite! Greek yogurt is a fantastic food choice. It is high in protein, which helps build muscle and keeps you full longer. It also has probiotics, which are good for your gut. These tiny bacteria help with digestion and boost your immune system. Eating Greek yogurt can reduce hunger and improve your overall health. Yes, you can use frozen berries! They are a great option if fresh berries are not available. If you use frozen berries, let them thaw slightly before adding them to your parfait. This way, they will mix well with the yogurt. Just remember, frozen berries may release some juice. This can make your parfait a bit wetter, but it still tastes great! Greek yogurt parfaits are best when eaten fresh. If you store them in the fridge, they will last about one day. The granola may become soft over time. To keep them fresh, layer the yogurt and berries, but store the granola separately. Add it just before you eat. This keeps everything crunchy and tasty! Absolutely! You can use many different fruits. Bananas, peaches, and mangoes work well. You might also try apples or kiwi for a fun twist. Mix and match fruits to find your favorite flavor! Each fruit adds its own taste and nutrients, making your parfait even better. Feel free to get creative! For the full recipe, check out the [Full Recipe]. We explored how to create delicious yogurt parfaits with Greek yogurt, granola, and berries. I shared tips to enhance flavor and texture, along with variations for different diets. You can easily prepare these parfaits ahead of time and store them for later. Remember, yogurt parfaits are not just tasty; they’re also healthy and versatile. Enjoy experimenting with flavors, and don’t hesitate to make them your own! Happy layering!](https://joymealplan.com/wp-content/uploads/2025/07/8855ae4d-523b-4aa1-9254-f07f25a898c1-768x768.webp)

