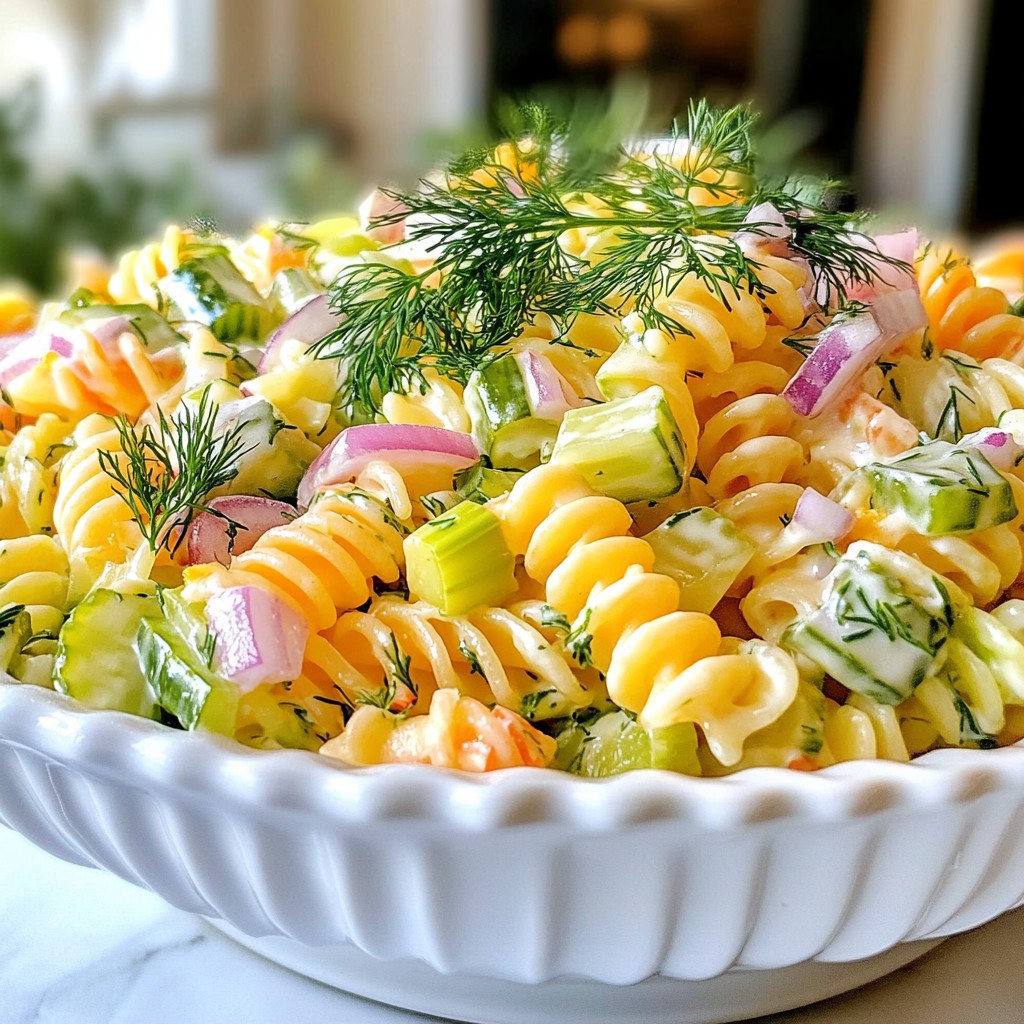
Are you ready for a fun twist on a classic dish? My Creamy Dill Pickle Pasta Salad combines tangy flavors with creamy textures, making it an instant favorite! This easy recipe uses simple ingredients like rotini pasta, mayonnaise, and dill pickles. Whether you're prepping for a picnic or a quick weeknight dinner, this salad is sure to impress. Let’s dive into the tasty details!
Why I Love This Recipe
- Deliciously Creamy: The combination of mayonnaise and Greek yogurt creates a rich, smooth dressing that perfectly coats the pasta and veggies.
- Flavorful Crunch: With the addition of dill pickles and celery, this pasta salad offers a delightful crunch that contrasts beautifully with the creamy texture.
- Quick and Easy: This recipe is simple to make, taking only about 15 minutes of prep time, perfect for busy days or last-minute gatherings.
- Perfect for Any Occasion: Whether it's a picnic, barbecue, or potluck, this creamy dill pickle pasta salad is a crowd-pleaser that pairs well with a variety of dishes.
Ingredients
List of Key Ingredients
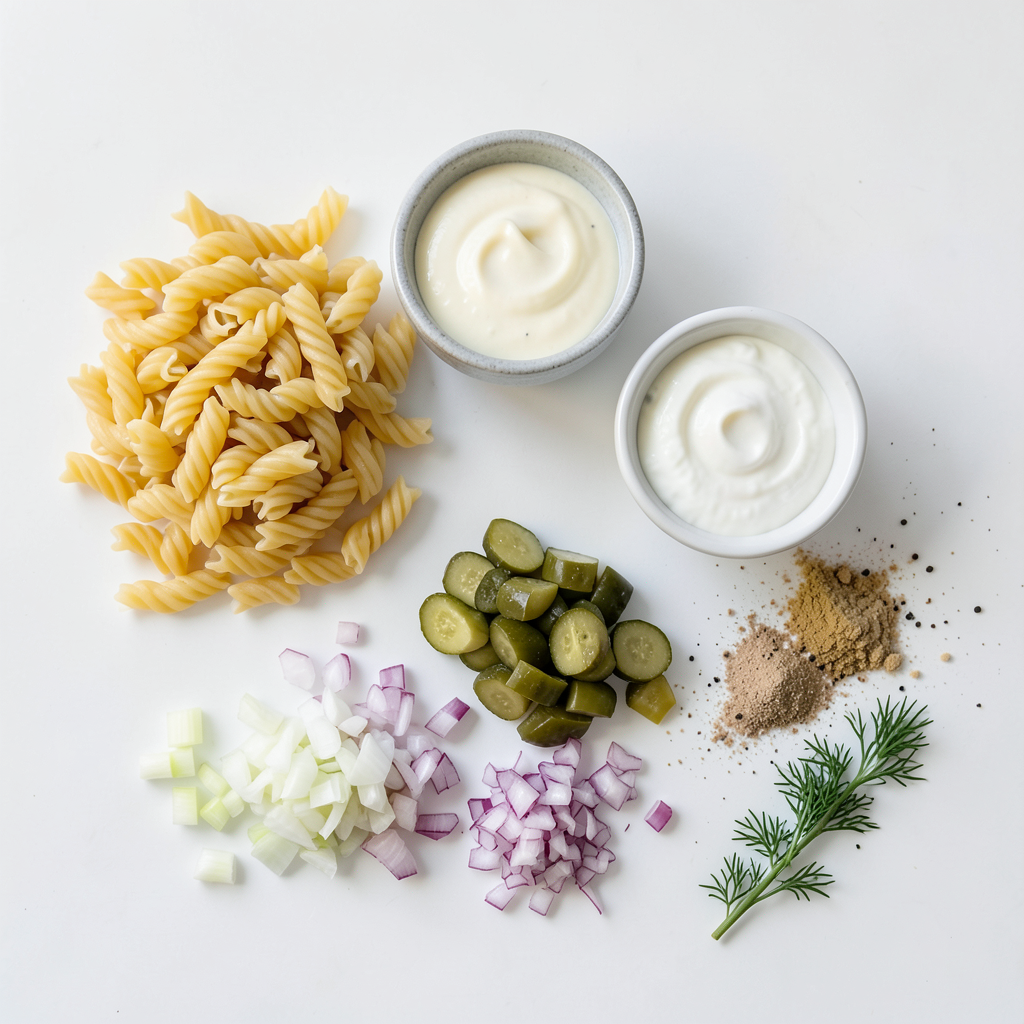
- 8 ounces rotini pasta
- 1 cup mayonnaise
- 1/2 cup Greek yogurt
- 1/2 cup dill pickles, finely diced
- 1/4 cup dill pickle juice
- 1/2 cup red onion, finely chopped
- 1/2 cup celery, diced
The main stars of this creamy dill pickle pasta salad are the rotini pasta, mayonnaise, and Greek yogurt. These ingredients create a rich base for the dish. Dill pickles add a crunchy, tangy flavor that makes every bite refreshing. The dill pickle juice enhances the overall taste, making it vibrant and zesty.
Optional Flavor Enhancers
- 1 teaspoon garlic powder
- 1 teaspoon onion powder
- Fresh dill, for garnish
For extra flavor, I like to add garlic powder and onion powder. These spices boost the taste without overpowering the dish. Fresh dill is a great choice for garnishing. It adds a burst of color and an aromatic touch.
Seasoning Recommendations
- Salt and freshly ground black pepper
To finish your salad, season it with salt and freshly ground black pepper. This step is crucial. It helps balance all the flavors. Adjust the seasoning to suit your taste. Remember, a little can go a long way!
Step-by-Step Instructions
Cooking the Pasta
Start by boiling a large pot of water. Add salt to the water to enhance flavor. When the water boils, drop in 8 ounces of rotini pasta. Cook the pasta until it is al dente, following package instructions. Al dente means it should be firm but not hard. Once done, drain the pasta in a colander. Rinse it under cold water to stop the cooking process. This helps keep the pasta from becoming mushy. Set the pasta aside to cool completely.
Preparing the Creamy Dressing
For the creamy dressing, take a medium bowl. Add 1 cup of mayonnaise and 1/2 cup of Greek yogurt. Mix them well with a whisk or spoon. Your goal is a smooth and creamy blend with no lumps. Next, add 1/4 cup of dill pickle juice. This juice adds zing to your dressing. Then, stir in 1 teaspoon of garlic powder and 1 teaspoon of onion powder. These flavors will make your dressing pop. Whisk everything together until fully blended.
Combining Salad Ingredients
In a large salad bowl, add the cooled rotini pasta. Then, toss in 1/2 cup of finely diced dill pickles, 1/2 cup of chopped red onion, and 1/2 cup of diced celery. These veggies add crunch and flavor. Gently mix them together, ensuring even distribution. Now, pour the creamy dressing over the pasta mixture. Use a spatula or large spoon to toss everything together. Make sure the pasta is well-coated in the dressing. Finally, season the salad with salt and freshly cracked black pepper to taste. Adjust the seasoning as you like. Cover the bowl and chill it in the fridge for at least 30 minutes. This helps all the flavors come together.
Tips & Tricks
Ensuring Perfect Pasta Texture
To make great pasta salad, cook the rotini until it is al dente. Al dente means the pasta is firm when you bite it. This gives the salad a nice texture. After cooking, drain the pasta and rinse it under cold water. Rinsing stops the cooking process and cools the pasta quickly. This helps keep the pasta from getting mushy.
Flavor Enhancement Techniques
Let your pasta salad chill in the fridge for at least 30 minutes. Chilling helps all the flavors blend together. The longer it sits, the better it tastes! If you can, chill it for a few hours. This extra time allows the creamy dressing to soak into the pasta and veggies, making each bite delicious.
Presentation Tips
For a beautiful finish, serve the salad in a large bowl. Top with extra diced dill pickles and fresh dill leaves. This adds color and makes the dish look fresh and inviting. A great presentation makes your dish more appealing and fun to eat!
Pro Tips
- Chill for Flavor: Allow the pasta salad to chill for at least 30 minutes before serving. This resting time helps the flavors to meld and develop, resulting in a tastier dish.
- Perfect Pasta Cooking: Make sure to cook the rotini pasta al dente. This ensures that the pasta holds its shape and texture when mixed with the dressing and other ingredients.
- Customize Your Veggies: Feel free to add or substitute other vegetables, such as bell peppers or cucumbers, to enhance the salad's texture and flavor profile.
- Fresh Dill Substitute: If fresh dill is unavailable, you can use dried dill. However, use about one-third of the amount, as dried herbs are more concentrated in flavor.
Variations
Ingredient Substitutions
You can swap mayonnaise and yogurt for other creamy options. For a lighter version, use avocado or silken tofu. These give a smooth texture without the extra calories. If you want a tangy kick, try using sour cream or a vegan mayo. Each option adds its own unique flavor.
Adding Protein
Want to make your pasta salad heartier? Add protein! Cooked chicken or canned tuna work well. Simply shred the chicken and mix it in. For tuna, just drain it and fold it gently into the salad. Both options boost the protein and make the dish more filling.
Different Vegetables
Mixing in other crunchy vegetables can elevate your salad. Try diced bell peppers for sweetness or shredded carrots for color and crunch. You can also use chopped cucumbers for a fresh bite. The more textures you add, the more fun your salad will be.
Storage Info
Refrigeration Guidelines
To store leftovers properly, place the pasta salad in an airtight container. Make sure the lid fits tightly. This helps keep the salad fresh and tasty. Always cool the pasta salad in the fridge within two hours of serving. If you have a large bowl, transfer it to smaller containers. This speeds up cooling and makes it easier to grab later.
Shelf Life
For best flavor retention, enjoy the pasta salad within three to five days. The pickles may lose some crunch over time, but the taste remains great. If you notice any off smells or strange colors, it’s best to throw it out. Always check before you eat!
Reheating Tips
You can enjoy this pasta salad cold. If you prefer it warm, reheat it gently. Place the salad in a pan on low heat. Stir often to avoid burning. Add a splash of pickle juice or a bit more mayo if it seems dry. Keep an eye on it, and remove it from heat when it's warm enough.
FAQs
Can I make this pasta salad ahead of time?
Yes, you can make this pasta salad ahead of time. I recommend preparing it a few hours before serving. This gives the salad time to chill and the flavors to blend well. Just cover it tightly and place it in the fridge. It stays fresh for up to two days.
Is it possible to freeze Creamy Dill Pickle Pasta Salad?
I do not recommend freezing this pasta salad. The creamy dressing will separate and change texture when thawed. If you want to store leftovers, keep them in the fridge instead. Enjoy the salad within two days for the best taste.
What can I serve with this pasta salad?
This pasta salad pairs well with many dishes. You can serve it alongside grilled chicken or burgers. It also goes great with a fresh green salad or coleslaw. For a fun twist, add some crunchy chips on the side for extra texture!
This blog provided a clear guide to making Creamy Dill Pickle Pasta Salad. You learned about key ingredients like rotini pasta and a yogurt-mayo blend. We covered step-by-step instructions and helpful tips for the best flavor and texture. You also discovered fun variations and proper storage methods.
In conclusion, this dish is easy to customize and share. Try mixing in your favorite veggies or proteins to make it your own. Enjoy this fun and tasty pasta salad at your next meal!


