Creamy Gnocchi with Spinach Quick and Easy Recipe

Creamy gnocchi with spinach is a delightful dish that’s quick and easy to make. With simple ingredients like store-bought gnocchi, fresh spinach, and creamy Parmesan sauce, you can whip up a delicious meal in no time. Whether you’re cooking for a busy weeknight or a cozy dinner, this recipe will impress. Get ready to dive into a comforting, flavorful dish that you and your family will love!
Why I Love This Recipe
- Comfort Food: This creamy gnocchi is the epitome of comfort food, perfect for cozy evenings at home.
- Quick and Easy: With a total time of just 20 minutes, this dish is a lifesaver for busy weeknights.
- Flavorful Ingredients: The combination of spinach, garlic, and Parmesan creates a deliciously rich flavor.
- Customizable: You can easily adjust the spices and add protein or other vegetables to suit your taste.
Ingredients
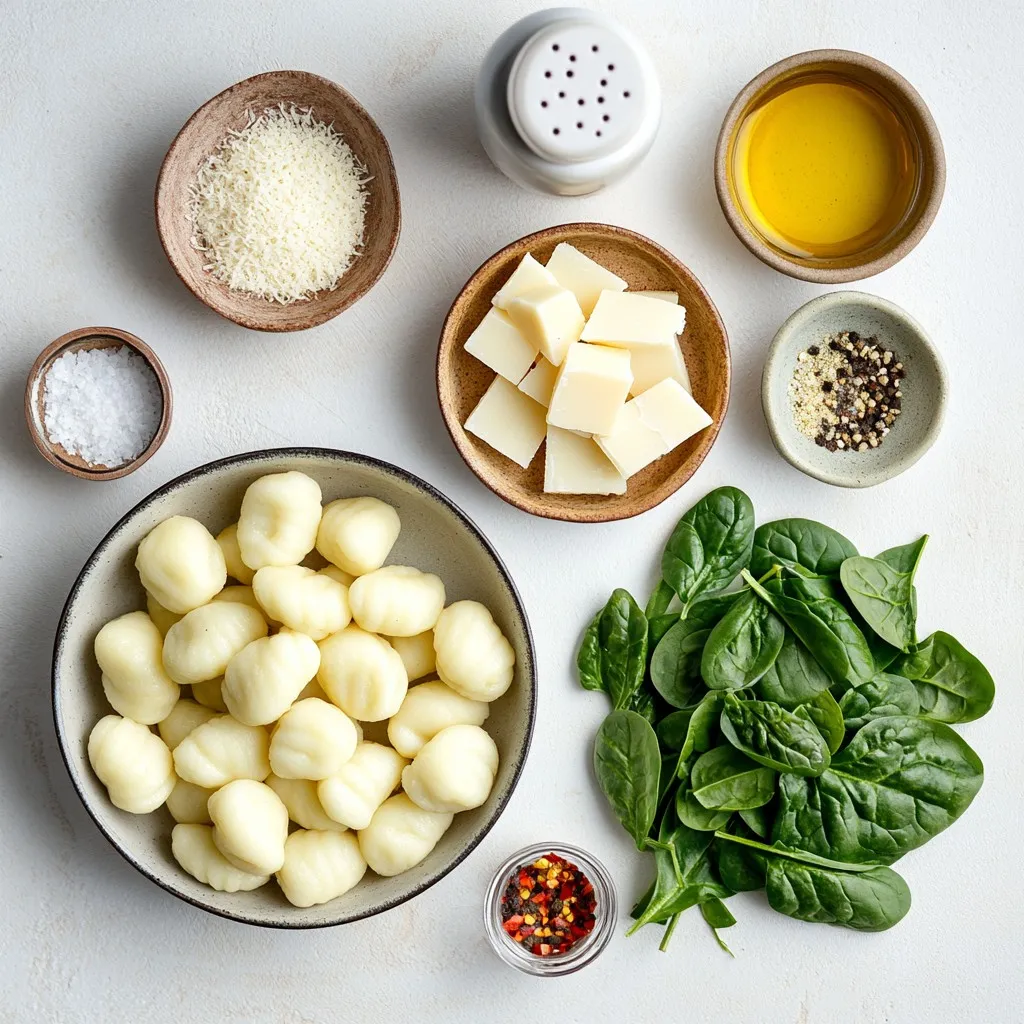
Here is what you need for creamy gnocchi with spinach:
– 1 pound store-bought gnocchi
– 2 cups fresh spinach, chopped
– 1 cup heavy cream
– 1 cup grated Parmesan cheese
– 2 cloves garlic, minced
– 1 tablespoon olive oil
– Salt and pepper to taste
– Optional spices: 1/4 teaspoon nutmeg, pinch of red pepper flakes
Each ingredient plays a role in making this dish rich and tasty. The gnocchi provides a comforting base, while the spinach adds freshness. Heavy cream makes the sauce creamy, and Parmesan gives it depth. Garlic brings flavor, and olive oil helps cook everything smoothly. Adjust salt and pepper to your taste. You can add nutmeg for warmth or red pepper flakes for heat if you like a kick. These simple ingredients come together to create a delightful meal in no time.

Step-by-Step Instructions
Cooking the Gnocchi
Start by boiling a big pot of water. Add a good amount of salt to it. When the water is boiling, add the gnocchi. Cook them as directed on the package, usually around 2-3 minutes. You’ll know they are ready when they float to the top. Carefully drain the gnocchi in a colander and set them aside.
Sautéing the Garlic
Grab a large skillet and heat the olive oil over medium heat. Once the oil is warm, add the minced garlic. Sauté the garlic for about 1 minute. You want it to smell good and turn a light golden color. Be careful not to let it burn.
Adding Spinach and Cream
Next, add the chopped spinach to your skillet. Stir it often for about 2-3 minutes. The spinach should cook down and become soft. Now, slowly pour in the heavy cream. Let it simmer gently for a couple of minutes. Then, add the grated Parmesan cheese. Keep stirring until the cheese melts and mixes well into the cream. Finally, gently fold in the cooked gnocchi. Season with salt and pepper to taste. If you like, sprinkle in some nutmeg and red pepper flakes for extra flavor. Enjoy your creamy gnocchi!
Tips & Tricks
Perfecting the Cream Sauce
To make a great cream sauce, start with good cream. Heavy cream gives the best results. Heat it gently to keep the sauce smooth. Add Parmesan cheese slowly while stirring. This helps the cheese melt nicely. If you want warmth, add a pinch of nutmeg. For some spice, red pepper flakes work well too. Taste your sauce and adjust salt and pepper to make it just right.
Serving Suggestions
Serve the gnocchi hot for the best taste. You can pair it with a nice green salad. A simple arugula salad with lemon dressing goes well. You can also add grilled chicken or shrimp for extra protein. This makes a complete meal that everyone will love.
Presentation Tips
For a pretty presentation, use shallow bowls. This highlights the creamy gnocchi. Drizzle a little olive oil on top for shine. Sprinkle freshly grated Parmesan cheese for added flavor. You can also add fresh herbs like basil or parsley. This gives a nice pop of color and freshness.
Pro Tips
- Cook Gnocchi Al Dente: For the best texture, ensure that you cook the gnocchi just until they float. Overcooking can make them mushy.
- Use Fresh Spinach: Fresh spinach adds a vibrant flavor and color to the dish. If you use frozen spinach, make sure to thaw and drain it well to avoid excess moisture in the sauce.
- Customize Your Cheese: While Parmesan is classic, feel free to mix in other cheeses like Pecorino Romano or Gouda for a unique twist on flavor.
- Adjust the Creaminess: For a lighter version, substitute half of the heavy cream with vegetable broth or milk. This will still keep the dish creamy while reducing calories.

Variations
Adding Protein Options (Chicken, Shrimp, etc.)
You can easily add protein to your creamy gnocchi. Chicken and shrimp are great choices. For chicken, use cooked, diced pieces. For shrimp, add them to the garlic when sautéing. Cook until they turn pink. This adds flavor and makes the meal hearty. You can also try adding cooked sausage for a spicy kick.
Alternative Vegetables to Incorporate
Feel free to mix in other vegetables. Peas, mushrooms, or bell peppers work well. Sauté them with the garlic for a few minutes. This adds color and nutrients. Broccoli or zucchini can also be used. Just make sure to cook them until tender. Each vegetable brings a new taste to the dish.
Vegan or Dairy-Free Modifications
You can make this dish vegan or dairy-free. Swap heavy cream for coconut milk or cashew cream. Use nutritional yeast instead of Parmesan cheese for a cheesy flavor. Choose plant-based gnocchi to keep it vegan. This way, everyone can enjoy your creamy gnocchi!
Storage Info
How to Store Leftovers
To store leftovers, let the gnocchi cool down. Place it in an airtight container. Make sure to seal it well. Store it in the fridge for up to three days. This helps keep the flavors fresh.
Reheating Instructions
To reheat, you can use a skillet. Add a splash of water or cream. Heat over medium-low until warm. Stir gently to keep the cream sauce smooth. You can also use a microwave. Heat in short bursts, stirring in between. This helps avoid hot spots.
Freezing Tips
If you want to freeze, first let the gnocchi cool completely. Place it in a freezer-safe bag or container. Remove as much air as possible. It can last for up to three months. To use, thaw it in the fridge overnight before reheating.
FAQs
Can I use frozen gnocchi instead of fresh?
Yes, you can use frozen gnocchi. Just cook them according to the package. They may take a few minutes longer than fresh gnocchi. Frozen gnocchi will still taste great in this creamy dish.
How can I make this recipe gluten-free?
To make this recipe gluten-free, use gluten-free gnocchi. Many brands offer gluten-free options made from potatoes or rice flour. Check the label to ensure it’s safe for your diet.
What can I substitute for heavy cream?
If you want a lighter option, you can use half-and-half or whole milk. For dairy-free, try coconut cream or cashew cream. These will change the flavor slightly, but they keep the dish creamy.
How long does creamy gnocchi last in the refrigerator?
Creamy gnocchi lasts about 3 to 4 days in the fridge. Store it in an airtight container for best results. If it thickens, add a splash of milk when reheating to bring back the creaminess.
This blog post covered a creamy gnocchi recipe, from ingredients to storage tips. You learned how to cook gnocchi and make a rich sauce. Plus, I shared ways to customize the dish to suit your taste. Don’t forget to experiment with proteins or veggies for different flavors. Store leftovers properly to enjoy them later. With these tips, you can create a meal that pleases everyone. Embrace your cooking skills and make this dish your ow

Creamy Gnocchi with Spinach
Ingredients
- 1 pound store-bought gnocchi
- 2 cups fresh spinach, chopped
- 1 cup heavy cream
- 1 cup grated Parmesan cheese
- 2 cloves garlic, minced
- 1 tablespoon olive oil
- to taste salt and pepper
- 0.25 teaspoon nutmeg (optional)
- pinch red pepper flakes (optional)
Instructions
- In a spacious pot, bring water to a boil and season it with salt. Add the gnocchi and cook according to package directions, usually 2-3 minutes until they float. Drain and set aside.
- In a large skillet, heat olive oil over medium heat. Add minced garlic and sauté for about 1 minute until aromatic and lightly golden.
- Add chopped spinach to the skillet and sauté for 2-3 minutes until tender and wilted.
- Gradually pour in the heavy cream, allowing it to simmer for a couple of minutes. Stir in grated Parmesan cheese until melted and well combined.
- Gently fold in the cooked gnocchi, ensuring they are coated in the cream sauce. Season with salt, pepper, nutmeg, and red pepper flakes if desired.
- Remove from heat once heated through and uniformly mixed, and prepare to serve.


![- 1 pound baby carrots (or 4 medium-sized regular carrots, sliced into uniform sticks or rounds) - 2 tablespoons unsalted butter - 3 tablespoons pure maple syrup - 1 tablespoon packed brown sugar - 1 teaspoon ground cinnamon - Salt and freshly cracked black pepper to taste - Fresh parsley, finely chopped, for garnish Each serving of maple glazed carrots has about 120 calories. You get roughly 30 grams of carbohydrates, with 15 grams of sugar. The dish has 4 grams of fat and 3 grams of fiber. These sweet carrots pack lots of flavor without too many calories, making them a great side. You might want to switch up ingredients for different diets. For a vegan option, use plant-based butter. If you want to lower sugar, try agave syrup or honey. Each choice can change the taste, but they all work well. To start, wash your carrots well. If you have baby carrots, just rinse them under cold water. For regular carrots, peel them first. Slice them into uniform sticks or rounds. This helps them cook evenly. Aim for pieces about the same size. This step is key for a great dish. Now, let’s cook! Heat a large skillet over medium heat. Add the unsalted butter and let it melt completely. Swirl the pan gently to coat the bottom. Once the butter is bubbly, add your prepared carrots. Sauté them for about 5 minutes. Stir occasionally to get even cooking. You want the carrots to start softening but not fully cooked yet. Next, sprinkle brown sugar and ground cinnamon over the carrots. Mix everything well so each carrot gets coated. This adds a sweet and warm flavor. Now, drizzle the pure maple syrup over the carrots. Cook for another 5-7 minutes, stirring often. This allows the glaze to thicken and the carrots to become tender. When your carrots are tender, season them with salt and black pepper to taste. Give everything one last gentle toss to combine. Carefully remove the skillet from the heat. Transfer the glazed carrots to a serving dish. Make sure to drizzle any leftover syrup from the skillet over the top. To add a finishing touch, garnish with finely chopped fresh parsley. This not only adds color but also a fresh taste. Serve your sweet maple glazed carrots warm. They look great on the plate and taste even better. You can find the complete recipe in the [Full Recipe]. To enhance the sweetness and aroma of your maple glazed carrots, always use pure maple syrup. This syrup has a rich taste that makes your dish shine. Combine it with a bit of brown sugar and cinnamon. This mix adds depth and warmth to the carrots. You can also try adding a pinch of nutmeg for extra flavor. This small tweak can make a big difference. For best results, use a large, heavy skillet. A cast-iron or non-stick pan works well. These types of pans heat evenly and help the carrots cook perfectly. If you have a sauté pan with high sides, that’s great too. This design keeps the glaze in the pan and helps it thicken faster. Maple glazed carrots pair well with many meals. They are a perfect side for roasted chicken or pork. You can also serve them with grilled fish for a fresh taste. If you want a vegetarian option, try them with quinoa or lentils. They add a sweet touch that balances savory dishes. For a festive look, serve them alongside other colorful veggies. For the full recipe, check out the Sweet Maple Glazed Carrots recipe above! {{image_4}} You can make your maple glazed carrots even better by adding other veggies. Try using baby potatoes, parsnips, or sweet potatoes. Cut them into similar sizes as the carrots for even cooking. This mix adds more color and flavor to your dish. When you add more vegetables, adjust the cooking time to ensure everything cooks well. Want to change the flavor? You can add herbs or spices to make your dish unique. Try adding fresh thyme or rosemary for an earthy taste. A pinch of nutmeg can also give a warm hint. If you like heat, sprinkle in some red pepper flakes. Mix and match these additions to find what you enjoy most. If you want to try different sweeteners, you have options! Honey works well and gives a floral note. Brown sugar adds a deeper flavor. Agave syrup is also a great choice for a lighter sweetness. Each sweetener will change the taste, so feel free to experiment with what you have on hand. For the full recipe, check the earlier section. To keep your maple glazed carrots fresh, store them in an airtight container. This helps prevent moisture loss and keeps them tasty. Place the cooled carrots in the container and seal tightly. You can keep them in the fridge for up to four days. If you want to enjoy them later, consider the next steps. When you are ready to eat the leftovers, you want to reheat them gently. The best way is to use a skillet. Heat the skillet over low heat. Add a splash of water or broth to help steam the carrots. Stir them often until they are warmed through. This method helps keep the carrots soft and the glaze flavorful. Avoid using a microwave, as it can make them mushy. If you want to store your maple glazed carrots for a long time, freezing is a good option. First, let them cool completely. Then, place the carrots in a freezer-safe bag or container. Remove as much air as possible to prevent freezer burn. They can last up to three months in the freezer. To use them, thaw in the fridge overnight before reheating. To make maple glazed carrots vegan, swap the butter for a plant-based oil or vegan butter. You can use coconut oil for a hint of tropical flavor. This keeps the dish rich and tasty while staying true to vegan standards. Remember to check the maple syrup as well; most brands are naturally vegan. Yes, you can use frozen carrots. They are convenient and can save time. However, frozen carrots may have a different texture than fresh ones. Thaw them first and drain excess water. Sauté them for a bit longer to ensure they cook through. Fresh carrots bring more crunch and flavor, but frozen can still work well in a pinch. To ensure your glazed carrots are tender, cook them over medium heat. Start with 5 minutes of sautéing before adding the glaze. After adding the maple syrup, cook for another 5-7 minutes. Stir often to coat them evenly. The key is to keep an eye on them and test for tenderness with a fork. Aim for a soft texture without losing their shape. This post covered how to make delicious maple glazed carrots. We discussed the key ingredients and their nutritional value. You learned tips for cooking and how to enhance flavors. I also shared ideas for variations and how to store your leftovers properly. Making these carrots is easy and fun. With simple swaps, you can adjust for dietary needs. Enjoy this dish as a side or experiment with different flavors. Happy cooking!](https://joymealplan.com/wp-content/uploads/2025/06/e145556d-f1e0-4204-89d9-54022a16ffd1-768x768.webp)
![To make a tasty savory breakfast hash, gather these key items: - 2 medium potatoes, diced into small cubes - 1 cup bell peppers, a mix of red and green, diced - 1 small onion, finely diced - 1 cup cooked breakfast sausage, crumbled (or a plant-based option) - 4 large eggs - 2 tablespoons olive oil - 1 teaspoon smoked paprika - ½ teaspoon garlic powder - ½ teaspoon freshly ground black pepper - Salt, to taste - Fresh parsley, chopped, for garnish These ingredients work well together. The potatoes give a hearty base, while the bell peppers and onions add sweetness and color. The sausage provides a savory touch. You can make your breakfast hash unique by adding: - Spinach or kale for greens - Cherry tomatoes for a burst of flavor - Cheese for creaminess - Hot sauce for some heat - Avocado slices for extra richness Feel free to mix and match these options based on what you like. This lets you create a dish that fits your taste. To whip up this savory breakfast hash, have the following tools ready: - A large skillet for cooking - A spatula for stirring and serving - A sharp knife for chopping - A cutting board for easy prep With these ingredients and tools, you can create a breakfast hash that is quick and full of flavor. Don't forget to check the Full Recipe for detailed steps! Start by heating 1 tablespoon of olive oil in a large skillet over medium heat. When the oil shimmers, add the diced potatoes. Season them with salt and black pepper. Cook for about 10 to 12 minutes, stirring now and then. You want the potatoes to be tender and golden. Next, add the diced onion and bell peppers to the skillet. Stir well and cook for another 5 to 7 minutes. The veggies should be soft and smell great. Now, mix in the crumbled breakfast sausage. Add the smoked paprika and garlic powder, stirring everything together. Let it cook for another 3 to 4 minutes to blend the flavors. Choose medium-sized potatoes for even cooking. Russet or Yukon Gold work great. Cut them into small cubes for quicker cooking. Soak the diced potatoes in water for 10 minutes before cooking. This helps remove excess starch and makes them crispier. Don’t overcrowd the skillet; use a large enough pan to allow space. Stir regularly to avoid burning and ensure even browning. Creating small wells in the hash is key. Crack one egg into each well gently. Cover the skillet to trap steam and cook the eggs evenly. For runny yolks, check them at around 5 minutes. For firmer yolks, let them cook for about 7 minutes. If you prefer scrambled eggs, whisk them in a bowl first. Pour them into the hash after adding the sausage and spices. Cook until they’re just set for a light and fluffy texture. For the full recipe, refer to the above section and enjoy this delicious dish! To boost flavor, use fresh herbs. Parsley adds brightness. You can also try cilantro or chives. Adding a splash of hot sauce can give your hash a kick. Use smoked paprika for a deep, rich taste. If you want a bit more heat, add cayenne pepper. For a savory touch, consider a dash of Worcestershire sauce. One common mistake is undercooking potatoes. Make sure they are tender and golden. Avoid overcrowding the skillet. This can lead to steaming instead of browning. Another mistake is not seasoning well. Taste your hash as you cook. Adjust salt and pepper as needed. Lastly, don’t rush the eggs. Let them cook gently to your liking for the best texture. To change serving sizes, simply scale the ingredients. For two servings, use one potato and two eggs. If you want to make more, double the recipe. This hash is easy to adapt. Just keep the ingredient ratios similar. You can also add more vegetables or proteins if you want extra portions. Experiment and enjoy your perfect breakfast hash! {{image_4}} You can make a tasty vegetarian hash without meat. Use a mix of veggies like zucchini, mushrooms, or spinach. Replace sausage with black beans or chickpeas. These add protein and flavor. You can also use tofu for a protein boost. Season with herbs like thyme and basil for more taste. This dish stays colorful and healthy. If you like heat, add jalapeños or red pepper flakes. This will give your hash a kick. You can also try spicy sausage or chorizo. These meat choices add a rich flavor. For extra zest, mix in a splash of hot sauce. Remember, balance the spice with creamy avocado or sour cream. This will help cool it down. Making a gluten-free breakfast hash is simple. The main ingredients, like potatoes and veggies, are naturally gluten-free. Just check your sausage label to ensure it’s gluten-free. You can also use quinoa as a base. This adds a nutty flavor and is packed with protein. Serve with a side of gluten-free toast for a complete meal. Feel free to explore these variations to make the hash your own! For the full recipe, check out the Savory Breakfast Hash. To keep your savory breakfast hash fresh, allow it to cool down. Use an airtight container to store the leftovers. Make sure to seal it tightly. You can keep it in the fridge for up to three days. This way, you can enjoy it again soon! When you are ready to eat your leftovers, you can reheat them in a skillet or the microwave. If using a skillet, add a splash of olive oil. Heat over medium until warm. Stir it often to heat evenly. If using a microwave, cover it with a microwave-safe lid. Heat for one to two minutes, stirring halfway through. This keeps the eggs from overcooking. If you want to store your breakfast hash for longer, freezing is a great option. Divide the hash into portions and place them in freezer-safe bags. Press out any extra air before sealing. You can store it in the freezer for up to three months. When you are ready to enjoy it, thaw it overnight in the fridge. Then reheat it as described above. This will help maintain the taste and texture. For the full recipe, check out the [Full Recipe]. The best potato for breakfast hash is the Yukon Gold. It has a creamy texture and holds its shape well. Russet potatoes are also a good choice. They give a crispy outer layer when cooked. Try to avoid waxy potatoes like red potatoes. They can become mushy during cooking. Yes, you can make Savory Breakfast Hash ahead of time. Cook the hash without eggs and store it in the fridge. When ready to eat, reheat the hash in a skillet. Then, add the eggs and cook them fresh. This keeps the eggs from becoming rubbery. You can also store the hash for up to three days. Good side dishes to serve with breakfast hash include fresh fruit, toast, or yogurt. A simple green salad can add freshness. If you want more protein, serve it with bacon or ham. For a fun twist, pair it with avocado slices or guacamole. These add creaminess and flavor to the dish. Savory breakfast hash offers a tasty way to start your day. We covered essential and optional ingredients, cooking steps, and great tips. You can customize it to fit your tastes, whether vegetarian or spicy. Remember the right cooking tools for best results. Store your leftovers properly to enjoy later. A well-made hash is not just a meal; it’s a chance to explore flavors. Experiment and find your favorite version for a delightful breakfast treat.](https://joymealplan.com/wp-content/uploads/2025/06/6aa0d9ce-cbc8-4487-b08c-a378fe8215a9-768x768.webp)


![This recipe is simple and fun to make. Here’s what you need: - 1 lb large shrimp, peeled and deveined - 4 tablespoons unsalted butter - 4 cloves garlic, minced - 1 teaspoon red pepper flakes (adjust to taste) - 1 lemon, juiced and zested - 1/4 cup chicken broth - 1/4 cup freshly chopped parsley - Salt and pepper to taste - 8 oz linguine or spaghetti - Grated Parmesan cheese for serving (optional) If you don’t have some ingredients, don’t worry! Here are some easy swaps: - Shrimp: You can use scallops or chicken instead. - Butter: Olive oil works well for a lighter touch. - Chicken broth: Vegetable broth or white wine can add nice flavor. - Parsley: Fresh basil or cilantro can give a different taste. - Lemon: Lime juice can be a zesty alternative. These substitutes keep the dish tasty and fun. You can mix and match as you like! This easy garlic shrimp scampi takes just 25 minutes to make. You will need about 10 minutes for prep and 15 minutes for cooking. It’s quick and perfect for busy nights. You can serve it to four people, so it’s great for a small family meal or a cozy dinner. 1. Cook the pasta: Start by boiling a large pot of salted water. Add 8 oz of linguine or spaghetti. Cook it according to the package directions until it is al dente. Remember to save 1/2 cup of the pasta water before you drain it. Set the pasta aside in a bowl. 2. Sauté the shrimp: In a large skillet, melt 2 tablespoons of butter over medium heat. Once it is bubbly, add 1 lb of peeled and deveined shrimp in a single layer. Sprinkle with salt and pepper. Cook for 2-3 minutes until they turn pink. Flip them and cook for another 1-2 minutes. Remove the shrimp and set them aside. 3. Make the garlic sauce: In the same skillet, lower the heat to medium-low. Add the remaining 2 tablespoons of butter and 4 cloves of minced garlic. Sauté for 1 minute until it smells great and turns lightly golden. Be careful not to burn the garlic. 4. Add flavor: Stir in 1 teaspoon of red pepper flakes, the juice and zest of 1 lemon, and 1/4 cup of chicken broth. Raise the heat a bit to bring this to a gentle simmer. Let it reduce for 2-3 minutes so the flavors blend well. 5. Combine everything: Add the shrimp back to the skillet, along with the cooked pasta and half of the 1/4 cup of chopped parsley. Toss gently, adding the reserved pasta water a little at a time until you reach a creamy sauce. It should not be too thick. 6. Finish and serve: Taste the dish and adjust with more salt and pepper if needed. Serve hot, topped with the rest of the parsley and some grated Parmesan cheese if you like. - Use fresh shrimp for the best taste. - Don’t overcrowd the pan when cooking shrimp. This helps them cook evenly. - Be careful with the garlic; it should be fragrant but not burnt. - Save some pasta water to adjust the sauce later. - Garnish with fresh parsley and lemon for a bright finish. For the full recipe, check out the [Full Recipe]. Enjoy your cooking! When making garlic shrimp scampi, avoid these common errors: - Overcooking shrimp: Cook shrimp for just 2-3 minutes on one side. Flip and cook for another 1-2 minutes. They should be pink and firm, not rubbery. - Burning garlic: Sauté garlic on medium-low heat. Brown garlic adds flavor, but burnt garlic ruins your dish. - Skipping pasta water: Reserve some pasta cooking water. It helps create a creamy sauce. To make your scampi even tastier: - Use fresh ingredients: Fresh shrimp and garlic will give the best flavor. - Add herbs: Fresh parsley brightens the dish. You can also try basil or oregano for extra flavor. - Experiment with spices: Adjust red pepper flakes for heat. A pinch of smoked paprika can add depth. Cooking pasta is simple, but there are key tips: - Use plenty of water: A large pot helps the pasta cook evenly. - Salt the water: This adds flavor to the pasta. Aim for a tablespoon of salt per gallon of water. - Don’t rinse pasta: Rinsing washes away the starch that helps the sauce stick. Keep it warm and toss it with the shrimp and sauce right away. For the full recipe, check out the [Full Recipe]. {{image_4}} You can easily add vegetables to your garlic shrimp scampi. Spinach, broccoli, or bell peppers work well. Just sauté them for a few minutes before adding the shrimp. This adds color and nutrients without changing the dish's taste much. Plus, you get a nice crunch with each bite. It’s a great way to sneak in some veggies for the kids or anyone who needs more greens. If you want to switch things up, you can use chicken or scallops instead of shrimp. For chicken, cut it into bite-sized pieces. Sauté it until golden and cooked through, just like the shrimp. For scallops, sear them for a few minutes on each side. Both options add their own unique flavor to the dish. This makes it fun to try new things while keeping the same garlic sauce. For a gluten-free version, use gluten-free pasta. There are many options available now, like rice or quinoa pasta. They cook similarly to regular pasta. Just follow the package instructions. You can also serve the garlic shrimp over zucchini noodles as a fresh twist. This gives you a light meal that is still full of flavor. To store leftover shrimp scampi, let it cool first. Place it in an airtight container. It can stay in the fridge for up to three days. Make sure to cover it well to keep flavors fresh. Avoid leaving it out for too long, as this can lead to spoilage. When reheating, do it gently to prevent overcooking the shrimp. Use a skillet over low heat and add a splash of broth or water. This keeps the dish moist. Stir often and check the shrimp closely. You want them warm but not rubbery. You can freeze shrimp scampi if needed. Use a freezer-safe container and leave some space for expansion. It can last for up to three months in the freezer. To thaw, place it in the fridge overnight. Reheat gently as described above. Enjoy your meal even after a long time! Yes, you can use frozen shrimp for this recipe. Just be sure to thaw them first. Place the shrimp in cold water for about 15-20 minutes. This helps them defrost quickly and evenly. Using frozen shrimp is a great time saver and still gives you a tasty dish. You can tell shrimp are done when they turn bright pink and curl slightly. This usually takes about 3-5 minutes of cooking. If they look opaque and firm, they are ready to eat. Overcooking can make them tough, so keep a close eye! Garlic shrimp scampi pairs well with several dishes. Here are some ideas: - A fresh green salad with lemon vinaigrette. - Garlic bread for a delicious side. - Steamed vegetables like broccoli or asparagus for color. - A glass of white wine, such as Sauvignon Blanc, to enhance the meal. Exploring these options will make your meal even better. Enjoy mixing flavors and textures! You can create a delicious Garlic Shrimp Scampi using easy ingredients and simple steps. The recipe includes cooking tips to prevent mistakes and ways to boost flavor. You can also make variations by adding veggies or using chicken. Remember to store leftovers properly and reheat them for the best taste. This dish brings joy to any meal. By following this guide, you can impress family and friends with your cooking skills. Enjoy making your own tasty Shrimp Scampi!](https://joymealplan.com/wp-content/uploads/2025/06/198ad0f3-6fc3-464f-bcc6-4256f6587cb9-768x768.webp)