Creamy Italian Meatball Soup Hearty Comfort Dish

Warm up with a bowl of Creamy Italian Meatball Soup, your go-to comfort dish! I’m excited to share this easy recipe that blends rich flavors and hearty ingredients. Imagine tender meatballs swimming in a creamy, savory broth. It’s a hug in a bowl! Let’s dive into the simple steps, helpful tips, and delicious variations. Your taste buds will thank you, so get ready to cook a meal that makes you feel right at home!
Why I Love This Recipe
- Comforting and Hearty: This soup is the perfect blend of flavors and textures, making it incredibly comforting on a chilly day.
- Easy to Prepare: With simple ingredients and straightforward steps, this recipe is perfect for a quick weeknight dinner.
- Rich and Creamy: The addition of heavy cream gives the soup a luscious texture that elevates the dish to gourmet status.
- Nutritious and Flavorful: Packed with vegetables and lean meat, this soup is not only delicious but also a great way to boost your nutrient intake.
Ingredients
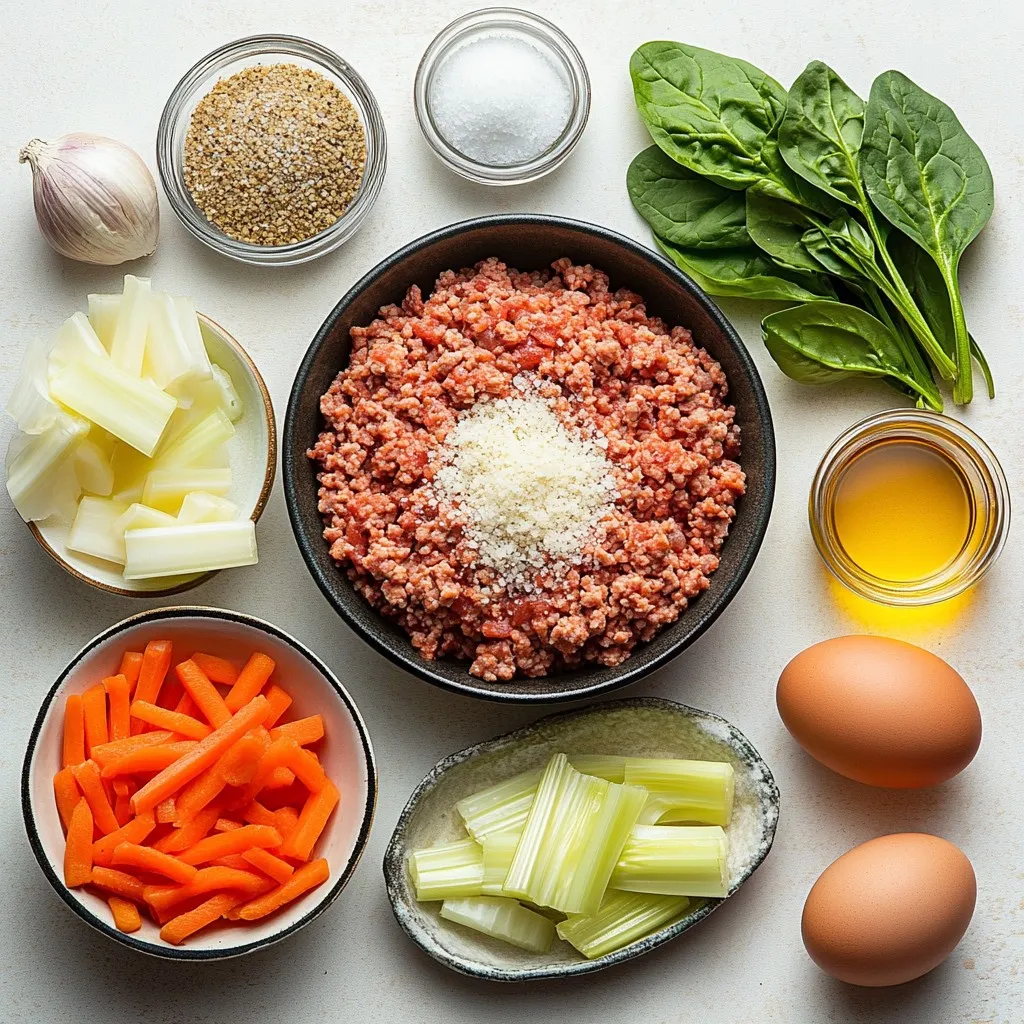
Main ingredients for Creamy Italian Meatball Soup
To make this tasty soup, gather these main ingredients:
– 1 lb ground beef or turkey
– 1/2 cup breadcrumbs
– 1/4 cup grated Parmesan cheese
– 1 large egg
– 2 cloves garlic, minced
– 1 tsp Italian seasoning
– Salt and pepper to taste
– 2 tbsp olive oil
– 1 medium onion, finely diced
– 2 carrots, peeled and diced
– 2 celery sticks, diced
– 4 cups low-sodium chicken broth
– 1 can (14 oz) diced tomatoes, undrained
– 1 cup heavy cream
– 1 cup fresh spinach, chopped
– Fresh basil leaves for garnish
These ingredients create a rich and hearty soup. The meatballs bring protein, while the cream adds a smooth touch. Each bite bursts with flavor.
Optional garnishes and additional toppings
You can make your soup even better with these garnishes:
– Fresh basil leaves
– Grated Parmesan cheese
– Croutons
– A drizzle of olive oil
These options add color and extra taste. Croutons give a nice crunch, while basil and cheese enhance the dish’s flavor.
Helpful pantry staples for flavor enhancement
To boost the soup’s taste, consider adding these pantry staples:
– Red pepper flakes for heat
– Bay leaves for depth
– Lemon juice for brightness
These ingredients can transform your soup. Red pepper flakes add a kick, while lemon juice brightens the flavors. Don’t be afraid to experiment!

Step-by-Step Instructions
Preparing the meatballs
To make the meatballs, start by mixing the ground meat with breadcrumbs, grated Parmesan cheese, and a large egg. Add minced garlic and Italian seasoning for flavor. Don’t forget a pinch of salt and pepper. Use your hands or a fork to mix everything well. You want a smooth and even texture. Once mixed, roll the meat mixture into small balls, about 1 inch in size. Place the meatballs on a plate and set them aside. This step makes sure they are ready for cooking.
Sautéing the vegetables
Next, heat olive oil in a large pot over medium heat. When the oil is hot, add diced onion, carrots, and celery. Sauté these vegetables for about 5 minutes. They will soften and smell great. Stir them often to avoid burning. This step builds a flavorful base for the soup.
Cooking the soup
Now it’s time to cook the soup. Gently add the meatballs to the pot. Be careful not to overcrowd them. Brown the meatballs on all sides for 5 to 7 minutes. You may need to do this in batches. Once browned, pour in the chicken broth and the undrained diced tomatoes. Stir everything together and bring it to a gentle simmer. Let the soup cook for 15 minutes. This helps the meatballs cook through and absorb the flavors. After 15 minutes, stir in heavy cream for a rich texture. Let it simmer for another 5 minutes. Finally, add chopped fresh spinach and cook for 2 minutes until it wilts. Taste and adjust seasoning if needed. Serve hot with fresh basil on top for a perfect finish.
Tips & Tricks
Best practices for making perfect meatballs
To make great meatballs, use fresh ingredients. Combine the ground meat with breadcrumbs, egg, and seasonings. Mix gently, but do not overwork it; this keeps them tender. Roll the meat into balls about one inch wide. This size helps them cook evenly and stay juicy.
How to achieve the creamiest soup texture
For a rich, creamy soup, use heavy cream. Add it to the soup after the meatballs cook. Let it simmer for a few minutes to blend the flavors. Stir gently to avoid breaking the meatballs. You can also add a bit of cheese for extra creaminess, like Parmesan.
Common mistakes to avoid
One mistake is overcrowding the pot with meatballs. This can cause them to steam instead of brown. Brown them in batches for the best texture. Another mistake is skipping the simmer time. This time lets the meatballs soak up the soup’s flavor. Also, be careful with salt. Taste the soup before adding more; the broth and cheese can be salty.
Pro Tips
- Use Fresh Herbs: Fresh basil not only enhances the flavor but also adds a beautiful presentation to your soup. Sprinkle some just before serving for the best aroma.
- Adjust the Creaminess: If you prefer a lighter soup, reduce the amount of heavy cream or substitute it with half-and-half or milk for a less rich option.
- Meatball Variations: Feel free to experiment with different proteins or add herbs like parsley or oregano to the meatball mixture for an extra flavor boost.
- Leftover Storage: This soup keeps well in the refrigerator for a few days. Reheat gently on the stove to maintain the creaminess of the broth.

Variations
Substituting different meats
You can change the meat to fit your taste. Ground turkey works well if you want a lighter soup. If you prefer beef, use ground sirloin for a rich flavor. You can even try ground chicken for a unique twist. Each meat adds different flavors, so feel free to experiment!
Making it vegetarian
To make this soup meat-free, use plant-based meat crumbles. They give a similar texture and flavor. You can also create veggie meatballs with beans or lentils. Just mix them with breadcrumbs, spices, and some mashed vegetables. This way, you keep the heartiness while skipping the meat.
Adding extra vegetables or spices
Boost the nutrition by adding more veggies. Consider bell peppers, zucchini, or mushrooms. They all add flavor and color. You can also try different spices for a kick. A pinch of red pepper flakes or some Italian herbs can enhance the taste. Don’t be afraid to get creative with what you have!
Storage Info
How to properly store leftovers
After enjoying your creamy Italian meatball soup, let it cool down. Use an airtight container to store the leftovers. Make sure to keep it in the fridge. This soup stays fresh for up to three days. If you want to keep it longer, consider freezing it.
Reheating tips for the best flavor and texture
When you are ready to enjoy the soup again, reheating is key. Pour the soup into a pot. Heat it over medium-low heat. Stir it often to prevent it from sticking. You can also use the microwave. Heat it in short intervals, stirring in between. This helps keep the texture creamy.
Freezing guidance for future meals
Freezing this soup is a great idea for quick meals. First, cool the soup completely. Then, divide it into portions. Use freezer-safe bags or containers. Label them with the date. You can freeze the soup for up to three months. When you want to eat it, thaw it overnight in the fridge. Then, reheat it as mentioned above for a delicious meal.
FAQs
Can I use different types of broth?
Yes, you can use different types of broth. Vegetable broth works well for a lighter flavor. Beef broth adds a richer taste. Just pick a broth that matches your meat choice.
How can I make this soup dairy-free?
To make this soup dairy-free, swap heavy cream with coconut milk or cashew cream. These options keep the soup rich and creamy. You can also use dairy-free cheese for extra flavor.
What sides pair well with Creamy Italian Meatball Soup?
This soup pairs nicely with crusty bread or a fresh green salad. Garlic bread complements the creamy soup well. You can also try serving it with a light pasta dish for a heartier meal.
How long does this soup last in the fridge?
The soup lasts about 3 to 4 days in the fridge. Store it in an airtight container to keep it fresh. Reheat it on the stove or in the microwave before serving.
Can I prepare the meatballs in advance?
Yes, you can prepare the meatballs in advance. Form them and store them in the fridge for up to 24 hours. You can also freeze them for longer storage. Just cook them straight from frozen when ready to use.
This blog post covered how to make Creamy Italian Meatball Soup from start to finish. We explored vital ingredients, step-by-step instructions, and helpful tips. You learned how to avoid mistakes and make variations suited to your taste. Don’t forget the storage tips for keeping your soup fresh and tasty. With these insights, you can create a delicious soup that’s comforting and easy. Enjoy making this dish and sharing it with friends and family. Trust me, it will become a favorite in your hom

Creamy Italian Meatball Soup
Ingredients
- 1 lb ground beef or turkey
- 0.5 cup breadcrumbs
- 0.25 cup grated Parmesan cheese
- 1 large egg
- 2 cloves garlic, minced
- 1 tsp Italian seasoning
- to taste salt and pepper
- 2 tbsp olive oil
- 1 medium onion, finely diced
- 2 carrots peeled and diced
- 2 sticks celery, diced
- 4 cups low-sodium chicken broth
- 1 can (14 oz) diced tomatoes, undrained
- 1 cup heavy cream
- 1 cup fresh spinach, chopped
- for garnish fresh basil leaves
Instructions
- In a mixing bowl, combine the ground meat with breadcrumbs, grated Parmesan cheese, egg, minced garlic, Italian seasoning, and a pinch of salt and pepper. Use your hands or a fork to mix until all ingredients are thoroughly combined, ensuring a uniform mixture.
- With your hands, roll the meat mixture into small meatballs, approximately 1 inch in diameter. Place the meatballs on a plate or a baking sheet and set aside.
- Heat the olive oil in a large pot or Dutch oven over medium heat. Once hot, add the diced onion, carrots, and celery to the pot. Sauté the vegetables for about 5 minutes, or until they become fragrant and tender.
- Gently add the meatballs into the pot, being careful not to overcrowd them. Brown the meatballs on all sides for about 5-7 minutes. You may need to do this in batches to ensure they cook evenly.
- Once the meatballs are browned, pour in the chicken broth and add the undrained diced tomatoes. Stir everything together and bring the mixture to a gentle simmer.
- Allow the soup to cook for about 15 minutes, giving the meatballs enough time to cook through and absorb the flavors.
- After 15 minutes, stir in the heavy cream, allowing it to combine smoothly with the broth. Let the soup simmer for an additional 5 minutes, which will give it a luscious, creamy texture.
- Incorporate the chopped fresh spinach into the soup, cooking for just about 2 minutes or until the spinach is wilted and vibrant.
- Taste the soup and adjust the seasoning with additional salt and pepper, if desired.
- Ladle the hot soup into bowls, garnishing each serving with a few fresh basil leaves for an aromatic finish.


![- 1 lb boneless, skinless chicken thighs - 4 large whole wheat tortillas or pita bread - 1 cup romaine lettuce, shredded - 1 large tomato, diced - 1 cucumber, diced - 3 tablespoons extra virgin olive oil - 1 tablespoon ground cumin - 1 tablespoon smoked paprika - 1 teaspoon ground turmeric - 1 teaspoon ground coriander - 1 teaspoon garlic powder - 1 teaspoon onion powder - Salt and freshly cracked black pepper, to taste - 1 cup creamy Greek yogurt - 1 tablespoon tahini - 1 tablespoon freshly squeezed lemon juice These ingredients create a rich and tasty chicken shawarma wrap. Chicken thighs are key for their juicy texture. Whole wheat tortillas or pita bread give your wrap a healthy base. Fresh veggies like lettuce, tomato, and cucumber add crunch and flavor. The marinade is full of spices like cumin and paprika that bring warmth and depth. Olive oil helps the spices cling well to the chicken. The sauce made with Greek yogurt, tahini, and lemon juice offers a creamy, tangy kick. For the full recipe, check the section above. Enjoy crafting your easy chicken shawarma wraps! To start, you need to make the marinade. In a bowl, combine: - 3 tablespoons extra virgin olive oil - 1 tablespoon ground cumin - 1 tablespoon smoked paprika - 1 teaspoon ground turmeric - 1 teaspoon ground coriander - 1 teaspoon garlic powder - 1 teaspoon onion powder - Salt and freshly cracked black pepper, to taste Whisk these ingredients together until they mix well. This step adds lots of flavor. Next, take 1 lb of boneless, skinless chicken thighs. Coat the chicken with the marinade, making sure every piece is covered. Cover the bowl with plastic wrap. You should refrigerate it for at least 30 minutes. For the best taste, let it sit for up to 2 hours. Now, it’s time to cook the chicken. Preheat your grill or a heavy skillet over medium-high heat. Once it’s hot, place the marinated chicken thighs on the grill. Cook each side for about 6-7 minutes. You want the chicken to be fully cooked and have a nice char. After cooking, remove the chicken from the heat. Let it rest for a few minutes. This helps keep the juices in. Then, slice the chicken into thin strips. Now, let’s assemble your wraps! Start by spreading sauce on the tortilla. For the sauce, mix 1 cup of creamy Greek yogurt, 1 tablespoon tahini, and 1 tablespoon freshly squeezed lemon juice in a bowl. Add a pinch of salt and pepper to taste. Once the sauce is on the tortilla, layer on the sliced chicken. Next, add a handful of shredded romaine lettuce, diced tomatoes, and diced cucumbers. These veggies add crunch and freshness. To finish, sprinkle with fresh cilantro or parsley. Carefully fold the sides of the tortilla inwards and roll it up tightly. For an extra crispy finish, grill the wrapped shawarma for 1-2 minutes. This makes the outside golden and crispy. Finally, slice the wrap in half diagonally and serve it right away. You can also serve any extra creamy dressing for dipping. Enjoy your Easy Chicken Shawarma Wraps! For the complete recipe, check out the [Full Recipe]. To get the best taste from your chicken shawarma, marinate the chicken for at least 30 minutes. If you have time, aim for 2 hours. This allows the flavors to soak in deeply. Want to spice up your marinade? Add a pinch of cayenne for heat. You can also toss in some smoked paprika for a richer flavor. Fresh herbs like thyme or mint will add a nice twist. Even a splash of vinegar can brighten the taste. When you assemble your wraps, wrap them tightly. Start by laying the chicken and veggies in the center. Fold the sides in, then roll from the bottom. This keeps everything inside. If you like a crispy wrap, grill it after rolling. Heat a skillet over medium heat. Grill each side for 1-2 minutes until golden. This extra step gives you a crunchy texture that contrasts with the juicy filling. {{image_4}} You can easily modify chicken shawarma wraps to fit your diet. If you want a gluten-free option, try using lettuce wraps. Just take large leaves of romaine or butter lettuce. They make a great, crunchy shell for your fillings. For a vegetarian option, consider using falafel or grilled veggies. Falafel adds a nice crunch and flavor. Grilled veggies like zucchini, bell peppers, and eggplant work well too. These options keep the meal tasty and satisfying. To make your wraps even better, think about adding toppings. Chopped olives and crumbled feta cheese can give a salty kick. You could also add sliced radishes for a nice crunch. Alternative sauces can enhance the dish too. Tzatziki sauce made with yogurt, cucumber, and garlic adds a cool and refreshing taste. You can mix it up by trying different sauces like hummus or spicy harissa. These additions help you create a wrap that suits your own taste perfectly. Don't forget to check the Full Recipe for more ideas! To keep your chicken shawarma wraps fresh, store them well. Wrap each shawarma tightly in plastic wrap or foil. This prevents air from getting in and keeps them from drying out. You can also place them in an airtight container. In the fridge, they will stay good for up to three days. After that, the taste and texture might change. When it's time to eat, reheating should keep the wraps tasty. I suggest using a skillet over low heat. This method warms the shawarma without making it soggy. Heat them for about 3-5 minutes on each side. You can also use an oven. Wrap them in foil and heat at 350°F for about 10 minutes. If you have extra chicken, use it in salads or grain bowls. It adds flavor and protein to any meal. The wraps are also great for lunch the next day. Just remember to store them well! For the full recipe, check out the detailed instructions above. You can marinate chicken shawarma for at least 30 minutes. For better flavor, marinate for up to 2 hours. This time allows the spices to soak into the meat. If you have more time, feel free to marinate it overnight. Just remember to keep it in the fridge to stay fresh. Yes, you can use chicken breast. However, thighs have more fat and flavor. This gives shawarma a juicier taste. Breasts may dry out more easily. If you choose breasts, keep an eye on cooking time to avoid overcooking them. Chicken shawarma wraps pair well with many sides. Try serving them with: - Hummus - Pita chips - Tabouli salad - Roasted vegetables - Pickled vegetables These sides add more flavor and texture to your meal. To add heat to your chicken shawarma, try these tips: - Mix in cayenne pepper or red pepper flakes to the marinade. - Add sliced jalapeños when assembling the wraps. - Serve with a spicy sauce like harissa or sriracha. These options will give your wraps a nice kick without overpowering the other flavors. For the full recipe, check out the complete guide. In this post, we covered making delicious chicken shawarma wraps. We started with the main ingredients: chicken thighs, whole wheat tortillas, and fresh veggies. Then, we looked at creating a tasty marinade and sauce. I shared step-by-step cooking and assembly instructions, plus tips for the best flavor. We explored variations, from gluten-free options to flavor additions. Finally, proper storage and reheating tips will keep your leftovers fresh. Now you can enjoy these wraps anytime. Make it your own with different toppings and spices!](https://joymealplan.com/wp-content/uploads/2025/06/27d0fa19-e080-46bc-ad73-80725d86a56a-768x768.webp)


