Creamy Lemon Asparagus Risotto Easy and Tasty Recipe

Are you ready to indulge in a creamy dish that brightens your day? My Creamy Lemon Asparagus Risotto is the perfect mix of comfort and zest. With just a few simple ingredients, you can create a rich and tasty meal that impresses anyone at your table. Join me step-by-step to whip up this delightful dish that is sure to become a household favorite!
Ingredients
Main Components
– 1 cup Arborio rice
– 4 cups vegetable broth (preferably low-sodium)
– 1 cup asparagus, trimmed and cut into 1-inch pieces
– 1 small onion, finely chopped
– 2 cloves garlic, minced
Essential Additions
– 1/2 cup heavy cream
– 1/2 cup freshly grated Parmesan cheese
– Zest of 1 medium lemon
– 2 tablespoons fresh lemon juice
Seasoning and Garnish
– 1 tablespoon extra virgin olive oil
– Salt and freshly cracked black pepper, to taste
– Fresh parsley, chopped (for garnish)
In this recipe, we use Arborio rice. It gives the risotto its creamy texture. The rice absorbs flavor and becomes soft yet retains a nice bite. Next, we have vegetable broth. I prefer low-sodium broth to control the saltiness. For the main veggie, we need asparagus. Fresh asparagus adds a nice crunch and bright color.
Onion and garlic round out the base. They build a delicious flavor. The heavy cream adds richness. Parmesan cheese brings a savory note. Lemon zest and juice brighten the dish, adding a refreshing twist.
For seasoning, we use olive oil, salt, and pepper. They enhance the overall taste. Finally, fresh parsley adds a pop of color and freshness when we serve. Each ingredient plays a key role in making this risotto both creamy and flavorful.
Step-by-Step Instructions
Preparing the Broth
Start by warming the vegetable broth in a medium saucepan. You want it hot but not boiling. This helps the rice cook evenly. Keeping the broth warm is key for a great risotto.
Cooking the Base
In a large skillet, heat the olive oil over medium heat. Add the finely chopped onion and cook for about 3-4 minutes. You want it soft and translucent. Next, add the minced garlic and cook for one more minute. Be careful not to burn the garlic; it can turn bitter quickly. Now, it’s time to toast the Arborio rice. Stir it into the skillet and cook for 2-3 minutes. This gives the rice a nice, nutty flavor and helps it absorb the broth better.
Adding the Broth
Now, begin to add the warm vegetable broth. Use one ladle at a time. Stir constantly, allowing the rice to soak up most of the broth before adding the next. This gradual method helps create that creamy risotto texture we love. After about 10 minutes, add the chopped asparagus. Keep stirring and adding broth for another 5-7 minutes. You want the rice to be creamy but still have a slight bite, or al dente.
Finishing Touches
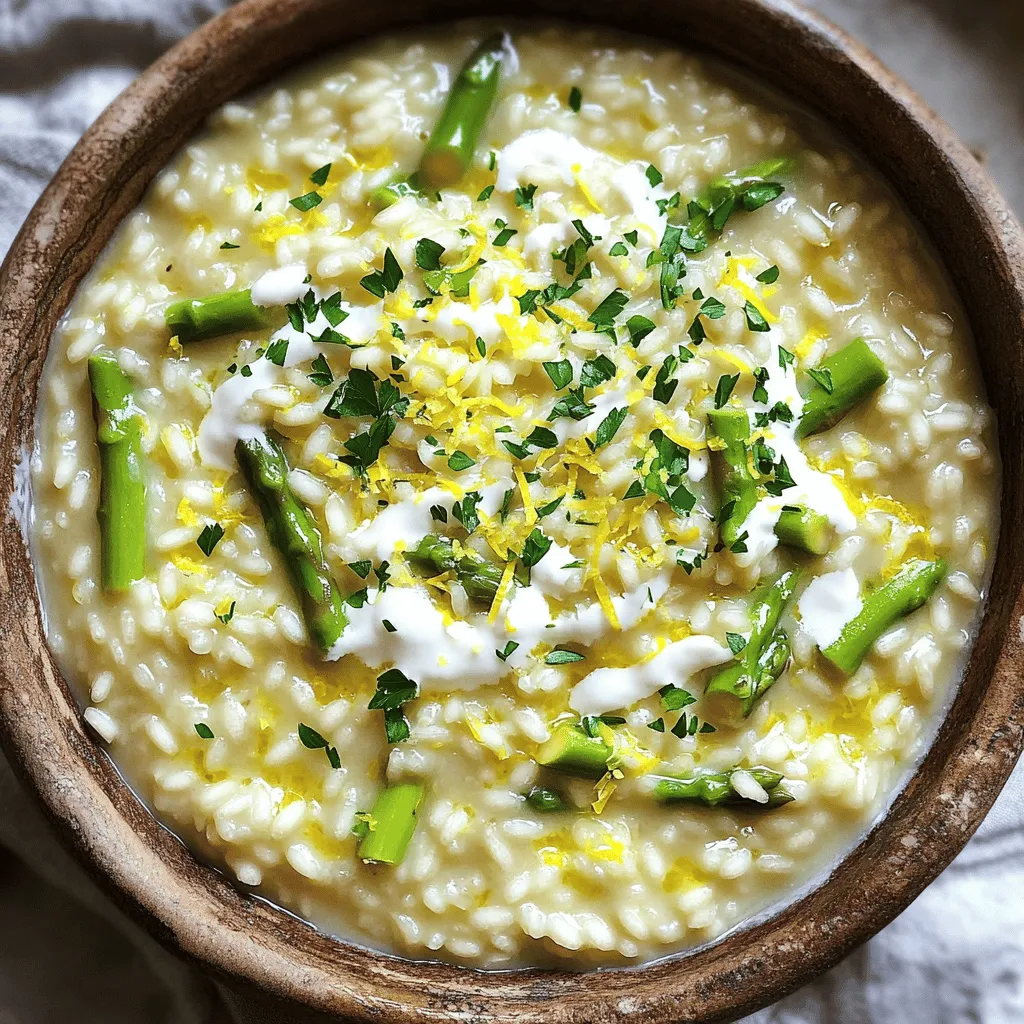
Once the rice is cooked to your liking, take the skillet off the heat. Stir in the heavy cream, grated Parmesan cheese, lemon zest, and lemon juice. Season with salt and cracked black pepper to taste. Mix everything until it is creamy and well combined. Let the risotto sit for a minute to meld all the flavors together. Serve it hot in shallow bowls and add some freshly chopped parsley on top for color and flavor.
Tips & Tricks
Achieving Creamy Texture
Stirring is key to a creamy risotto. You must stir often while cooking. This helps the rice release its starch. The starch makes the risotto thick and smooth. You’ll know the rice is al dente when it feels firm but not hard. It should have a slight bite, which is perfect for risotto.
Flavor Enhancements
You can switch up the cheese for more flavor. Try using Pecorino Romano or Gorgonzola for a twist. They add a unique taste that complements the lemon. Using homemade broth also boosts the flavor. It has richer taste than store-bought. Plus, it’s easy to make with leftover veggies and herbs.
Presentation Ideas
Serve your risotto in shallow bowls for a nice touch. This helps show off the creamy texture. Drizzle some extra olive oil on top for shine. You can also sprinkle more lemon zest for brightness. Finally, add fresh parsley to give it color and flavor. These simple steps will impress your guests!

Variations
Vegetarian Options
You can easily make this risotto vegetarian. Just swap the vegetable broth for a homemade broth. This will enhance the flavor. You may also add more vegetables to the mix. Try peas, spinach, or even mushrooms. These additions boost nutrition and texture.
Protein Additions
For a heartier meal, consider adding chicken or shrimp. Cook the chicken in the skillet before starting the risotto. Let it rest, then slice it thin. For shrimp, toss them in after the asparagus. Cook until they turn pink. Adjust your cooking times to avoid overcooking.
Dietary Substitutions
If you’re gluten-free, you can still enjoy this dish. Arborio rice is naturally gluten-free, so you’re set there. For a dairy-free option, use coconut cream instead of heavy cream. Nutritional yeast can replace Parmesan cheese for that cheesy flavor.
Storage Info
Storing Leftovers
You can keep leftover risotto in the fridge. Place it in an airtight container. It will last for about 3 days. When you want to eat it again, reheat gently. Use a saucepan on low heat. Add a splash of broth or water. This will help bring back its creamy texture. Stir often to warm it evenly.
Freezing Tips
If you want to freeze risotto, do it right away. Allow it to cool completely first. Then place it in a freezer-safe container. It can last for up to 2 months in the freezer. When you are ready to eat, take it out the night before. Let it thaw in the fridge. Reheat it gently in a saucepan, adding a bit of broth. Stir often to ensure it warms evenly.
FAQs
How long does risotto last in the fridge?
Risotto lasts about three to four days in the fridge. To store it, place it in an airtight container. This keeps the risotto fresh and prevents strong odors from mixing in. When you are ready to eat it, reheat it gently on the stove or in the microwave. Add a splash of broth or water to help it regain its creamy texture.
Can I make risotto in advance?
You can prepare risotto in advance, but it may lose some creaminess. To make it ahead, cook the risotto until just al dente. Stop before adding the cream and cheese. Cool it quickly and store it in the fridge. When you’re ready to serve, add broth and heat it up. Finish with cream, cheese, and lemon juice for a fresh taste.
What is the best type of rice for risotto?
The best rice for risotto is Arborio rice. Arborio rice has a high starch content. This helps create that creamy texture we love. Other rice types, like jasmine or basmati, do not work well. They are less starchy and cook differently. Arborio rice is key to a perfect risotto.
This blog covered how to make a creamy asparagus risotto using simple ingredients. We discussed key components like Arborio rice, vegetable broth, and seasonings. The step-by-step instructions made cooking easy and fun. I shared tips for that perfect creamy texture and ways to customize your dish. Remember, variations can elevate your risotto, whether vegetarian or with added protein. Store or freeze leftovers wisely for later enjoyment. Now, you have all the tools to create a delicious risotto any time. Happy cooking!


![- 1 lb boneless, skinless chicken thighs, cut into bite-sized chunks - 2 tablespoons olive oil - 1 cup broccoli florets, washed and trimmed - 1 red bell pepper, sliced into thin strips - 1 cup snap peas, ends trimmed - 1 small carrot, julienned - 3 green onions, finely chopped - 2 cloves garlic, minced - 1 tablespoon fresh ginger, grated - 1/4 cup low-sodium soy sauce - 2 tablespoons honey - 1 tablespoon rice vinegar - 1 teaspoon sesame oil - Salt and freshly ground black pepper to taste - Toasted sesame seeds for garnish The chicken is the star here. I use boneless, skinless thighs for juiciness. They cook quickly and stay tender. For veggies, I choose bright broccoli, sweet bell pepper, crisp snap peas, and a touch of carrot for color. Fresh garlic and ginger add a zing. The sauce blends soy sauce, honey, rice vinegar, and sesame oil for a sweet and savory mix. - Other protein options: shrimp, beef, or tofu - Additional veggies: zucchini, mushrooms, or bell peppers - Garnishes and toppings: cilantro, green onions, or chili flakes You can swap chicken for shrimp, beef, or even tofu for a vegetarian twist. Feel free to add other veggies like zucchini or mushrooms. They all taste great! Top with fresh cilantro or chili flakes for extra flavor. This dish is fun to customize based on what you have at home. For more details, you can check the Full Recipe. To start, gather your teriyaki sauce ingredients. You need low-sodium soy sauce, honey, rice vinegar, sesame oil, garlic, and ginger. In a small bowl, mix these ingredients well. A whisk works great here. This sauce adds a sweet and savory taste to your dish. Next, heat olive oil in a large skillet or wok. Use medium-high heat for the best results. When the oil shimmers, add the chicken chunks. Sprinkle a pinch of salt and black pepper over it. Cook for about 5-7 minutes. Turn the chicken often until it is brown and cooked through. Remove the chicken and set it aside on a plate. In the same skillet, add your vegetables: broccoli, bell pepper, snap peas, and carrot. Stir them for 3-4 minutes. You want the veggies to stay bright and start to soften. This keeps them crunchy and full of flavor. Now, return the cooked chicken to the skillet. Pour the teriyaki sauce over everything. Toss gently to coat the chicken and veggies evenly. Cook for another 2-3 minutes. This allows the flavors to meld nicely. Finally, remove the skillet from the heat. Stir in finely chopped green onions. This adds a fresh taste. To serve, spoon the stir fry onto plates. Sprinkle toasted sesame seeds on top for a nice finish. You can serve it over jasmine rice or alongside quinoa. This makes a complete meal. Enjoy the vibrant colors and flavors! - Overcooking the chicken: Overcooked chicken turns dry and tough. Cook it just until it's no longer pink inside. This usually takes about 5-7 minutes on medium-high heat. - Vegetable texture issues: If you overcook the veggies, they lose their crispness. Stir fry them for about 3-4 minutes. They should be bright and tender but still crunchy. - Flavor tweaks: Want more heat? Add chili flakes or sriracha to your teriyaki sauce. Prefer a sweeter taste? Mix in more honey or brown sugar. Adjust the sauce to match your taste. - Alternative vegetables: You can swap out the veggies based on what you have. Try bell peppers, zucchini, or even bok choy. Mix and match for fun flavors and colors. - Sweetness adjustments: If the sauce is too sweet, add a splash of soy sauce. If it’s not sweet enough, add more honey. Taste as you go to get it just right. - Thickness options: To thicken your sauce, simmer it longer in the pan. For a thinner sauce, add a bit of water or broth. This helps you control the sauce for your liking. By following these tips, you'll create a teriyaki chicken stir fry that's both delicious and fun to make. If you're ready to dive in, check out the Full Recipe for all the details! {{image_4}} You can easily make this dish fit your diet. - Low-Carb Options: Swap the chicken for shrimp or tofu. Use cauliflower rice instead of white rice. This keeps the flavor but cuts carbs. - Vegetarian or Vegan Swaps: For a plant-based dish, use tofu or tempeh. You can also add more veggies like bell peppers or mushrooms. You can give your stir fry a twist. - Different Sauce Options: Try a hoisin sauce or sweet chili sauce for a different taste. You can even add peanut butter for a creamy texture. - Cultural Twists on Stir Fry: Add spices like curry powder for an Indian flavor. Or use a teriyaki sauce recipe from Japan. Each culture adds its unique flair. Using seasonal produce can enhance your dish. - Best Vegetables to Use Per Season: In spring, use asparagus and snap peas. In summer, add zucchini and bell peppers. Fall is great for carrots and squash. Winter brings hearty greens like kale. - Sustainable Sourcing Tips: Shop local farmers' markets. This supports local farms and gets you fresh ingredients. You can also look for organic labels to ensure quality. Explore these options to make your teriyaki chicken stir fry even more special! To store your teriyaki chicken stir fry, first let it cool down. Place it in an airtight container. This helps keep the flavors fresh. You can refrigerate it for up to three days. If you want to keep it longer, freezing is a good option. Use a freezer-safe container or bag. It can last up to three months in the freezer. When you're ready to eat your leftovers, reheating is easy. For the microwave, place the stir fry in a bowl. Cover it with a microwave-safe lid. Heat it for one to two minutes, stirring halfway. This ensures even heating. If you prefer a skillet, heat a small amount of oil over medium heat. Add the stir fry and stir until warm, about three to five minutes. In the fridge, your teriyaki chicken stir fry lasts about three days. Be sure to check for signs of spoilage before eating. If you see any mold or if it smells off, it's best to throw it away. When frozen, the stir fry can sit for up to three months. After that, the taste may not be as good. Always trust your senses when it comes to food safety. You can serve teriyaki chicken stir fry with rice or noodles. Here are some great options: - Jasmine rice: This fluffy rice pairs well with teriyaki sauce. - Brown rice: A healthier option with more fiber. - Egg noodles: These add a nice chew to your meal. - Quinoa: A protein-rich choice that adds texture. - Side salad: A fresh salad can balance the flavors. Try pairing your stir fry with steamed or sautéed vegetables. Broccoli, bok choy, and carrots work well. You can also serve it with a light soup for a complete meal. Yes, you can make teriyaki chicken stir fry in advance. Here are some tips: - Cook and cool: Prepare the dish fully, then cool it quickly. - Store properly: Place it in an airtight container in the fridge. - Reheat gently: When ready to eat, heat it on the stove or in the microwave. Meal prep makes busy nights easier. You can also chop veggies ahead of time. This saves time and lets you enjoy a fresh meal. Teriyaki chicken stir fry is tasty and nutritious. Here are the key facts: - Caloric content: One serving has about 350 calories. - Protein: It has around 30 grams of protein from chicken. - Carbohydrates: Expect about 30 grams, mostly from veggies and sauce. - Fat: It contains about 10 grams, mostly healthy fats from olive oil. This dish is rich in vitamins and minerals, thanks to the colorful veggies. Broccoli offers vitamin C, while carrots are high in beta-carotene. Enjoy this dish for a balanced meal! For the complete instructions and ingredient list, check out the [Full Recipe]. Teriyaki chicken stir fry is a simple dish to make at home. You learned key ingredients, how to prepare the sauce, and tips for cooking. Avoid common mistakes like overcooking chicken. Customize your stir fry with different veggies or proteins to suit your taste. Remember, fresh ingredients make a big difference. Whether you serve it fresh or store leftovers, this dish is delicious. Enjoy creating your own unique stir fry!](https://joymealplan.com/wp-content/uploads/2025/06/4a36c5e3-194c-4011-88f6-f3f1f5f34a05-768x768.webp)


![- 8 corn tortillas - 1 cup black beans, drained and rinsed - 1 cup corn kernels (fresh or frozen) - 1 red bell pepper, diced - 1 small zucchini, diced - 1 cup fresh spinach, chopped - 1 teaspoon ground cumin - 1 teaspoon chili powder - 1/2 teaspoon garlic powder - 1 1/2 cups enchilada sauce - 1 cup shredded cheese - 1 tablespoon olive oil - Salt and pepper to taste - Fresh cilantro for garnish You can swap black beans for pinto or kidney beans. You might also try non-dairy cheese if you want a vegan option. If you need gluten-free, use gluten-free tortillas. These swaps keep the recipe flexible and fun! Each serving has about 300 calories. You get protein from beans and fiber from veggies. Black beans boost heart health, while spinach adds iron. Corn gives you energy, making these enchiladas not just tasty but also good for you. - Preheat the oven to 375°F (190°C). - In a large skillet, heat 1 tablespoon of olive oil over medium heat. - Add 1 diced red bell pepper and 1 small diced zucchini. - Sauté for about 5 minutes until they soften. Stir often to avoid sticking. - Next, stir in 1 cup of drained black beans, 1 cup of corn, and 1 cup of chopped spinach. - Cook for 3-4 minutes until the spinach wilts. - Season the mix with 1 teaspoon of ground cumin, 1 teaspoon of chili powder, and 1/2 teaspoon of garlic powder. - Add salt and pepper to taste. Mix well and cook for another 2 minutes. - Pour 1/2 cup of enchilada sauce into a baking dish. Spread it evenly across the bottom. - Warm 8 corn tortillas in the microwave for 20 seconds, or heat them in a skillet. - Take one tortilla and spoon a portion of the filling into the center. - Sprinkle some shredded cheese on top, then roll it up tightly. Place the rolled tortilla seam-side down in the baking dish. - Repeat this for all the tortillas until the filling is used up. - Pour the remaining enchilada sauce over the assembled enchiladas. - Sprinkle the remaining shredded cheese on top of the sauce. - Place the dish in the oven and bake for 20-25 minutes. Look for melted and bubbly cheese. - Allow the enchiladas to cool for a few minutes before serving. Enjoy with fresh cilantro if you like! For the full recipe, check the details above. - Add smokiness with chipotle peppers: Chipotle peppers add a rich, smoky taste. You can use them in the filling or mix them into the sauce. Just chop a few and add them to your veggies while cooking. This will elevate the flavor profile. - Use fresh herbs for garnish: Fresh herbs brighten up your dish. I love adding cilantro or parsley on top before serving. It adds color and freshness, making the enchiladas look even more appealing. - Importance of softening tortillas: Softening the tortillas is key. If they are too hard, they will crack when you roll them. Heat them in the microwave for 20 seconds or warm them on a skillet. This makes them easy to roll and fill without breaking. - Tips for perfectly melted cheese: To get that perfect melt, use a cheese blend with good melting properties. Cheddar and Monterey Jack work great. Add a little extra cheese on top when baking for a delicious, bubbly finish. - Pair with side dishes: Serve your enchiladas with rice or beans on the side. These help balance the meal and add more protein. You can also serve them with a simple salad for extra crunch. - Ideas for toppings: Top your enchiladas with sour cream or guacamole. These creamy toppings add richness and flavor. You can also sprinkle some diced onions or jalapeños for extra spice. These tips will help you make your vegetarian enchiladas even more delicious. For the full recipe, check out the [Full Recipe]. {{image_4}} You can make your enchiladas even better by changing the filling. - Adding roasted vegetables: Roasting veggies like carrots, eggplant, or butternut squash adds depth. The sweet, caramelized flavor makes the filling more exciting. - Using different kinds of cheese: Try mixing cheeses like queso fresco or pepper jack. Each cheese brings its unique taste. This change can keep your enchiladas fresh and fun. The sauce can change the whole dish. - Homemade enchilada sauce recipe: Making your own sauce is simple and rewarding. Blend tomatoes, chili powder, and spices for a rich flavor. This way, you control the heat and taste. - Alternatives like verde sauce: If you like a fresh twist, try verde sauce made with tomatillos. It adds a nice tangy kick that contrasts well with the cheese and veggies. You can adjust the recipe to fit various diets. - Vegan version of enchiladas: Swap cheese for a nut-based cheese or leave it out. Use more beans and veggies to fill the tortillas. You still get a hearty meal without animal products. - Low-carb or keto adaptations: Use lettuce wraps instead of tortillas. This swap keeps the taste while reducing carbs. You can still enjoy the flavors of enchiladas without the extra carbs. For a complete guide on making these delicious meals, check out the Full Recipe. To store leftovers, first, let the enchiladas cool down. Place them in an airtight container. This keeps them fresh and tasty. Glass or plastic containers work well. I prefer glass for easy reheating. If you want to freeze enchiladas, wrap them tightly in plastic wrap. Then, place them in a freezer-safe bag or container. Label the bag with the date. To reheat frozen enchiladas, remove them from the freezer. Let them thaw in the fridge overnight. Bake in a preheated oven at 350°F (175°C) until hot. In the fridge, these enchiladas last about 3 to 5 days. Always check for signs of spoilage. Look for off smells, mold, or changes in color. If you see any of these, it’s best to throw them out. Enjoy your tasty vegetarian enchiladas with confidence! For the full recipe, check the earlier sections. To prevent soggy enchiladas, apply the sauce wisely. Use a thin layer on the bottom of your dish. Do not drown the rolled enchiladas in sauce. Pour the rest of the sauce on top after filling them. Bake them just right. Overcooking can cause sogginess. Bake at 375°F for 20-25 minutes. This keeps them firm and tasty. Yes, you can use flour tortillas. They are softer and easier to roll. However, corn tortillas add a nice flavor. They are also gluten-free. Flour tortillas can get too soft and break. Each type has its charm. Choose based on your taste and needs. Many sides pair well with vegetarian enchiladas. Try Mexican rice for a classic touch. Beans add protein and fiber. A fresh salad can balance the meal. Guacamole or sour cream makes a great dip. You can also serve with a refreshing drink. Consider agua fresca or a light beer. These sides enhance the flavor of your enchiladas. Enjoy exploring different pairings! This blog post covered all you need for delicious vegetarian enchiladas. We discussed key ingredients, from black beans to fresh spinach. I shared tips on prepping and cooking, plus variations for your taste. You learned how to store leftovers and reheat them. These enchiladas are tasty, healthy, and easy to make. Enjoy trying different flavors and ingredients. Whether for a quick dinner or a party, these enchiladas will impress everyone. Now, get in the kitchen and start cooking!](https://joymealplan.com/wp-content/uploads/2025/06/0bc30ee8-fb20-468c-811c-2f42a5691433-768x768.webp)

