Creamy Pesto Tortellini Salad Fresh and Flavorful Dish

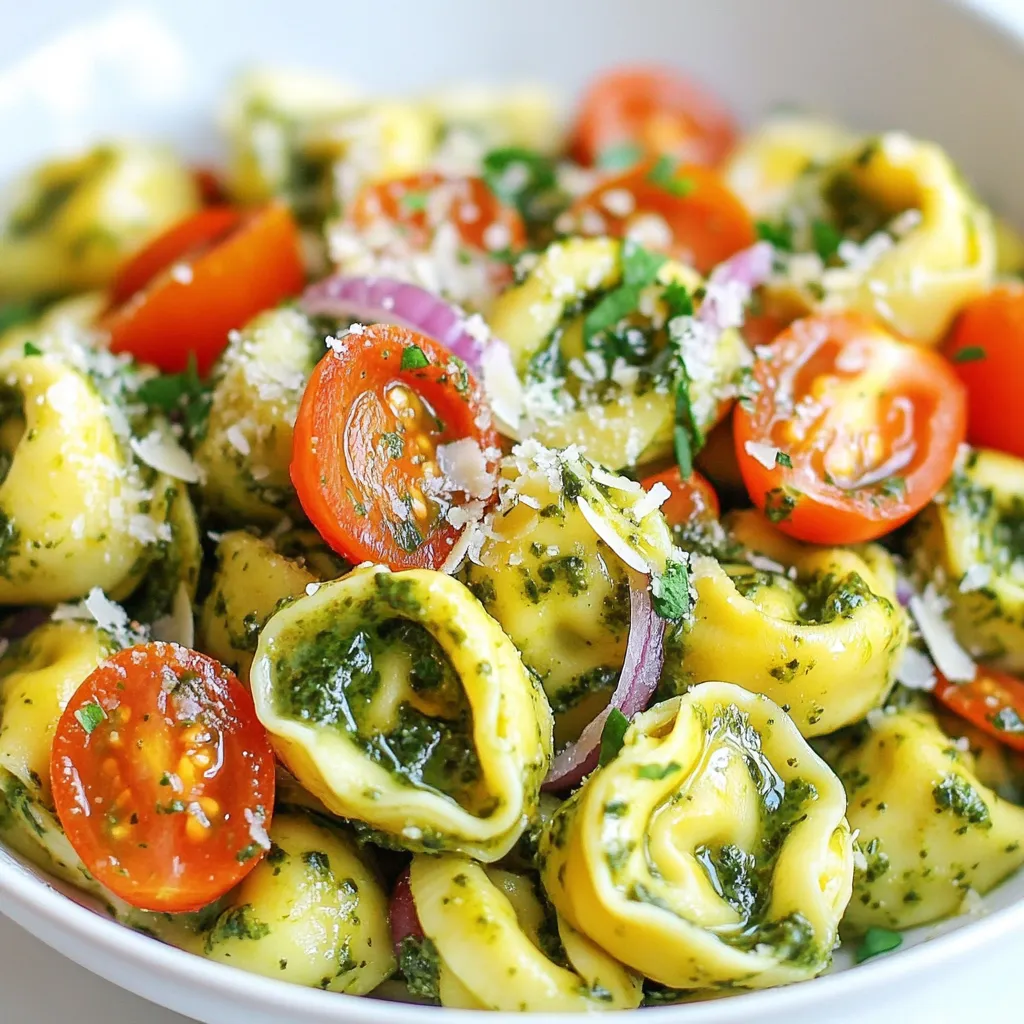
Ready for a dish that bursts with flavor and is super easy to make? This Creamy Pesto Tortellini Salad combines delightful cheese tortellini, fresh veggies, and a rich, creamy pesto that will impress your taste buds. Whether you’re cooking for a crowd or want something tasty for lunch, this salad is a win! Let’s dive into the ingredients and simple steps to create your new favorite salad!
Why I Love This Recipe
- Quick and Easy: This salad can be whipped up in just 15 minutes, making it a perfect choice for busy weeknights or last-minute gatherings.
- Flavorful and Creamy: The creamy pesto dressing adds a rich and vibrant flavor that elevates the tortellini and fresh veggies.
- Versatile Ingredients: You can easily customize this recipe by adding your favorite vegetables or protein, such as grilled chicken or shrimp.
- Perfect for Meal Prep: This salad stores well in the fridge, making it an excellent option for meal prepping and enjoying throughout the week.
Ingredients
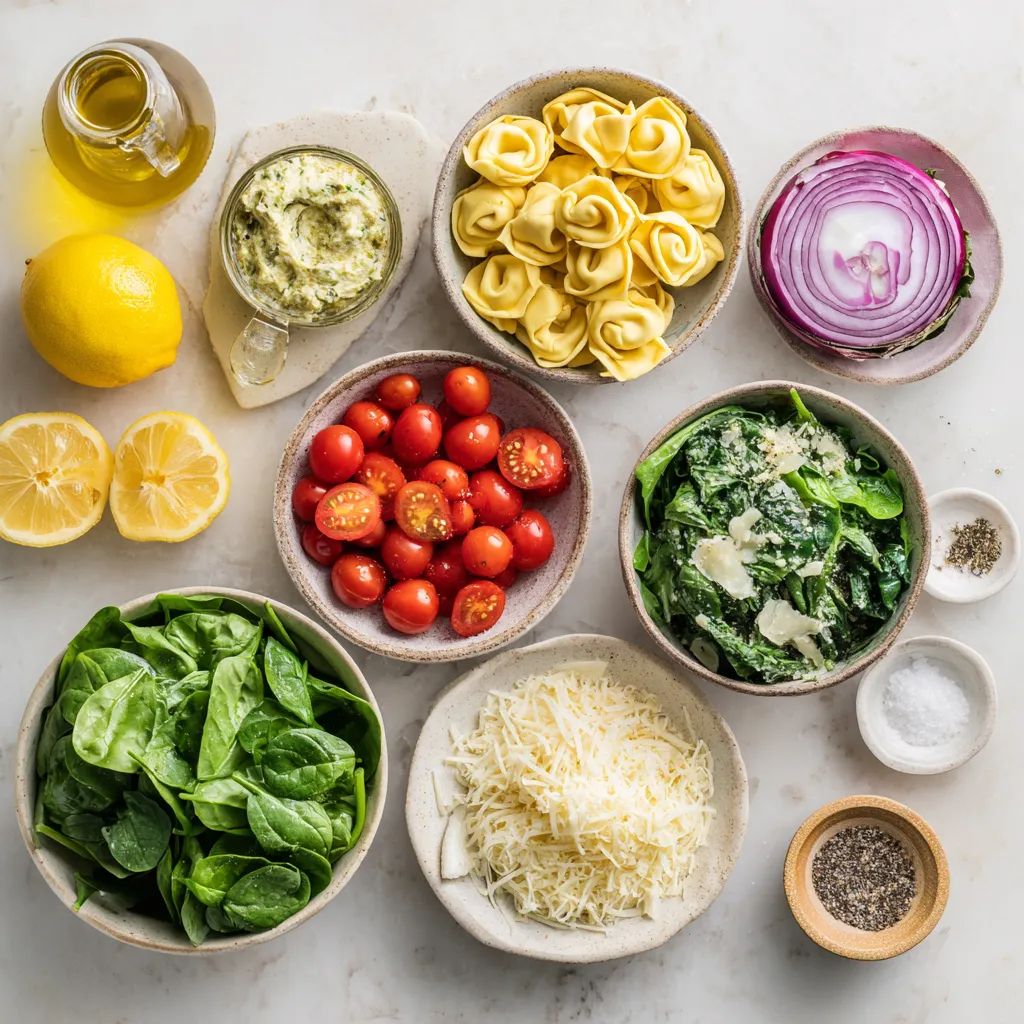
The key to a great Creamy Pesto Tortellini Salad is using fresh and tasty ingredients. Here’s what you will need:
– 12 oz cheese tortellini
– 1 cup cherry tomatoes, halved
– 1 cup fresh spinach, roughly chopped
– ½ cup creamy pesto (your choice of store-bought or homemade)
– ½ cup grated Parmesan cheese
– ¼ cup red onion, finely chopped
– 1 tablespoon lemon juice
– Salt and freshly ground black pepper to taste
– 2 tablespoons extra virgin olive oil
Each ingredient plays a role in making this salad vibrant and full of flavor. The cheese tortellini gives it a hearty base. The cherry tomatoes add a burst of sweetness. Fresh spinach brings in a crunchy texture. Creamy pesto ties it all together with a rich taste. Grated Parmesan adds a salty kick. Red onion offers a mild sharpness. Lemon juice brightens the flavors, while olive oil enriches the dressing. Salt and pepper enhance everything.
Feel free to mix and match ingredients based on your taste. This dish is all about enjoying fresh flavors!

Step-by-Step Instructions
Cooking the Tortellini
Boiling the Water
Start by filling a large pot with water. Add a good pinch of salt. Turn on the heat to high. Wait until the water boils vigorously.
Cooking Time and Method
Once the water is boiling, add 12 oz of cheese tortellini. Cook them for 3 to 5 minutes. Follow the package instructions for the best results. Check that they are tender yet firm, or al dente. Drain the cooked tortellini. Rinse them under cold water to stop the cooking process.
Mixing Ingredients
Combining Tortellini with Vegetables
In a large mixing bowl, add the cooled tortellini. Toss in 1 cup of halved cherry tomatoes, 1 cup of roughly chopped fresh spinach, ½ cup of grated Parmesan cheese, and ¼ cup of finely chopped red onion. Mix gently to blend all the ingredients.
Preparing the Dressing
In a separate small bowl, whisk together ½ cup of creamy pesto, 1 tablespoon of lemon juice, and 2 tablespoons of extra virgin olive oil. Mix until the dressing is smooth and creamy. This adds a rich flavor to your salad.
Assembling the Salad
Tossing Ingredients Together
Pour the creamy pesto dressing over the tortellini mixture. Gently toss everything together. Make sure every piece is well-coated in the dressing.
Chilling Time
Taste the salad and season it with salt and freshly ground black pepper. If you want a stronger pesto taste, add more creamy pesto. Cover the bowl with plastic wrap or a lid. Place it in the fridge to chill for at least 30 minutes. This helps the flavors blend nicely. Serve the salad cold or at room temperature.
Tips & Tricks
Perfecting the Texture
Cooking Tortellini to Al Dente
Cook the cheese tortellini in a large pot of salted water. Boil it for about 3 to 5 minutes. You want them tender but still firm. This is called al dente, which means “to the tooth” in Italian. Drain the tortellini once cooked, and do not forget to rinse them under cold water. This stops the cooking and keeps them perfect.
Proper Cooling Techniques
After rinsing, spread the tortellini on a baking sheet in a single layer. This helps them cool down quickly. You want to avoid them sticking together as they cool. Once cool, they are ready for your salad.
Enhancing Flavor
Seasoning Suggestions
Taste your salad before serving. Add salt and freshly ground black pepper to your liking. This step is key. A little seasoning can make a big difference in flavor.
Customizing Pesto Flavor
If you want a stronger pesto taste, add a bit more creamy pesto. You can also mix in a touch of lemon juice to brighten the flavor. Experimenting with herbs like basil or parsley can also change the taste.
Serving Suggestions
Garnishing Ideas
For a pretty touch, add extra grated Parmesan cheese on top. A few fresh spinach leaves can add color too. These simple garnishes make your dish look fancy.
Best Accompaniments
This salad pairs well with crusty bread or a light soup. You can also serve it with grilled chicken for a heartier meal. Enjoy the blend of fresh flavors!
Pro Tips
- Use Fresh Ingredients: Using fresh spinach and ripe cherry tomatoes will enhance the flavor and texture of your salad, making it more vibrant and delicious.
- Chill Before Serving: Allowing the salad to chill for at least 30 minutes lets the flavors meld together, resulting in a more cohesive taste experience.
- Customize Your Pesto: Feel free to experiment with different types of pesto, such as sun-dried tomato or arugula pesto, to give your salad a unique twist.
- Add Protein: To make this salad more filling, consider adding grilled chicken, shrimp, or chickpeas for a protein boost.

Variations
Ingredient Swaps
Alternative Vegetables
You can change up the veggies in this salad. Try bell peppers, cucumbers, or zucchini. Each adds a unique crunch and flavor. You can also swap in arugula for spinach. It gives a nice peppery kick.
Different Cheese Options
If you want to mix the cheese, use feta or goat cheese. Both add a tangy taste. You could also use a mix of cheeses for more depth. Just remember, cheese adds creaminess and flavor.
Dietary Adjustments
Gluten-Free Options
To make this salad gluten-free, use gluten-free tortellini. Many brands offer tasty options. You can also use a gluten-free pasta, like rice or quinoa pasta. Just cook it according to the package instructions.
Vegan Substitutes
For a vegan version, choose a vegan tortellini. Many stores sell these now. Swap the creamy pesto for a vegan version. Use nutritional yeast instead of Parmesan. It gives a nice cheesy flavor without dairy.
Seasonal Additions
Summer Fresh Veggies
In summer, add fresh corn or diced avocado. They make the salad bright and refreshing. You can also include grilled veggies for a smoky taste. Cherry tomatoes are sweetest in summer, so use lots!
Fall Flavor Boosters
As fall arrives, consider adding roasted butternut squash or sweet potatoes. They add a warm, sweet flavor. You might also try adding walnuts for crunch and a hint of nutty flavor. This gives your salad a cozy vibe perfect for fall.
Storage Info
Refrigerating the Salad
To keep your creamy pesto tortellini salad fresh, store it in an airtight container. This will help lock in flavors and prevent any unwanted smells in the fridge. Always let the salad cool to room temperature before sealing it. The salad stays tasty for up to three days in the fridge. However, the longer it sits, the softer the veggies may become.
Freezing Considerations
You can freeze tortellini salad, but it’s not ideal. Freezing can change the texture of the tortellini and veggies. If you choose to freeze it, use a freezer-safe container. It’s best to eat it within a month for the best taste.
When you want to enjoy your frozen salad, thaw it in the fridge overnight. This keeps the salad cold and helps maintain its flavor. After thawing, give it a good stir and check for seasoning. You may need to add a little salt, pepper, or even more pesto to refresh the taste.
FAQs
How to Make Tortellini from Scratch?
Ingredients Needed:
– 2 cups all-purpose flour
– 3 large eggs
– 1/2 teaspoon salt
– 1 cup ricotta cheese
– 1/2 cup grated Parmesan cheese
– Fresh herbs (basil or parsley)
Simple Steps to Follow:
1. In a bowl, mix flour and salt.
2. Make a well in the center and add eggs.
3. Stir until dough forms. Knead for 8-10 minutes.
4. Let dough rest for 30 minutes.
5. Roll out dough thinly. Cut into squares.
6. Fill each square with ricotta mix and fold into triangles.
7. Pinch edges to seal. Your tortellini is ready to cook!
Can I Use Store-Bought Pesto?
Recommendations for Quality:
Yes, store-bought pesto is a great option. Look for brands with fresh ingredients.
Flavor Considerations:
Taste different brands to find the one you love. Some can be too oily or salty. Choose one that balances flavor well.
What Are the Best Substitutes for Tortellini?
Alternative Pasta Types:
You can use any small pasta, like shells or farfalle. These shapes hold the sauce nicely.
Cooking Adjustments Needed:
Cooking times may vary based on the pasta type. Check the package for guidance to ensure it cooks perfectly.
This blog post covers a tasty tortellini salad. You learned about key ingredients, cooking methods, and mixing tips. I shared how to enhance flavors and suggested alternatives for your needs. You saw storage tips to keep it fresh and answers to common questions. Enjoy this simple yet delightful dish as a healthy meal or side. With these steps, you can impress family and friends with ease. Try different flavors and make it your ow

Creamy Pesto Tortellini Salad
Ingredients
- 12 oz cheese tortellini
- 1 cup cherry tomatoes, halved
- 1 cup fresh spinach, roughly chopped
- 0.5 cup creamy pesto
- 0.5 cup grated Parmesan cheese
- 0.25 cup red onion, finely chopped
- 1 tablespoon lemon juice
- to taste salt
- to taste freshly ground black pepper
- 2 tablespoons extra virgin olive oil
Instructions
- Start by bringing a large pot of salted water to a vigorous boil. Carefully add the cheese tortellini and cook according to the package instructions, usually around 3 to 5 minutes, or until they are tender yet firm to the bite (al dente). Once cooked, drain the tortellini and rinse them under cold water to halt the cooking process and cool them down.
- In a spacious mixing bowl, combine the cooled tortellini with the halved cherry tomatoes, roughly chopped fresh spinach, grated Parmesan cheese, and finely chopped red onion. Gently stir to ensure even distribution of the ingredients.
- In a separate small bowl, whisk together the creamy pesto, freshly squeezed lemon juice, and extra virgin olive oil until the mixture becomes smooth and well combined. This will create a delightful dressing for your salad.
- Pour the pesto dressing over the tortellini mixture and gently toss everything together, ensuring that all components are well-coated in the creamy goodness of the pesto.
- Taste your salad and season it with salt and freshly ground black pepper to your liking. If you desire a bolder pesto flavor, feel free to add a little more creamy pesto to suit your taste.
- Cover the bowl with plastic wrap or a lid and place it in the refrigerator. Chill the salad for at least 30 minutes, allowing the flavors to meld beautifully.
- Once chilled, you can serve the salad cold or at room temperature. For an added touch, garnish each serving with extra grated Parmesan cheese and a few fresh spinach leaves for color and presentation.


![To make Garlic Parmesan Roasted Asparagus, gather these fresh items: - 1 bunch of fresh asparagus, trimmed - 3 tablespoons extra virgin olive oil - 4 cloves of garlic, finely minced - 1/2 cup freshly grated Parmesan cheese - 1 teaspoon freshly grated lemon zest - 1/2 teaspoon red pepper flakes (optional for a spicy kick) - Sea salt and freshly cracked black pepper to taste - Fresh parsley, chopped (for garnish) Using fresh ingredients makes a big difference. Fresh asparagus has a nice crunch and bright flavor. If you can't find fresh asparagus, you can use frozen, but the texture will change. Extra virgin olive oil adds a rich taste. You can swap it with avocado oil if desired. Minced garlic is key for flavor. If you want milder garlic, use garlic powder instead. Parmesan cheese brings a salty, nutty flavor. For a dairy-free option, try nutritional yeast for a cheesy taste. Lemon zest wakes up the dish. If you don’t have lemon, use lime zest for a different twist. Fresh ingredients are essential for great taste. They add vibrant flavors and textures that dried or stale items can’t match. The freshness of the asparagus shines through when roasted. It becomes tender and slightly crispy, perfect with garlic and cheese. Using fresh garlic enhances the aroma and flavor of the dish. Plus, fresh parsley adds a pop of color and freshness when you garnish the asparagus. Always choose fresh when you can. It makes a simple dish like Garlic Parmesan Roasted Asparagus truly stand out. For the full recipe, check out the details above! Start by trimming the asparagus. Hold a spear in your hand and bend it gently. The asparagus will snap at the right point. This is where the tough part ends. I usually take about an inch off. Rinse the asparagus under cold water to remove any dirt. Pat them dry with a clean towel. This step is key to getting a nice roast. In a large bowl, add the trimmed asparagus. Pour in the extra virgin olive oil. Use your hands to toss the asparagus, ensuring they are well-coated. Next, add the minced garlic, grated Parmesan cheese, and lemon zest. If you like spice, sprinkle in red pepper flakes. Season with sea salt and freshly cracked black pepper. Toss everything again until the asparagus is fully coated in the tasty mix. Now, arrange the asparagus on a lined baking sheet. Make sure they are in a single layer. This helps them cook evenly. Place the baking sheet in the oven set to 425°F (220°C). Roast for about 15 to 20 minutes. Check on them halfway through. You want them tender with crispy edges. When done, take them out and let them cool for a few minutes. Garnish with chopped parsley for a fresh look. For the full recipe, check the details above. To get that perfect crispiness, start with fresh asparagus. The thinner the spears, the better they crisp up. Make sure to coat them evenly with olive oil. This helps them roast nicely. Lay the asparagus in a single layer on the baking sheet. If they overlap, they can steam instead of roast. Keep an eye on them while they cook. You want them tender with slightly crispy edges. You can adjust the flavors to fit your taste. If you love garlic, add more minced cloves. For a kick, sprinkle in more red pepper flakes. If you prefer a milder taste, reduce the garlic or skip the flakes. Add a squeeze of lemon juice after roasting for extra brightness. Experiment until you find your perfect mix. Serve your Garlic Parmesan Roasted Asparagus warm. It pairs well with grilled meats or fish. You can also serve it alongside pasta dishes. For a fun twist, add it to salads or grain bowls. Garnish with fresh parsley for a pop of color. For more flavor, drizzle balsamic reduction over the top. This adds a sweet balance to the savory notes. Check out the Full Recipe for more ideas! {{image_4}} You can make Garlic Parmesan Roasted Asparagus more exciting. Try adding lemon juice for zest. A squeeze of fresh lime also brightens the dish. For a smoky flavor, add smoked paprika. You can also mix in nuts, like almonds or pine nuts, for added crunch. If you want a cheesy twist, use feta or goat cheese instead. The options are endless, and each adds a new layer of taste. If you prefer a vegan option, swap the Parmesan cheese for a plant-based cheese. Nutritional yeast is a great choice too. It gives a cheesy flavor without dairy. You can also use a mix of sunflower seeds and garlic powder to mimic the cheese flavor. This way, you still enjoy the savory goodness without any animal products. You can cook asparagus in many ways. Grilling gives it a nice smoky taste. To grill, toss the asparagus in oil and seasonings, then place it on the grill for about 5-7 minutes. Air frying is also a great method. It cooks the asparagus quickly while keeping it crisp. Just set your air fryer to 400°F (200°C) and cook for 8-10 minutes. Each method offers a unique flavor and texture, so feel free to experiment. For full details on the recipe, check the Full Recipe section! To store Garlic Parmesan Roasted Asparagus, first let it cool down. Place it in an airtight container. Make sure to keep it in the fridge. This keeps it fresh and tasty for later. You can also use a resealable plastic bag if you prefer. Just squeeze out the air before sealing. When you are ready to enjoy the leftovers, preheat your oven to 350°F (175°C). Spread the asparagus on a baking sheet. Heat for about 10 minutes. This will help restore its crispiness. If you want a quicker method, use the microwave. Heat it for 30 seconds at a time until warm. You can store Garlic Parmesan Roasted Asparagus in the fridge for up to 3 days. After that, it may lose its flavor and texture. If you want to keep it longer, consider freezing it. Wrap it well and store it in the freezer for up to 2 months. Just remember, the texture may change after freezing. For the best taste, enjoy it fresh or within a few days. For the full recipe, check out the earlier sections. Yes, you can use frozen asparagus. However, fresh asparagus tastes better. Frozen asparagus may have more water, which can affect the final texture. If you use frozen ones, reduce the roasting time. Cook them until they are tender but still hold their shape. Asparagus is perfectly roasted when it is bright green and tender. The tips should be slightly crispy. You can test doneness by piercing a spear with a fork. If it goes through easily, it is ready. Keep an eye on the time. Roasting takes about 15-20 minutes at 425°F. Yes, you can make this recipe in advance. Roast the asparagus, then cool it down. Store it in the fridge for up to 3 days. When ready to serve, reheat it in the oven for a few minutes. This keeps the flavors fresh and the texture nice. For the full recipe, check [Full Recipe]. This blog post covered how to make garlic parmesan roasted asparagus. You learned about key ingredients and how fresh ones make a big difference. I shared easy steps to prepare, mix, and roast the asparagus to perfection. You also found tips for crispiness, flavor, and serving ideas. Plus, variations let you explore new tastes, and I provided advice on storing leftovers. Use this guide to make a delicious dish. Enjoy your cooking and make your meals healthier and tastier!](https://joymealplan.com/wp-content/uploads/2025/06/31f02132-0972-47ce-ba26-05432beb78d0-768x768.webp)

![- 2 pounds baby Yukon gold potatoes - 4 tablespoons extra-virgin olive oil - 4 cloves garlic, finely minced To start, gather your primary ingredients. Baby Yukon gold potatoes taste great and roast well. The olive oil keeps everything moist and smooth. Garlic adds a bold flavor that makes these potatoes shine. - 1/2 cup freshly grated Parmesan cheese - 1 teaspoon dried Italian herbs - Salt and freshly ground black pepper Next, we need to season our potatoes. Freshly grated Parmesan cheese gives a rich, cheesy taste. Italian herbs, like oregano and basil, add a nice touch. Don’t forget to season with salt and black pepper for balance. - 2 tablespoons fresh parsley, finely chopped Lastly, for a pop of color and freshness, use chopped parsley. It brightens the dish and makes it more appealing. You can find the Full Recipe online to get all the details and cooking steps. - Preheat the oven to 425°F (220°C). - Prepare the baking sheet with parchment paper. First, I make sure my oven is hot. Preheating helps the potatoes cook evenly. Lining the baking sheet with parchment paper makes cleaning easier. It also helps the potatoes not stick. - Combine the potatoes with olive oil and seasonings. - Toss to coat the potatoes evenly. Next, I grab a large bowl. I add the halved baby Yukon gold potatoes. Then, I pour in the extra-virgin olive oil and minced garlic. I also add dried Italian herbs, salt, and pepper. This mix gives the potatoes their flavor. I toss everything until each piece is coated well. - Arrange the potatoes on the baking sheet. - Initial roasting and adding Parmesan cheese. - Final roasting until crispy and golden. Now, I spread the seasoned potatoes on the baking sheet. I make sure they have space between them. This helps them roast, getting crispy on the outside. I place the sheet in the oven for about 20 minutes. After that, I take it out and sprinkle Parmesan cheese on top. I put it back in the oven for another 15-20 minutes. I want the potatoes golden brown and crispy. When they are done, I take them out and sprinkle fresh parsley on top for color. You can find the full recipe in the previous section. To ensure even seasoning, always mix your ingredients well. When you combine the potatoes with olive oil and spices, make sure every piece gets coated. This step is key for flavor. Next, place the potatoes on the baking sheet with space between them. This spacing helps them roast evenly and get crispy. If they touch, they might steam instead of roast. For golden brown potatoes, roast them at a high temperature. I recommend 425°F (220°C). This heat gives the potatoes that nice crunch you want. Halfway through cooking, check them. If they look brown, they are getting close to being done. You can adjust the time based on your oven. When serving, think about the dish you use. A rustic wooden bowl adds a cozy touch. You can also use a decorative platter for a nice presentation. For garnish, sprinkle fresh parsley on top. This adds color and a fresh taste. Consider pairing these potatoes with grilled chicken or steak for a complete meal. They also go well with a fresh salad! For more detailed steps, check out the Full Recipe. {{image_4}} You can make Garlic Parmesan Roasted Potatoes even tastier. Adding fresh herbs like rosemary or thyme boosts flavor. They add a nice, earthy note. You can also infuse your potatoes with a bit of lemon zest. This gives a bright, fresh taste. Red pepper flakes can add a spicy kick. Just a pinch can make a big difference. If you want variety, try different cheeses. Cheddar or gouda can work well too. Each cheese brings a unique flavor. For a vegan option, use nutritional yeast. It has a cheesy flavor and is a great substitute for Parmesan. Cashew cheese is another tasty choice. You don’t have to stick with Yukon gold potatoes. Try red or fingerling potatoes for a new twist. They have different textures and flavors. Sweet potatoes are a fun alternative too. They add sweetness and a vibrant color to the dish. Each type of potato can change the taste and look of your meal. For the full recipe, check out the [Full Recipe]. To store leftover Garlic Parmesan Roasted Potatoes, let them cool first. Place them in an airtight container. You can keep them in the fridge for up to four days. When you want to reheat, use the oven or air fryer for best results. This keeps them crispy. Heat at 350°F (175°C) for about 10-15 minutes. Yes, you can freeze Garlic Parmesan Roasted Potatoes. To do this, let them cool completely. Spread them on a baking sheet and freeze for a few hours. Once frozen, transfer them to a freezer bag. This helps prevent them from sticking together. When you're ready to eat, thaw them overnight in the fridge. Reheat in the oven for best texture. Leftovers last about four days in the fridge. Check for signs of spoilage, like a bad smell or slimy texture. If you notice these signs, it’s best to throw them away. Enjoy your tasty Garlic Parmesan Roasted Potatoes while they're fresh! For the complete recipe, check the Full Recipe. Yes, you can make Garlic Parmesan Roasted Potatoes ahead of time. Cook the potatoes fully and let them cool. Then, place them in an airtight container. Store them in the fridge for up to three days. When you are ready to eat, reheat them in the oven. This method keeps them crispy. You can also prepare and season the potatoes a day before. Just wait to roast them until you are ready. Garlic Parmesan Roasted Potatoes pair well with many dishes. Here are some great options: - Grilled chicken - Roasted vegetables - Steak or pork chops - A fresh green salad These sides enhance the meal and add more flavor to your plate. To achieve that perfect crispy texture, follow these tips: - Use baby Yukon gold potatoes, as they roast well. - Make sure to space the potatoes on the baking sheet. This allows hot air to circulate. - Toss them in olive oil and seasonings before roasting. - Roast at a high temperature, around 425°F (220°C). - For extra crispiness, broil them for a few minutes at the end. Yes, you can use pre-cut frozen potatoes. They save time and are convenient. However, keep a few things in mind: - Thaw them first to ensure even cooking. - Adjust the cooking time since frozen potatoes may take longer. - Check for doneness by piercing them with a fork. They should be tender inside. Using frozen potatoes can still yield tasty results with this recipe. Garlic Parmesan Roasted Potatoes are simple yet delicious. You learned how to choose the right ingredients, prepare, and roast the potatoes to perfection. We discussed enhancing the flavor with various herbs and cheeses. You can store leftovers and even freeze them for later meals. Embrace this recipe and make it your own. It’s perfect for any meal. Enjoy the crispy goodness with your favorite dishes!](https://joymealplan.com/wp-content/uploads/2025/07/f9349f8b-67c5-4d5e-a46e-da791f5e9156-768x768.webp)