Creamy Spinach Chicken Casserole Tasty Family Meal

Looking for a hearty family meal that’s easy to make? I’ve got just the recipe for you: Creamy Spinach Chicken Casserole! Packed with tender chicken, fresh spinach, and creamy cheeses, this dish is not only comforting but also bursting with flavor. Whether you’re serving it for dinner or prepping for leftovers, you’ll want to keep this recipe on hand. Let’s dive into how to create this deliciously simple casserole that everyone will love!
Why I Love This Recipe
- Comforting and Creamy: This casserole is rich and satisfying, combining creamy cheeses with tender chicken and spinach for a comforting meal.
- Easy to Prepare: With simple ingredients and straightforward steps, this recipe makes it easy to whip up a delicious dinner on a busy night.
- Healthy Ingredients: Packed with fresh spinach, lean chicken, and nutritious cheeses, this dish is a great way to incorporate healthy ingredients into your family’s diet.
- Versatile and Fun: You can easily customize this casserole by adding your favorite veggies or using different types of pasta, making it a fun dish to experiment with!
Ingredients
Main Ingredients
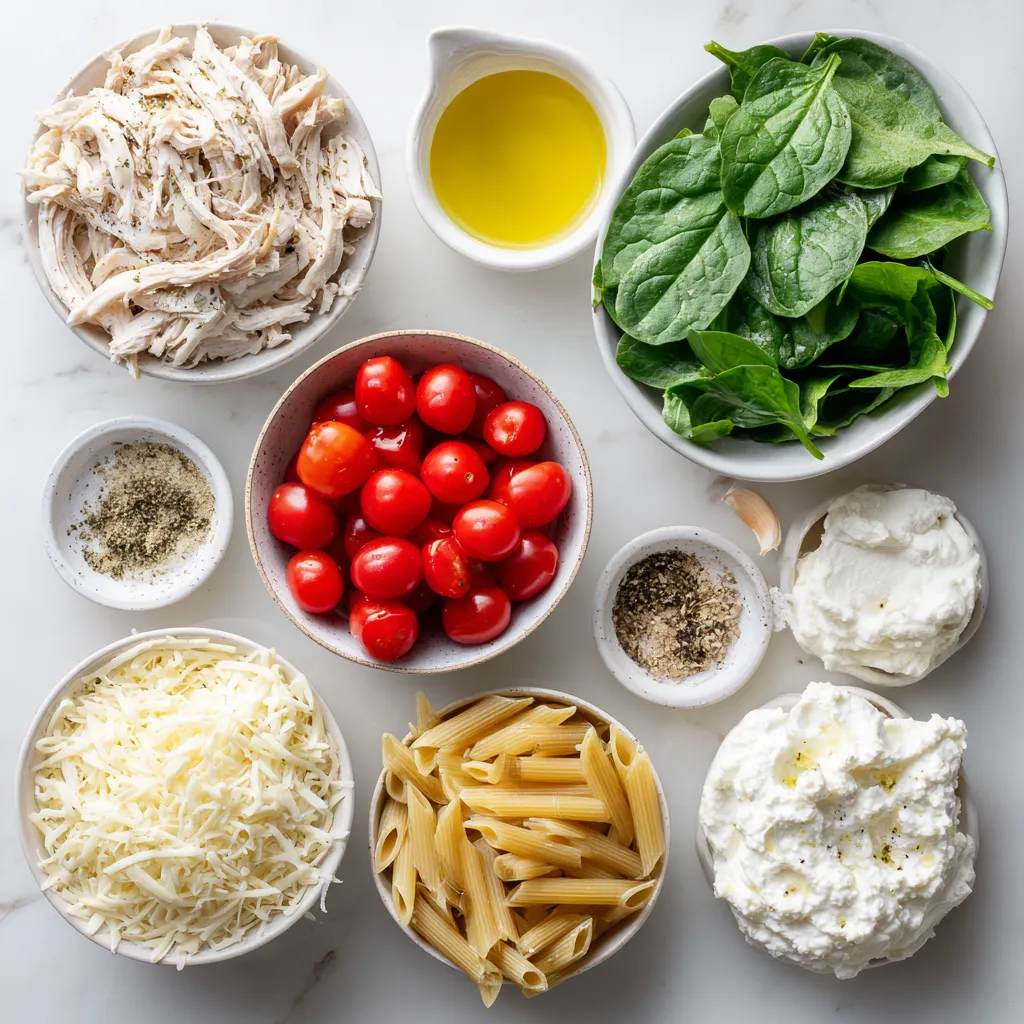
– 2 cups cooked chicken, shredded
– 2 cups fresh spinach, roughly chopped
– 1 cup ricotta cheese
– 1 cup cream cheese, softened
– 1 cup shredded mozzarella cheese
– 1/2 cup grated Parmesan cheese
– 1 cup cherry tomatoes, halved
– 3 cloves garlic, minced
Seasonings and Extras
– 1 teaspoon Italian seasoning
– Salt and pepper, to taste
– 1 tablespoon olive oil
Pasta Options
Pasta is key in this dish. I suggest using penne or rotini. These types hold the sauce well. They also make each bite tasty. If you have other pasta, feel free to use it. Just ensure it cooks well with the sauce.
Using different pasta can change the dish’s feel. Try using whole wheat or gluten-free pasta for a healthy twist. Each type brings a unique flavor and texture. Enjoy exploring these options!

Step-by-Step Instructions
Preparation Steps
– Preheat the oven to 350°F (175°C).
– In a large skillet, heat 1 tablespoon of olive oil over medium heat. Add 3 cloves of minced garlic and sauté for about 1 minute. You want the garlic to smell great.
– Next, add 2 cups of roughly chopped fresh spinach to the skillet. Cook it for about 3-4 minutes, stirring often. The spinach should wilt down nicely.
Mixing Ingredients
– In a big mixing bowl, combine 2 cups of shredded cooked chicken, the cooked spinach, 1 cup of ricotta cheese, and 1 cup of softened cream cheese.
– Add half of the 1 cup of shredded mozzarella cheese and 1 teaspoon of Italian seasoning. Season with salt and pepper to taste. Mix it all well until everything is combined.
– Carefully fold in 1 cup of cooked pasta and 1 cup of halved cherry tomatoes. Make sure the pasta and tomatoes are mixed in evenly.
Baking Instructions
– Transfer the mixture to a greased 9×13 inch baking dish. Spread it out evenly to help it cook well.
– Top the casserole with the remaining shredded mozzarella cheese and 1/2 cup of grated Parmesan cheese. Spread the cheese out evenly over the top.
– Cover the baking dish with aluminum foil. Bake in the preheated oven for 25 minutes. After this, remove the foil and bake for another 15 minutes. The top should be bubbly and golden when ready.
– Once done, take the casserole out of the oven and let it cool for about 5 minutes before serving.
Tips & Tricks
Cooking Tips
To avoid over-browning, cover your casserole with aluminum foil for the first part of baking. This keeps the top moist and allows the flavors to blend well. After 25 minutes, remove the foil to let the cheese bubble and turn golden.
Let the casserole rest for about 5 minutes before serving. This helps the layers set and makes it easier to cut. Plus, it cools slightly, making it perfect for eating.
Serving Suggestions
Garnish your dish with fresh herbs like parsley or basil. This adds color and a burst of flavor. You can also sprinkle some on just before serving for a fresh touch.
Pair this casserole with a simple side salad or fresh bread. A crisp salad balances the creaminess of the dish. Bread is great for soaking up the delicious sauce.
Healthier Substitutes
For a lighter option, try low-fat cheese. Ricotta or mozzarella can often be found in reduced-fat versions. This makes the dish less rich while still tasting good.
You can also swap out regular pasta for whole wheat or gluten-free varieties. These options boost the fiber content and cater to different diets.
Pro Tips
- Use Rotisserie Chicken: For a quicker prep time, consider using store-bought rotisserie chicken. It saves time and adds great flavor to your casserole.
- Fresh Spinach Alternative: If fresh spinach isn’t available, you can use frozen spinach. Just make sure to thaw and drain it well to avoid excess moisture.
- Cheese Variations: Feel free to mix and match cheeses! Adding a bit of feta or goat cheese can elevate the flavor profile.
- Make Ahead: This casserole can be assembled the night before and stored in the refrigerator. Just add a few extra minutes to the baking time if cooking straight from the fridge.

Variations
Ingredient Swaps
You can easily change the proteins in this dish. Try using turkey instead of chicken. Tofu works well for a plant-based version. For veggies, swap out spinach for kale or broccoli. Both options add great flavor and texture.
Flavor Enhancements
Want more kick? Add spices like paprika or cayenne pepper. A dash of hot sauce can also spice things up. If you love cheese, try mixing in goat cheese or feta. These cheeses bring a unique taste to the casserole.
Gluten-Free Options
For a gluten-free meal, choose gluten-free pasta. There are many brands that offer great options. You can also use gluten-free breadcrumbs on top. This adds a nice crunch while keeping the dish suitable for all diets.
Storage Info
Refrigerator Storage
To store leftovers, let the casserole cool completely. Then, cover it tightly with plastic wrap or aluminum foil. This keeps it fresh and prevents it from drying out. You can also use an airtight container for easy storage. In the fridge, the casserole lasts for about 3 to 4 days.
Freezing Instructions
For freezing, cut the casserole into portions. Wrap each piece in plastic wrap, then place them in a freezer-safe bag. This helps avoid freezer burn and keeps flavors intact. The casserole can be frozen for up to 3 months. To reheat, thaw it overnight in the fridge. Then, bake it at 350°F (175°C) until hot. This keeps the taste and texture just right.
Meal Prep Ideas
You can make this casserole ahead of time. Simply prepare it up to the baking step, then cover and refrigerate. When ready to eat, bake it straight from the fridge. This saves time on busy nights. Portioning is also easy; you can cut it into squares for quick meals. Just reheat the portions as needed. This makes weeknight dinners a breeze!
FAQs
Can I make this casserole ahead of time?
Yes, you can make this casserole ahead of time. Prepare the dish up to the baking step. Cover it tightly and store it in the fridge. When ready, bake it straight from the fridge. Just add a few extra minutes to the baking time. This way, you save time on busy days.
Can I substitute low-fat cheese in this recipe?
Absolutely! You can use low-fat cheese in this casserole. Low-fat ricotta or cream cheese work well. Just keep in mind that the texture may change slightly. The flavor should still be tasty and creamy.
What can I serve alongside this dish?
This casserole pairs well with a simple side salad. You can also serve it with garlic bread or roasted vegetables. These sides add freshness and balance to the meal. Try adding a light vinaigrette to the salad for extra flavor.
How do I ensure the casserole doesn’t dry out?
To keep the casserole moist, cover it with foil while baking. This traps steam and keeps the dish creamy. Also, avoid overcooking it. Once the top is bubbly and golden, take it out right away. Let it rest for a few minutes before serving to allow the flavors to settle.
Is it possible to make this recipe vegetarian?
Yes, you can easily make this casserole vegetarian. Just replace the chicken with mushrooms or cooked lentils. You can also add more veggies like bell peppers or zucchini. This keeps the dish hearty while still being meat-free.
This blog post covered a creamy chicken pasta casserole made with fresh ingredients and simple steps. You learned about main ingredients like chicken, spinach, and ricotta cheese, plus spices that boost the flavor. Step-by-step, I showed you how to prepare, mix, and bake the dish. You also discovered tips for serving, variations for customization, and how to store leftovers.
Now you can enjoy this delightful recipe in new ways. Happy cookin

Creamy Spinach Chicken Casserole
Ingredients
- 2 cups cooked chicken, shredded
- 2 cups fresh spinach, roughly chopped
- 1 cup ricotta cheese
- 1 cup cream cheese, softened at room temperature
- 1 cup shredded mozzarella cheese, divided
- 0.5 cup grated Parmesan cheese
- 1 cup cherry tomatoes, halved
- 3 cloves garlic, minced
- 1 teaspoon Italian seasoning
- to taste Salt and pepper
- 1 tablespoon olive oil
- 1 cup cooked pasta (penne or rotini recommended)
Instructions
- Preheat your oven to 350°F (175°C).
- In a large skillet, heat the olive oil over medium heat. Once hot, add the minced garlic and sauté for about 1 minute, or until fragrant.
- Add the chopped spinach to the skillet and cook, stirring occasionally, until wilted, about 3-4 minutes.
- In a large mixing bowl, combine the shredded cooked chicken, wilted spinach, ricotta cheese, cream cheese, half of the shredded mozzarella cheese, Italian seasoning, and season with salt and pepper. Mix well until all ingredients are evenly incorporated.
- Carefully fold in the cooked pasta and halved cherry tomatoes into the chicken and spinach mixture until well combined.
- Transfer the mixture to a greased 9x13 inch baking dish, spreading it out evenly to ensure even cooking.
- Top the casserole with the remaining shredded mozzarella cheese and the grated Parmesan cheese, distributing it evenly across the surface.
- Cover the baking dish with aluminum foil to prevent over-browning and bake in the preheated oven for 25 minutes. After this time, remove the foil and continue to bake for an additional 15 minutes, or until the top is bubbly and golden.
- Once done, remove the casserole from the oven and let it cool for about 5 minutes before serving.


![- 1 lb boneless, skinless chicken thighs - 2 tablespoons olive oil - 3 cloves garlic, minced - 2 teaspoons ground cumin - 2 teaspoons ground paprika - 1 teaspoon ground turmeric - 1 teaspoon ground cinnamon - 1 teaspoon cayenne pepper (adjust according to spice preference) - Salt and pepper to taste - 1 cup cooked quinoa or couscous (your choice) - 1 cup cherry tomatoes, halved - 1 cucumber, diced into bite-sized pieces - 1/2 red onion, thinly sliced - 1 cup mixed greens or baby spinach - 1/4 cup plain Greek yogurt - 2 tablespoons tahini - Juice of 1 fresh lemon - Fresh parsley, chopped, for garnish For these Chicken Shawarma Bowls, chicken thighs shine as the star. They stay juicy and tender, making each bite a delight. Olive oil and spices create a fantastic marinade. The blend of garlic, cumin, and paprika gives a warm, rich flavor. The cayenne adds a kick, but you can adjust it to suit your taste. Fresh toppings like cherry tomatoes and cucumber bring crunch. Mixed greens or baby spinach add a lovely green touch. Topping it all off with Greek yogurt and tahini creates a creamy finish. This mix of flavors makes each bowl special. - Additional vegetables - Different types of grains or bases - Garnishes for enhanced flavor While the main ingredients are fantastic, you can personalize your bowls. Add extra vegetables like bell peppers or carrots for more color and texture. You can switch grains too—try brown rice or farro for a unique twist. Garnishes like chopped nuts or seeds give a nice crunch. Fresh herbs, like mint or dill, can brighten the dish. Feel free to experiment based on what you love or have at home. These options add fun and flavor to your meal. For the complete recipe, check out the Full Recipe. To start, you need to prepare the marinade. In a large bowl, mix together the olive oil, minced garlic, cumin, paprika, turmeric, cinnamon, cayenne pepper, salt, and pepper. Whisk until everything combines well. This creates a tasty blend that makes your chicken shine. Next, it’s time to coat the chicken. Add the boneless, skinless chicken thighs to your bowl. Make sure each piece is covered in the marinade. For the best flavor, let it sit for at least 30 minutes. If you have more time, refrigerate it overnight. Now, let’s cook the chicken. You can grill it or pan-sear it. Preheat your grill pan or skillet over medium-high heat. When it’s hot, place the marinated chicken thighs in the pan. Cook each side for about 6-7 minutes. You want the chicken fully cooked with a nice char. After cooking, take the chicken off the heat. Let it rest for a few minutes before slicing it into bite-sized pieces. This helps keep it juicy. It’s time to build your bowls. Start with a base of quinoa or couscous in a large serving bowl. Next, add a layer of mixed greens or baby spinach. After that, pile on the diced cucumber, halved cherry tomatoes, and sliced red onion. This makes for a colorful and fresh salad. Now, carefully arrange the sliced chicken on top. For a lovely finish, mix Greek yogurt, tahini, and lemon juice in a small bowl. Drizzle this over the chicken and salad. Finally, sprinkle chopped fresh parsley on top. This adds color and boosts the flavor. For a great presentation, serve the bowls with extra lemon wedges on the side. A colorful bowl can also make the dish pop! For the full recipe, check out the main article. To get the best flavor from your chicken shawarma, marinate the chicken well. I recommend using the marinade for at least 30 minutes. If you have time, let it sit overnight. This gives the spices time to work their magic. Use a mix of cumin, paprika, turmeric, and cinnamon for depth. The cayenne pepper adds a kick, so adjust it to your taste. When cooking, keep the chicken juicy. I suggest using a grill pan or skillet. Preheat it over medium-high heat. Cook each side for 6-7 minutes. Check that the chicken is fully cooked. It should be charred and have nice grill marks. Let the chicken rest before slicing. This helps keep it moist and flavorful. If you want to switch up the dressing, try alternatives to Greek yogurt and tahini. You can use sour cream or hummus for a creamy base. For a lighter option, mix plain yogurt with lemon juice. This will brighten the flavors. Feel free to adjust the spices in the dressing too. Adding a pinch of smoked paprika or a dash of garlic powder can enhance the taste. Experiment with different herbs like dill or mint for unique flavors. Pair your chicken shawarma bowls with refreshing drinks. I recommend serving it with a cool lemonade or mint tea. These drinks balance the spices well. For side dishes, consider serving warm pita bread or a light salad. A simple cucumber and tomato salad can add freshness. You can also add roasted vegetables for a hearty touch. Enjoy your colorful and tasty meal! {{image_4}} If you want a vegetarian or vegan twist, you can easily swap out the chicken. Here are some great substitutes: - Chickpeas: Use canned or cooked chickpeas. They add protein and texture. - Tofu: Firm tofu works well. Marinate it just like the chicken. - Seitan: This wheat-based protein is chewy and absorbs flavors nicely. For toppings, consider: - Roasted vegetables: Try zucchini, bell peppers, or eggplant. - Avocado: Creamy avocado adds richness. - Feta cheese: If you're not vegan, crumbled feta adds a nice tang. You can change the flavors of your chicken shawarma bowls by using different spices and herbs. Here are some ideas: - Coriander: Adds a fresh, citrusy taste. - Allspice: Gives a warm, aromatic flavor. - Mint: Fresh mint can brighten up the dish. You can also explore regional variations. For example, if you want a Mediterranean twist, add: - Olives: They bring a salty punch. - Pine nuts: These add crunch and a nutty flavor. Feel free to mix and match flavors. Your chicken shawarma bowls can be as unique as your taste! For the full recipe, check out the [Full Recipe]. To keep your chicken shawarma bowls fresh, you need proper storage. First, let the bowls cool down to room temperature. Next, place the leftovers in airtight containers. This helps keep moisture in and air out. You can store them in the fridge for up to three days. If you notice any off smells or changes in color, it’s best to toss them. Freezing is a great way to save your chicken shawarma bowls for later. To freeze, separate the chicken from the other ingredients. This prevents sogginess when thawing. Wrap the chicken tightly in plastic wrap and place it in a freezer bag. For the veggies and grains, use freezer-safe containers. You can freeze these for up to three months. When you're ready to eat, thaw the chicken in the fridge overnight. Reheat it on the stove or in the microwave. Then, enjoy a tasty meal that feels fresh! If you need the full recipe again, just check back. The best way to marinate chicken is to coat it evenly in the marinade. Use a bowl for mixing. My favorite marinade combines olive oil, garlic, and spices. For chicken shawarma, let it sit for at least 30 minutes. If you have time, refrigerate it overnight. This lets the flavors soak in deeply. Yes, you can make chicken shawarma bowls ahead of time. Prepare the chicken and marinate it in advance. You can also cook the chicken and store it in the fridge. Keep the toppings separate until you are ready to serve. This keeps everything fresh and tasty. You can assemble the bowls quickly when it's time to eat. To make the recipe spicier, add more cayenne pepper or chili powder. You can also use fresh chili peppers for a kick. If you prefer a milder flavor, reduce the cayenne or skip it altogether. You can add more yogurt or tahini to balance the heat. Adjust the spices to fit your taste! You’ve learned how to make delicious chicken shawarma bowls that please everyone. We covered the essential ingredients, from chicken thighs to tasty toppings. I shared tips for marinating and cooking the chicken to keep it juicy. Don’t forget the fun variations and meal prep ideas! Experimenting with flavors makes this dish even better. Enjoy your cooking journey, and explore new ways to make it your own!](https://joymealplan.com/wp-content/uploads/2025/07/e03f62b6-42d7-4413-8d7f-397ee404e053-768x768.webp)


![- Feta cheese - Cherry tomatoes - Olive oil - Garlic - Dried oregano - Red pepper flakes - Salt and pepper - Pasta options (penne or fusilli) - Fresh basil leaves - Optional garnishes (lemon zest) For this dish, you need fresh and high-quality ingredients. The feta cheese brings creaminess, while the cherry tomatoes add sweetness. Olive oil enhances the flavor and helps with cooking. Garlic gives a lovely aroma and taste. Dried oregano adds a hint of earthiness, and red pepper flakes can bring a nice kick. Salt and pepper are essential for seasoning. You can pick either penne or fusilli pasta for this recipe. Both hold the creamy sauce well. Fresh basil leaves add brightness and color to your dish. If you want a zesty touch, lemon zest is a perfect addition. When you gather these ingredients, you set the stage for a simple yet delightful meal. Each component plays a role in making your baked feta pasta a creamy delight. Be sure to look at the full recipe for all the details! First, set your oven temperature to 400°F (200°C). This temperature works well for baking the feta and tomatoes. Next, choose a baking dish that fits all your ingredients. A medium-sized dish works best, allowing enough space for everything. Now it’s time to create your dish. Place the block of feta cheese in the center of the baking dish. Surround it with the halved cherry tomatoes. This colorful mix makes the dish look inviting. Drizzle olive oil over the feta and tomatoes. Then, add minced garlic, dried oregano, red pepper flakes, salt, and pepper. This step adds a burst of flavor to the dish. Place the dish in your preheated oven. Bake for about 30 minutes. Look for the tomatoes to blister and the feta to soften. When it’s ready, the feta should turn a lovely golden color. While that bakes, boil salted water in a pot for the pasta. Cook the pasta according to the package instructions until it is al dente. After cooking, drain the pasta and set it aside. After 30 minutes, carefully take the baking dish out of the oven. Use a fork to mash the softened feta and blistered tomatoes. This creates a creamy sauce. Now, gently fold the cooked pasta into your baking dish. Toss everything together to coat the pasta well. Finally, taste your dish and adjust the seasoning. You can add more salt, pepper, or red pepper flakes for extra flavor. Serve the dish right away, garnished with fresh basil leaves. If you like, add a sprinkle of grated lemon zest for a refreshing twist. Enjoy your simple and creamy delight! For more details, check the Full Recipe. To get the best baked feta pasta, know your oven. Every oven heats a little differently. If yours runs hot, lower the temp by 25°F. Check on the dish after 25 minutes. Look for blistered tomatoes and soft feta. If the feta is golden and creamy, it’s ready! Cook your pasta to al dente. This means it should still have a slight bite. Follow the package directions, but check it a minute early. Save some starchy pasta water when draining. This water helps the sauce stick to the pasta. Want to boost flavor? Try adding a pinch of lemon zest or a dash of balsamic vinegar. Fresh herbs like parsley or thyme can brighten the dish too. If you like heat, toss in more red pepper flakes. You can mix and match spices to fit your taste! {{image_4}} You can easily make Baked Feta Pasta gluten-free. Just use gluten-free pasta instead of regular pasta. Many brands offer tasty options that work well. If you want a vegan version, substitute feta cheese with a plant-based alternative. Look for brands that make creamy vegan feta. These options still give that tangy flavor you love. To add some color and nutrition, toss in vegetables. Spinach wilts nicely and adds a fresh taste. Zucchini can also work well; just chop it into small pieces. For protein, you can add cooked chicken or shrimp. Both will make your dish more filling. Cook the protein separately, then mix it in right before serving. While penne and fusilli are great, you can use other pasta types too. Bowtie or rotini can hold the creamy sauce well. For a lighter option, serve the dish over zoodles or spiralized veggies. You’ll get a fresh twist while keeping it healthy. For the full recipe, check out [Full Recipe]. After you enjoy your baked feta pasta, store any leftovers in the fridge. Use a tight container to keep it fresh. Make sure to cool it down before sealing. It will stay good for about three to four days. This dish tastes great the next day, too. You can reheat your pasta in two ways: the microwave or the oven. If you use the microwave, heat in short bursts. Stir it after each burst to keep it creamy. For the oven, preheat to 350°F (175°C). Place the pasta in an oven-safe dish, cover it, and heat for about 15 minutes. This way, you maintain the texture of the sauce. Yes, you can freeze this dish, but it’s best to freeze it before baking. Place the unbaked dish in a freezer-safe container. It will last around two to three months. When ready to eat, thaw it overnight in the fridge and bake as normal. If you freeze it after baking, the texture might change, but it’s still tasty. Just be careful when reheating to avoid drying it out. Baked Feta Pasta started in Finland. It became popular on social media in 2020. The dish caught on for its simple steps and great taste. People enjoyed the creaminess of feta mixed with tomatoes. It became a fun way to cook pasta. Now, it's a favorite in many homes worldwide. Yes, you can prep Baked Feta Pasta ahead of time. You can bake the feta and tomatoes the night before. Store them in the fridge after cooling. When ready to eat, cook the pasta and mix it in. Just be sure to adjust the baking time as needed. Baked Feta Pasta has some healthy aspects. Feta cheese offers protein and calcium. Tomatoes provide vitamins and antioxidants. However, it also has olive oil and pasta, which add calories. Balance is key. You can add veggies for extra nutrients. This dish pairs well with many sides. A fresh salad with greens is great. Garlic bread adds a nice crunch. You can also serve it with roasted vegetables. For a light option, try steamed broccoli or green beans. To add heat, use more red pepper flakes. You can also try adding sliced jalapeños. For a smoky flavor, mix in some smoked paprika. Taste as you go, so it's just right for your spice level. In this blog post, we explored how to create baked feta pasta. We covered the ingredients, step-by-step instructions, and tips for the perfect dish. Remember to select fresh ingredients for the best flavor. You can personalize the recipe with your choice of pasta and optional add-ins. This dish is simple, satisfying, and perfect for any meal. Enjoy experimenting with flavors and variations to make it your own. With these steps, you'll serve a delightful meal that family and friends will love.](https://joymealplan.com/wp-content/uploads/2025/07/e04698b2-b085-49cc-98ed-107e8e7c4045-768x768.webp)