
Are you ready to elevate your snack game? Today, I’m sharing my Crispy Bang Bang Salmon Bites recipe that delivers bold flavor in every bite. These bites are crunchy on the outside, tender on the inside, and paired with a mouthwatering Bang Bang sauce. Perfect for parties or quick dinners, you’ll love how simple they are to make. Let’s dive into the ingredients and get cooking!
Why I Love This Recipe
- Deliciously Crispy: The panko breadcrumbs create a perfect crunchy exterior that contrasts beautifully with the tender salmon inside.
- Flavor Packed: The combination of garlic powder, smoked paprika, and the zesty Bang Bang sauce elevates these bites to a whole new level.
- Quick and Easy: This recipe comes together in just 30 minutes, making it a great option for a weeknight dinner or a last-minute party snack.
- Customizable Heat: Adjust the sriracha in the Bang Bang sauce to suit your taste, ensuring everyone can enjoy these bites at their preferred spice level.
Ingredients
Main Ingredients for Crispy Bang Bang Salmon Bites
To make these delicious bites, gather the following main ingredients:
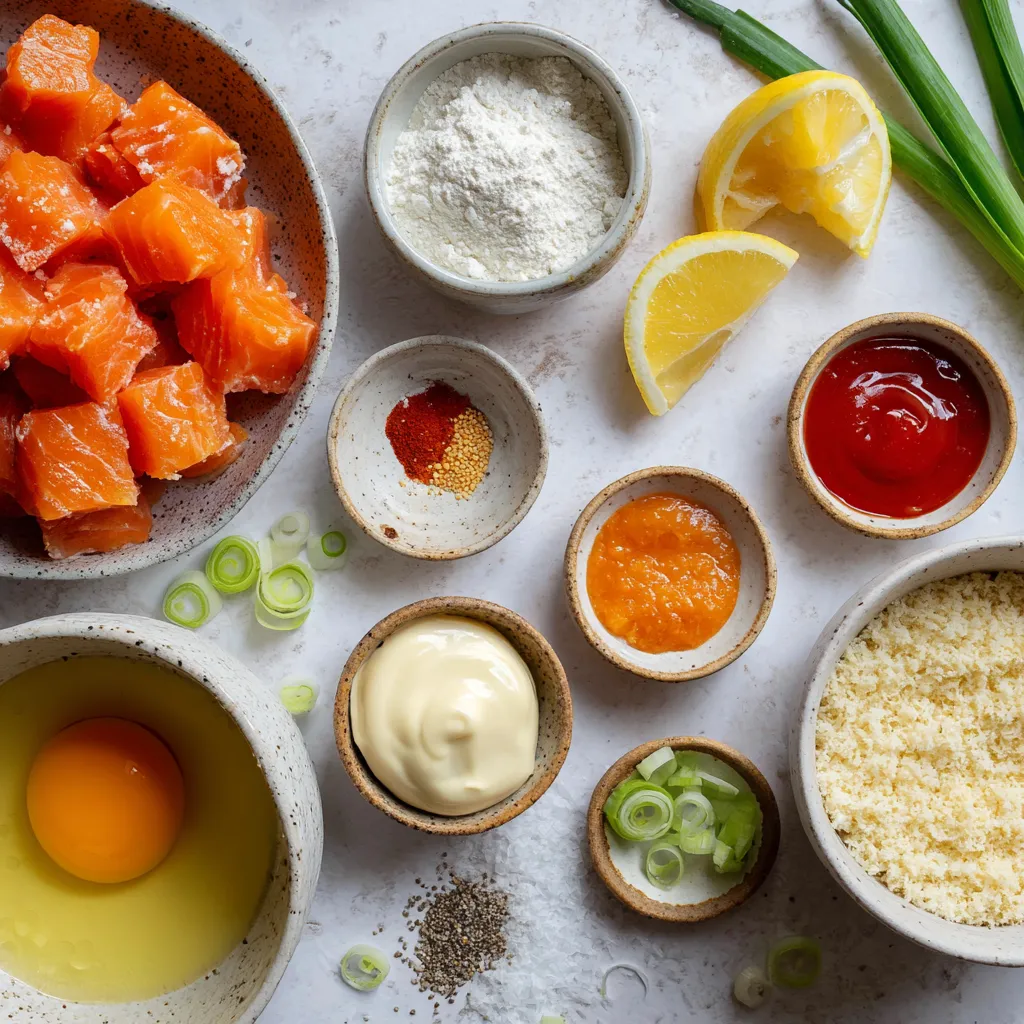
– 1 pound skinless, boneless salmon fillet, cut into bite-sized cubes
– 1/2 cup all-purpose flour
– 1 teaspoon garlic powder
– 1 teaspoon smoked paprika
– 1/2 teaspoon sea salt
– 1/4 teaspoon freshly ground black pepper
– 1 large egg, beaten until smooth
– 1 cup panko breadcrumbs
These ingredients come together to create a crispy coating that perfectly complements the salmon.
Ingredients for Bang Bang Sauce
Now, let’s whip up that delightful Bang Bang sauce. You will need:
– 1/2 cup mayonnaise
– 2 tablespoons sweet chili sauce
– 1 tablespoon sriracha (adjust based on your heat preference)
– 1 tablespoon fresh lemon juice
This sauce brings a creamy, spicy kick that makes every bite special.
Essential Equipment Needed for Preparation
You will need a few tools to make this recipe easy and fun:
– A shallow dish for mixing the breading
– Two bowls for the egg and panko
– A large, heavy skillet for frying
– A slotted spoon for removing the salmon bites
– Paper towels for draining excess oil
Having the right equipment helps make cooking smoother and more enjoyable.
Step-by-Step Instructions
Preparing the Breading Mixture
Start by gathering your ingredients. You will need:
– 1/2 cup all-purpose flour
– 1 teaspoon garlic powder
– 1 teaspoon smoked paprika
– 1/2 teaspoon sea salt
– 1/4 teaspoon freshly ground black pepper
In a shallow dish, whisk together the flour, garlic powder, smoked paprika, sea salt, and black pepper. Mix until everything is well combined. This mixture gives a great flavor base to the salmon bites.
Next, in another bowl, beat one large egg until smooth. In a third bowl, pour in 1 cup of panko breadcrumbs. The panko will create that crispy texture we love.
How to Properly Bread the Salmon
Now it’s time to bread the salmon. Take one piece of salmon and dredge it in the flour mixture. Make sure it is fully coated. Shake off any extra flour; we want a nice thin layer.
Next, dip the floured salmon cube into the beaten egg. Let any excess egg drip off. Finally, coat the salmon in the panko breadcrumbs. Press gently so they stick well. Repeat this process until all your salmon cubes are breaded.
Frying the Salmon Bites to Perfection
Heat about 1/2 inch of oil in a large, heavy skillet over medium-high heat. Wait until it shimmers but does not smoke. Carefully add the breaded salmon bites in small batches. Make sure they have space; this helps them fry evenly.
Cook the salmon bites for about 3-4 minutes on each side. Look for a golden brown color and that crispy texture. Once cooked, remove them and place on a plate lined with paper towels. This helps absorb any extra oil.
Now, your crispy Bang Bang salmon bites are ready for the next delicious step!
Tips & Tricks
Achieving Maximum Crispiness
To get your salmon bites super crispy, start with dry salmon. Pat the cubes with paper towels. This removes moisture, which helps the coating stick better. Use panko breadcrumbs for a light and crunchy texture. They fry up beautifully and give a nice crunch. When frying, let the oil get hot, but not smoking. This keeps the bites from soaking up too much oil. Fry in small batches to ensure even cooking and crispiness.
Best Oils for Frying Salmon Bites
Choose oils with a high smoke point for frying. Good options include vegetable oil, canola oil, or peanut oil. These oils can handle high heat without breaking down. Avoid olive oil as it burns quickly and alters the taste. Heating oil to the right temperature is key. You want it hot enough to sizzle when salmon touches it.
Common Mistakes to Avoid
One common mistake is overcrowding the pan. This traps steam and makes the bites soggy. Fry only a few at a time. Another mistake is not heating the oil enough. If it’s too cold, the batter won’t crisp up. Finally, don’t skip the seasoning in the flour mix. It adds flavor to each bite.
Pro Tips
- Fresh Salmon is Key: Always use the freshest salmon you can find for the best flavor and texture. Look for bright pink flesh and a fresh ocean scent.
- Perfectly Panko: For extra crunch, consider toasting the panko breadcrumbs in a dry skillet for a few minutes before using them to coat the salmon.
- Oil Temperature Matters: Ensure your oil is hot enough before adding the salmon bites. If the oil isn’t hot, the bites will absorb too much oil and become greasy.
- Customize the Sauce: Feel free to adjust the sweetness and spice of the Bang Bang sauce to your taste. Add more sriracha for heat or a bit of honey for sweetness!
Variations
Alternative Sauces for Dipping
You can change up the Bang Bang sauce to fit your taste. Try mixing yogurt with a bit of lemon juice and garlic for a creamy dip. You can also use a spicy mayo by blending mayonnaise with more sriracha. Another option is a sweet and tangy teriyaki sauce. Each sauce will give your salmon bites a new twist.
Substituting Salmon for Other Proteins
If you want to switch things up, use chicken or shrimp. For chicken, cut it into bite-sized pieces like salmon. The cooking time is similar, about 4-5 minutes per side. Shrimp cooks faster. Just fry them for 2-3 minutes until they turn pink. Both options keep the crispy texture and flavor.
Healthy Cooking Methods: Baking vs. Frying
Baking is a great way to make these bites healthier. Preheat the oven to 400°F. After breading, place the salmon bites on a baking sheet lined with parchment paper. Spray them lightly with oil and bake for 12-15 minutes. They will be less oily but still tasty. Frying gives a crunchier bite, but baking is lighter. Choose what fits your meal best!
Storage Info
How to Store Leftover Salmon Bites
After enjoying your crispy salmon bites, you may have some leftovers. To store them properly, let them cool completely first. Place the salmon bites in an airtight container. Make sure the container is sealed well to keep out air. You can store them in the fridge for up to three days. This way, you can enjoy them later without losing their taste.
Reheating Tips to Maintain Crispiness
To reheat the salmon bites and keep them crispy, avoid the microwave. Instead, preheat your oven to 350°F (175°C). Spread the salmon bites on a baking sheet lined with parchment paper. Heat them for about 10-15 minutes. This method helps regain the crunchiness. You can also use an air fryer for about 5-7 minutes. Both options work well to keep that perfect crisp.
Freezing Instructions for Meal Prep
If you want to prepare these bites ahead of time, freezing is a great option. First, let the cooked salmon bites cool completely. Then, place them in a single layer on a baking sheet. Freeze them for about an hour. After they are firm, transfer them to a freezer-safe bag. Remove as much air as possible before sealing. You can store them in the freezer for up to two months. When ready to eat, follow the reheating tips above for best results.
FAQs
What is Bang Bang Sauce?
Bang Bang sauce is a creamy and spicy dip. It combines mayonnaise, sweet chili sauce, and sriracha. The name comes from the bold flavors that “bang” on your taste buds. You can adjust the spice by adding more sriracha. This sauce works great with many dishes, not just salmon.
Can I make these salmon bites ahead of time?
Yes, you can prepare these salmon bites ahead of time. Bread the salmon and store them in the fridge. You can fry them just before serving. This keeps them crispy and fresh. If you want to make the sauce ahead, mix it and store it in the fridge as well.
How spicy is Bang Bang Sauce?
The spice level of Bang Bang sauce can vary. If you like heat, add more sriracha. For a milder taste, use less. Most people find it has a nice kick without being overwhelming. Adjust it to fit your taste buds and enjoy.
What to serve with Crispy Bang Bang Salmon Bites?
Crispy Bang Bang Salmon Bites pair well with many sides. Here are some tasty options:
– Steamed rice
– Fresh salad
– Coleslaw
– Vegetable sticks
– Lime wedges
These sides add color and flavor to your meal, making it even better!
In this post, we explored crispy Bang Bang salmon bites. We covered key ingredients, from the fish to the sauce, and shared essential tools for cooking. You learned step-by-step how to prepare, bread, and fry the bites. We provided tips for crispy texture and avoided common mistakes. Plus, you discovered variations, storage methods, and answered your burning questions.
Now, you can enjoy these tasty salmon bites anytime. Happy cookin