Are you ready to dive into a world of flavor? This Crispy Coconut Chicken Strips recipe is your ticket to a crunchy and delightful meal that your whole family will love. With simple ingredients like chicken, coconut, and panko, you can whip up this dish in no time. Let me show you how to make these golden treats and a zesty dipping sauce that perfectly complements them!
Why I Love This Recipe
- Unique Flavor Combination: The sweet coconut perfectly complements the savory chicken, making each bite a delightful experience.
- Crispy Texture: The panko breadcrumbs and shredded coconut create an irresistible crunch that enhances the overall enjoyment of the dish.
- Quick and Easy: This recipe can be prepared in just 30 minutes, making it a great option for busy weeknights or last-minute gatherings.
- Versatile Dipping Sauce: The honey-lime sauce adds a refreshing tang that pairs well with the chicken, offering a perfect balance of flavors.
Ingredients
Main Ingredients
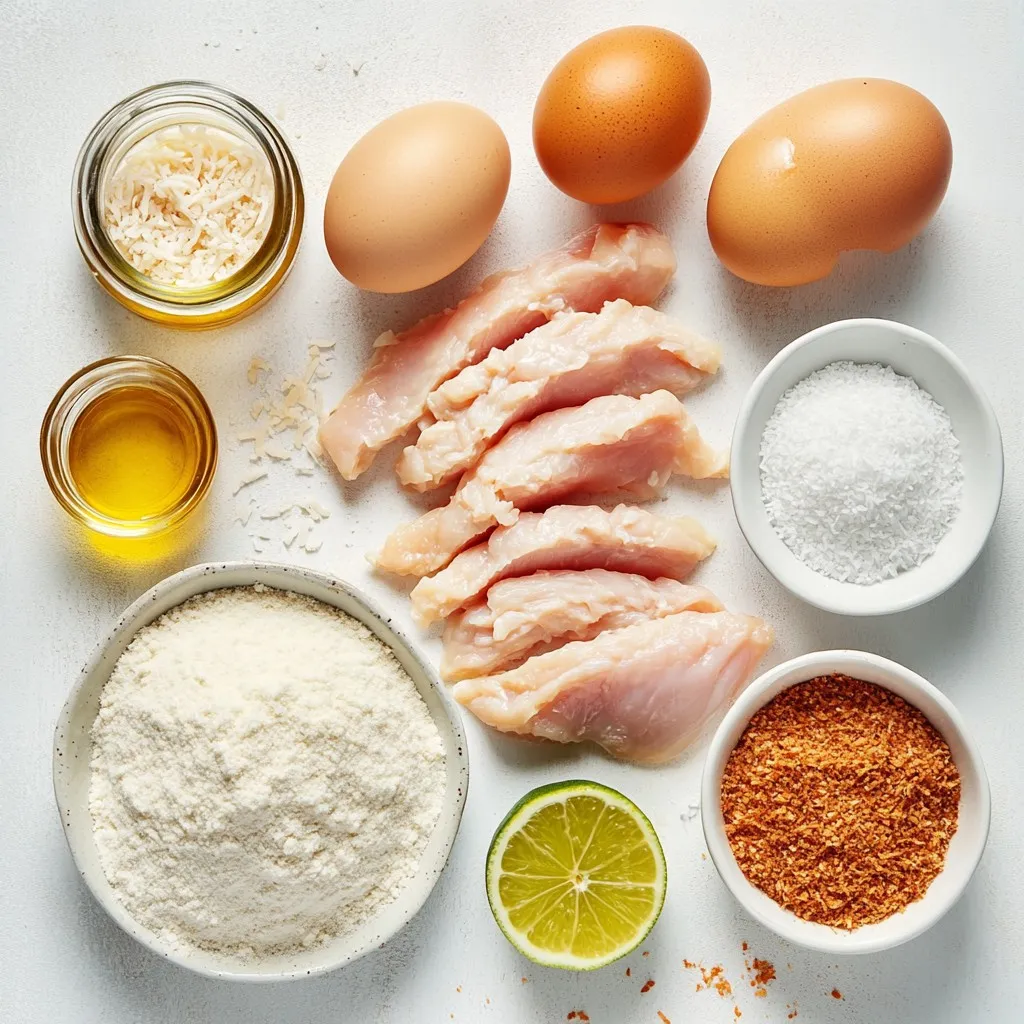
– 1 lb chicken breast, cut into 1-inch strips
– Cooking oil for frying
Coating Components
– 1 cup all-purpose flour
– 2 large eggs
– 1 cup shredded coconut (you can choose sweetened or unsweetened)
– 1 cup panko breadcrumbs
Seasonings
– 1 teaspoon garlic powder
– 1 teaspoon smoked paprika
– Salt and freshly ground black pepper to taste
Dipping Sauce Ingredients
– 1 tablespoon honey
– 1 tablespoon fresh lime juice
Gathering ingredients is the first fun step. You need chicken breast for the main part. Cut it into 1-inch strips. They should be bite-sized and easy to handle. Next, we need cooking oil for frying. This will give our chicken a nice crunch.
For the coating, we have some simple items. All-purpose flour helps the other layers stick. You also need two large eggs for an egg wash. The eggs bind the coating to the chicken. Then, grab shredded coconut. You can pick sweetened coconut for a sweeter taste or unsweetened for a more natural flavor. Lastly, add one cup of panko breadcrumbs to give that extra crunch.
For seasoning, we use garlic powder and smoked paprika. These add depth and warmth. Don’t forget salt and black pepper to taste. They help balance the flavors.
Finally, let’s not skip the dipping sauce! Mix one tablespoon of honey with one tablespoon of fresh lime juice. This sauce will enhance the flavors of the chicken. It’s sweet and tangy, perfect for dipping.
Now you have everything you need for crispy coconut chicken strips! Get ready to cook!
Step-by-Step Instructions
Preparation Steps
1. Prepare the flour mixture: In a shallow bowl, mix 1 cup of all-purpose flour, 1 teaspoon garlic powder, 1 teaspoon smoked paprika, salt, and pepper. This mix adds flavor to the chicken.
2. Prepare the egg wash: In another bowl, crack 2 large eggs. Whisk them until the yolks and whites blend well. This will help the coating stick to the chicken.
3. Prepare the coconut-panko coating: In a third bowl, combine 1 cup of shredded coconut and 1 cup of panko breadcrumbs. This mix gives the chicken its lovely crunch.
Coating the Chicken Strips
1. Coat the chicken in the flour mixture: Take each chicken strip and dip it into the flour mix. Make sure it gets a good coating. Shake off any extra flour.
2. Dip in the egg wash: Next, take the floured chicken strip and dip it into the egg wash. Allow any extra egg to drip off.
3. Final coating in coconut-panko mixture: Coat the chicken strip in the coconut-panko mix. Press lightly to help it stick. Repeat for all the chicken strips.
Cooking the Chicken Strips
1. Heat the oil: In a large skillet, heat about 1 inch of cooking oil over medium-high heat. You can test if it’s hot by dropping a bit of the coating in. If it sizzles, it’s ready.
2. Fry the chicken strips: Carefully place the coated chicken strips in the hot oil. Fry each side for about 3-4 minutes. They should be golden brown and reach an internal temp of 165°F (74°C).
3. Drain and remove excess oil: Once cooked, move the chicken strips to a plate lined with paper towels. This helps soak up any extra oil.
Make the Dipping Sauce
1. Combine honey and lime juice: In a small bowl, mix 1 tablespoon of honey with 1 tablespoon of fresh lime juice. Stir until well combined. Adjust the sweetness if needed.
Serving Suggestions
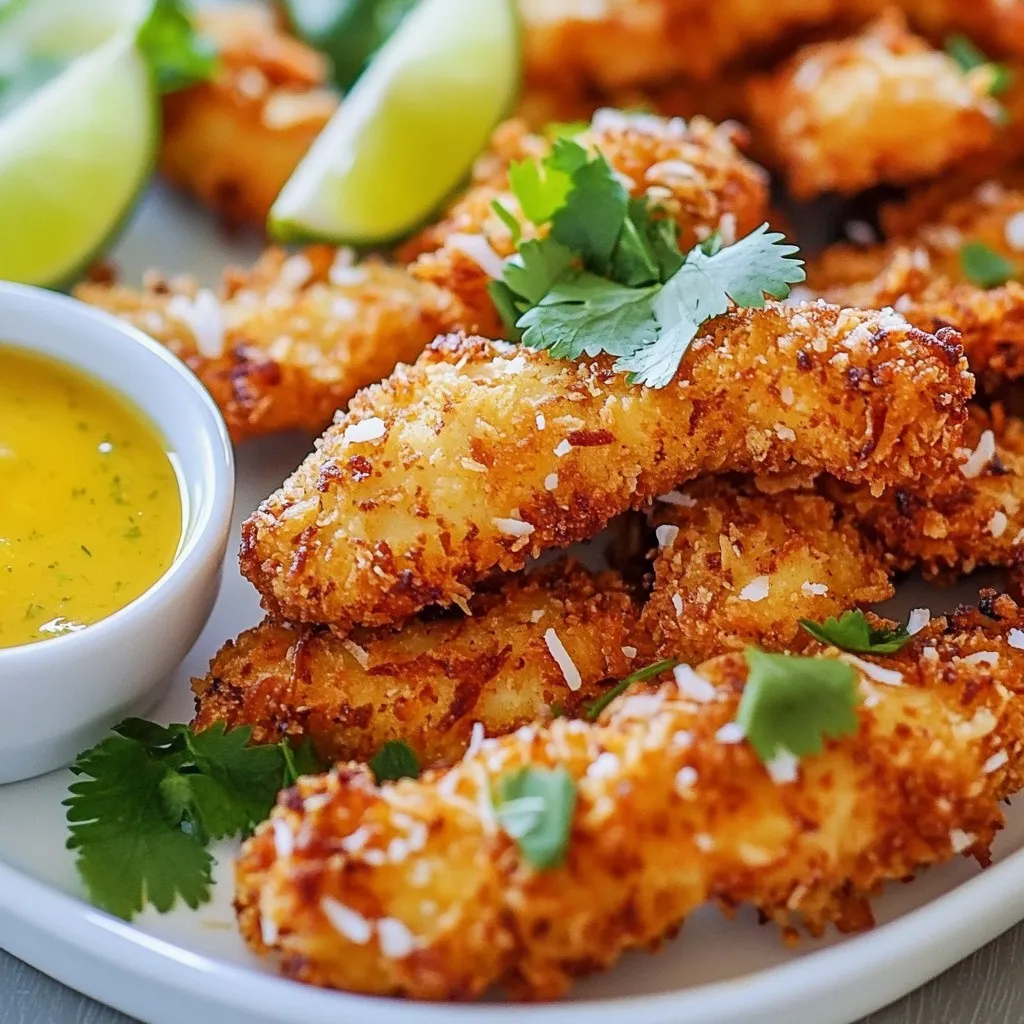
1. Presentation tips: Serve the crispy coconut chicken strips on a colorful platter.
2. Additional garnishes: Add fresh lime wedges and a small bowl of dipping sauce. For a touch of green, include some sprigs of fresh cilantro. Enjoy your tasty dish!
Tips & Tricks
Cooking Tips
– Best oil for frying: Use vegetable or coconut oil. These oils have high smoke points and add great flavor.
– Ensuring proper coating adhesion: Make sure to shake off excess flour and egg. This helps the coconut-panko mix stick better.
Flavor Enhancements
– Adding spices to the flour mixture: Try adding cayenne for heat or dried herbs for extra flavor. Experiment with what you like!
– Using different types of coconut: Sweetened coconut gives a nice touch of sweetness. Unsweetened coconut is a great choice for a more natural taste.
Serving Recommendations
– Pairing with sides or salads: Serve with a fresh salad or crispy fries. Coleslaw also adds a nice crunch and pairs well.
– Suggestions for additional dipping sauces: Try sweet chili sauce or a tangy barbecue sauce. They both complement the chicken strips perfectly.
Pro Tips
- Choose Your Coconut Wisely: Selecting between sweetened and unsweetened coconut can significantly affect the flavor profile. Sweetened coconut will add a delightful sweetness, while unsweetened provides a more natural taste.
- Maintain Oil Temperature: To achieve that perfect crispy texture, ensure the oil is hot enough before adding the chicken. If the oil is too cool, the strips will absorb more oil and become soggy.
- Batch Frying: Fry the chicken strips in batches to avoid overcrowding the pan. This helps maintain the oil temperature and ensures each strip gets that beautiful golden brown color.
- Experiment with Dipping Sauces: While the honey-lime sauce is delicious, feel free to experiment with other dips like sweet chili sauce or a spicy aioli for a unique flavor twist!
Variations
Ingredient Alternatives
You can switch the chicken for shrimp or tofu. Both options work well with the coating. Shrimp cooks fast and adds a sweet flavor. Tofu gives a nice texture and absorbs spices well. For breading, try crushed cornflakes or almond flour. These create a unique crunch while keeping it gluten-free.
Flavor Variations
Change the dipping sauce to suit your taste. Try sweet chili sauce or a tangy mango salsa. Both add a fun twist to the dish. You can also mix in herbs or spices. Adding fresh cilantro or basil can brighten the flavor. A sprinkle of cayenne pepper adds heat for those who love spice.
Cooking Methods
If you want a healthier option, bake the chicken strips instead. Preheat your oven to 400°F (200°C). Place the coated strips on a baking sheet lined with parchment. Bake for about 20-25 minutes, flipping halfway through. For a quick option, use an air fryer. Set it to 375°F (190°C) and cook for 10-12 minutes. This gives a crispy result with less oil.
Storage Info
Storing Leftovers
To keep your crispy coconut chicken strips fresh, follow these steps:
– Let them cool: First, allow the chicken strips to cool completely. This helps avoid moisture buildup.
– Use airtight containers: Store them in a sealed container. Glass or plastic containers work well.
– Separate layers: Place parchment paper between layers if stacking. This helps keep them from sticking.
Reheating Tips
When you want to enjoy leftovers, reheating is key.
– Use the oven: Preheat your oven to 375°F (190°C). Place the chicken strips on a baking sheet. Bake for about 10-15 minutes. This keeps them crispy.
– Avoid the microwave: Microwaving can make them soggy. If you must, use a low power setting for a short time.
Freezing Options
Freezing is a great way to save extra strips for later.
– Freeze properly: Lay the chicken strips on a baking sheet and freeze them until solid. This prevents them from sticking together. After that, transfer them to a freezer-safe bag or container.
– Thawing instructions: When ready to eat, thaw them in the fridge overnight. Reheat them in the oven for best results.
FAQs
What is the best way to keep coconut chicken strips crispy?
To keep your coconut chicken strips crispy, serve them right after frying. Place them on a wire rack instead of a plate. This allows air to circulate around the strips and keeps them from getting soggy. If you must hold them, keep them in a warm oven set to low heat. Avoid stacking them, as this traps moisture.
Can I make these chicken strips ahead of time?
Yes, you can prepare the chicken strips ahead of time. Coat the chicken and place it on a baking sheet. Cover it and refrigerate for up to 24 hours. When you’re ready to cook, just fry them straight from the fridge. This keeps the strips fresh and tasty.
What dipping sauces pair well with coconut chicken strips?
Coconut chicken strips taste great with several sauces. A honey-lime sauce is a perfect match. You can also try sweet chili sauce or a tangy barbecue sauce. For a creamy option, a ranch dip works well too. Feel free to experiment and find your favorite!
How do I know when the chicken is fully cooked?
To check if the chicken is fully cooked, use a meat thermometer. The internal temperature should reach 165°F (74°C). You can also cut into a piece. The meat should be white with no pink inside. Juices should run clear, which means it’s done.
Can these strips be baked instead of fried?
Yes, you can bake the chicken strips for a healthier option. Preheat your oven to 400°F (200°C). Place the coated strips on a baking sheet lined with parchment paper. Spray them lightly with cooking oil. Bake for about 20-25 minutes, flipping halfway through, until golden brown.
In this post, we explored making delicious coconut chicken strips. You learned about the main ingredients and steps, from coating to cooking. Each stage helps create a tasty dish. Consider trying different flavors and cooking methods, like baking or air frying. Store leftovers well to enjoy later. This dish is simple and fun to make, and you can customize it to fit your taste. Now, gather your ingredients and start cooking! You’ll impress friends and family with your new skil


