Crispy Parmesan Crusted Chicken Easy and Flavorful Dish

Are you ready to impress your family with a delicious meal? This Crispy Parmesan Crusted Chicken is easy to make and packed with flavor. With just a few simple ingredients, you can create a dish that’s crispy on the outside and juicy on the inside. Whether you’re a busy parent or a cooking novice, this recipe is sure to become a family favorite. Let’s dive into the details and get cooking!
Ingredients
When you want to make Crispy Parmesan Crusted Chicken, you’ll need a few key ingredients. Each one plays a big role in making the dish tasty and crunchy. Here’s what you need:
– 4 boneless, skinless chicken breasts
– 1 cup freshly grated Parmesan cheese
– 1 cup panko breadcrumbs
– 2 teaspoons garlic powder
– 1 teaspoon Italian seasoning
– 1 teaspoon smoked paprika
– Salt and freshly ground black pepper to taste
– 2 large eggs
– 1 tablespoon extra virgin olive oil
– Fresh parsley for garnish
These ingredients come together to create a dish that is not only crispy but also packed with flavor. The Parmesan cheese adds a rich, savory taste, while the panko breadcrumbs give that perfect crunch. Garlic powder, Italian seasoning, and smoked paprika bring warmth and depth to each bite.
Don’t forget the eggs! They help the coating stick to the chicken, ensuring that every piece has that delicious crust. Using fresh parsley at the end adds a pop of color and freshness.
Step-by-Step Instructions
Preparing the Chicken
– Preheat the oven to 400°F (200°C).
– Line the baking sheet with parchment paper.
Start by heating your oven. The right heat makes a big difference. Lining your baking sheet helps prevent sticking. This way, your chicken comes out clean and easy to serve.
Preparing the Coating
– Combine Parmesan, panko, spices, and seasoning.
– Whisk eggs in a separate bowl.
In a bowl, mix together the grated Parmesan, panko breadcrumbs, garlic powder, Italian seasoning, smoked paprika, salt, and pepper. This mix is what gives the chicken its crispy, tasty crust. In another bowl, whisk the eggs. The eggs will help the coating stick to the chicken.
Coating the Chicken
– Pat chicken dry and dip in eggs.
– Dredge in breadcrumb mixture, pressing gently.
– Arrange on the baking sheet and drizzle with olive oil.
Take your chicken breasts and pat them dry. This step is key for a crispy finish. First, dip each piece in the eggs, then coat it in the breadcrumb mix. Press gently to make sure it sticks well. After coating, place the chicken on the baking sheet. Drizzle a little olive oil over the top to boost the crispiness.
Baking the Chicken
– Bake in the oven for 25-30 minutes.
– Ensure the chicken reaches an internal temperature of 165°F (75°C).
Put your chicken in the oven and bake it for 25 to 30 minutes. The chicken should turn golden brown. Use a meat thermometer to check if it reaches 165°F (75°C). This ensures it is safe to eat and stays juicy.
Final Touches
– Let rest for 5 minutes before slicing.
– Garnish with parsley before serving.
Once done, take the chicken out and let it rest for about 5 minutes. This helps keep the juices inside. Just before serving, sprinkle fresh parsley on top for color and flavor. Enjoy your crispy masterpiece!
Tips & Tricks
Cooking Time Adjustments
Cooking time for chicken can vary based on several factors. The thickness of your chicken breasts is key. Thicker pieces take longer to cook through. Likewise, your oven’s actual temperature can differ from what it shows. Always use a meat thermometer to check for doneness. Chicken should reach an internal temperature of 165°F.
To avoid undercooked chicken, start with an even thickness. You can pound the chicken breasts gently to flatten them. This ensures they cook evenly. If you worry about overcooking, check the chicken a few minutes early. It’s better to check often than to serve dry meat.
Achieving the Perfect Crispiness
For an extra crunch, you can use different oils or fats. Try using melted butter or vegetable oil for frying. These add flavor and help the crust become crispier.
To enhance the crunch factor, consider adding crushed cornflakes to your breadcrumb mix. This gives a fun texture. Also, make sure to press the coating firmly onto the chicken.
Presentation Ideas
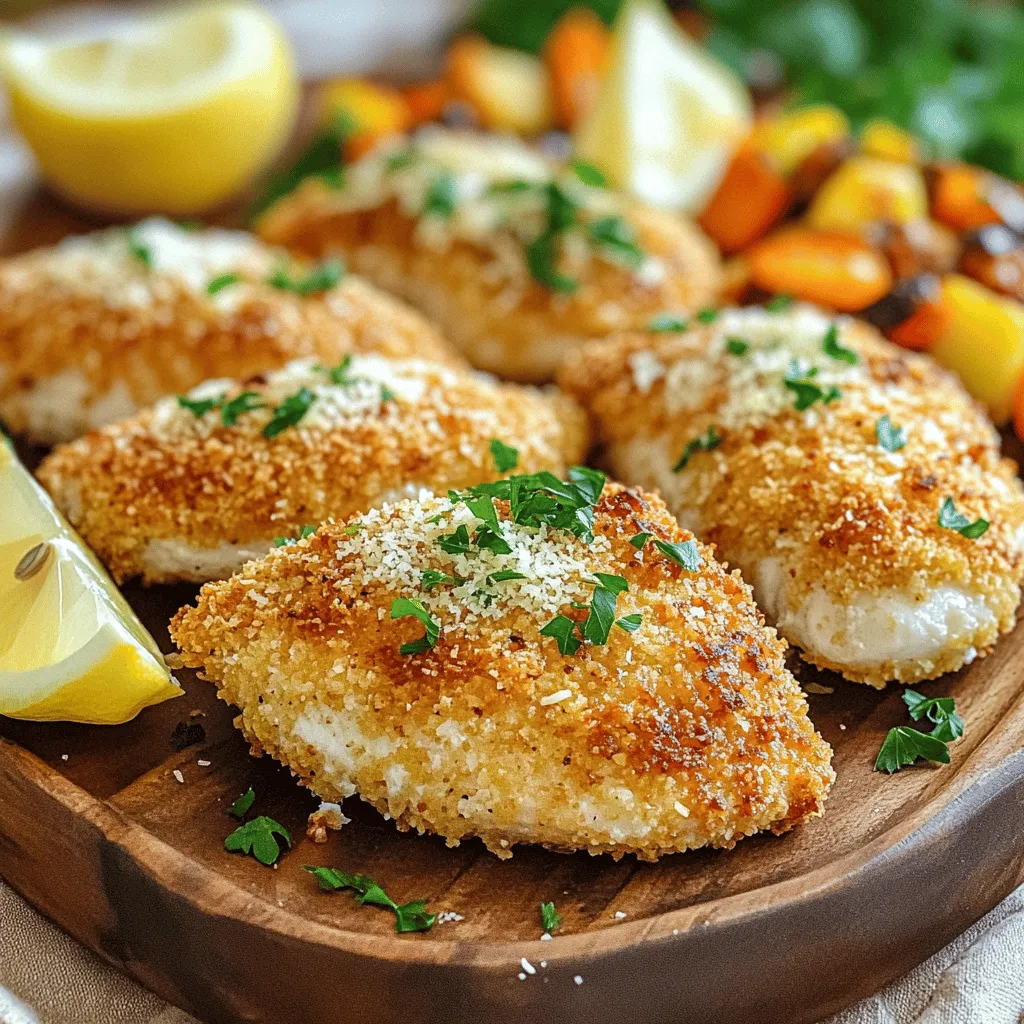
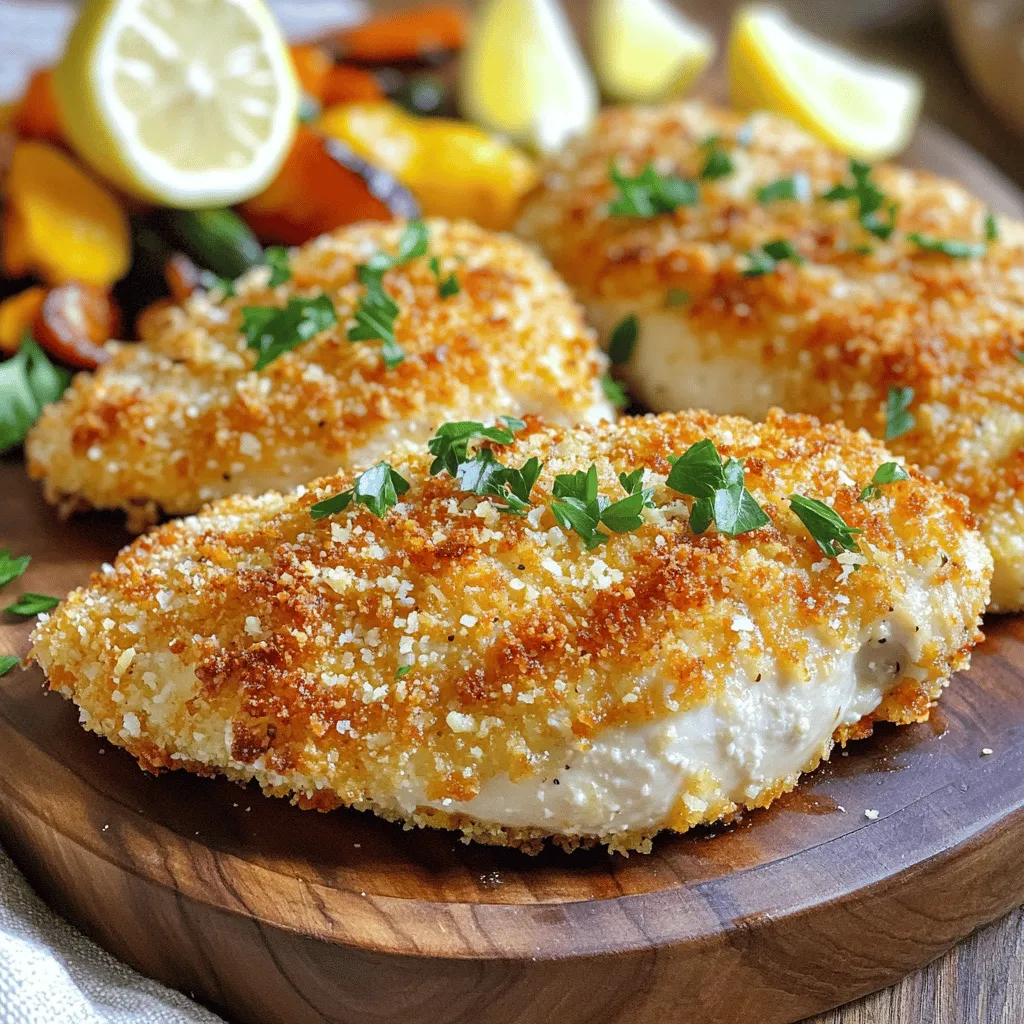
For an elegant presentation, arrange the crispy chicken on a nice platter. You can add lemon wedges for a pop of color. The yellow looks great next to the golden chicken.
Pair your Crispy Parmesan Crusted Chicken with a fresh garden salad or roasted vegetables. These side dishes add color and balance the meal. For a full experience, try serving with a light sauce like marinara. This ties the dish together beautifully.

Variations
Flavor Variations
You can change the taste of your Crispy Parmesan Crusted Chicken easily. Adding fresh herbs like rosemary or thyme gives it a new twist. These herbs add a nice, earthy flavor. If you like heat, try a spicy version! Just mix in some cayenne pepper or a splash of hot sauce. This will give your chicken a kick without overpowering it.
Gluten-Free Alternatives
If you need gluten-free options, don’t worry! You can swap the panko breadcrumbs for gluten-free breadcrumbs. This keeps the crunch you love without gluten. Another great choice is almond flour or crushed nuts. These options add flavor and texture. They also give your chicken a nutty taste that many enjoy.
Serving Suggestions
For sauces, marinara or garlic aioli are great pairs. These sauces add rich flavors that complement the crispy chicken. You can also think about side dishes. A fresh garden salad or roasted veggies make perfect companions. They balance the meal and add color to your plate. For extra flair, add a few lemon wedges. They brighten up the dish and enhance flavors.
Storage Info
Storing Leftovers
To keep your Crispy Parmesan Crusted Chicken fresh, refrigeration is key. First, let the chicken cool down to room temperature. This helps prevent condensation in storage. Next, wrap each piece in plastic wrap or aluminum foil. You can also place them in an airtight container. Make sure the container is sealed tightly to keep the chicken moist.
Store the chicken in the fridge for up to three days. If you want to keep it longer, consider freezing it. Just follow the same steps for wrapping. This way, you can enjoy it later!
Reheating Instructions
When it comes to reheating, you want to keep that crispy texture. The best method is to use an oven. Preheat your oven to 350°F (175°C). Place the chicken on a baking sheet and heat for about 10-15 minutes. This helps the chicken stay crunchy.
Using a microwave is quicker but may not keep the crispiness. If you must use a microwave, place a paper towel under the chicken. This can help absorb moisture. Heat for 1-2 minutes, checking until warm. Just remember, the oven is the better choice for keeping that crunch.
FAQs
What is the best way to ensure my chicken stays juicy?
To keep your chicken juicy, start with good quality meat. Always pat the chicken dry before cooking. This allows the coating to stick better. Bake the chicken at the right temperature. Aim for 400°F (200°C). This helps to cook it evenly and keeps moisture inside. Letting the chicken rest for five minutes after baking also locks in juices.
Can I use chicken thighs instead of breasts?
Yes, chicken thighs work well in this recipe. Thighs have more fat than breasts, which makes them juicy and flavorful. Adjust the cooking time slightly. Thighs may take a bit longer to cook through. Always check that the internal temperature reaches 165°F (75°C).
How can I make this dish ahead of time?
You can prepare the chicken in advance and keep it chilled. Coat the chicken and place it on the baking sheet. Wrap it tightly with plastic wrap or foil. Store it in the fridge for up to a day.
Is there a vegetarian alternative to this recipe?
Yes, you can use eggplant or zucchini as a substitute for chicken. Slice the vegetables into thick pieces. Coat them just like the chicken. Bake until they are golden and crispy. This gives a similar crunch and flavor without the meat.
What sides pair well with Crispy Parmesan Crusted Chicken?
Many side dishes complement this chicken. A fresh garden salad adds brightness. Roasted vegetables bring warmth and flavor. Garlic mashed potatoes or creamy risotto also work well. You can even serve it with pasta for a hearty meal.
Can I freeze the leftovers?
Yes, you can freeze leftovers. Make sure the chicken is fully cooled. Wrap each piece in plastic wrap and place it in an airtight container. It can last in the freezer for up to three months. When ready to eat, thaw in the fridge and reheat in the oven for best results.
This blog post shared a simple recipe for Crispy Parmesan Crusted Chicken. You learned about the ingredients, how to coat and bake the chicken, and tips for serving.
Remember, adjusting the cooking time and adding herbs can enhance flavor. Store leftovers properly to keep them fresh. Enjoy trying different variations to make this dish your own. This recipe is a great way to impress friends and family while keeping it easy and delicious. Happy cooking!


![- 12 oz pasta (penne, fusilli, or preferred variety) - 2 large red bell peppers - 1 cup raw cashews (soaked in water) - 1 tablespoon olive oil - 3 cloves garlic, minced - 1 cup vegetable broth - 1 tablespoon nutritional yeast - 1 tablespoon freshly squeezed lemon juice - Salt and pepper to taste - Fresh basil leaves for garnish For this vegan creamy roasted red pepper pasta, I love using red bell peppers. They bring sweetness and a lovely color. Start with 12 ounces of your favorite pasta. I prefer penne or fusilli, but any shape you like works. Next, grab two large red bell peppers. These will be roasted to bring out their flavor. Don’t forget the cashews! Use one cup of raw cashews. Soak them in water for at least two hours. This step makes them creamy when blended. Now, let’s talk about the extra ingredients. You’ll need one tablespoon of olive oil for cooking. Garlic adds great taste, so use three cloves, minced. For a nice base, use one cup of vegetable broth. We also need one tablespoon of nutritional yeast for a cheesy flavor. Add one tablespoon of freshly squeezed lemon juice to brighten the sauce. Season with salt and pepper to taste. Finally, fresh basil leaves will make a beautiful garnish. This recipe is easy to follow and packed with flavor. Check out the Full Recipe for more details and instructions! - Preheat your oven to 425°F (220°C). - Slice the red bell peppers in half and remove seeds and stems. - Place them cut side down on a baking sheet. - Roast for 20-25 minutes until the skins blister and char. - Let the peppers cool for a few minutes. - Peel off the skins and chop the peppers into small pieces. - In a large pot, bring salted water to a boil. - Add your pasta and cook until al dente, following package instructions. - Before draining, reserve about 1 cup of the pasta water. - Drain the pasta and set it aside for later. - In a blender, add the roasted peppers, soaked cashews, and garlic. - Pour in the vegetable broth, nutritional yeast, and lemon juice. - Season with a pinch of salt and pepper. - Blend until smooth and creamy, scraping the sides if needed. - Adjust the sauce consistency with reserved pasta water as desired. - Add the cooked pasta back into the pot. - Pour the creamy sauce over the pasta and mix well. - Gently heat the mixture on low for 2-3 minutes. - Taste and adjust seasoning with more salt and pepper if needed. This simple guide helps you create a delightful vegan creamy roasted red pepper pasta that bursts with flavor. For the complete recipe, check the [Full Recipe]. Enjoy cooking! To achieve perfect pasta texture, follow these simple steps. Always cook your pasta in salted water. This enhances flavor and ensures the pasta cooks evenly. Aim for al dente, which means firm to the bite. It should not be mushy. Reserve a cup of pasta water before draining. This water helps to adjust your sauce later. For roasting peppers effectively, preheat your oven to 425°F. Slice the red bell peppers in half and remove the seeds. Place them cut side down on a baking sheet. Roast them for about 20 to 25 minutes. You want the skins to blister and char lightly. This caramelizes their sugars and boosts sweetness. Adjusting seasoning is key for a balanced dish. Start with a pinch of salt and pepper, then taste your sauce. If it needs more flavor, add more salt or lemon juice. For creaminess, you can also add a splash of vegetable broth. Using fresh or dried herbs can elevate your dish. Fresh basil adds brightness. Dried oregano or thyme brings depth. Add these herbs during the blending process for a more integrated flavor. Garnishing can transform your dish. Fresh basil leaves add a pop of color and freshness. Sprinkle some nutritional yeast on top for a cheesy flavor. Crushed red pepper flakes can add a nice kick. For visual appeal, plate your pasta with care. Swirl the noodles for a nice shape. You can also arrange extra basil leaves artfully around the dish. Serve your Vegan Creamy Roasted Red Pepper Pasta hot for the best experience. Enjoy your meal! For the full recipe, check out the details above. {{image_4}} For the sauce base, you can swap the cashews with other nuts. Almonds or macadamia nuts work well. If you want a nut-free option, try using sunflower seeds. They blend into a creamy texture too. If you need gluten-free pasta, use brown rice pasta or chickpea pasta. Both these options taste great and keep the dish healthy. They also add a unique flavor to your pasta. You can make this dish even heartier by adding proteins. Chickpeas or lentils are great choices. They cook quickly and blend well with the sauce. Just stir them in after mixing the pasta with the sauce. If you prefer something meatier, try vegan sausage or tofu. Cook them separately, then mix in with the pasta. This adds a nice texture and extra flavor. This pasta pairs well with side salads or crusty bread. A simple green salad adds freshness and crunch. Garlic bread is a great choice to soak up the creamy sauce. For meal prep, store the pasta in airtight containers. You can make it ahead and reheat it for quick lunches. Just warm it gently on the stove or in the microwave. This dish stays delicious for days! For the full recipe, check out the complete guide. To store leftovers, let the pasta cool down first. Place it in an airtight container. This keeps it fresh for up to four days. When you want to eat it again, take out the amount you need. For reheating, I recommend using the stove. Add a splash of water or vegetable broth. Heat it gently over low heat. Stir often to avoid burning. You can also use the microwave. Just cover it and heat in short bursts. Stir in between to heat evenly. For freezing, I suggest separating the sauce from the pasta. Store the sauce in a freezer-safe container. It will last up to three months in the freezer. You can freeze the pasta too, but it may change texture. If you freeze it, store it in a separate bag. When you're ready to use, thaw the sauce in the fridge overnight. Reheat on the stove, adding a splash of broth if needed. For frozen pasta, boil it for a few minutes until warm. This keeps your vegan creamy roasted red pepper pasta delightful and fresh! For the full recipe, check out the previous sections. Yes, you can use different types of pasta. Here are some suggestions: - Penne: This shape holds sauce well. - Fusilli: The spirals trap sauce nicely. - Spaghetti: Classic choice that works with creamy sauces. - Gluten-free options: Look for rice or chickpea pasta. Feel free to choose your favorite! To add heat, try these tips: - Red pepper flakes: Sprinkle them in the sauce for a kick. - Cayenne pepper: Add a pinch to the blended sauce. - Hot sauce: Mix in your favorite brand to taste. These options let you control the spice level. No, this recipe contains cashews. However, you can make it nut-free. Here are some alternatives: - Sunflower seeds: They blend smoothly and add creaminess. - Pumpkin seeds: A great nut-free option with a slightly different flavor. - Silken tofu: This gives a creamy texture without nuts. These substitutes work well and keep the dish tasty. To make it nut-free, simply substitute the cashews. Here’s how: 1. Choose a nut-free base: Use sunflower seeds or silken tofu. 2. Blend the new ingredient: Just like the cashews, blend them smooth. 3. Adjust seasoning: You may need to tweak the flavors to balance the change. This way, you can enjoy the dish without nuts. For the full recipe, check out the details above. This blog covers a tasty, creamy pasta dish using roasted peppers and cashews. You learned about the ingredients, step-by-step cooking, and tips for best results. Variations give you flexibility with proteins and flavors. Plus, I shared easy storage methods for leftovers. Remember, cooking can be fun and creative! Try different ingredients to make it your own. Enjoy making this flavorful recipe and make it a family favorite. Your kitchen adventures await!](https://joymealplan.com/wp-content/uploads/2025/07/982ba21e-a058-40ff-b3d3-28c410105247-768x768.webp)


![- 1 pound boneless, skinless chicken breasts - Marinade: 1 cup buttermilk - Breading elements: 1 cup panko breadcrumbs, 1/2 cup all-purpose flour - Seasonings: 1 teaspoon garlic powder, 1 teaspoon onion powder, 1 teaspoon smoked paprika, 1/2 teaspoon salt, 1/2 teaspoon black pepper, 1/4 teaspoon cayenne pepper (optional) - Cooking oil: 2 tablespoons extra virgin olive oil - Garnish: Fresh parsley, finely chopped I love using fresh, simple ingredients for my crispy baked chicken tenders. The chicken breasts are the star here. I always choose boneless and skinless for easy handling. This keeps them juicy and tender. For the marinade, I use buttermilk. It helps to make the chicken soft and adds great flavor. Soak the chicken for at least 30 minutes. You can go up to two hours for the best taste. Next comes the breading. I prefer panko breadcrumbs because they give the best crunch. The all-purpose flour helps the breadcrumbs stick. Mixing garlic powder, onion powder, smoked paprika, salt, and pepper adds a nice depth of flavor. I add cayenne pepper for those who like a bit of heat. It’s optional, but it gives a great kick. Finally, a drizzle of extra virgin olive oil helps the tenders bake to a golden brown. You can finish with fresh parsley for a pop of color. Want the full recipe? Check out the [Full Recipe]. It’s a delicious way to enjoy chicken! First, set your oven to 425°F (220°C). While it heats up, grab a baking sheet. Line it with parchment paper. This will help the chicken not stick. It also makes cleanup easy. Take a big bowl and pour in the buttermilk. Add the chicken strips. Make sure they are all covered. Cover the bowl with plastic wrap. Let it sit for at least 30 minutes. For even more flavor, you can marinate it for up to 2 hours in the fridge. In another shallow dish, mix the flour, garlic powder, onion powder, smoked paprika, salt, black pepper, and cayenne pepper. Whisk it well. In a separate bowl, place the panko breadcrumbs. This is what will give your chicken that crunchy outside. After marinating, take the chicken out of the buttermilk. Let the excess drip off. Next, coat each piece in the flour mixture. Make sure each strip is covered. Gently shake off the extra flour. For extra crunch, dip the chicken back into the buttermilk. Then, roll it in the panko breadcrumbs. Press down a bit to help the crumbs stick. Arrange the coated chicken on the lined baking sheet. Drizzle a little olive oil on top. This helps it get golden brown. Bake the chicken for 20-25 minutes. Check with a meat thermometer. It should reach 165°F (75°C). Once the chicken is baked, take it out of the oven. Let it rest for about 5 minutes. This helps keep the juices in. Finally, garnish with fresh parsley. It adds a nice touch. Serve hot with your favorite sauces. Don't forget to check the Full Recipe for all the details! For the crispiest chicken tenders, use panko breadcrumbs. Panko adds a light and airy crunch that regular breadcrumbs can't match. Their larger flakes create a wonderful texture. To take it up a notch, use the double-dipping technique. First, coat the chicken in flour, then dip it back into the buttermilk before rolling it in panko. This extra layer of breading will give you an amazing crunch. To make your chicken tenders more flavorful, add spices to the breading mix. Garlic powder, onion powder, and smoked paprika all work great. Feel free to adjust the amounts to fit your taste. You can also try different marinades. A simple mix of lemon juice and herbs can change the flavor profile entirely. Experiment with your favorites to find the perfect taste. If you want a healthier option, consider using an air fryer. It cooks the chicken tenders with less oil while still keeping them crispy. Adjust the cooking time to about 12-15 minutes at 400°F (200°C). Another great tip is to place the chicken tenders on a wire rack. This allows hot air to circulate around the tenders, leading to even cooking and a crispier finish. {{image_4}} You can easily change the flavor of your chicken tenders. Here are two fun ideas: - Lemon pepper chicken tenders: Add lemon zest and black pepper to the flour mix. This gives a bright and zesty taste that wakes up your meal. - BBQ chicken tenders: Brush the tenders with your favorite BBQ sauce before baking. This adds a sweet and tangy flavor that kids love. If you have dietary needs, you can still enjoy these tenders: - Gluten-free options: Use gluten-free breadcrumbs instead of regular. This way, everyone can enjoy the meal without any worry. - Low-carb alternatives: Swap regular flour with almond flour or coconut flour. Both options give you a nice crunch while keeping carbs low. Pair your chicken tenders with tasty sides and dips: - Suggested dipping sauces: Try ranch dressing, honey mustard, or spicy sriracha. Each adds a unique kick to your tenders. - Side dish pairings: Serve them with a fresh salad, crispy fries, or steamed veggies. These sides complete your meal and add more nutrition. For more ideas, check out the Full Recipe to explore different flavors and tips! To keep your chicken tenders fresh, store them right. First, let the cooked tenders cool. Then, place them in an airtight container. You can store them in the fridge for up to three days. If you want to keep them longer, freezing is a great option. Use containers that seal tightly. Glass or plastic containers work well. If you use plastic wrap, make sure it hugs the tenders closely. This way, they won’t dry out. When you want to enjoy your leftovers, reheating is key. The best way to keep them crispy is to use the oven. Preheat your oven to 375°F (190°C) and bake for about 10 to 15 minutes. This method makes the chicken hot and crispy again. You can also use an air fryer. Set it to 375°F (190°C) and heat for about 5 to 7 minutes. This method is quick and gives great results. You can freeze both uncooked and cooked chicken tenders. For uncooked tenders, place them on a baking sheet to freeze individually first. Once they are frozen, transfer them to a freezer bag. This keeps them from sticking together. For cooked tenders, let them cool, then store them in an airtight container. They can last up to three months in the freezer. When you are ready to eat, just reheat them as mentioned earlier. For more detailed cooking methods, check the Full Recipe. Bake chicken tenders for 20 to 25 minutes at 425°F. This time gives them a golden color and keeps them juicy. Always check their internal temperature; it should reach 165°F for safety. Yes, you can make these chicken tenders ahead of time. Prepare them fully and store them in the fridge for up to 24 hours. When you're ready to eat, just pop them in the oven to reheat. This way, you save time while still enjoying a tasty meal. If you don't have buttermilk, use regular milk with a splash of vinegar or lemon juice. Let it sit for about five minutes. This method mimics buttermilk's acidity and helps tenderize the chicken just as well. Check chicken tenders with a meat thermometer. They are done when they hit 165°F inside. If you don’t have a thermometer, cut one open. The meat should be white, not pink, and the juices should run clear. Yes, chicken thighs work well in this recipe. They are more flavorful and juicy than breasts. Just cut them into strips like you would with the chicken breasts. The cooking time may be similar, so keep an eye on them. Crispy baked chicken tenders are easy and tasty. You start with simple ingredients, like chicken, buttermilk, and spices. The steps are clear, from marinating to baking. I shared tips for extra crunch and tasty flavors. Finally, you can personalize these tenders with countless variations and sides. Whether it's for a family dinner or meal prep, these tenders will impress. Enjoy making them and exploring your options!](https://joymealplan.com/wp-content/uploads/2025/06/4bfc5954-182f-42e7-9a90-e67bfbd9568b-768x768.webp)