Easy Chicken Fajita Bake Simple and Flavorful Meal

Are you craving a quick and tasty meal? My Easy Chicken Fajita Bake is just what you need. With juicy chicken, colorful veggies, and vibrant spices, it packs a punch of flavor! You can easily adjust it to fit your taste. Plus, you can get dinner on the table in no time. Let’s dive into the simple steps that will make your next meal exciting and satisfying!
Why I Love This Recipe
- Flavorful Spices: The combination of chili powder, cumin, and smoked paprika creates a deliciously bold flavor that elevates the chicken and veggies.
- Easy to Prepare: This one-pan dish requires minimal prep and cleanup, making it perfect for busy weeknights.
- Family-Friendly: With customizable toppings like sour cream and fresh cilantro, everyone can build their own perfect fajita!
- Healthy and Satisfying: Packed with lean protein and colorful veggies, this dish is both nutritious and filling.
Ingredients
Chicken and Vegetables
For this easy chicken fajita bake, you need:
– 4 boneless, skinless chicken breasts
– 1 red bell pepper, thinly sliced
– 1 green bell pepper, thinly sliced
– 1 yellow onion, thinly sliced
These fresh ingredients bring color and crunch to your dish. The chicken forms a nice base, while the bell peppers and onion add a sweet, savory touch.
Spices and Seasonings
For flavor, gather these spices:
– 2 teaspoons chili powder
– 1 teaspoon ground cumin
– 1 teaspoon smoked paprika
– ½ teaspoon garlic powder
– ½ teaspoon salt
– ¼ teaspoon black pepper
These spices create a warm and zesty taste. They help the chicken shine while adding depth to the veggies.
Toppings and Serving Suggestions
When serving, consider these additions:
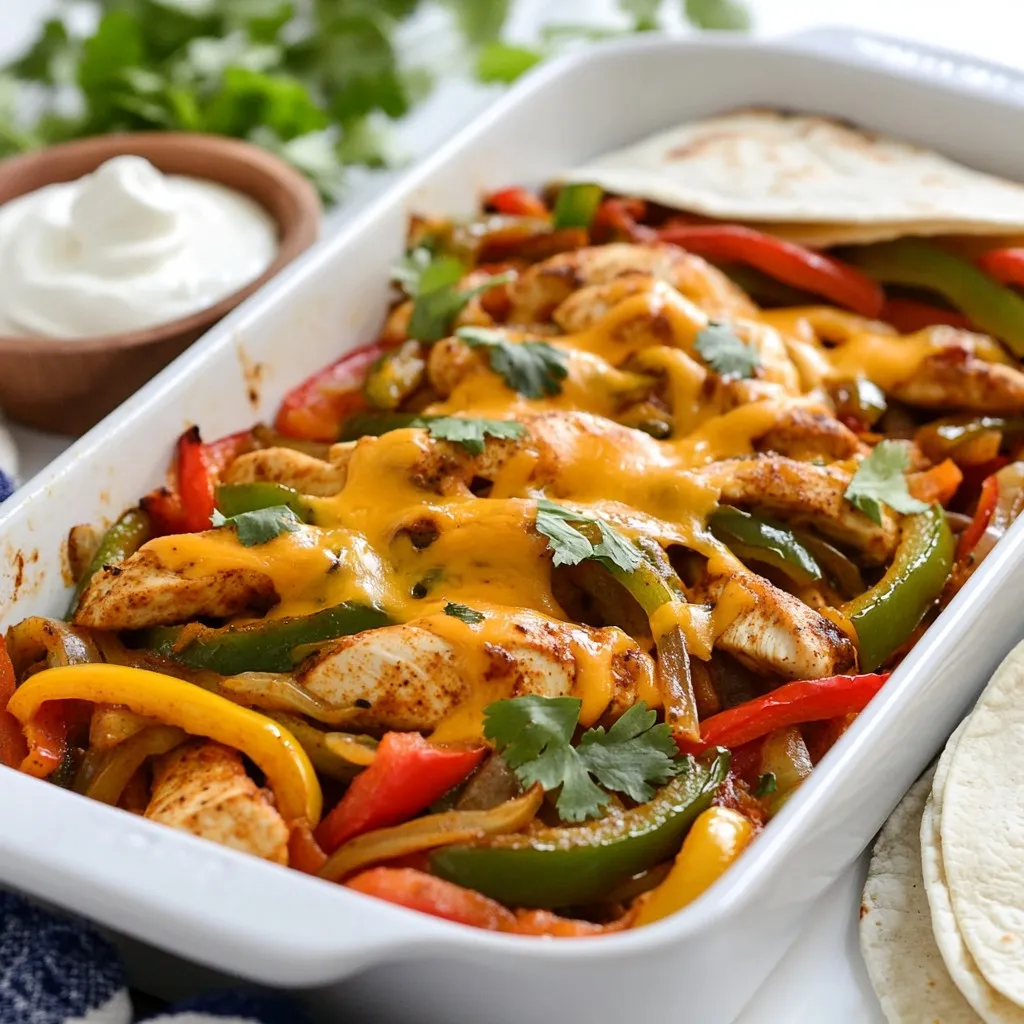
– 1 cup shredded sharp cheddar cheese
– ½ cup sour cream (for serving)
– Fresh cilantro, chopped (for garnish)
– Flour tortillas (for serving)
The cheese melts beautifully, adding creaminess. Sour cream cools the dish down, while cilantro gives it a fresh kick. Warm tortillas make it easy to enjoy every bite.

Step-by-Step Instructions
Preheat the Oven
First, you need to preheat your oven to 400°F (200°C). This step is key for a great bake. A hot oven cooks the chicken evenly and helps the veggies get tender.
Prepare the Chicken
Take four boneless, skinless chicken breasts. Place them in a large, deep baking dish. Arrange them side by side in a single layer. This keeps them from steaming and helps them cook well.
Season and Layer the Ingredients
Next, you’ll want to season the chicken. Sprinkle 2 teaspoons of chili powder, 1 teaspoon of ground cumin, 1 teaspoon of smoked paprika, ½ teaspoon of garlic powder, ½ teaspoon of salt, and ¼ teaspoon of black pepper over the chicken. Don’t hold back on the spices! They add a lot of flavor.
Now it’s time for the veggies. Thinly slice 1 red bell pepper, 1 green bell pepper, and 1 yellow onion. Layer these sliced veggies on top of the chicken. Toss the vegetables gently in the spices. This helps them soak up all that good flavor.
Baking Process
Cover the baking dish tightly with aluminum foil. This helps keep the moisture in. Place it in the preheated oven and bake for 30 minutes. After that, carefully remove the foil. Watch out for steam! Bake for another 15 minutes.
Check the chicken’s internal temperature. It should reach 165°F (75°C). The veggies should be tender. When done, take the dish out of the oven. Sprinkle 1 cup of shredded sharp cheddar cheese on top. Return the dish to the oven for 5 more minutes. Wait for the cheese to melt and bubble.
Let the fajita bake cool for a few minutes. This makes it easier to slice the chicken into strips. Enjoy your tasty meal with warm flour tortillas and a dollop of sour cream. Don’t forget to add some fresh cilantro on top for a nice touch!
Tips & Tricks
Perfecting the Bake
To make your chicken fajita bake perfect, start with even chicken pieces. Cut the chicken breasts to similar sizes. This helps them cook evenly. Use a meat thermometer. It should read 165°F to ensure safe eating. Cover the dish with foil for the first part of baking. This keeps the chicken moist. Remove the foil later to brown the top.
Flavor Enhancements
To boost flavor, try adding lime juice or fresh garlic. Lime juice adds a bright zing. You can also use fresh herbs like oregano or thyme. Toss your vegetables with olive oil before layering. It enhances their taste and texture. If you like heat, add sliced jalapeños or a dash of hot sauce.
Serving Suggestions
Serve the fajita bake with warm flour tortillas. This makes it easy to enjoy. Add sour cream for creaminess and chopped cilantro for freshness. You can also include avocado slices or a fresh salad on the side. This adds color and crunch. Don’t forget to offer extra lime wedges for squeezing on top!
Pro Tips
- Even Cooking: Arrange the chicken breasts in a single layer to ensure even cooking throughout.
- Flavor Boost: Don’t be shy with the spices! A generous sprinkle will enhance the flavor of your dish significantly.
- Moisture Lock: Covering the dish with aluminum foil during the first half of baking helps retain moisture for juicier chicken.
- Cheese Perfection: For the best melt, add cheese during the last few minutes of baking to achieve that bubbly, golden top.

Variations
Substituting Proteins
You can swap chicken for other proteins in this dish. Try sliced beef, pork, or shrimp. Each option gives a new taste. Beef adds a rich flavor. Pork gives a nice sweetness. Shrimp cooks quickly and adds a seafood twist. Just adjust baking time based on the protein you choose.
Vegetarian Alternatives
If you want a meat-free option, use hearty vegetables. Zucchini, mushrooms, or eggplant work well. You can also add beans for protein. Chickpeas or black beans add texture and flavor. For a cheesy touch, use extra cheese or a plant-based cheese. This makes a filling meal without meat.
Different Flavor Profiles
You can change the spices for a new flavor. Try adding taco seasoning for a classic taste. Or use curry powder for an Indian twist. Adding lime juice brightens up the dish. You can even throw in some fresh herbs like cilantro or parsley for extra freshness.
Storage Info
Refrigeration Guidelines
After enjoying your chicken fajita bake, let leftovers cool down. Place the dish in an airtight container. This keeps the meal fresh. Store it in the fridge for up to three days. To keep the flavors bright, don’t wait too long to eat it!
Freezing Instructions
If you want to keep the fajita bake longer, freezing is a great option. Make sure the dish is completely cool. Transfer it to a freezer-safe container. You can freeze it for up to three months. Label the container with the date. When ready to eat, thaw it in the fridge overnight.
Reheating Tips
To reheat, preheat your oven to 350°F (175°C). Place the fajita bake in an oven-safe dish. Cover it with foil to keep it moist. Heat for about 20-25 minutes. Check if it’s hot all the way through. You can also use a microwave for quicker reheating. Just make sure to cover it to prevent drying out. Enjoy your meal just as delicious as the first time!
FAQs
Can I use chicken thighs instead of breasts?
Yes, you can use chicken thighs. Thighs have more fat, making them juicy. They can add great flavor to your fajita bake. Just adjust the cooking time slightly, as thighs may take a bit longer to cook.
What can I substitute for sour cream?
If you need a substitute for sour cream, try Greek yogurt. It has a similar texture and tang. You can also use avocado or a dairy-free cream for a different flavor.
How do I know when the chicken is fully cooked?
To check if the chicken is done, use a meat thermometer. The internal temperature should reach 165°F (75°C). You can also cut into the chicken. If the juices run clear and the meat is no longer pink, it is cooked.
Can I make this dish ahead of time?
Yes, you can prepare the dish a day ahead. Just assemble everything in the baking dish and cover it. Keep it in the fridge until you are ready to bake. This makes it easy for busy days!
This article covered the key parts of preparing a tasty dish. You learned about the main ingredients, cooking steps, and helpful tips. I shared ways to change the recipe based on your needs. We also discussed how to store leftovers safely.
Remember, cooking can be fun and flexible. With practice, you can make this dish your own! Enjoy your time in the kitche

Savory Chicken Fajita Bake
Ingredients
- 4 pieces boneless, skinless chicken breasts
- 1 piece red bell pepper, thinly sliced
- 1 piece green bell pepper, thinly sliced
- 1 piece yellow onion, thinly sliced
- 2 teaspoons chili powder
- 1 teaspoon ground cumin
- 1 teaspoon smoked paprika
- 0.5 teaspoon garlic powder
- 0.5 teaspoon salt
- 0.25 teaspoon black pepper
- 1 cup shredded sharp cheddar cheese
- 0.5 cup sour cream (for serving)
- 1 bunch fresh cilantro, chopped (for garnish)
- as needed pieces flour tortillas (for serving)
Instructions
- Begin by preheating your oven to 400°F (200°C) to ensure it’s hot and ready when the dish is prepared.
- In a large, deep baking dish, lay the chicken breasts side by side in a single layer.
- Evenly sprinkle the chili powder, ground cumin, smoked paprika, garlic powder, salt, and black pepper over the chicken breasts.
- Layer the sliced red and green bell peppers, along with the yellow onion, atop the seasoned chicken.
- Cover the baking dish tightly with aluminum foil and bake for 30 minutes.
- After 30 minutes, carefully remove the foil and continue baking for another 15 minutes.
- When the chicken is done, sprinkle the shredded sharp cheddar cheese over the top and return to the oven for an additional 5 minutes until melted.
- Let the fajita bake cool for a few minutes before slicing the chicken into strips.
- Serve the chicken and veggies alongside warm flour tortillas, topped with sour cream and fresh cilantro.


![- Feta cheese - Cherry tomatoes - Olive oil - Garlic - Dried oregano - Red pepper flakes - Salt and pepper - Pasta options (penne or fusilli) - Fresh basil leaves - Optional garnishes (lemon zest) For this dish, you need fresh and high-quality ingredients. The feta cheese brings creaminess, while the cherry tomatoes add sweetness. Olive oil enhances the flavor and helps with cooking. Garlic gives a lovely aroma and taste. Dried oregano adds a hint of earthiness, and red pepper flakes can bring a nice kick. Salt and pepper are essential for seasoning. You can pick either penne or fusilli pasta for this recipe. Both hold the creamy sauce well. Fresh basil leaves add brightness and color to your dish. If you want a zesty touch, lemon zest is a perfect addition. When you gather these ingredients, you set the stage for a simple yet delightful meal. Each component plays a role in making your baked feta pasta a creamy delight. Be sure to look at the full recipe for all the details! First, set your oven temperature to 400°F (200°C). This temperature works well for baking the feta and tomatoes. Next, choose a baking dish that fits all your ingredients. A medium-sized dish works best, allowing enough space for everything. Now it’s time to create your dish. Place the block of feta cheese in the center of the baking dish. Surround it with the halved cherry tomatoes. This colorful mix makes the dish look inviting. Drizzle olive oil over the feta and tomatoes. Then, add minced garlic, dried oregano, red pepper flakes, salt, and pepper. This step adds a burst of flavor to the dish. Place the dish in your preheated oven. Bake for about 30 minutes. Look for the tomatoes to blister and the feta to soften. When it’s ready, the feta should turn a lovely golden color. While that bakes, boil salted water in a pot for the pasta. Cook the pasta according to the package instructions until it is al dente. After cooking, drain the pasta and set it aside. After 30 minutes, carefully take the baking dish out of the oven. Use a fork to mash the softened feta and blistered tomatoes. This creates a creamy sauce. Now, gently fold the cooked pasta into your baking dish. Toss everything together to coat the pasta well. Finally, taste your dish and adjust the seasoning. You can add more salt, pepper, or red pepper flakes for extra flavor. Serve the dish right away, garnished with fresh basil leaves. If you like, add a sprinkle of grated lemon zest for a refreshing twist. Enjoy your simple and creamy delight! For more details, check the Full Recipe. To get the best baked feta pasta, know your oven. Every oven heats a little differently. If yours runs hot, lower the temp by 25°F. Check on the dish after 25 minutes. Look for blistered tomatoes and soft feta. If the feta is golden and creamy, it’s ready! Cook your pasta to al dente. This means it should still have a slight bite. Follow the package directions, but check it a minute early. Save some starchy pasta water when draining. This water helps the sauce stick to the pasta. Want to boost flavor? Try adding a pinch of lemon zest or a dash of balsamic vinegar. Fresh herbs like parsley or thyme can brighten the dish too. If you like heat, toss in more red pepper flakes. You can mix and match spices to fit your taste! {{image_4}} You can easily make Baked Feta Pasta gluten-free. Just use gluten-free pasta instead of regular pasta. Many brands offer tasty options that work well. If you want a vegan version, substitute feta cheese with a plant-based alternative. Look for brands that make creamy vegan feta. These options still give that tangy flavor you love. To add some color and nutrition, toss in vegetables. Spinach wilts nicely and adds a fresh taste. Zucchini can also work well; just chop it into small pieces. For protein, you can add cooked chicken or shrimp. Both will make your dish more filling. Cook the protein separately, then mix it in right before serving. While penne and fusilli are great, you can use other pasta types too. Bowtie or rotini can hold the creamy sauce well. For a lighter option, serve the dish over zoodles or spiralized veggies. You’ll get a fresh twist while keeping it healthy. For the full recipe, check out [Full Recipe]. After you enjoy your baked feta pasta, store any leftovers in the fridge. Use a tight container to keep it fresh. Make sure to cool it down before sealing. It will stay good for about three to four days. This dish tastes great the next day, too. You can reheat your pasta in two ways: the microwave or the oven. If you use the microwave, heat in short bursts. Stir it after each burst to keep it creamy. For the oven, preheat to 350°F (175°C). Place the pasta in an oven-safe dish, cover it, and heat for about 15 minutes. This way, you maintain the texture of the sauce. Yes, you can freeze this dish, but it’s best to freeze it before baking. Place the unbaked dish in a freezer-safe container. It will last around two to three months. When ready to eat, thaw it overnight in the fridge and bake as normal. If you freeze it after baking, the texture might change, but it’s still tasty. Just be careful when reheating to avoid drying it out. Baked Feta Pasta started in Finland. It became popular on social media in 2020. The dish caught on for its simple steps and great taste. People enjoyed the creaminess of feta mixed with tomatoes. It became a fun way to cook pasta. Now, it's a favorite in many homes worldwide. Yes, you can prep Baked Feta Pasta ahead of time. You can bake the feta and tomatoes the night before. Store them in the fridge after cooling. When ready to eat, cook the pasta and mix it in. Just be sure to adjust the baking time as needed. Baked Feta Pasta has some healthy aspects. Feta cheese offers protein and calcium. Tomatoes provide vitamins and antioxidants. However, it also has olive oil and pasta, which add calories. Balance is key. You can add veggies for extra nutrients. This dish pairs well with many sides. A fresh salad with greens is great. Garlic bread adds a nice crunch. You can also serve it with roasted vegetables. For a light option, try steamed broccoli or green beans. To add heat, use more red pepper flakes. You can also try adding sliced jalapeños. For a smoky flavor, mix in some smoked paprika. Taste as you go, so it's just right for your spice level. In this blog post, we explored how to create baked feta pasta. We covered the ingredients, step-by-step instructions, and tips for the perfect dish. Remember to select fresh ingredients for the best flavor. You can personalize the recipe with your choice of pasta and optional add-ins. This dish is simple, satisfying, and perfect for any meal. Enjoy experimenting with flavors and variations to make it your own. With these steps, you'll serve a delightful meal that family and friends will love.](https://joymealplan.com/wp-content/uploads/2025/07/e04698b2-b085-49cc-98ed-107e8e7c4045-768x768.webp)
