Easy Chicken Fajita Bowls Flavorful and Simple Meal

Are you ready for a meal that’s both tasty and easy to make? These Easy Chicken Fajita Bowls pack a flavorful punch while taking hardly any time to prepare. With just a few simple ingredients like chicken, bell peppers, and spices, you can create a dish that’s perfect for busy nights or casual gatherings. Dive in, and let me show you how to put these delicious bowls together in no time!
Ingredients
Primary Ingredients
– 2 boneless, skinless chicken breasts
– 1 red bell pepper
– 1 green bell pepper
– 1 medium red onion
For the primary ingredients, I focus on high-quality chicken and fresh vegetables. The chicken breasts provide a lean source of protein. The bell peppers add sweetness and crunch, while the red onion brings a nice sharpness to the dish.
Seasonings and Oils
– 2 tablespoons olive oil
– 1 teaspoon ground cumin
– 1 teaspoon chili powder
– 1 teaspoon garlic powder
– 1 teaspoon smoked paprika
– Salt and pepper to taste
Seasonings are key to making this dish pop. I use olive oil to cook the chicken and veggies. The spices create a warm, inviting flavor. Cumin and chili powder give a nice depth, while garlic powder adds a savory touch. Salt and pepper are essential to bring out the natural flavors.
Bowl Components
– 1 cup cooked brown rice or quinoa
– 1 can (15 oz) black beans, drained and rinsed
– 1 cup corn (fresh or frozen)
– 1 ripe avocado, diced
– Fresh cilantro, chopped, for garnish
– Lime wedges, for serving
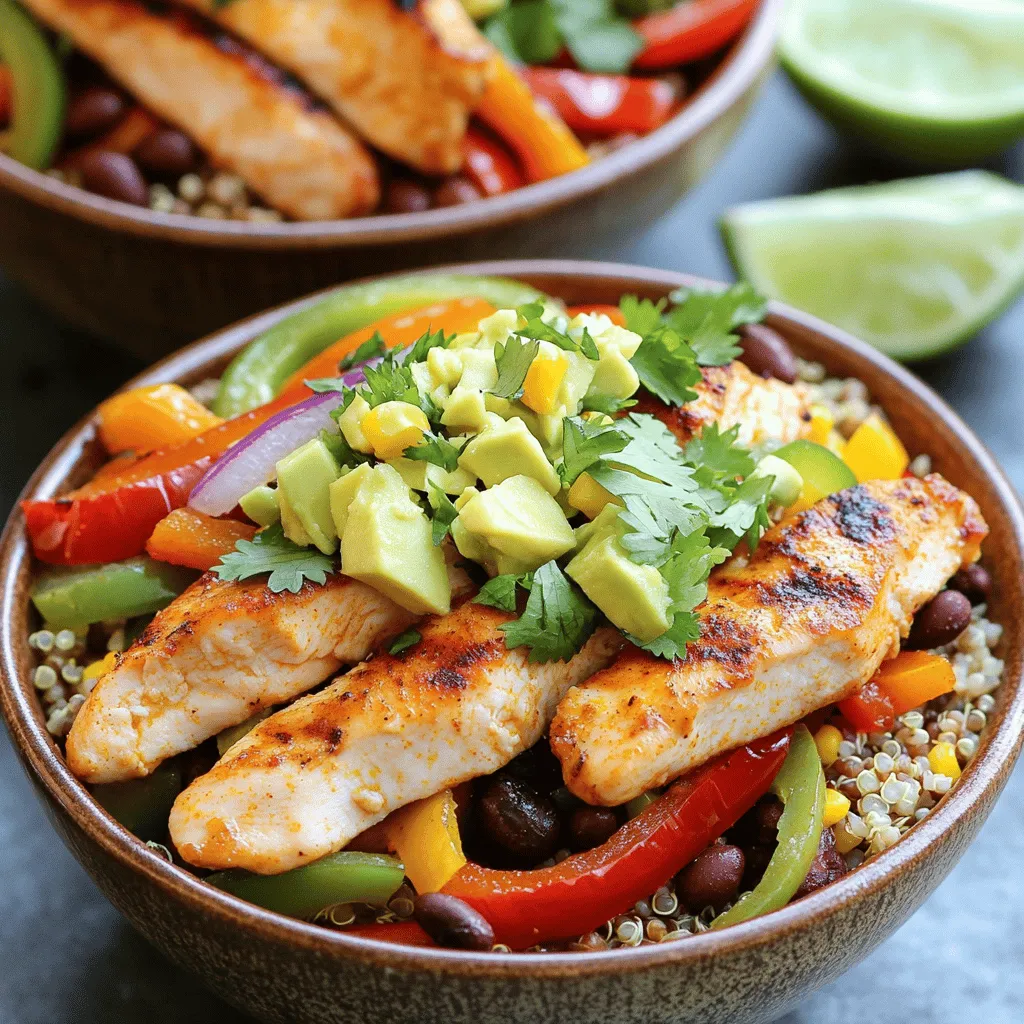
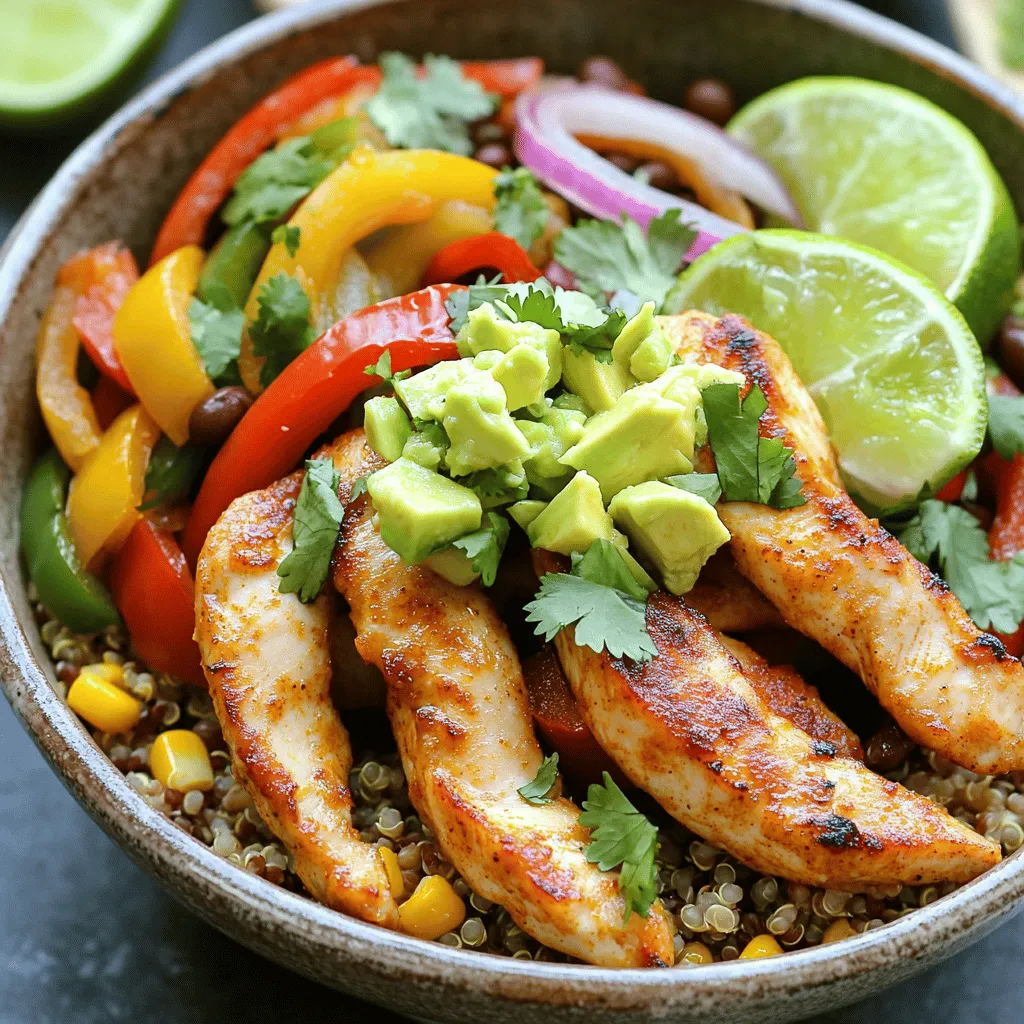
The bowl components bring everything together. I like brown rice for its nutty flavor, but quinoa works just as well. Black beans and corn add fiber and texture. Don’t forget the avocado! It adds creaminess. The fresh cilantro and lime wedges give a bright finish to each bowl.
Step-by-Step Instructions
Marinating the Chicken
To start, you need to marinate the chicken. Take your sliced chicken and put it in a bowl. Add 1 tablespoon of olive oil, ground cumin, chili powder, garlic powder, smoked paprika, salt, and black pepper. Mix well until the chicken is coated. Let it marinate for at least 15 minutes. If you have time, refrigerate it for up to 1 hour. This adds great flavor to the chicken.
Sautéing the Vegetables
Next, it’s time to sauté the vegetables. Heat 1 tablespoon of olive oil in a large skillet on medium heat. When the oil shimmers, toss in the sliced red onion and both bell peppers. Sauté for 5-7 minutes, stirring often. You want the veggies to become tender and sweet. They should start to caramelize, which makes them extra tasty. Once done, remove them from the skillet and set aside.
Cooking the Chicken
Now, let’s cook the chicken. In the same skillet, add the marinated chicken strips. Cook for 6-8 minutes, stirring often. You want the chicken to turn golden brown and no longer pink inside. To check if it’s cooked, use a meat thermometer. The inside should reach 165°F (75°C). This ensures it’s safe to eat.
Combining Ingredients
Once the chicken is ready, it’s time to combine everything. Return the sautéed vegetables to the skillet with the chicken. Add the drained black beans and corn. Stir gently to mix everything well. Heat this mixture for another 2-3 minutes until it’s all warmed through. This step helps all the flavors blend together.
Assembling the Bowls
Now we can assemble the bowls. Start with a generous base layer of cooked brown rice or quinoa in each bowl. Then, top it with the chicken and vegetable mixture. Make sure to distribute it evenly among the bowls. Each bowl should look colorful and inviting.
Garnishing and Serving
To finish, let’s add some garnishes. Sprinkle diced avocado on each bowl and add a handful of chopped cilantro for freshness. Serve lime wedges on the side. Squeezing lime juice over the bowl adds a bright flavor. This makes every bite special and refreshing. Enjoy your Easy Chicken Fajita Bowls!
Tips & Tricks
Enhancing Flavor
– Suggested marination techniques: Marinating chicken adds depth to the flavor. Mix your chicken with olive oil, cumin, chili powder, garlic powder, smoked paprika, salt, and black pepper. Let it sit for at least 15 minutes. If you have time, chill it for an hour. This step makes the chicken juicy and tasty.
– Spice adjustments for heat lovers: Love heat? Add more chili powder or a pinch of cayenne pepper. You can also toss in some diced jalapeños during cooking for extra kick. Adjust the spices to fit your taste buds.
Presentation Tips
– Ideal serving dishes: Use rustic wooden boards or colorful ceramic bowls. These dishes make the meal look bright and fun. You want to impress with both flavor and sight.
– Enhancing meal aesthetics with garnishes: Fresh cilantro and diced avocado add color and freshness. Squeeze lime juice over the top for a zesty touch. You can also add extra lime wedges on the side for guests.
Cooking Methods
– Options for stovetop versus oven: You can cook the chicken and veggies in a skillet on the stovetop. If you prefer, roast the chicken and veggies in the oven at 400°F (200°C) for about 20-25 minutes. Both methods work well.
– Batch cooking recommendations: Make more than you need. Store leftovers in the fridge for quick meals. This dish stays tasty for several days. You can enjoy it again without extra effort.

Variations
Protein Alternatives
You can swap chicken for beef or tofu in these fajita bowls. If you use beef, choose thin cuts like flank steak. Cook it the same way as chicken. Tofu is a great choice for a plant-based option. Press it to remove excess water, then cut it into cubes. Sauté it until golden and crispy, which takes about 8-10 minutes. Adjust the cooking time based on the protein you use.
Dietary Adjustments
If you want a vegan bowl, use tofu or tempeh instead of chicken. Make sure to check that your tortillas or any toppings are also vegan. For gluten-free options, use corn tortillas or skip the tortillas entirely. You can also swap brown rice for quinoa, which is gluten-free. To make it healthier, use less oil or add more veggies like spinach or kale.
Flavor Customizations
You can add different vegetables or beans to your bowl. Try using zucchini, mushrooms, or even sweet potatoes. Adding beans like pinto or kidney beans can boost protein and fiber. For extra flavor, drizzle on some salsa or hot sauce. You could also mix in a dollop of Greek yogurt or a splash of lime juice. These small changes can really elevate your dish!
Storage Info
Refrigeration Guidelines
You can keep the chicken fajita bowls in the fridge for up to four days. Store them in airtight containers to keep them fresh. It’s best to keep the rice or quinoa separate from the chicken and veggies. This way, the rice stays fluffy and doesn’t become soggy.
Freezing Instructions
If you want to save some for later, freeze portions in freezer-safe bags. Make sure to remove as much air as you can. This helps prevent freezer burn. When you’re ready to eat, thaw the bowls in the fridge overnight. Reheat them in the microwave or on the stove until hot.
Reusing Leftovers
Leftovers can be fun! You can make a quesadilla with the chicken and veggies. Just add cheese and grill until golden. You could also toss everything into a salad for a fresh twist. Or, make a wrap using tortillas for a quick lunch. The options are endless with these tasty ingredients!
FAQs
What can I serve with chicken fajita bowls?
You can serve many tasty sides and toppings with chicken fajita bowls. Here are some ideas:
– Tortilla chips for a crunch
– Salsa for added flavor
– Sour cream for creaminess
– Grated cheese for richness
– Fresh lime wedges for zest
These sides add different tastes and textures. Feel free to mix and match based on your preference.
Can I make these bowls ahead of time?
Yes, you can make these bowls ahead of time. Meal prep helps save time on busy days. Here are some tips:
– Cook and cool the chicken and veggies. Store them in airtight containers.
– Keep rice or quinoa separate until serving. This keeps it fresh and fluffy.
– Store toppings like avocado and cilantro in separate containers. They taste best when fresh.
You can enjoy leftovers for lunch or dinner throughout the week.
How do I make the best chicken fajita bowls?
To make the best chicken fajita bowls, avoid these common mistakes:
– Don’t rush the marinating time. Even 15 minutes helps build flavor.
– Make sure the skillet is hot before adding the chicken. This gives a nice sear.
– Stir the chicken and veggies gently. This helps them cook evenly.
Following these tips leads to delicious, flavorful bowls every time.
What are the best toppings for chicken fajita bowls?
Top your chicken fajita bowls with these tasty options:
– Diced avocado for creaminess
– Chopped cilantro for freshness
– Sliced jalapeños for heat
– Corn salsa for sweetness
– Crumbled feta or cotija cheese for a tangy flavor
These toppings add a burst of flavor and color to your meal.
Is this recipe spicy?
The recipe has mild spices but can be adjusted. If you like heat, try these tips:
– Add more chili powder or sliced jalapeños.
– Use spicy salsa as a topping.
– Serve with hot sauce for an extra kick.
For milder flavor, reduce the chili powder or skip the jalapeños. Enjoy it at your spice level!
In this post, we explored how to make delicious chicken fajita bowls. We covered essential ingredients like chicken, veggies, and healthy grains. You learned step-by-step directions for marinating, cooking, and assembling your bowls. Tips for flavor, presentation, and meal prep added value to your cooking.
Overall, these bowls are versatile and easy to customize. Enjoy creating your own version with various proteins and toppings. Happy cooking!


![- 1 pound baby carrots (or 4 medium-sized regular carrots, sliced into uniform sticks or rounds) - 2 tablespoons unsalted butter - 3 tablespoons pure maple syrup - 1 tablespoon packed brown sugar - 1 teaspoon ground cinnamon - Salt and freshly cracked black pepper to taste - Fresh parsley, finely chopped, for garnish Each serving of maple glazed carrots has about 120 calories. You get roughly 30 grams of carbohydrates, with 15 grams of sugar. The dish has 4 grams of fat and 3 grams of fiber. These sweet carrots pack lots of flavor without too many calories, making them a great side. You might want to switch up ingredients for different diets. For a vegan option, use plant-based butter. If you want to lower sugar, try agave syrup or honey. Each choice can change the taste, but they all work well. To start, wash your carrots well. If you have baby carrots, just rinse them under cold water. For regular carrots, peel them first. Slice them into uniform sticks or rounds. This helps them cook evenly. Aim for pieces about the same size. This step is key for a great dish. Now, let’s cook! Heat a large skillet over medium heat. Add the unsalted butter and let it melt completely. Swirl the pan gently to coat the bottom. Once the butter is bubbly, add your prepared carrots. Sauté them for about 5 minutes. Stir occasionally to get even cooking. You want the carrots to start softening but not fully cooked yet. Next, sprinkle brown sugar and ground cinnamon over the carrots. Mix everything well so each carrot gets coated. This adds a sweet and warm flavor. Now, drizzle the pure maple syrup over the carrots. Cook for another 5-7 minutes, stirring often. This allows the glaze to thicken and the carrots to become tender. When your carrots are tender, season them with salt and black pepper to taste. Give everything one last gentle toss to combine. Carefully remove the skillet from the heat. Transfer the glazed carrots to a serving dish. Make sure to drizzle any leftover syrup from the skillet over the top. To add a finishing touch, garnish with finely chopped fresh parsley. This not only adds color but also a fresh taste. Serve your sweet maple glazed carrots warm. They look great on the plate and taste even better. You can find the complete recipe in the [Full Recipe]. To enhance the sweetness and aroma of your maple glazed carrots, always use pure maple syrup. This syrup has a rich taste that makes your dish shine. Combine it with a bit of brown sugar and cinnamon. This mix adds depth and warmth to the carrots. You can also try adding a pinch of nutmeg for extra flavor. This small tweak can make a big difference. For best results, use a large, heavy skillet. A cast-iron or non-stick pan works well. These types of pans heat evenly and help the carrots cook perfectly. If you have a sauté pan with high sides, that’s great too. This design keeps the glaze in the pan and helps it thicken faster. Maple glazed carrots pair well with many meals. They are a perfect side for roasted chicken or pork. You can also serve them with grilled fish for a fresh taste. If you want a vegetarian option, try them with quinoa or lentils. They add a sweet touch that balances savory dishes. For a festive look, serve them alongside other colorful veggies. For the full recipe, check out the Sweet Maple Glazed Carrots recipe above! {{image_4}} You can make your maple glazed carrots even better by adding other veggies. Try using baby potatoes, parsnips, or sweet potatoes. Cut them into similar sizes as the carrots for even cooking. This mix adds more color and flavor to your dish. When you add more vegetables, adjust the cooking time to ensure everything cooks well. Want to change the flavor? You can add herbs or spices to make your dish unique. Try adding fresh thyme or rosemary for an earthy taste. A pinch of nutmeg can also give a warm hint. If you like heat, sprinkle in some red pepper flakes. Mix and match these additions to find what you enjoy most. If you want to try different sweeteners, you have options! Honey works well and gives a floral note. Brown sugar adds a deeper flavor. Agave syrup is also a great choice for a lighter sweetness. Each sweetener will change the taste, so feel free to experiment with what you have on hand. For the full recipe, check the earlier section. To keep your maple glazed carrots fresh, store them in an airtight container. This helps prevent moisture loss and keeps them tasty. Place the cooled carrots in the container and seal tightly. You can keep them in the fridge for up to four days. If you want to enjoy them later, consider the next steps. When you are ready to eat the leftovers, you want to reheat them gently. The best way is to use a skillet. Heat the skillet over low heat. Add a splash of water or broth to help steam the carrots. Stir them often until they are warmed through. This method helps keep the carrots soft and the glaze flavorful. Avoid using a microwave, as it can make them mushy. If you want to store your maple glazed carrots for a long time, freezing is a good option. First, let them cool completely. Then, place the carrots in a freezer-safe bag or container. Remove as much air as possible to prevent freezer burn. They can last up to three months in the freezer. To use them, thaw in the fridge overnight before reheating. To make maple glazed carrots vegan, swap the butter for a plant-based oil or vegan butter. You can use coconut oil for a hint of tropical flavor. This keeps the dish rich and tasty while staying true to vegan standards. Remember to check the maple syrup as well; most brands are naturally vegan. Yes, you can use frozen carrots. They are convenient and can save time. However, frozen carrots may have a different texture than fresh ones. Thaw them first and drain excess water. Sauté them for a bit longer to ensure they cook through. Fresh carrots bring more crunch and flavor, but frozen can still work well in a pinch. To ensure your glazed carrots are tender, cook them over medium heat. Start with 5 minutes of sautéing before adding the glaze. After adding the maple syrup, cook for another 5-7 minutes. Stir often to coat them evenly. The key is to keep an eye on them and test for tenderness with a fork. Aim for a soft texture without losing their shape. This post covered how to make delicious maple glazed carrots. We discussed the key ingredients and their nutritional value. You learned tips for cooking and how to enhance flavors. I also shared ideas for variations and how to store your leftovers properly. Making these carrots is easy and fun. With simple swaps, you can adjust for dietary needs. Enjoy this dish as a side or experiment with different flavors. Happy cooking!](https://joymealplan.com/wp-content/uploads/2025/06/e145556d-f1e0-4204-89d9-54022a16ffd1-768x768.webp)


![To create a delicious Lemon Herb Grilled Salmon, you need fresh and simple ingredients. Here’s what you will gather: - 4 salmon fillets (approximately 6 ounces each) - 1/4 cup extra virgin olive oil - Zest from 1 large lemon - Juice of 2 fresh lemons - 3 cloves garlic, finely minced - 2 tablespoons fresh parsley, finely chopped - 2 tablespoons fresh dill, finely chopped - 1 tablespoon fresh thyme, finely chopped - Salt and freshly ground black pepper to taste - Lemon wedges, for garnishing These ingredients work together to bring out the bright and zesty flavor of the salmon. The fresh herbs add depth, while the lemon provides a refreshing kick. When you combine these elements, you create a dish that looks and tastes amazing. If you want to explore the complete process, check out the Full Recipe. To start, grab a medium bowl. Mix together: - 1/4 cup extra virgin olive oil - Zest from 1 large lemon - Juice from 2 fresh lemons - 3 cloves garlic, finely minced - 2 tablespoons fresh parsley, chopped - 2 tablespoons fresh dill, chopped - 1 tablespoon fresh thyme, chopped - Salt and pepper to taste Whisk all these ingredients together until they blend well. This mix will be your flavorful marinade. Now, take your salmon fillets. Place them in a resealable bag or shallow dish. Pour the marinade over the salmon. Make sure each piece is well coated. Seal the bag or cover the dish. Let it chill in the fridge for 30 minutes up to 2 hours. The longer it sits, the stronger the flavor will be. Preheat your grill to medium-high heat. If using a grill pan, set it to medium heat. Lightly coat the surface with olive oil to stop the fish from sticking. After marinating, remove the salmon from the bag. Let any extra marinade drip off. Discard the leftover marinade. Place the salmon skin-side down on the hot grill. Cook for about 5-6 minutes without touching it. Then, flip the salmon gently with a spatula. Grill for another 4-5 minutes. The fish should be opaque and flake easily with a fork. Once it’s done, let the salmon rest for a few minutes. This helps improve the flavor and texture. Serve the grilled salmon with fresh lemon wedges. Add a pop of citrus to enhance your dish. Enjoy your meal! For the complete recipe, check the [Full Recipe]. To grill salmon just right, aim for medium-high heat. This usually means around 375°F to 400°F. The salmon needs about 5-6 minutes on the first side. Flip it gently and grill for another 4-5 minutes. To check for doneness, use a fork. The fish should easily flake apart and look opaque. If it’s still shiny, it needs more time. For more flavors, try adding a pinch of smoked paprika or a dash of cayenne pepper. These spices can add a nice kick. Pair the salmon with sides like roasted veggies, quinoa, or a fresh salad. These dishes complement the salmon well and balance its rich taste. When plating the salmon, add a bright touch with fresh herbs. A sprinkle of parsley or dill makes it pop. Serve with lemon wedges for an extra zing. For drinks, a crisp white wine, like Sauvignon Blanc, pairs well. It enhances the meal and makes it feel special. For a non-alcoholic option, try sparkling water with lemon. It refreshes the palate and adds a lovely touch to your dinner. For the full recipe, check out the detailed steps above. {{image_4}} You can switch up the marinade to keep things fresh. Try using lime or orange juice instead of lemon. These fruits add a different twist to your salmon. You can also add spices like cayenne pepper for some heat. A touch of heat makes the dish more exciting. Grilling is great, but you have other choices too. Baking or broiling the salmon works well and keeps it moist. If it’s raining or too cold outside, use a stovetop grill pan. Just make sure it’s hot before adding the salmon for even cooking. You can make this dish fit your diet needs. For a gluten-free version, check that your spices are gluten-free. You can also skip dairy by using olive oil instead of butter. If you want to lower calories, use less oil in the marinade. These small changes keep the meal healthy while still tasting great. Try these variations to make lemon herb grilled salmon fit your taste and lifestyle. For the full recipe, check out the earlier sections! To keep your grilled salmon fresh, store it in the fridge. Place the salmon in an airtight container. This helps keep it from drying out. It should last for up to three days in the fridge. If you want to save it longer, freezing is a good option. Wrap the salmon tightly in plastic wrap, then put it in a freezer bag. You can freeze it for up to three months. Label the bag with the date so you know when to use it. When you reheat grilled salmon, you want to keep it moist. The best way is to use the oven. Preheat the oven to 275°F (135°C). Place the salmon on a baking sheet, cover it with foil, and heat for about 15 minutes. This method helps avoid drying out the fish. You can also use a microwave, but be careful. Heat it in short bursts of 30 seconds on low power. Check often to keep the flavor and texture. A splash of lemon juice can help refresh the taste. Grilling time depends on the thickness of the salmon. For fillets about 1 inch thick, grill for 5-6 minutes on one side. Flip and grill for another 4-5 minutes. Thicker fillets may need more time, so check for doneness. When the salmon is opaque and flakes easily, it's ready to eat. Yes, you can use frozen salmon. To cook it, thaw the salmon first. Place it in the fridge overnight or submerge it in cold water for about an hour. Once thawed, pat it dry and marinate as in the Full Recipe. This will help keep it moist while grilling. Lemon herb grilled salmon pairs well with fresh salads and veggies. Try serving it with: - Mixed green salad with a light vinaigrette - Steamed asparagus or green beans - Roasted potatoes seasoned with herbs - Quinoa or rice pilaf for a hearty side These dishes complement the fresh flavors of the salmon and make a complete meal. Grilling lemon herb salmon is simple and rewarding. You start with fresh salmon and a tasty marinade of olive oil, lemon, garlic, and herbs. Marinate for a short time to boost flavor. Grill it right and serve with sides for a complete meal. Experiment with different flavors and cooking methods to find your favorite. Always store leftovers properly to enjoy them later. With these tips, you’ll impress everyone at the table. Now, get ready to grill and enjoy this delicious dish!](https://joymealplan.com/wp-content/uploads/2025/06/94675a3f-7fd4-4f6d-bbd0-da6b916d26a4-768x768.webp)

