
Are you ready to make a meal that’s both simple and oh-so-tasty? Garlic Butter Shrimp & Rice is your answer! I’ll guide you through every step, from gathering your ingredients to serving up a delicious plate. This dish is a favorite because it combines bold flavors with easy prep. Get ready to impress your family or enjoy a cozy meal just for yourself! Let’s dive in!
Why I Love This Recipe
- Delicious Flavor Combination: The rich garlic butter, zesty lemon, and tender shrimp create a mouthwatering experience that is hard to resist.
- Quick and Easy: This recipe can be prepared in just 30 minutes, making it perfect for busy weeknights or last-minute dinner parties.
- One-Pot Wonder: With the shrimp cooked in the same skillet as the garlic butter, cleanup is a breeze and the flavors meld beautifully.
- Customizable: Feel free to add your favorite veggies or adjust the spice level, making it a versatile dish for any palate.
Ingredients
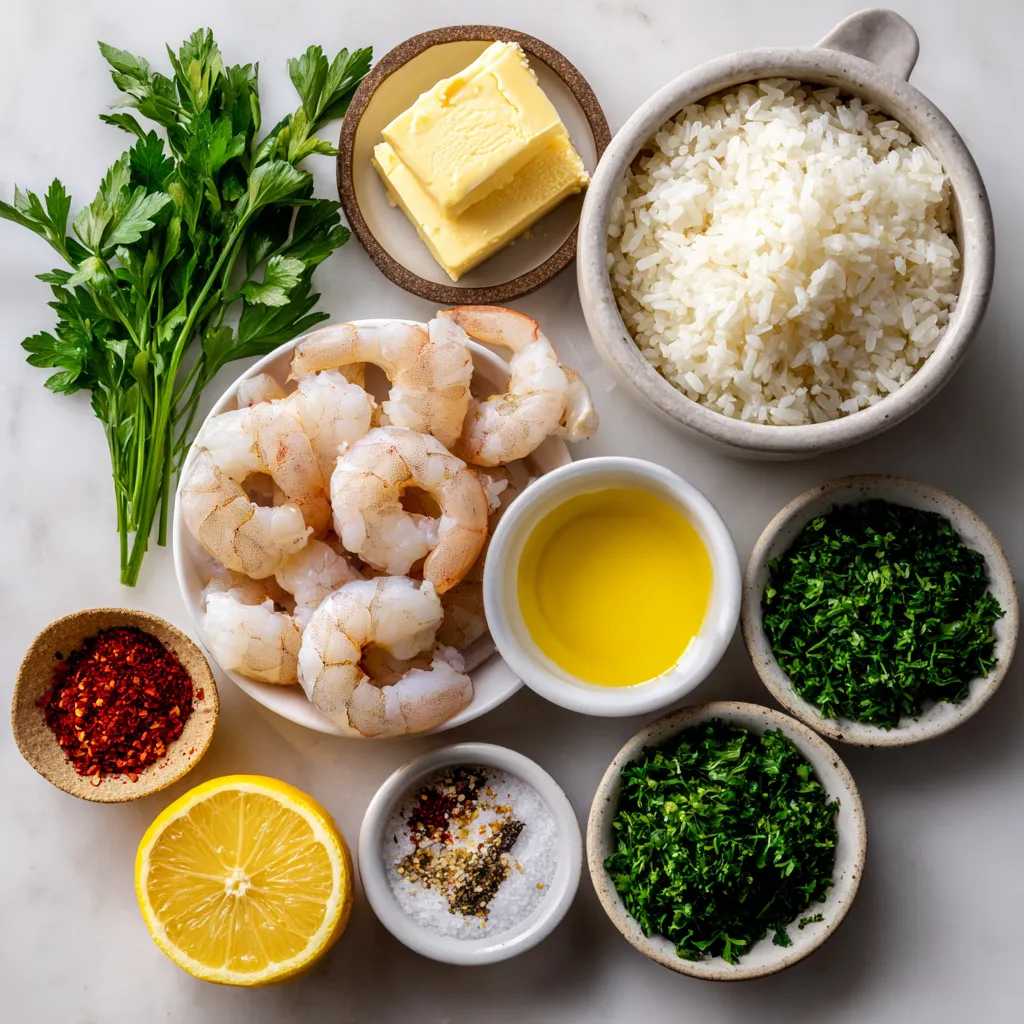
List of Ingredients
– 1 pound large shrimp, peeled and deveined
– 1 cup jasmine rice
– 2 cups chicken or vegetable broth
– 4 tablespoons unsalted butter
– 6 cloves garlic, minced
– 1 teaspoon smoked paprika
– 1 teaspoon fresh lemon zest
– 1 tablespoon freshly squeezed lemon juice
– Salt and freshly ground black pepper, to taste
– ¼ cup fresh parsley, finely chopped (for garnish)
– Optional: A pinch of red pepper flakes for those who enjoy a spicy kick
Preparation of Ingredients
Start by rinsing the jasmine rice. Use cold water until it runs clear. This step helps remove extra starch. It makes the rice fluffy and not sticky. Next, mince the garlic. You want it finely chopped for a strong flavor.
For the shrimp, peel and devein them if they are not already. This step is key for a clean bite. Gather all your spices and herbs. Measure them out beforehand for easy mixing later.
Measurement Tips
When measuring rice, use a dry measuring cup. For liquids like broth, a liquid measuring cup works best. Make sure to pack the garlic firmly when you chop it. This ensures you get the full flavor in each bite. For spices, use measuring spoons to get just the right amount. Remember, you can adjust salt and pepper to your taste.
Step-by-Step Instructions
Cooking the Jasmine Rice
To start, rinse 1 cup of jasmine rice under cold water. Keep rinsing until the water runs clear. This step removes excess starch. It helps the rice cook fluffy.
Next, in a medium saucepan, mix the rinsed rice with 2 cups of chicken or vegetable broth. Bring it to a boil over medium-high heat. Once it boils, reduce the heat to low. Cover the pot and let it simmer for 15 minutes. The rice will absorb all the broth. After that, take it off the heat and let it sit for 5 more minutes. This helps the rice steam and become tender.
Preparing the Garlic Butter Shrimp
While your rice cooks, let’s prepare the shrimp. In a large skillet, melt 2 tablespoons of butter over medium heat. When the butter is bubbling, add 6 cloves of minced garlic. Sauté the garlic for about 1 minute. Stir it often so it doesn’t burn. You want it fragrant and golden.
Add 1 pound of deveined shrimp to the skillet. Season the shrimp with 1 teaspoon of smoked paprika, lemon zest, salt, and black pepper. Cook the shrimp for 2-3 minutes on each side. When they turn pink and opaque, they are ready.
Once cooked, stir in the other 2 tablespoons of butter and 1 tablespoon of lemon juice. Toss the shrimp in the garlic butter sauce to coat them well. If you like spice, add a pinch of red pepper flakes.
Plating and Garnishing the Dish
Now it’s time to plate your meal. Fluff the cooked rice with a fork to separate the grains. Serve a generous amount of rice on each plate. Top it with the garlic butter shrimp.
For a nice touch, sprinkle finely chopped parsley on top. You can also add a bit of extra lemon zest if you want more citrus flavor. This dish looks great and tastes even better!
Tips & Tricks
How to Achieve Fluffy Rice
To make fluffy rice, wash the jasmine rice well. Rinsing helps remove extra starch. This step is key. Use cold water until it runs clear. After that, cook the rice in broth. This adds flavor. Follow a 2:1 liquid to rice ratio. When boiling, cover and reduce the heat. Let it simmer for 15 minutes. After cooking, let it sit for 5 minutes. This allows the rice to steam and become fluffy.
Cooking Shrimp to Perfection
For perfect shrimp, start with fresh or frozen shrimp. If frozen, thaw them first. Heat butter in a skillet. Use medium heat to avoid burning. Add minced garlic and sauté for about a minute. Then, add the shrimp and season them. Cook for 2-3 minutes on each side. Look for pink and opaque shrimp. This means they’re ready. Remember, overcooking makes shrimp rubbery, so watch closely.
Flavor Enhancers and Seasoning Options
To enhance flavor, use smoked paprika for warmth. A touch of fresh lemon zest brightens the dish. You can also add a splash of lemon juice. If you like heat, red pepper flakes are great. Fresh herbs like parsley add color and taste. Feel free to experiment with spices you enjoy. Each twist makes the meal unique and fun.
Pro Tips
- Rinse the Rice: Rinsing jasmine rice under cold water removes excess starch, resulting in fluffier rice that doesn’t stick together.
- Don’t Overcook the Shrimp: Cook shrimp just until they turn pink and opaque, usually 2-3 minutes per side, to avoid rubbery texture.
- Add Freshness with Zest: Incorporating lemon zest not only enhances flavor but also adds a vibrant aroma to the dish.
- Garnish for Color: Finishing with fresh parsley and extra lemon zest elevates presentation and adds a pop of color to your dish.
Variations
Spicy Garlic Butter Shrimp (with Red Pepper Flakes)
If you love heat, add red pepper flakes. Start with a pinch and taste. You can always add more if you want. The flakes bring warmth and a nice kick to the dish. This simple tweak will make your garlic butter shrimp sizzle with flavor.
Alternative Protein Options (e.g., Chicken, Tofu)
Not in the mood for shrimp? You can swap it for chicken or tofu. Use about one pound of chicken breast, cut into small pieces. Cook it the same way you cook shrimp. If you want to use tofu, choose firm tofu. Cube it and sauté until golden. Both options will still soak up that tasty garlic butter sauce.
Vegetable Additions (e.g., Asparagus, Peas)
Adding veggies can boost nutrition and flavor. Try asparagus or peas for a pop of color. Cut asparagus into bite-sized pieces and cook them with the shrimp. For peas, add them in the last minute of cooking. They will stay bright and crisp. This simple addition makes the dish even more appealing and balanced.
Storage Info
How to Store Leftovers
To store leftovers, let the dish cool first. Place the shrimp and rice in an airtight container. Make sure it seals well to keep the flavors fresh. Store it in the fridge for up to three days. If you keep it longer, it may lose its taste and texture.
Reheating Instructions
When you’re ready to eat, take the leftovers out of the fridge. You can reheat them in the microwave. Use a microwave-safe bowl and cover it with a lid or a damp paper towel. Heat for about 1 to 2 minutes, stirring halfway through. Check if it’s warm enough. If not, heat for an extra 30 seconds.
You can also reheat in a skillet. Add a splash of broth or water to keep it moist. Warm it over medium heat, stirring gently until it’s hot. This method helps keep the shrimp tender.
Freezing Tips for Meal Prep
If you want to freeze the dish, let it cool completely. Divide it into smaller portions and place them in freezer-safe bags or containers. Remove as much air as possible to avoid freezer burn. You can freeze it for up to three months.
To thaw, place the container in the fridge overnight. For a quicker method, you can use the microwave’s defrost setting. Once thawed, reheat as mentioned above. This way, you can enjoy this tasty meal on busy days!
FAQs
What type of shrimp is best for this recipe?
For this recipe, I recommend using large shrimp. They provide a nice bite and cook well. Look for fresh or frozen shrimp that is peeled and deveined. You can also use shrimp labeled as “jumbo” if you want a bigger portion. The cooking time remains the same, so you’ll still get that perfect garlic butter flavor.
Can I use brown rice instead of jasmine rice?
Yes, you can use brown rice. It has a nuttier taste and a chewier texture. Keep in mind, brown rice takes longer to cook. You will need to adjust the cooking time to about 40-45 minutes. Use the same amount of broth, but check the rice often to avoid overcooking.
How do I prevent the shrimp from becoming rubbery?
To keep shrimp tender, avoid overcooking them. Cook the shrimp just until they turn pink and opaque, which takes about 2-3 minutes per side. Make sure your skillet is hot before adding the shrimp. If you see them curling tightly, they are likely overcooked.
Is it possible to make this dish without butter?
Yes, you can make this dish without butter. You can use olive oil or a plant-based butter alternative. Both options will add flavor and richness to the dish. If you choose olive oil, use the same amount as the butter to maintain the creamy texture.
This blog post covered key steps for cooking garlic butter shrimp and jasmine rice. We discussed the right ingredients, how to prep them, and helpful measurement tips. You learned cooking methods and plating ideas for a great dish. I shared tips for fluffy rice and cooking shrimp well. Options for variations and smart storage methods were also included.
The right ingredients and careful preparation lead to a tasty meal you can enjo


