Garlic Butter Steak Bites Savory and Quick Dish

Are you ready to treat your taste buds? Garlic Butter Steak Bites are a quick and savory dish you’ll love! With tender steak cubes tossed in rich garlic butter and fresh herbs, they make the perfect meal or snack. In this post, I’ll guide you through easy steps, tips for perfect flavor, and delicious serving ideas. Let’s dive into this tasty recipe and make your next meal unforgettable!
Ingredients
Main Ingredients
– 1 pound sirloin steak, cut into bite-sized cubes
– 4 tablespoons unsalted butter, divided
– 4 cloves garlic, finely minced
– Fresh herbs: rosemary and thyme
– Seasoning: salt and freshly ground black pepper
– Optional: soy sauce for added flavor
To make garlic butter steak bites, I focus on fresh and quality ingredients. The sirloin steak is the star here. It is tender and full of flavor. Cutting it into bite-sized cubes helps with even cooking.
Butter adds richness to our dish. I use unsalted butter to control the salt. The key to great taste is the garlic. I finely mince it to release its full flavor. Fresh herbs like rosemary and thyme enhance the dish. They add a lovely aroma and depth.
Seasoning is crucial. Salt and freshly ground black pepper bring out the natural flavors of the steak. If you want an extra kick, you can drizzle some soy sauce on the steak for a savory twist.
Garnish
– Fresh parsley, finely chopped
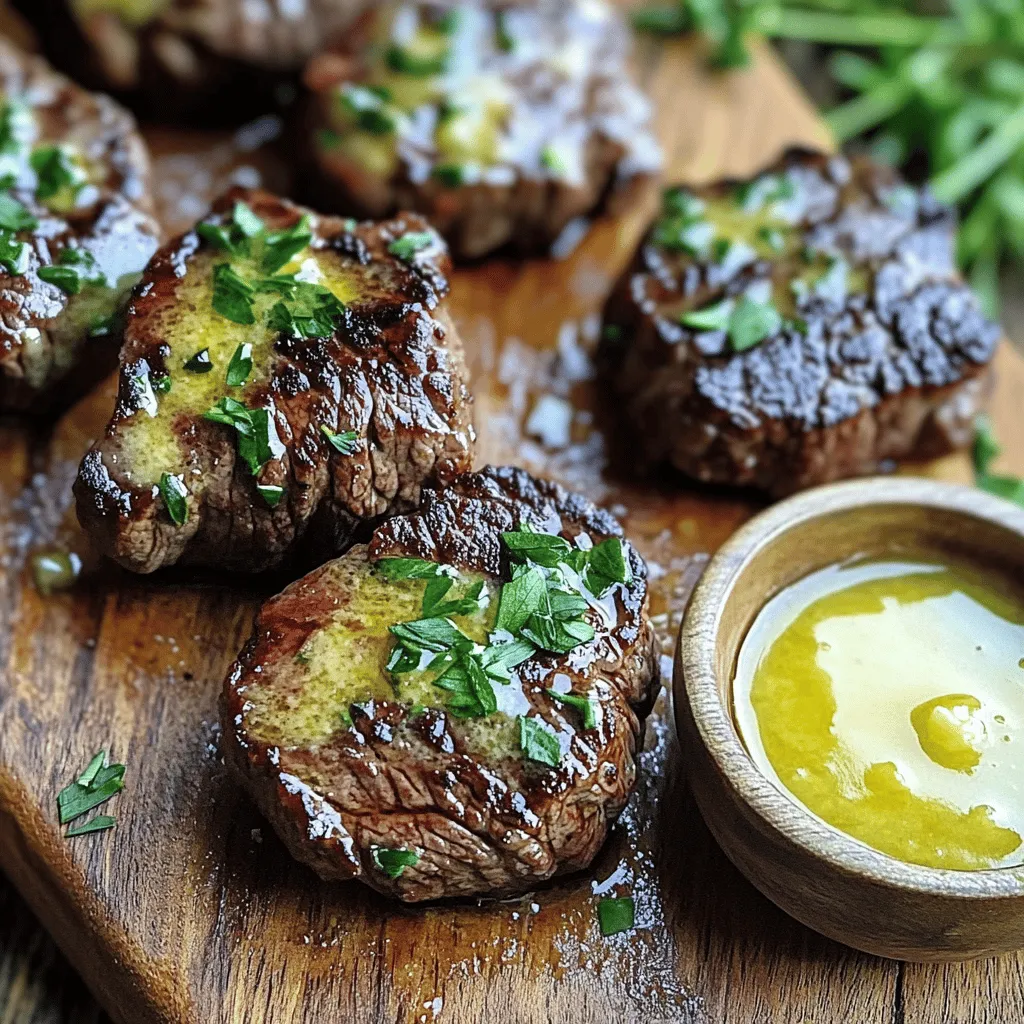
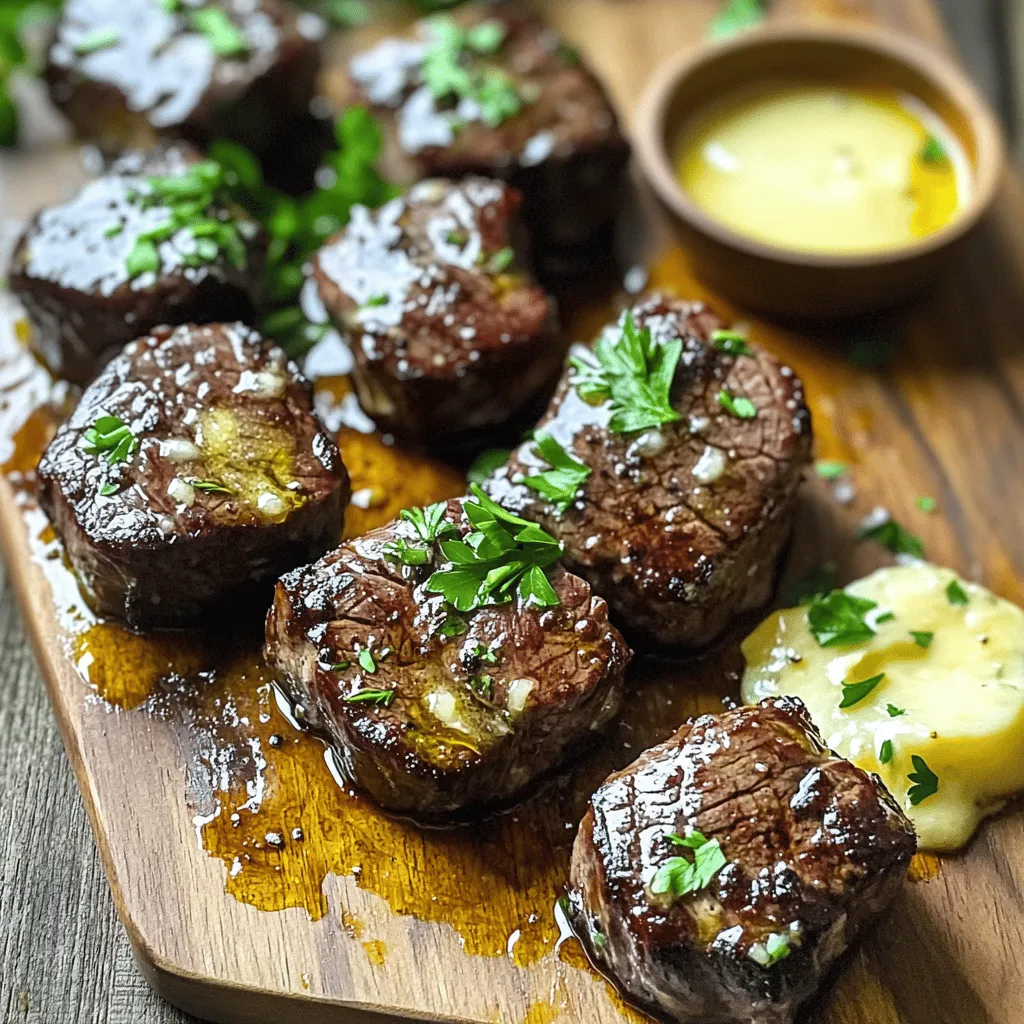
Lastly, I love to sprinkle fresh parsley on top. It adds a pop of color and freshness. This simple garnish makes the dish look more inviting.
Step-by-Step Instructions
Preparing the Steak
To start, season the steak cubes with salt and pepper. If you want, add soy sauce for extra flavor. Let the steak sit for 15 minutes; this helps the flavors mix. When cutting sirloin, use a sharp knife. Cut it into bite-sized pieces. Aim for uniform cubes so they cook evenly.
Cooking the Steak
For cooking, use a large skillet. Heat 2 tablespoons of butter over medium-high heat. Once the butter is hot, add the steak cubes in a single layer. Avoid overcrowding the pan. This allows for a nice sear. Cook for 2-3 minutes on each side. The goal is a golden crust and your preferred doneness. After cooking, take the steak bites out and let them rest on a plate.
Making the Garlic Butter Sauce
Lower the heat to medium. Add the remaining 2 tablespoons of butter into the skillet. Once it melts, stir in the minced garlic, rosemary, and thyme. Sauté this mix for 1-2 minutes until the garlic smells great. Then, add the steak bites back to the skillet. Toss them in the garlic butter for about a minute. This coats them in flavor and warms them up. Finally, take the skillet off the heat and serve the steak bites on a platter. Top with fresh parsley for extra color and taste.
Tips & Tricks
Meat Selection
Choosing the right cut of steak is key. I recommend sirloin steak for its flavor and tenderness. Look for meat that has a nice red color and some marbling. This fat helps keep the meat juicy. When buying fresh herbs, check for vibrant green leaves. Smell them too; they should have a strong, pleasant scent. Avoid herbs that look wilted or brown.
Perfecting the Cooking Technique
To avoid overcooking your steak bites, use high heat. Sear them for 2-3 minutes on each side. Do not move them too much; this lets a nice crust form. After cooking, let the steak rest for a few minutes. This helps the juices stay in the meat, making it more tender and juicy.
Serving Suggestions
Garlic butter steak bites go well with many sides. Try serving them with mashed potatoes or a fresh salad. These sides balance the rich flavors of the steak. For dipping sauces, I suggest a creamy garlic sauce or a tangy chimichurri. Both add a fun twist to the dish.

Variations
Flavor Enhancements
You can change the taste of garlic butter steak bites by adding herbs or spices. Try using fresh basil or parsley for a light twist. For a bolder flavor, add a pinch of smoked paprika or cayenne pepper. You can also switch up the sauces. Instead of soy sauce, try Worcestershire sauce for a tangy kick. Or, use a splash of balsamic vinegar for a sweet and sour touch. Each choice brings a new flavor to your dish.
Cooking Methods
You can grill garlic butter steak bites for a smoky flavor. Preheat your grill to medium-high heat. Follow the same seasoning steps, then thread the steak cubes onto skewers. Grill for 2-3 minutes on each side until they reach your desired doneness. For a faster method, use an Instant Pot. Simply season the steak and sauté it in the pot with butter. Add a bit of broth, then cook on high pressure for 5 minutes. This method speeds up your cooking time while keeping the meat tender.
Dietary Considerations
To make garlic butter steak bites gluten-free, skip the soy sauce. Use tamari instead, which is gluten-free. For a dairy-free option, substitute the butter with olive oil or a vegan butter alternative. This way, you keep the dish tasty while meeting dietary needs. Each variation allows everyone to enjoy this dish without missing out.
Storage Info
How to Store Leftovers
To store leftover garlic butter steak bites, follow these steps:
– Allow the steak bites to cool to room temperature.
– Place them in an airtight container.
– Store in the fridge for up to three days.
This helps keep them fresh and tasty.
Reheating Instructions
To reheat the steak bites, use the stove or microwave:
– For the stove, heat a pan over medium heat.
– Add a little butter or oil to the pan.
– Place the steak bites in the pan and heat for a few minutes.
This keeps them juicy and flavorful.
– For the microwave, place the bites on a plate.
– Cover with a damp paper towel and heat in short bursts.
Check often to avoid overcooking.
Freezing Tips
Yes, you can freeze garlic butter steak bites:
– After cooking, let them cool completely.
– Place in a freezer-safe bag or container.
– Store in the freezer for up to three months.
For the best results, use a vacuum sealer if you have one.
To thaw, move the container to the fridge the night before.
You can also use the microwave on defrost mode.
This helps maintain the flavors and texture.
FAQs
How do I know when steak bites are cooked perfectly?
To check if steak bites are cooked just right, use a meat thermometer. The ideal internal temperature for medium-rare is 130°F to 135°F. For medium, aim for 140°F to 145°F. If you don’t have a thermometer, you can use the touch test. Press the steak with your finger; it should feel soft yet firm for medium-rare.
– Use these tips for checking doneness:
– Look for a nice golden crust.
– Cut one piece open to see the color.
– Trust your senses; you’ll learn with practice.
Can I make these steak bites ahead of time?
Yes, you can make these steak bites ahead of time. Cook the steak bites, then let them cool completely. Store them in an airtight container in the fridge for up to three days. When you are ready to eat, reheat them in a skillet. Add a bit of butter for flavor and moisture.
– Preparing in advance:
– Cook your steak bites and cool them.
– Store in a fridge-safe container.
– Reheat on low heat in a skillet.
What can I serve with garlic butter steak bites?
Garlic butter steak bites pair well with many sides. Try serving them with mashed potatoes, grilled veggies, or a fresh salad. You can also use toothpicks for easy serving at parties.
– Popular pairing ideas:
– Creamy mashed potatoes.
– Grilled asparagus or green beans.
– A crisp garden salad with vinaigrette.
You learned how to make tasty garlic butter steak bites using simple steps. Start with quality sirloin and fresh herbs. Cooking techniques and resting time are crucial for the best flavor. Remember to try variations and adapt for dietary needs.
In the end, these tips and tricks will help you impress friends and family. Enjoy your cooking journey and savor every bite!


![To make sticky orange chicken, you'll need a few simple yet flavorful items. Here is a complete list of ingredients you'll need for this recipe: - 1.5 lbs boneless, skinless chicken thighs - 1/2 cup cornstarch - 2 tablespoons vegetable oil - 3 cloves garlic, finely minced - 1-inch piece of fresh ginger, grated - 1/4 cup low sodium soy sauce - 1/2 cup freshly squeezed orange juice - Zest of 1 medium orange - 1/4 cup honey - 2 tablespoons rice vinegar - 1/2 teaspoon red pepper flakes (optional) - 2 green onions, finely chopped, for garnish - Sesame seeds, for garnish Using high-quality chicken is key for this dish. Chicken thighs stay juicy and tender. Cornstarch is essential for a crispy texture. Vegetable oil helps with frying and flavor. Fresh garlic and ginger bring bold taste to the sauce. Orange juice and zest create a bright, zesty flavor. Honey adds sweetness that balances the dish. Rice vinegar gives a touch of tang. If you like spice, add red pepper flakes for heat. Don’t forget the green onions and sesame seeds for garnish. They add color and crunch. This recipe is simple yet packed with flavor. You can find the full recipe in earlier sections. Coating with Cornstarch Start by placing the chicken pieces in a big bowl. Pour in the cornstarch. Mix it well with your hands or a spoon. Make sure all chicken pieces are covered. This step is key for a crispy finish. Sautéing the Chicken Pieces Next, heat the vegetable oil in a large skillet or wok on medium-high heat. Once hot, add the chicken in batches. Avoid crowding the pan. Cook for about 5-7 minutes. Stir it often until the chicken turns golden brown. Check that each piece reaches 165°F inside. Remove the chicken and place it on a plate with paper towels to soak up extra oil. Sautéing Garlic and Ginger Lower the heat to medium. In the same skillet, add the minced garlic and grated ginger. Sauté for about 30 seconds. You want to smell the rich aroma of garlic and ginger. This signals it’s time to mix the sauce. Mixing the Sauce Ingredients Pour in the soy sauce, orange juice, orange zest, honey, and rice vinegar. If you like some heat, add the red pepper flakes. Stir it all together. Increase the heat slightly and let it bubble. Allow the sauce to simmer for 3-5 minutes. You want it to thicken and develop a rich flavor. Glazing the Chicken Now, return the cooked chicken to the skillet. Use a spatula to toss the chicken in the sauce. Ensure every piece gets coated. Let it cook for another 2-3 minutes. This will heat the chicken through and make it sticky and flavorful. Garnishing for Serving Take the skillet off the heat. Sprinkle the chopped green onions and sesame seeds over the chicken. These add color and crunch. Serve this dish hot and enjoy the zesty flavors of your sticky orange chicken. Check the Full Recipe for more details! Importance of Cornstarch Coating Coating the chicken in cornstarch is key for a crispy bite. It helps create a crunchy layer when you fry it. The cornstarch seals in moisture, keeping the chicken juicy. You want to ensure every piece is coated well. This simple step makes a big difference in texture and taste. Avoiding Overcrowding the Pan Do not overcrowd the pan when cooking the chicken. If you add too much at once, the chicken will steam instead of fry. This means less crispiness. Cook in batches and give each piece space. This way, you get that golden-brown color you want. Using Fresh Ingredients Using fresh ingredients makes your dish taste better. Fresh garlic and ginger give a bright flavor. Squeeze your own orange juice for the best taste. Fresh zest adds a lovely aroma. These small details make your sticky orange chicken shine. Adjusting Spice Levels If you like heat, add red pepper flakes. Start with a small amount and taste as you go. You can always add more if you want a kick. If you prefer a milder dish, skip the spice. Tailor the recipe to your taste buds. Pairing with Sides This sticky orange chicken goes well with many sides. Serve it over fluffy jasmine rice for a complete meal. Steamed broccoli or green beans also work nicely. These sides balance the sweetness of the chicken. Presentation Ideas Make your dish look as good as it tastes. Use a white plate to make the orange color pop. Drizzle some extra sauce on top. Sprinkle sesame seeds and green onions for a final touch. A pretty plate makes every meal special. For the full recipe, check out the Sticky Orange Chicken Delight. {{image_4}} You can easily switch up the protein in this dish. - Using Chicken Breasts: You can replace chicken thighs with chicken breasts. They are leaner and will still taste great. Just be sure to cook them until they are juicy. - Substituting with Tofu or Tempeh: For a plant-based option, try tofu or tempeh. Cut them into bite-sized pieces and follow the same steps as the chicken. They soak up the sauce well and give a nice texture. Feel free to play with flavors to make this dish your own. - Adding More Citrus: Want more zing? Add lime or lemon juice. A splash at the end brightens the dish and gives it a fresh twist. - Experimenting with Herbs and Spices: You can also try adding fresh herbs like cilantro or basil. A sprinkle of these can add depth and freshness. This recipe can fit many dietary needs. - Gluten-Free Modifications: If you're gluten-free, use tamari instead of soy sauce. This keeps the flavor while making it safe for your diet. - Low-Sugar Alternatives: For a low-sugar version, substitute honey with a sugar-free sweetener. This still gives sweetness without the extra calories. These variations help you enjoy Sticky Orange Chicken in your own way. Check the Full Recipe for more details! After you enjoy your sticky orange chicken, you may have some leftovers. To keep them fresh, store the chicken in an airtight container. Place it in the fridge. It will last for about 3 to 4 days. When reheating, use the microwave or a skillet. Heat it gently to avoid drying it out. A splash of water can help keep it moist. If you want to keep your sticky orange chicken longer, consider freezing it. Allow the chicken to cool completely before freezing. Place it in a freezer-safe bag or container. Remove as much air as possible to prevent freezer burn. It can stay in the freezer for up to 3 months. When you're ready to use it, thaw the chicken overnight in the fridge. For a quicker method, you can use the defrost setting on your microwave. Just be careful not to start cooking it. To maintain the best flavor, always serve your sticky orange chicken fresh. If you prepare it ahead of time, store the sauce separately. This will help keep the chicken crispy. When you are ready to serve, reheat both the chicken and sauce. Toss them together just before serving for that sticky goodness. For more details on how to make this dish, check out the Full Recipe. You can enjoy Sticky Orange Chicken with a few tasty sides. Here are some great options: - Fluffy jasmine rice - Steamed broccoli - Fried rice - Sautéed snap peas - Crisp green salad For drinks, pair it with: - Iced tea - Sparkling water with lemon - A light white wine These sides and drinks will balance the sweet and sticky flavors of the chicken. To kick up the heat in your Sticky Orange Chicken, try these tips: - Adding Heat with Pepper Flakes: Sprinkle red pepper flakes into the sauce. Start with a little and add more if needed. This gives a nice kick without overpowering the dish. - Experimenting with Hot Sauces: Mix in your favorite hot sauce. A few drops can add flavor and heat. Choose a sauce that complements the orange taste. You can adjust the heat to match your taste! Yes, you can prep Sticky Orange Chicken in advance. Here’s how: - Prep Tips for Making in Advance: Marinate the chicken in the sauce for a few hours or overnight. This adds great flavor. You can also chop the garlic and ginger ahead of time. - Adjusting Cooking Times: When cooking, make sure the chicken is heated through. If you make it ahead, just warm it on low heat in the skillet. This keeps it from drying out. These tips help you enjoy a delicious meal even on busy days. For the full recipe, check out the [Full Recipe]. This blog post guided you through making Sticky Orange Chicken, from ingredients to storage tips. Remember to coat the chicken in cornstarch for that perfect crunch. Use fresh ingredients to enhance flavor and feel free to experiment with proteins and spices. With these straightforward steps and variations, you can enjoy a tasty meal that suits your needs. Keep these tips in mind for a delicious outcome every time. Now, it’s time to bring this vibrant dish to your table!](https://joymealplan.com/wp-content/uploads/2025/06/0fb5afb5-059d-4b64-a6dc-9cc9d9794f9b-768x768.webp)


![- 1 pound fresh shrimp, peeled and deveined - 1 tablespoon extra virgin olive oil - 1 teaspoon chili powder - 1 teaspoon ground cumin - 1 clove garlic, finely minced - Juice of 1 lime - 1/2 teaspoon sea salt - 1/4 teaspoon freshly ground black pepper The main ingredients create the base of your dish. Fresh shrimp gives a sweet and juicy taste. Olive oil adds richness and helps with cooking. The spices and seasonings bring the zing. Chili powder and cumin mix well for flavor. Garlic adds depth, while lime juice brightens the dish. - 8 small corn tortillas - 1 cup finely shredded red cabbage - 1/2 cup ripe tomatoes, diced - 1 ripe avocado, sliced into thin wedges - Fresh cilantro leaves, chopped For the tacos, corn tortillas are perfect. They hold all the goodness inside. Red cabbage gives a nice crunch. Diced tomatoes add a fresh touch. Avocado brings creaminess, balancing the flavors. Cilantro adds a bright note, making each bite special. - Lime wedges - Salsa Garnishes add fun and flavor. Squeeze fresh lime over the tacos for more zest. Salsa can give extra taste and a little heat. These choices let you customize each taco just how you like it. You can find the full recipe for Zesty Shrimp Tacos, and enjoy cooking! To start, I prepare the marinade. In a medium bowl, I combine fresh shrimp with olive oil, chili powder, cumin, minced garlic, lime juice, sea salt, and black pepper. I mix everything well so the shrimp get coated evenly. This step is crucial for flavor. I let the shrimp marinate for about 15 minutes. This time allows the flavors to blend and makes the shrimp taste amazing. Next, I heat a non-stick skillet over medium-high heat. Once it's hot, I add the marinated shrimp in a single layer. I make sure not to crowd the pan. I cook the shrimp for about 2-3 minutes on each side. They turn pink and opaque when done. Once cooked, I remove them from the heat and set them aside. While the shrimp cook, I warm the corn tortillas. I have two methods. First, I can use a pan. I heat it over low heat for about 30 seconds on each side. This keeps them soft. The second way is to use the microwave. I place the tortillas on a plate, cover them with a damp paper towel, and microwave them for 15-20 seconds. Soft tortillas are key for great tacos. Now it’s time to assemble the tacos. I take each warm tortilla and place 3-4 shrimp pieces on it. I ensure each taco has enough filling. Then, I top the shrimp with shredded red cabbage, diced tomatoes, and avocado slices. This layering makes each bite full of flavor. For the finishing touch, I sprinkle fresh cilantro leaves on top. If I want, I can add a squeeze of lime juice for extra zest. For the full recipe, check out the detailed instructions. To avoid overcooking shrimp, watch the clock closely. Cook them for only 2-3 minutes per side. Shrimp cooks fast and can turn rubbery if you leave them too long. Look for signs of perfectly cooked shrimp: they should be pink and opaque. The texture should be firm but not tough. Adding extra spices can boost the taste of your shrimp. Try cayenne for heat or smoked paprika for a deeper flavor. Pair your tacos with sauces like spicy crema or zesty salsa. These add layers of flavor and make each bite exciting. When serving, make your tacos look appealing. Use a colorful platter to catch the eye. Arrange lime wedges around the tacos for a bright touch. For gatherings, consider serving with a small bowl of extra toppings. Diced tomatoes or fresh salsa can be fun for guests to add themselves. {{image_4}} You can switch up the protein in your tacos for different tastes. Fish like salmon or tilapia works great instead of shrimp. Just follow the same marinade and cooking steps. Chicken is another option. Use diced chicken breast and cook it until golden. If you want a vegetarian version, try grilled portobello mushrooms or spicy tofu. Both options soak up flavors well and add a hearty bite. Experimenting with marinades can add fun twists to your tacos. Try a mango lime marinade for a sweet and tangy kick. A chipotle marinade gives a smoky, spicy flavor. You can also mix herbs like oregano and basil for a fresh taste. For toppings, get creative! Add sliced radishes for crunch or pickled onions for tang. Feta cheese can also lend a creamy touch. Each of these will make your tacos unique and exciting. To make your meal more complete, serve your tacos with side dishes. Black beans or corn salad pair well. A light cucumber salad can also balance the spice. If you have leftovers, use them in new ways. Toss shrimp in a salad or mix with rice for a bowl. You can also make a shrimp quesadilla using the tortillas left over. There are many ways to enjoy what you have! For the full recipe, check out the [Full Recipe]. To keep leftover shrimp fresh, store them in an airtight container. Make sure to refrigerate them right away. Shrimp can stay good in the fridge for up to three days. If you wait longer, they may spoil. Always check for any bad smell before using leftovers. To keep tortillas fresh, wrap them tightly in foil or plastic wrap. You can also place them in a resealable bag. Store them in the fridge for up to a week. For toppings like avocado and cabbage, use airtight containers. Avocado can turn brown quickly, so add lime juice to slow down this process. Cabbage stays fresh for about five days when stored properly. Yes, you can freeze cooked shrimp. Place them in a single layer on a baking sheet. Once frozen, transfer them to a freezer-safe bag. They can last for up to three months in the freezer. For raw shrimp, store them in a freezer-safe bag with as much air removed as possible. They can also last for up to three months. Always label your bags with the date for easy tracking. You should marinate shrimp for about 15 minutes. This short time lets the flavors soak in. The lime juice adds a nice tang, while the spices enhance the taste. Don't go too long, or the shrimp can become tough. Yes, you can prep some parts in advance. You can marinate the shrimp and store it in the fridge for a few hours. Just cook it when you’re ready. You can also chop veggies early and keep them in airtight containers. If you have shrimp allergies, try chicken or fish. Thinly sliced chicken breast works well. You can also use tofu or tempeh for a plant-based option. Just keep the marinade the same for great flavor. To spice up your tacos, add jalapeños or hot sauce. You can mix in cayenne pepper or chipotle powder with the marinade. Another idea is to top with a spicy salsa. These tweaks will give your tacos an extra kick. For the full recipe, check out the Full Recipe section. In summary, this guide covered how to make zesty shrimp tacos from start to finish. We discussed key ingredients, step-by-step instructions, useful tips, and delicious variations. You learned how to marinate shrimp perfectly, warm tortillas, and assemble the tacos for the best flavor. Remember, customizing your tacos keeps things fresh and fun. Enjoy experimenting with different ingredients and flavors. These tacos can make every meal feel special. Dive in, and happy cooking!](https://joymealplan.com/wp-content/uploads/2025/06/53de0157-3bfc-48aa-976d-e4e7ac7f22a7-768x768.webp)