Garlic Butter Steak Bites Savory and Simple Recipe
![- 1 pound sirloin steak, cut into bite-sized cubes - 4 tablespoons unsalted butter - 4 cloves garlic, finely minced - 1 tablespoon fresh rosemary, finely chopped - 1 tablespoon fresh thyme, finely chopped - Salt and freshly ground black pepper, to taste - 1 tablespoon olive oil - ¼ teaspoon red pepper flakes (optional for heat) - Fresh parsley, finely chopped, for garnish The right ingredients make all the difference. For this dish, you want a good cut of meat. Sirloin steak works well because it’s tender and flavorful. Cut it into bite-sized cubes. This size helps them cook quickly and evenly. Butter adds richness. The unsalted kind allows you to control the salt level. Garlic gives a strong, tasty punch. Fresh herbs, like rosemary and thyme, add a nice touch. They bring out the beefy flavor. You can add red pepper flakes for a bit of heat. If you prefer a milder dish, just skip this ingredient. Fresh parsley is perfect for garnishing. It adds color and freshness to the final plate. Every ingredient plays a role. Together, they create joy in every bite. For the complete recipe, check out the Full Recipe section. Start by patting the steak cubes dry with a paper towel. This helps create a nice crust when searing. Moisture can make it hard to get that perfect sear. Next, season each steak cube with salt and freshly ground black pepper. This simple step packs in flavor. Let the seasoned steak sit for a bit. This allows the salt to work its magic. In a large skillet, heat the olive oil over medium-high heat until it shimmers. This means the oil is hot enough for searing. Carefully add the steak cubes. Make sure they are in a single layer. Sear the steak for 2-3 minutes without moving them. This helps form a beautiful crust. After that, flip the cubes and sear for another 2-3 minutes. Adjust the time if you want your steak more done. Once they’re seared to your liking, take the steak bites out and set them aside. In the same skillet, lower the heat to medium. Add the unsalted butter and minced garlic. Then toss in the chopped rosemary, thyme, and red pepper flakes if you want some heat. Stir everything together until the butter melts and the garlic smells great. This should take about a minute. Now, return the cooked steak bites to the skillet. Toss them gently in the garlic butter sauce. Cook for another 1-2 minutes. This lets all the flavors mix well together. Take the skillet off the heat. For the final touch, garnish the steak bites with freshly chopped parsley. Serve them on a colorful platter for a nice look. For fun, you can skewer the bites with toothpicks. This makes them easy to eat. Drizzle some of that garlic butter sauce on top to make them even more tasty! For the full recipe, check out the details provided earlier. Enjoy your cooking! To make the best garlic butter steak bites, start with patting the steak dry. This step is key. Dry steak creates a nice crust when you sear it. Use a paper towel to soak up any moisture. Next, adjust your cooking times based on how you like your steak. For medium-rare, sear the cubes for 2-3 minutes on each side. If you prefer your steak more done, add an extra minute or two. Remember, don’t overcrowd the pan. This helps the steak cook evenly. To boost flavor, consider adding spices and herbs. Fresh rosemary and thyme work wonders. The aroma will fill your kitchen and make the bites irresistible. You can also customize your steak bites with optional add-ins. If you like heat, sprinkle in some red pepper flakes. Want a bit of sweetness? Try adding a splash of balsamic vinegar. Each tweak can create a new taste experience. For the full recipe, click here: [Full Recipe]. {{image_4}} You can swap steak for chicken or shrimp. Chicken thighs work well because they stay juicy. Cut the pieces into bite-sized chunks. Cook for about 5-7 minutes until they are golden brown. Shrimp cooks quickly and adds a sweet taste. Use large shrimp and cook them for 2-3 minutes on each side until they turn pink. Both options absorb the garlic butter flavor nicely. For a gluten-free meal, use gluten-free soy sauce instead of regular soy sauce. Always check the label on your butter and spices. Most of them are naturally gluten-free. This keeps the dish safe for those with gluten sensitivities. Enjoy the same great taste without worry. If you want a vegetarian version, mushrooms are a great substitute. Portobello or cremini mushrooms can mimic the texture of meat. Slice them into bite-sized pieces and cook until golden. You can also use tofu for added protein. Press the tofu to remove moisture, then cut it into cubes. Sauté in the garlic butter for a tasty, plant-based dish. To keep your leftover steak bites fresh, store them in an airtight container. Make sure to cool them first. Place them in the fridge within two hours of cooking. This way, they stay safe to eat. Good storage helps keep the flavor and texture. Leftover steak bites last about three to four days in the fridge. When you're ready to enjoy your steak bites again, reheating is key. Use a skillet for the best results. Heat it over medium-low heat. Add a small amount of butter or oil to help keep them moist. Stir gently for about five minutes. This way, you keep the great taste and tender bite. Avoid using the microwave, as it can make the steak chewy. If you want to save steak bites for later, freezing is a good option. First, let them cool completely. Then, place them in a freezer-safe container. You can also use freezer bags, making sure to remove as much air as possible. They can last up to three months in the freezer. When ready to eat, thaw in the fridge overnight. Reheat them in a skillet for the best flavor. Enjoy your Garlic Butter Steak Bites with these storage tips for later meals! For the full recipe, check out the earlier section. Garlic butter steak bites pair well with many sides. Here are some great options: - Roasted vegetables: Carrots, Brussels sprouts, or asparagus are tasty choices. - Mashed potatoes: Creamy potatoes balance the rich steak flavor. - Rice: Fluffy rice soaks up the garlic butter sauce nicely. - Salad: A fresh green salad adds a crisp bite. - Garlic bread: Perfect for dipping into the garlic butter sauce. Yes, you can prep some parts ahead. Here are my tips: - Season the steak: You can season the steak cubes a few hours before cooking. This helps the flavors soak in. - Make the garlic butter sauce: Prepare the sauce in advance and store it in the fridge. Just warm it up before tossing in the steak. - Cook and store: You can cook the steak bites and store them in the fridge for up to two days. Reheat them gently before serving. If you want more heat, try these ideas: - Add more red pepper flakes: Increase the amount to your taste. - Use hot sauce: Drizzle some hot sauce over the finished dish. - Add jalapeños: Sauté sliced jalapeños with the garlic for extra spice. - Try chili powder: Sprinkle some chili powder on the steak while seasoning. These changes will add a nice kick to your garlic butter steak bites! For the full recipe, check out the [Full Recipe]. In this guide, we explored making garlic butter steak bites. We covered key ingredients, step-by-step cooking instructions, and tips for perfecting your dish. Remember to use fresh herbs for great flavor and adjust cooking times for your preference. You can also try alternatives like chicken or mushrooms. This dish is easy to store and reheat, making it perfect for any meal. Enjoy experimenting with flavors and creating a delicious steak experience!](https://joymealplan.com/wp-content/uploads/2025/06/487cc2c4-861e-43bd-80e8-4492eb920a60.webp)
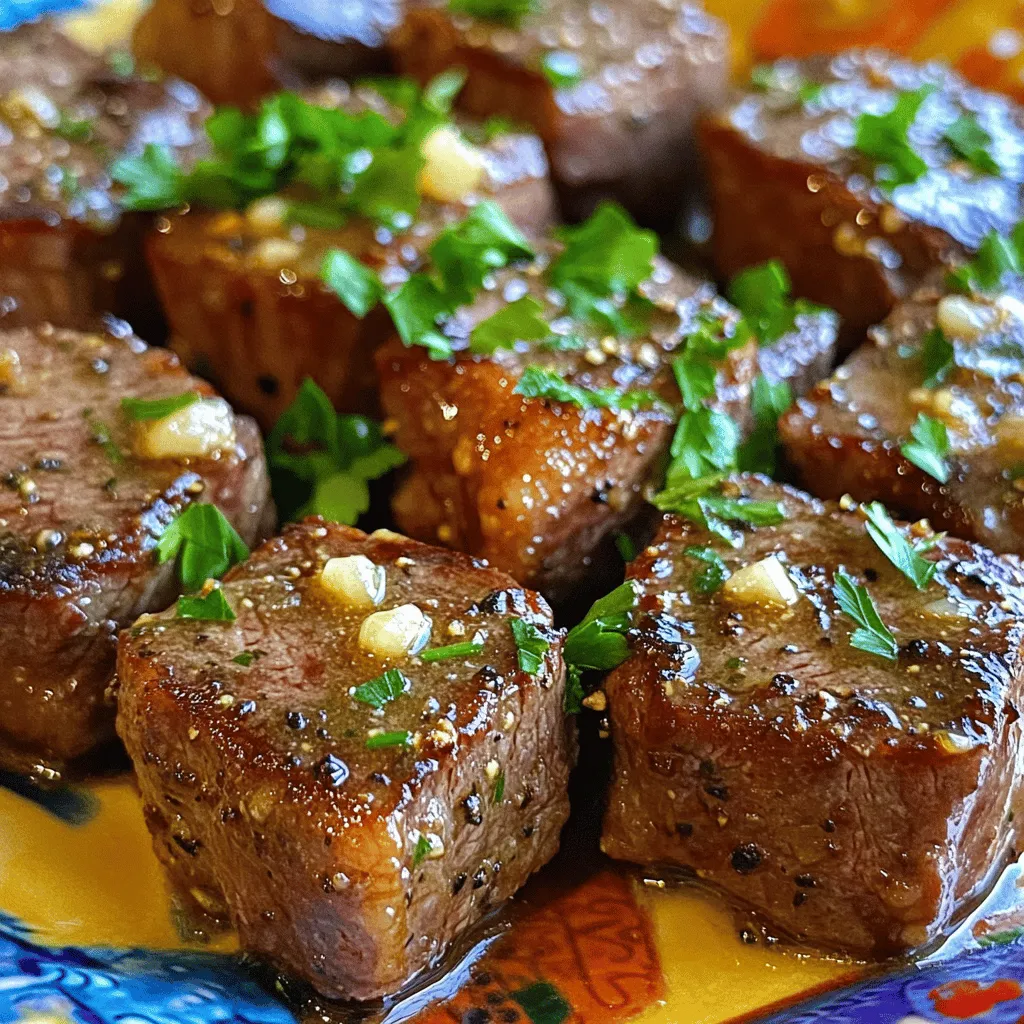
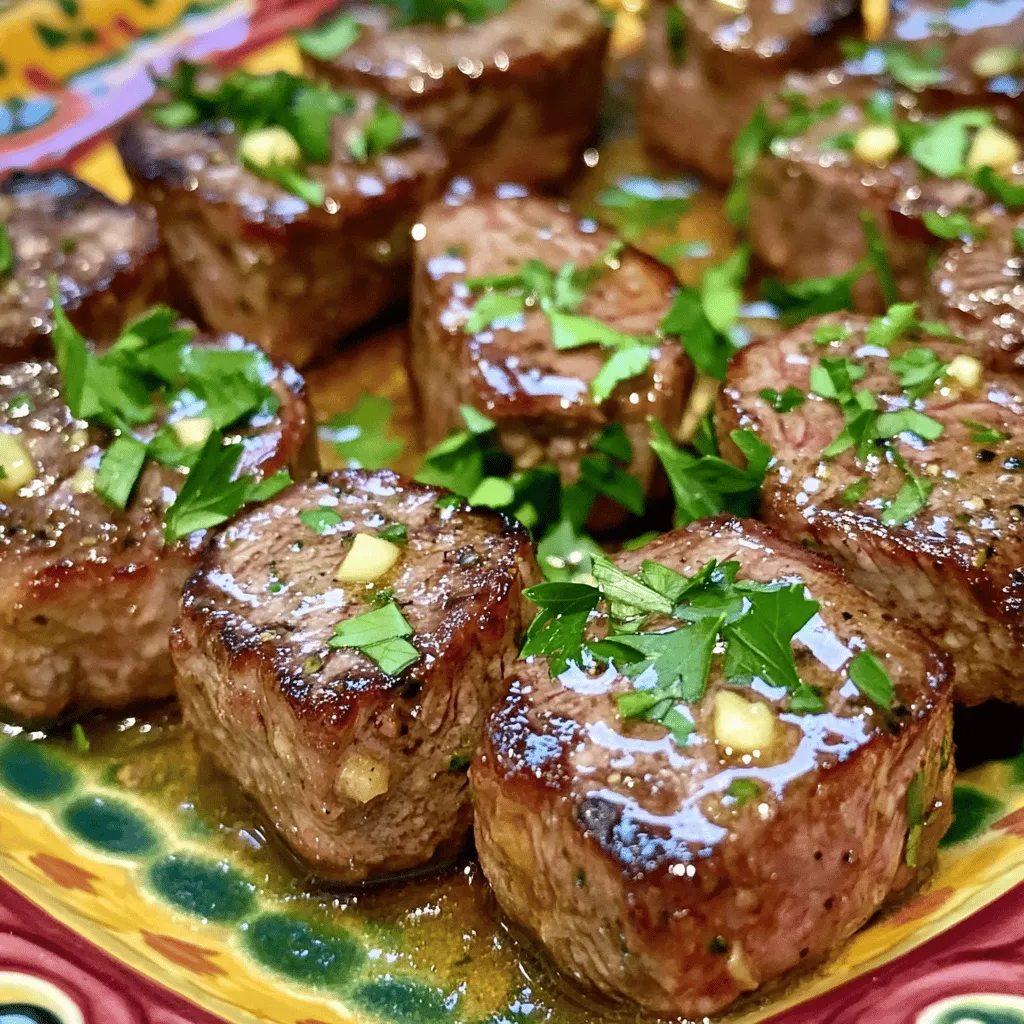
If you crave a quick, flavorful dish, you’ll love these Garlic Butter Steak Bites! This recipe brings tender sirloin steak to life with rich garlic and fresh herbs. It’s simple, satisfying, and packed with taste. You’ll impress your family or friends without spending hours in the kitchen. Ready to savor every bite? Let’s dive into the ingredients and cooking steps that will make this dish a favorite!
Ingredients
List of Required Ingredients
– 1 pound sirloin steak, cut into bite-sized cubes
– 4 tablespoons unsalted butter
– 4 cloves garlic, finely minced
– 1 tablespoon fresh rosemary, finely chopped
– 1 tablespoon fresh thyme, finely chopped
– Salt and freshly ground black pepper, to taste
– 1 tablespoon olive oil
– ¼ teaspoon red pepper flakes (optional for heat)
– Fresh parsley, finely chopped, for garnish
The right ingredients make all the difference. For this dish, you want a good cut of meat. Sirloin steak works well because it’s tender and flavorful. Cut it into bite-sized cubes. This size helps them cook quickly and evenly.
Butter adds richness. The unsalted kind allows you to control the salt level. Garlic gives a strong, tasty punch. Fresh herbs, like rosemary and thyme, add a nice touch. They bring out the beefy flavor.
You can add red pepper flakes for a bit of heat. If you prefer a milder dish, just skip this ingredient. Fresh parsley is perfect for garnishing. It adds color and freshness to the final plate.
Every ingredient plays a role. Together, they create joy in every bite.
Step-by-Step Instructions
Preparation Steps
Start by patting the steak cubes dry with a paper towel. This helps create a nice crust when searing. Moisture can make it hard to get that perfect sear.
Next, season each steak cube with salt and freshly ground black pepper. This simple step packs in flavor. Let the seasoned steak sit for a bit. This allows the salt to work its magic.
Cooking Instructions
In a large skillet, heat the olive oil over medium-high heat until it shimmers. This means the oil is hot enough for searing. Carefully add the steak cubes. Make sure they are in a single layer.
Sear the steak for 2-3 minutes without moving them. This helps form a beautiful crust. After that, flip the cubes and sear for another 2-3 minutes. Adjust the time if you want your steak more done.
Once they’re seared to your liking, take the steak bites out and set them aside.
In the same skillet, lower the heat to medium. Add the unsalted butter and minced garlic. Then toss in the chopped rosemary, thyme, and red pepper flakes if you want some heat. Stir everything together until the butter melts and the garlic smells great. This should take about a minute.
Combining and Serving
Now, return the cooked steak bites to the skillet. Toss them gently in the garlic butter sauce. Cook for another 1-2 minutes. This lets all the flavors mix well together.
Take the skillet off the heat. For the final touch, garnish the steak bites with freshly chopped parsley. Serve them on a colorful platter for a nice look.
For fun, you can skewer the bites with toothpicks. This makes them easy to eat. Drizzle some of that garlic butter sauce on top to make them even more tasty!Enjoy your cooking!
Tips & Tricks
Perfecting Your Steak Bites
To make the best garlic butter steak bites, start with patting the steak dry. This step is key. Dry steak creates a nice crust when you sear it. Use a paper towel to soak up any moisture.
Next, adjust your cooking times based on how you like your steak. For medium-rare, sear the cubes for 2-3 minutes on each side. If you prefer your steak more done, add an extra minute or two. Remember, don’t overcrowd the pan. This helps the steak cook evenly.
Enhancing Flavor
To boost flavor, consider adding spices and herbs. Fresh rosemary and thyme work wonders. The aroma will fill your kitchen and make the bites irresistible.
You can also customize your steak bites with optional add-ins. If you like heat, sprinkle in some red pepper flakes. Want a bit of sweetness? Try adding a splash of balsamic vinegar. Each tweak can create a new taste experience.

Variations
Alternative Proteins
You can swap steak for chicken or shrimp. Chicken thighs work well because they stay juicy. Cut the pieces into bite-sized chunks. Cook for about 5-7 minutes until they are golden brown. Shrimp cooks quickly and adds a sweet taste. Use large shrimp and cook them for 2-3 minutes on each side until they turn pink. Both options absorb the garlic butter flavor nicely.
Gluten-Free Options
For a gluten-free meal, use gluten-free soy sauce instead of regular soy sauce. Always check the label on your butter and spices. Most of them are naturally gluten-free. This keeps the dish safe for those with gluten sensitivities. Enjoy the same great taste without worry.
Vegetarian Adaptations
If you want a vegetarian version, mushrooms are a great substitute. Portobello or cremini mushrooms can mimic the texture of meat. Slice them into bite-sized pieces and cook until golden. You can also use tofu for added protein. Press the tofu to remove moisture, then cut it into cubes. Sauté in the garlic butter for a tasty, plant-based dish.
Storage Info
Refrigeration Guidelines
To keep your leftover steak bites fresh, store them in an airtight container. Make sure to cool them first. Place them in the fridge within two hours of cooking. This way, they stay safe to eat. Good storage helps keep the flavor and texture. Leftover steak bites last about three to four days in the fridge.
Reheating Tips
When you’re ready to enjoy your steak bites again, reheating is key. Use a skillet for the best results. Heat it over medium-low heat. Add a small amount of butter or oil to help keep them moist. Stir gently for about five minutes. This way, you keep the great taste and tender bite. Avoid using the microwave, as it can make the steak chewy.
Freezing Instructions
If you want to save steak bites for later, freezing is a good option. First, let them cool completely. Then, place them in a freezer-safe container. You can also use freezer bags, making sure to remove as much air as possible. They can last up to three months in the freezer. When ready to eat, thaw in the fridge overnight. Reheat them in a skillet for the best flavor.
Enjoy your Garlic Butter Steak Bites with these storage tips for later meals!
FAQs
What sides go well with Garlic Butter Steak Bites?
Garlic butter steak bites pair well with many sides. Here are some great options:
– Roasted vegetables: Carrots, Brussels sprouts, or asparagus are tasty choices.
– Mashed potatoes: Creamy potatoes balance the rich steak flavor.
– Rice: Fluffy rice soaks up the garlic butter sauce nicely.
– Salad: A fresh green salad adds a crisp bite.
– Garlic bread: Perfect for dipping into the garlic butter sauce.
Can I prepare garlic butter steak bites in advance?
Yes, you can prep some parts ahead. Here are my tips:
– Season the steak: You can season the steak cubes a few hours before cooking. This helps the flavors soak in.
– Make the garlic butter sauce: Prepare the sauce in advance and store it in the fridge. Just warm it up before tossing in the steak.
– Cook and store: You can cook the steak bites and store them in the fridge for up to two days. Reheat them gently before serving.
How can I make these steak bites more spicy?
If you want more heat, try these ideas:
– Add more red pepper flakes: Increase the amount to your taste.
– Use hot sauce: Drizzle some hot sauce over the finished dish.
– Add jalapeños: Sauté sliced jalapeños with the garlic for extra spice.
– Try chili powder: Sprinkle some chili powder on the steak while seasoning.
These changes will add a nice kick to your garlic butter steak bites!
In this guide, we explored making garlic butter steak bites. We covered key ingredients, step-by-step cooking instructions, and tips for perfecting your dish. Remember to use fresh herbs for great flavor and adjust cooking times for your preference. You can also try alternatives like chicken or mushrooms. This dish is easy to store and reheat, making it perfect for any meal. Enjoy experimenting with flavors and creating a delicious steak experience!
![- 1 pound sirloin steak, cut into bite-sized cubes - 4 tablespoons unsalted butter - 4 cloves garlic, finely minced - 1 tablespoon fresh rosemary, finely chopped - 1 tablespoon fresh thyme, finely chopped - Salt and freshly ground black pepper, to taste - 1 tablespoon olive oil - ¼ teaspoon red pepper flakes (optional for heat) - Fresh parsley, finely chopped, for garnish The right ingredients make all the difference. For this dish, you want a good cut of meat. Sirloin steak works well because it’s tender and flavorful. Cut it into bite-sized cubes. This size helps them cook quickly and evenly. Butter adds richness. The unsalted kind allows you to control the salt level. Garlic gives a strong, tasty punch. Fresh herbs, like rosemary and thyme, add a nice touch. They bring out the beefy flavor. You can add red pepper flakes for a bit of heat. If you prefer a milder dish, just skip this ingredient. Fresh parsley is perfect for garnishing. It adds color and freshness to the final plate. Every ingredient plays a role. Together, they create joy in every bite. For the complete recipe, check out the Full Recipe section. Start by patting the steak cubes dry with a paper towel. This helps create a nice crust when searing. Moisture can make it hard to get that perfect sear. Next, season each steak cube with salt and freshly ground black pepper. This simple step packs in flavor. Let the seasoned steak sit for a bit. This allows the salt to work its magic. In a large skillet, heat the olive oil over medium-high heat until it shimmers. This means the oil is hot enough for searing. Carefully add the steak cubes. Make sure they are in a single layer. Sear the steak for 2-3 minutes without moving them. This helps form a beautiful crust. After that, flip the cubes and sear for another 2-3 minutes. Adjust the time if you want your steak more done. Once they’re seared to your liking, take the steak bites out and set them aside. In the same skillet, lower the heat to medium. Add the unsalted butter and minced garlic. Then toss in the chopped rosemary, thyme, and red pepper flakes if you want some heat. Stir everything together until the butter melts and the garlic smells great. This should take about a minute. Now, return the cooked steak bites to the skillet. Toss them gently in the garlic butter sauce. Cook for another 1-2 minutes. This lets all the flavors mix well together. Take the skillet off the heat. For the final touch, garnish the steak bites with freshly chopped parsley. Serve them on a colorful platter for a nice look. For fun, you can skewer the bites with toothpicks. This makes them easy to eat. Drizzle some of that garlic butter sauce on top to make them even more tasty! For the full recipe, check out the details provided earlier. Enjoy your cooking! To make the best garlic butter steak bites, start with patting the steak dry. This step is key. Dry steak creates a nice crust when you sear it. Use a paper towel to soak up any moisture. Next, adjust your cooking times based on how you like your steak. For medium-rare, sear the cubes for 2-3 minutes on each side. If you prefer your steak more done, add an extra minute or two. Remember, don’t overcrowd the pan. This helps the steak cook evenly. To boost flavor, consider adding spices and herbs. Fresh rosemary and thyme work wonders. The aroma will fill your kitchen and make the bites irresistible. You can also customize your steak bites with optional add-ins. If you like heat, sprinkle in some red pepper flakes. Want a bit of sweetness? Try adding a splash of balsamic vinegar. Each tweak can create a new taste experience. For the full recipe, click here: [Full Recipe]. {{image_4}} You can swap steak for chicken or shrimp. Chicken thighs work well because they stay juicy. Cut the pieces into bite-sized chunks. Cook for about 5-7 minutes until they are golden brown. Shrimp cooks quickly and adds a sweet taste. Use large shrimp and cook them for 2-3 minutes on each side until they turn pink. Both options absorb the garlic butter flavor nicely. For a gluten-free meal, use gluten-free soy sauce instead of regular soy sauce. Always check the label on your butter and spices. Most of them are naturally gluten-free. This keeps the dish safe for those with gluten sensitivities. Enjoy the same great taste without worry. If you want a vegetarian version, mushrooms are a great substitute. Portobello or cremini mushrooms can mimic the texture of meat. Slice them into bite-sized pieces and cook until golden. You can also use tofu for added protein. Press the tofu to remove moisture, then cut it into cubes. Sauté in the garlic butter for a tasty, plant-based dish. To keep your leftover steak bites fresh, store them in an airtight container. Make sure to cool them first. Place them in the fridge within two hours of cooking. This way, they stay safe to eat. Good storage helps keep the flavor and texture. Leftover steak bites last about three to four days in the fridge. When you're ready to enjoy your steak bites again, reheating is key. Use a skillet for the best results. Heat it over medium-low heat. Add a small amount of butter or oil to help keep them moist. Stir gently for about five minutes. This way, you keep the great taste and tender bite. Avoid using the microwave, as it can make the steak chewy. If you want to save steak bites for later, freezing is a good option. First, let them cool completely. Then, place them in a freezer-safe container. You can also use freezer bags, making sure to remove as much air as possible. They can last up to three months in the freezer. When ready to eat, thaw in the fridge overnight. Reheat them in a skillet for the best flavor. Enjoy your Garlic Butter Steak Bites with these storage tips for later meals! For the full recipe, check out the earlier section. Garlic butter steak bites pair well with many sides. Here are some great options: - Roasted vegetables: Carrots, Brussels sprouts, or asparagus are tasty choices. - Mashed potatoes: Creamy potatoes balance the rich steak flavor. - Rice: Fluffy rice soaks up the garlic butter sauce nicely. - Salad: A fresh green salad adds a crisp bite. - Garlic bread: Perfect for dipping into the garlic butter sauce. Yes, you can prep some parts ahead. Here are my tips: - Season the steak: You can season the steak cubes a few hours before cooking. This helps the flavors soak in. - Make the garlic butter sauce: Prepare the sauce in advance and store it in the fridge. Just warm it up before tossing in the steak. - Cook and store: You can cook the steak bites and store them in the fridge for up to two days. Reheat them gently before serving. If you want more heat, try these ideas: - Add more red pepper flakes: Increase the amount to your taste. - Use hot sauce: Drizzle some hot sauce over the finished dish. - Add jalapeños: Sauté sliced jalapeños with the garlic for extra spice. - Try chili powder: Sprinkle some chili powder on the steak while seasoning. These changes will add a nice kick to your garlic butter steak bites! For the full recipe, check out the [Full Recipe]. In this guide, we explored making garlic butter steak bites. We covered key ingredients, step-by-step cooking instructions, and tips for perfecting your dish. Remember to use fresh herbs for great flavor and adjust cooking times for your preference. You can also try alternatives like chicken or mushrooms. This dish is easy to store and reheat, making it perfect for any meal. Enjoy experimenting with flavors and creating a delicious steak experience!](https://joymealplan.com/wp-content/uploads/2025/06/487cc2c4-861e-43bd-80e8-4492eb920a60-300x300.webp)


![- 2 cups cooked brown rice - 1 lb boneless, skinless chicken breast, diced - 1 can (15 oz) black beans, rinsed and drained - 1 cup corn (fresh, frozen, or canned) - 1 ripe avocado, diced - 1/2 cup shredded cheddar cheese - 1 tablespoon taco seasoning - Salt and black pepper to taste - Optional toppings: sour cream, salsa, sliced jalapeños For these Loaded Chicken Burrito Bowls, I focus on simple, fresh ingredients. The brown rice serves as a wholesome base. It adds fiber and nutrients. I choose boneless, skinless chicken breast for lean protein. It cooks up juicy and tender. Black beans bring extra protein and a creamy texture. Rinsing them helps remove excess sodium, making them healthier. Corn adds sweetness and a pop of color. You can use fresh, frozen, or canned, based on your preference. Avocado is a delightful addition. It brings creaminess and healthy fats. The shredded cheddar cheese adds richness and flavor. For seasoning, I use taco seasoning. It gives a bold taste without extra effort. I also add salt and black pepper to enhance the flavors. Toppings are where you can get creative. I suggest sour cream for creaminess. Salsa adds zest, and sliced jalapeños bring heat. Feel free to mix and match as you like. You can find the Full Recipe for all these delicious ingredients and how to prepare them. - Heat olive oil in a skillet over medium heat. - Add diced chicken and season with taco seasoning. First, I heat a tablespoon of olive oil in a skillet over medium heat. I want the oil to shimmer before adding the chicken. Once it’s hot, I toss in the diced chicken breast. I sprinkle it with taco seasoning, along with a pinch of salt and black pepper. I cook this for about 6 to 8 minutes. I stir often to ensure even cooking. The chicken should turn a lovely golden brown and reach an internal temperature of 165°F. - Prepare brown rice according to package instructions. - Fluff rice once cooked. While the chicken cooks, I prepare brown rice. I follow the package instructions closely. This step is key for fluffy rice. Once it’s cooked, I use a fork to fluff the rice. Fluffy rice makes a great base for my burrito bowls. - Mix black beans, corn, and tomatoes in a bowl. - Combine with cooked chicken and layer on rice. Next, I grab a large mixing bowl. I combine the rinsed black beans, corn, and halved cherry tomatoes. I gently toss them together until they mix well. Once the chicken is done, I add it to the bowl. I stir everything together to let the flavors blend. Now it's time to build the burrito bowls! I divide the fluffy brown rice into four serving bowls. I spoon the chicken mixture on top of the rice in each bowl. Next, I add diced avocado, shredded cheese, and fresh cilantro. For a zesty finish, I serve lime wedges on the side. You can also add sour cream or salsa if you want. For the full recipe, check the complete instructions and ingredient list. Enjoy making your loaded chicken burrito bowls! How to ensure chicken is cooked thoroughly To cook chicken safely, use a meat thermometer. The internal temperature should reach 165°F. Cook chicken pieces until they are golden brown and no longer pink inside. This ensures it is juicy and safe to eat. Best practices for fluffy rice For fluffy rice, rinse it well before cooking. This removes extra starch that makes it sticky. Cook it with the right water ratio, usually 2 cups of water for every cup of rice. After cooking, fluff it gently with a fork. This keeps the grains separate and light. Colorful arrangement ideas for the toppings To make your burrito bowls pop, layer the toppings by color. Place bright tomatoes, vibrant corn, and green avocado on top. This adds visual interest. You can also create small sections on the bowl for each topping. This way, each bite looks and tastes amazing. Using garnishes to enhance visual appeal Fresh herbs like cilantro can elevate your dish. Sprinkle them on top for a burst of color. Lime wedges can add a zesty touch. Place them artfully around the bowl for that extra flair. Suggestions for extra spices or ingredients to add To boost the flavor, try adding cumin or smoked paprika. These spices add warmth and depth. You can also mix in jalapeños for heat or lime juice for brightness. Freshly chopped garlic can also add a punch of flavor. Alternative cooking methods for chicken If you want to switch it up, grill or bake the chicken instead of pan-frying. Grilling adds a nice smoky flavor. Baking can keep it tender and juicy. You can marinate the chicken beforehand to infuse even more flavor. For the Full Recipe, check the earlier section for all the details! {{image_4}} You can easily make Loaded Chicken Burrito Bowls vegetarian or vegan. To do this, simply replace the chicken with a plant-based protein. Options include lentils, tempeh, or tofu. For a vegan cheese option, try cashew cheese or nutritional yeast. For gluten-free options, make sure to check your taco seasoning. Some brands add gluten. You can also swap brown rice for quinoa or cauliflower rice. If you like heat, add jalapeños or hot sauce to your bowl. This gives a spicy kick that enhances the flavors. You can also try different beans like pinto or kidney beans. Each type adds a unique taste and texture to your dish. Feel free to adjust your ingredients based on what is in season or what you like best. You can swap corn for bell peppers or zucchini for a fresh twist. For cheese, consider using feta or goat cheese for a different flavor. If you want a creamy topping, try Greek yogurt instead of sour cream. These swaps keep your bowls exciting! For the full recipe, check out the complete details in the recipe section. To keep your loaded chicken burrito bowls fresh, store them in airtight containers. This helps preserve flavor and texture. Place all components in separate containers if possible. This way, the rice, chicken, and toppings stay fresh longer. Generally, leftovers last about 3 to 4 days in the fridge. Make sure to check for any signs of spoilage before eating. If the chicken looks or smells off, it's best to toss it. When reheating, use the microwave for quick warmth. Place the food in a microwave-safe bowl, cover it with a damp paper towel, and heat it in 30-second intervals until warm. This method keeps the rice moist and prevents it from drying out. For the best texture, consider reheating in a skillet. Add a splash of water, cover, and cook on low heat until everything is warmed through. This method helps maintain flavor and texture. To freeze components, let them cool completely first. Portion the rice, chicken, and toppings into freezer-safe containers. Label them with the date. This makes it easy to track freshness. You can freeze cooked chicken and rice for up to 3 months. When ready to eat, thaw them overnight in the fridge. Reheat them as mentioned above to enjoy your delicious meal again. You can add many tasty toppings to your burrito bowls. Here are some great ideas: - Sour cream: Adds creaminess and a tangy flavor. - Salsa: Choose your favorite type, from mild to spicy. - Sliced jalapeños: For some heat and crunch. - Chopped green onions: Adds freshness and color. - Lettuce: A nice crunch and extra nutrients. - Black olives: For a salty, savory touch. - Cheese: Try a different cheese like queso fresco or pepper jack. Mix and match these options to find your favorite combination. Each topping can change the flavor and texture of the dish. Yes, you can prepare Loaded Chicken Burrito Bowls ahead of time. Here are some tips for meal prep: - Cook the chicken and rice: You can cook and store these in separate containers in the fridge. - Prep toppings: Chop your vegetables and store them in airtight containers. - Assemble before serving: When ready to eat, layer the rice, chicken, and toppings in a bowl. This keeps everything fresh. When stored properly, the ingredients can last for about 3 to 4 days in the fridge. You can easily customize your burrito bowls to fit your needs. Here are some tips: - Dietary needs: If you're vegetarian, use beans instead of chicken. For vegan, skip cheese and sour cream. - Flavor preferences: Add different spices or sauces to change the flavor. - Vegetable swaps: Use seasonal vegetables, like bell peppers or zucchini. - Grain choices: Try quinoa, cauliflower rice, or even lettuce wraps instead of brown rice. Get creative and make the dish your own! For the complete ingredients and instructions for Loaded Chicken Burrito Bowls, check out the [Full Recipe]. This post shared how to make tasty Loaded Chicken Burrito Bowls. You learned about main and optional ingredients. I explained step-by-step instructions, helpful tips, and fun variations. You can customize the bowls to your liking and store leftovers easily. Making these burrito bowls is fun and flexible. Enjoy your meal and get creative with flavors. The possibilities are endless, so dive in and make it your own!](https://joymealplan.com/wp-content/uploads/2025/07/a2d38b5a-a8a2-4e80-9f96-ef24cf5264b7-768x768.webp)

