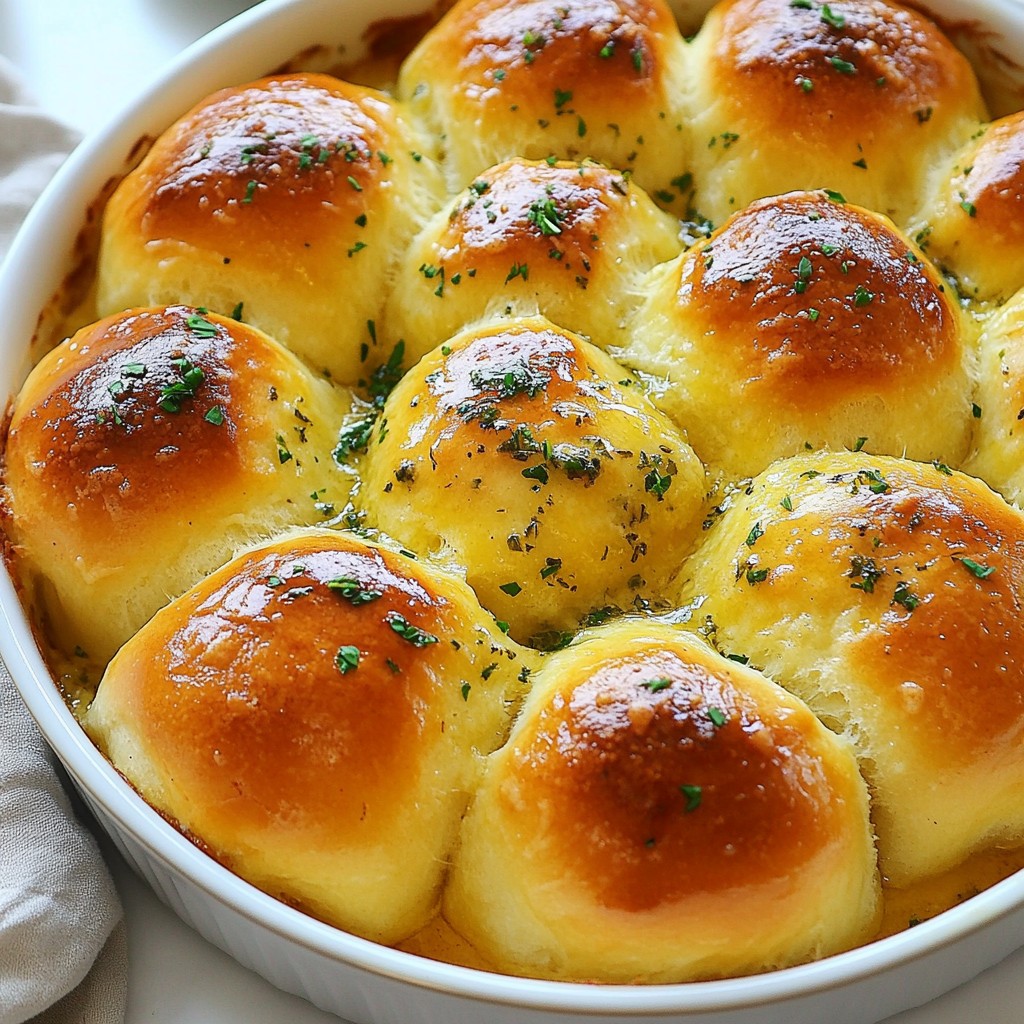
If you crave warm, fluffy rolls bursting with flavor, you’re in for a treat! In this recipe, I’ll guide you through making Garlic Herb Butter Pull-Apart Rolls that are simply irresistible. You’ll learn all the tips for crafting the perfect dough, creating rich garlic herb butter, and ensuring your rolls turn out soft and delicious. Get ready to impress your family and friends with this delightful addition to any meal!
Why I Love This Recipe
- Warm and Buttery Bliss: These rolls are a comforting treat, warm out of the oven, with a rich garlic herb butter that melts in your mouth.
- Easy to Make: This recipe is straightforward, perfect for beginner bakers looking to impress with homemade bread.
- Perfect for Sharing: With 12 rolls, it's an ideal dish for gatherings, making them easy to pull apart and share with friends and family.
- Customizable Flavors: You can easily modify the herbs or add cheese to the garlic butter for a personalized twist on the classic recipe.
Ingredients
List of Ingredients
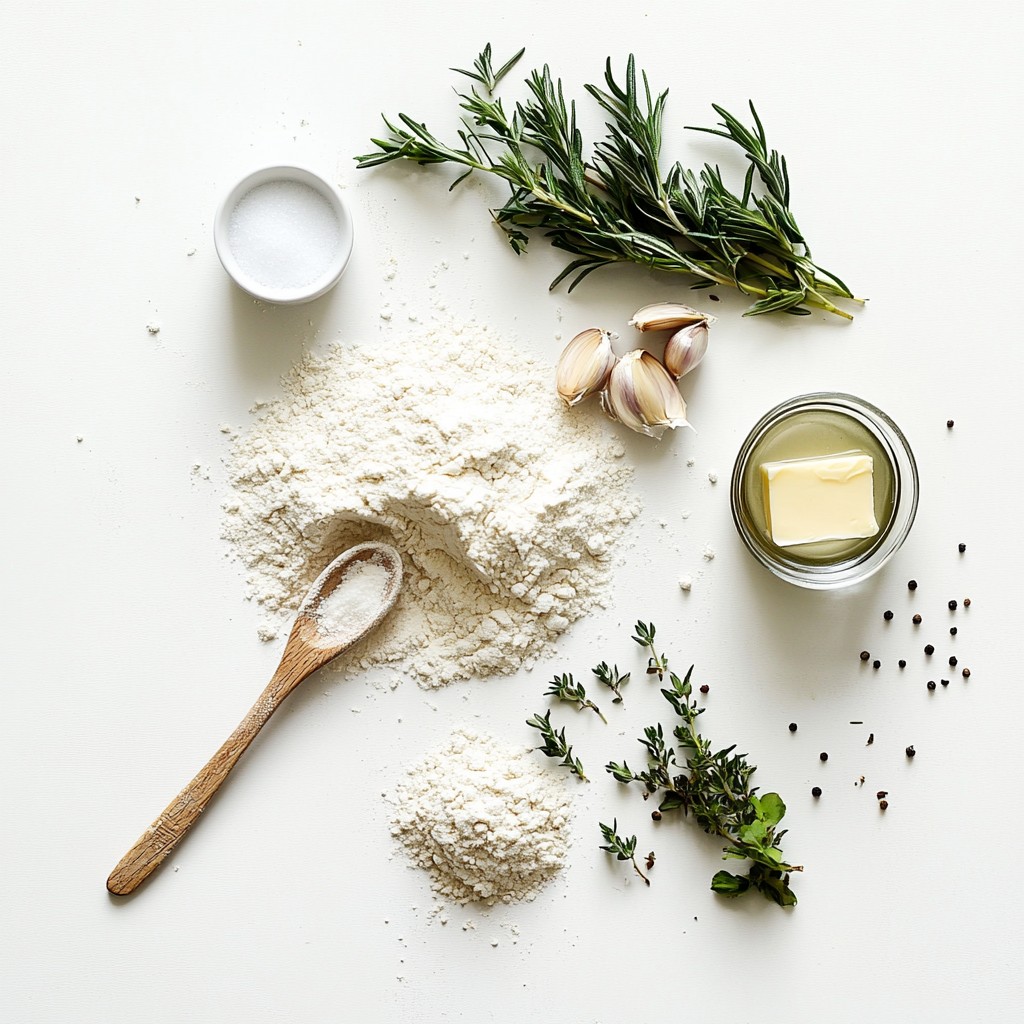
To make Garlic Herb Butter Pull-Apart Rolls, you need the following ingredients:
- 3 cups all-purpose flour
- 2 teaspoons instant yeast
- 1 tablespoon granulated sugar
- 1 teaspoon fine sea salt
- 1 cup warm water (about 110°F or 43°C)
- 1/4 cup unsalted butter, melted and cooled slightly
- 3 cloves garlic, finely minced
- 2 tablespoons fresh parsley, chopped
- 1 tablespoon fresh rosemary, finely chopped
- 1 tablespoon fresh thyme, leaves only
- 1/2 teaspoon freshly ground black pepper
These ingredients work together to create soft, tasty rolls.
Ingredient Substitutions
You might not have every ingredient at home. Here are some swaps:
- All-purpose flour: Use bread flour for a chewier roll.
- Instant yeast: Active dry yeast works too. Just let it dissolve in warm water first.
- Granulated sugar: Brown sugar adds a slight caramel flavor.
- Unsalted butter: Use salted butter for a salted taste. Just skip adding extra salt.
- Fresh herbs: Dried herbs can work. Use one-third the amount, as they are more potent.
Fresh vs. Dried Herbs
Fresh herbs bring bright flavors to your rolls. They add color and aroma. I love using fresh parsley, rosemary, and thyme in this recipe.
Dried herbs are more concentrated. If you use them, the flavor will be strong. You might want to try mixing both. This offers a nice balance of fresh and deep flavors.
Experiment with what you have on hand. Cooking should be fun and creative!
Step-by-Step Instructions
Preparing the Dough
Start by mixing the dry ingredients. In a big bowl, combine 3 cups of all-purpose flour, 2 teaspoons of instant yeast, 1 tablespoon of granulated sugar, and 1 teaspoon of fine sea salt. Stir them well until they blend together. Next, gradually add 1 cup of warm water (about 110°F) and 1/4 cup of melted butter. Use a wooden spoon to mix until the dough forms a shaggy mass.
Now, transfer the dough to a lightly floured surface. Knead the dough for 5 to 7 minutes. You want it to feel smooth and elastic. If you have a stand mixer with a dough hook, you can use that too. Once kneaded, shape the dough into a ball and place it in a greased bowl. Cover it with a clean towel and let it rise in a warm spot for about 1 hour, or until it doubles in size.
Making the Garlic Herb Butter
While the dough rises, it’s time to make the garlic herb butter. In a small bowl, mix together 3 finely minced garlic cloves, 2 tablespoons of chopped parsley, 1 tablespoon of finely chopped rosemary, 1 tablespoon of thyme leaves, and 1/2 teaspoon of freshly ground black pepper. If you have extra melted butter, stir it in for extra flavor. This mix will give your rolls a rich taste.
Shaping and Baking the Rolls
Once the dough has risen, gently punch it down to remove air bubbles. Divide the dough into 12 equal pieces and roll each piece into a ball. Next, lightly grease a round baking dish or a cast-iron skillet. Arrange the dough balls close together, so they touch.
Now, generously spoon your garlic herb butter mixture over the top of the dough balls. Make sure each ball gets a good coating. Cover the dish with a towel again and let the rolls rise for another 30 minutes until they are puffy.
While they rise, preheat your oven to 375°F. After the rolls have puffed up, bake them for 20 to 25 minutes until golden brown. They should sound hollow when you tap them. Remove them from the oven and brush any remaining garlic herb butter on top for extra flavor.
Tips & Tricks
Kneading Techniques for Best Results
Kneading dough helps develop gluten, which gives the rolls their fluffy texture. Use your hands to fold the dough over itself. Push down and away with the heel of your hand. Turn the dough a quarter turn and repeat. Do this for 5-7 minutes until the dough is smooth and elastic. If you have a stand mixer, use the dough hook for easy kneading. Just remember to keep an eye on the dough. It should be soft but not sticky.
How to Store Leftover Rolls
If you have leftover rolls, store them in an airtight container. This keeps them fresh and soft. You can also wrap them in plastic wrap or foil. For longer storage, place them in the fridge for up to 3 days. If you want to keep them longer, freeze the rolls. Wrap each roll in plastic wrap and then in foil. They can last up to 3 months in the freezer. When you’re ready to eat them, simply thaw and reheat.
Serving Suggestions and Pairings
These rolls are a hit at any meal. Serve them warm right from the oven. They pair well with soups, salads, or pasta. For a tasty twist, try them with marinara sauce for dipping. You can also serve them with a side of garlic butter or herb-infused olive oil. If you want to impress, add a sprinkle of sea salt or more fresh herbs on top before serving. Enjoy the warm, fluffy goodness!
Pro Tips
- Use Fresh Herbs: Opt for fresh herbs instead of dried for a more vibrant flavor and aroma in your garlic herb butter.
- Warm Environment for Rising: Create a warm environment by placing the dough in an oven preheated to the lowest setting for a few minutes, then turning it off. This helps the dough rise faster.
- Even Baking: Rotate the baking dish halfway through the baking time for even browning and cooking of the rolls.
- Store Properly: To keep the rolls fresh, store them in an airtight container at room temperature for up to 2 days or freeze for longer storage.
Variations
Adding Cheese or Other Flavors
You can add cheese to these rolls for a tasty twist. Try mozzarella, cheddar, or even feta. Just shred or crumble the cheese and mix it into your garlic herb butter. You can also sprinkle it on top before baking. Cheese melts beautifully and adds a rich flavor.
Gluten-Free Options
If you need a gluten-free version, use a gluten-free flour blend. Look for one that has a good balance of starch and protein. The rolls may not rise as much, but they will still taste great. Always check the yeast to ensure it's gluten-free, too.
Herb Variations: Experimenting with Different Herbs
Feel free to play with herbs in this recipe. Basil, dill, or oregano can give your rolls a new flavor. Mix and match to find your favorite combination. Fresh herbs add bright notes, while dried herbs can work well too. Just remember to adjust the amount based on the herb's strength.
Storage Info
How to Properly Store Pull-Apart Rolls
To keep your garlic herb butter pull-apart rolls fresh, store them in an airtight container. This helps maintain their softness and flavor. You can keep them at room temperature for up to three days. If you want to enjoy them longer, consider freezing them.
Freezing Instructions
Freezing is easy and works well for these rolls. Allow the rolls to cool completely after baking. Next, place them in a freezer-safe bag or container. Be sure to remove as much air as possible to prevent freezer burn. They can last up to three months in the freezer. When you’re ready to eat them, just thaw in the fridge overnight.
Reheating Tips
Reheating your rolls can bring back their warm, buttery goodness. Preheat your oven to 350°F (175°C). Place the rolls on a baking sheet and cover them with foil. Heat for about 10-15 minutes. If you like, brush them with a bit of melted butter before serving. This will add extra flavor and keep them moist. Enjoy your rolls just like they were fresh from the oven!
FAQs
Can I make this recipe ahead of time?
Yes, you can make this recipe ahead of time. Prepare the dough and let it rise as usual. After the first rise, shape the dough into balls and place them in the baking dish. Cover the dish and put it in the fridge overnight. The next day, let the rolls rise for about 30 minutes at room temperature before baking. This method saves time and gives you fresh rolls for breakfast or dinner.
How can I ensure my rolls are fluffy?
To ensure fluffy rolls, follow these tips:
- Use warm water, around 110°F (43°C), to activate the yeast.
- Knead the dough well for 5-7 minutes until it's smooth and elastic.
- Allow the dough to rise in a warm place until it doubles in size. This step is crucial for fluffiness.
- Don't rush the second rise; let the rolls puff up before baking.
What if I don’t have instant yeast?
If you don’t have instant yeast, you can use active dry yeast. Simply mix the active dry yeast with warm water and a bit of sugar. Let it sit for 5-10 minutes until it bubbles. Then, add it to the flour mixture as you would with instant yeast. The rolls may take longer to rise, so be patient and watch for doubling in size.
In this post, we explored the key ingredients for pull-apart rolls and how to use them. We covered dough preparation, making garlic herb butter, and shaping the rolls. You learned tips for kneading, storing, and serving. Other exciting variations included adding cheese or experimenting with herbs.
Try these recipes for delicious results, and don’t be afraid to make them your own. With practice, you'll master this roll recipe and impress your family. Enjoy baking!


