Garlic Herb Butter Steak Bites Savory and Quick Meal

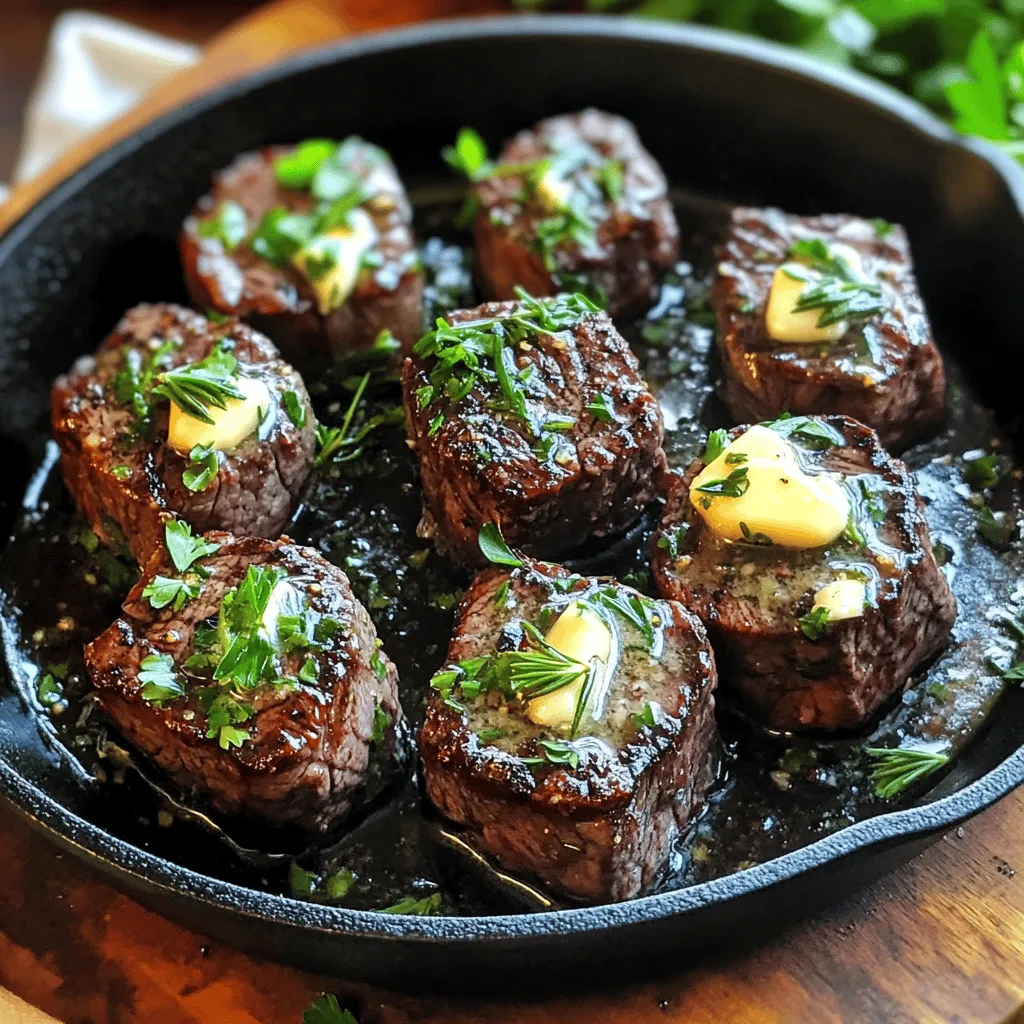
If you’re in the mood for a quick and tasty meal, you’ve come to the right place. Today, I’ll show you how to make Garlic Herb Butter Steak Bites. This dish features juicy steak, rich butter, and fresh herbs, all in one simple recipe. It’s perfect for busy nights or impressing guests. Let’s dive into making this savory treat that will leave you craving more!
Ingredients
Main Ingredients
– 1 lb sirloin or ribeye steak, trimmed and cut into 1-inch cubes
– 4 tablespoons unsalted butter
– 4 cloves fresh garlic, finely minced
Herbs and Seasonings
– 1 tablespoon fresh rosemary, finely chopped
– 1 tablespoon fresh thyme, finely chopped
– 1 teaspoon sea salt
– 1/2 teaspoon freshly cracked black pepper
Additional Ingredients
– 1 tablespoon extra virgin olive oil
– Fresh parsley, roughly chopped (for garnish)
For this dish, I love using sirloin or ribeye steak. Both cuts are tender and flavorful. Trim the meat and cut it into 1-inch cubes. This size helps the steak cook quickly and evenly.
Unsalted butter is key. It melts beautifully and allows the garlic and herbs to shine. I use fresh garlic, as it adds a strong aroma and taste.
Herbs make this dish special. Fresh rosemary and thyme bring out the best flavors in the steak. Sea salt and black pepper enhance the seasoning, making every bite burst with taste.
Extra virgin olive oil helps sear the steak. It has a high smoke point, which is great for frying. Finally, fresh parsley adds color and a hint of freshness on top.
When you gather these ingredients, you set yourself up for a savory and quick meal. Enjoy the process, and get ready for a delicious experience!
Step-by-Step Instructions
Preparing the Steak Bites
To start, season the steak cubes. I use sea salt and freshly cracked black pepper. This adds a great flavor. Toss the meat gently with your hands. Make sure every piece is coated well.
Next, preheat your skillet. Set it on medium-high heat. Add one tablespoon of extra virgin olive oil. When the oil shimmers, it’s ready for the steak.
Cooking the Steak Bites
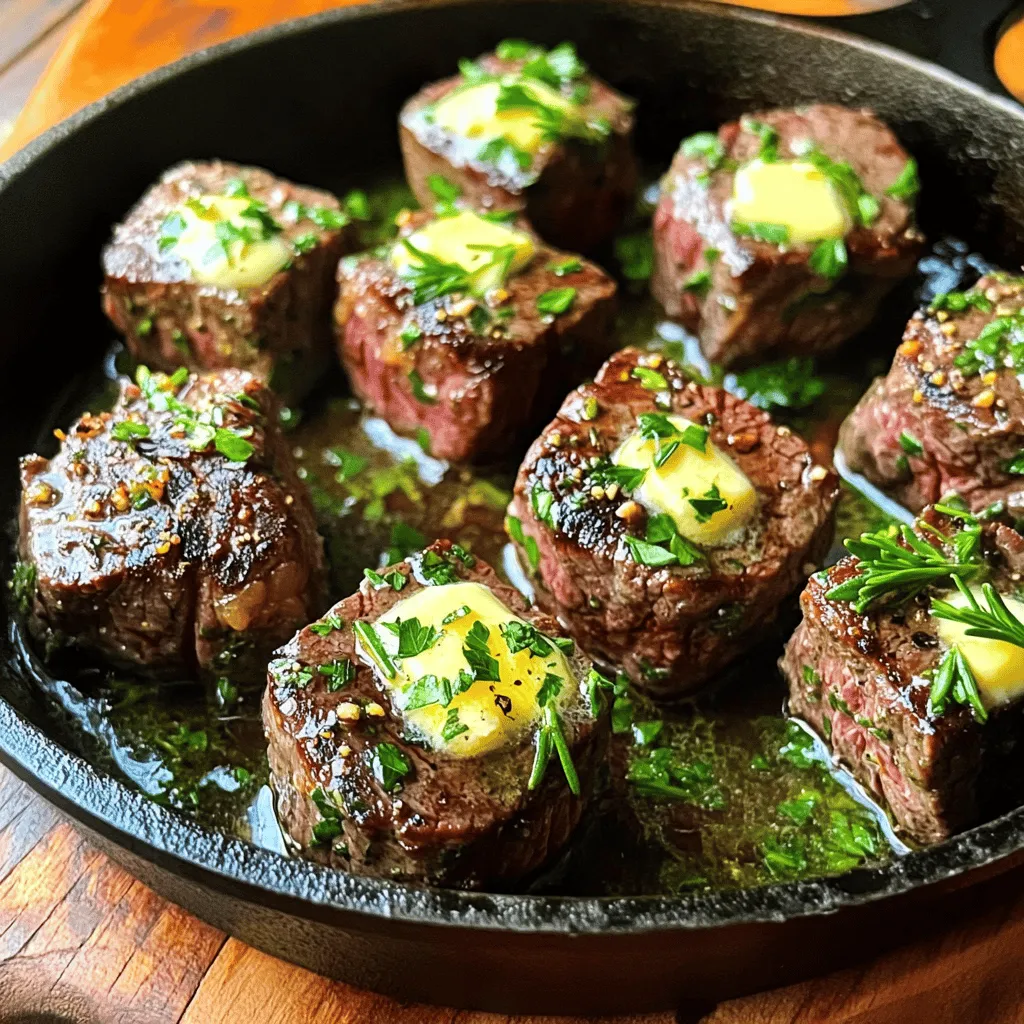
Now, place the steak bites in the skillet. Lay them in a single layer. This helps them cook evenly. Sear the steak for about 2-3 minutes on each side. Look for a nice brown crust. This shows they are cooking well.
Check for doneness. If you like your steak medium-rare, cook until it reaches a warm red center. Once cooked, take them out and place them on a plate. Cover them lightly with aluminum foil to keep warm.
Making the Garlic Herb Butter
In the same skillet, lower the heat to medium. Add four tablespoons of unsalted butter. Let it melt completely. Once melted, add four cloves of minced garlic. Then, toss in one tablespoon each of chopped rosemary and thyme.
Stir this mix for about 1-2 minutes. You want the garlic to soften and smell great. Be careful not to burn it. Return the seared steak bites to the skillet. Toss them in the garlic herb butter.
Let them cook together for another minute. This helps the steak soak in the flavors. Finally, take the skillet off the heat. Sprinkle fresh parsley on top for a nice touch.
Tips & Tricks
Cooking Tips
– How to achieve the perfect sear
For a perfect sear, heat your skillet well before adding the steak. The oil should shimmer. Place the steak bites in a single layer without crowding the pan. Sear for 2-3 minutes on each side. Look for a deep brown crust. This gives flavor and texture.
– Tips for choosing the right cut of steak
I recommend sirloin or ribeye for steak bites. Sirloin is lean and tender. Ribeye has more fat, adding flavor. Both cuts cook well and provide great taste in this dish.
Flavor Enhancement
– Adding spice blends or additional herbs
You can boost flavor by adding spices, like paprika or cayenne. Fresh herbs like basil or oregano work great too. Experiment to find your favorite blend.
– Suggested butter alternatives
If you want to switch it up, try using ghee or herb-infused butter. These options add unique flavors and can enhance the dish.
Serving Suggestions
– Recommended side dishes
I love serving these steak bites with crispy roasted potatoes or a fresh salad. They balance the rich flavors well. Grilled veggies also pair nicely.
– Pairing with sauces and dips
Try serving with chimichurri or garlic aioli. These sauces add a tasty kick and complement the steak bites perfectly. Enjoy exploring different pairings!

Variations
Different Cuts of Steak
You can use different cuts to make steak bites. Filet mignon gives a tender bite. Flank steak is leaner and offers more texture. When using filet mignon, cook for about 2-3 minutes each side. For flank steak, you may need an extra minute for the best doneness. Always check the meat’s color and firmness to find the right cooking time.
Flavor Variations
Adding new flavors can change your dish. You can mix in Worcestershire sauce for a tangy taste. Soy sauce adds a salty kick. Try different herbs, too. Basil or oregano gives a fresh twist. Mix and match to find your favorite blend.
Preparation Methods
You can cook your steak bites in different ways. Grilling adds a nice char and smoky flavor. Make sure to preheat your grill well. Pan-searing is quick and easy, giving a nice crust. If you prefer, you can even bake in the oven. Just set it to 400°F and cook for 10-12 minutes. Each method offers a unique taste!
Storage Info
Storing Leftovers
After enjoying your garlic herb butter steak bites, store any leftovers quickly. Place them in an airtight container. Refrigerate them within two hours to keep them safe. Try to eat them within three days for the best taste. If you want to keep them longer, freezing is a good option.
Reheating Tips
When you’re ready to enjoy the leftovers, reheat them gently. The best way is to use a skillet. Heat it over medium-low heat. Add a bit of olive oil or butter to keep them moist. Stir often until they are warm. You can also use a microwave. Cover the dish and heat for 30 seconds at a time, checking often.
Freezing Instructions
To freeze steak bites, let them cool completely first. Place them in a freezer-safe bag or container. Squeeze out any extra air to avoid freezer burn. They can stay frozen for up to three months. For thawing, move them to the fridge overnight. If you need them fast, place the bag in cold water for quicker thawing.
FAQs
What is the best steak for steak bites?
The best steak for steak bites is sirloin or ribeye. Sirloin offers a good balance of flavor and tenderness. Ribeye has more fat, which adds rich taste. Both cuts are easy to cut into cubes. They also cook well at high heat, giving you nice browning.
How can I make steak bites less fatty?
To make steak bites less fatty, choose lean cuts like sirloin. Trim off any visible fat before cooking. You can also use a paper towel to pat the cooked steak bites dry. This helps remove excess grease. Cooking them with less butter or oil also helps reduce fat.
Can I use dried herbs instead of fresh?
Yes, you can use dried herbs instead of fresh. Use about one-third the amount of dried herbs. Dried herbs have a stronger flavor, so a little goes a long way. Add them earlier in the cooking process to release their full flavor.
How do I ensure my steak is tender?
To ensure your steak is tender, choose high-quality cuts like ribeye or sirloin. Cut the meat against the grain, which helps break down fibers. Allow the steak to rest after cooking, as this helps keep it juicy. Also, avoid overcooking, as this can make the meat tough.
What are some good side dishes to serve with steak bites?
Good side dishes for steak bites include mashed potatoes or roasted veggies. A fresh salad complements the rich flavors well. You can also serve them with rice or a grain salad. Bread or rolls can be great for soaking up extra sauce.
This blog post outlined how to make delicious steak bites using simple ingredients. You learned about the main components like steak, garlic, and herbs. I covered step-by-step cooking tips that ensure great flavor.
For best results, choose quality cuts and season well. Experiment with different flavors and serving ideas. This dish is easy and fun to make. Enjoy your cooking adventure and share these bites with friends!


![- 1 pound sirloin steak, cut into bite-sized cubes - 4 tablespoons unsalted butter - 4 cloves garlic, finely minced - 1 tablespoon fresh rosemary, finely chopped - 1 tablespoon fresh thyme, finely chopped - Salt and freshly ground black pepper, to taste - 1 tablespoon olive oil - ¼ teaspoon red pepper flakes (optional for heat) - Fresh parsley, finely chopped, for garnish The right ingredients make all the difference. For this dish, you want a good cut of meat. Sirloin steak works well because it’s tender and flavorful. Cut it into bite-sized cubes. This size helps them cook quickly and evenly. Butter adds richness. The unsalted kind allows you to control the salt level. Garlic gives a strong, tasty punch. Fresh herbs, like rosemary and thyme, add a nice touch. They bring out the beefy flavor. You can add red pepper flakes for a bit of heat. If you prefer a milder dish, just skip this ingredient. Fresh parsley is perfect for garnishing. It adds color and freshness to the final plate. Every ingredient plays a role. Together, they create joy in every bite. For the complete recipe, check out the Full Recipe section. Start by patting the steak cubes dry with a paper towel. This helps create a nice crust when searing. Moisture can make it hard to get that perfect sear. Next, season each steak cube with salt and freshly ground black pepper. This simple step packs in flavor. Let the seasoned steak sit for a bit. This allows the salt to work its magic. In a large skillet, heat the olive oil over medium-high heat until it shimmers. This means the oil is hot enough for searing. Carefully add the steak cubes. Make sure they are in a single layer. Sear the steak for 2-3 minutes without moving them. This helps form a beautiful crust. After that, flip the cubes and sear for another 2-3 minutes. Adjust the time if you want your steak more done. Once they’re seared to your liking, take the steak bites out and set them aside. In the same skillet, lower the heat to medium. Add the unsalted butter and minced garlic. Then toss in the chopped rosemary, thyme, and red pepper flakes if you want some heat. Stir everything together until the butter melts and the garlic smells great. This should take about a minute. Now, return the cooked steak bites to the skillet. Toss them gently in the garlic butter sauce. Cook for another 1-2 minutes. This lets all the flavors mix well together. Take the skillet off the heat. For the final touch, garnish the steak bites with freshly chopped parsley. Serve them on a colorful platter for a nice look. For fun, you can skewer the bites with toothpicks. This makes them easy to eat. Drizzle some of that garlic butter sauce on top to make them even more tasty! For the full recipe, check out the details provided earlier. Enjoy your cooking! To make the best garlic butter steak bites, start with patting the steak dry. This step is key. Dry steak creates a nice crust when you sear it. Use a paper towel to soak up any moisture. Next, adjust your cooking times based on how you like your steak. For medium-rare, sear the cubes for 2-3 minutes on each side. If you prefer your steak more done, add an extra minute or two. Remember, don’t overcrowd the pan. This helps the steak cook evenly. To boost flavor, consider adding spices and herbs. Fresh rosemary and thyme work wonders. The aroma will fill your kitchen and make the bites irresistible. You can also customize your steak bites with optional add-ins. If you like heat, sprinkle in some red pepper flakes. Want a bit of sweetness? Try adding a splash of balsamic vinegar. Each tweak can create a new taste experience. For the full recipe, click here: [Full Recipe]. {{image_4}} You can swap steak for chicken or shrimp. Chicken thighs work well because they stay juicy. Cut the pieces into bite-sized chunks. Cook for about 5-7 minutes until they are golden brown. Shrimp cooks quickly and adds a sweet taste. Use large shrimp and cook them for 2-3 minutes on each side until they turn pink. Both options absorb the garlic butter flavor nicely. For a gluten-free meal, use gluten-free soy sauce instead of regular soy sauce. Always check the label on your butter and spices. Most of them are naturally gluten-free. This keeps the dish safe for those with gluten sensitivities. Enjoy the same great taste without worry. If you want a vegetarian version, mushrooms are a great substitute. Portobello or cremini mushrooms can mimic the texture of meat. Slice them into bite-sized pieces and cook until golden. You can also use tofu for added protein. Press the tofu to remove moisture, then cut it into cubes. Sauté in the garlic butter for a tasty, plant-based dish. To keep your leftover steak bites fresh, store them in an airtight container. Make sure to cool them first. Place them in the fridge within two hours of cooking. This way, they stay safe to eat. Good storage helps keep the flavor and texture. Leftover steak bites last about three to four days in the fridge. When you're ready to enjoy your steak bites again, reheating is key. Use a skillet for the best results. Heat it over medium-low heat. Add a small amount of butter or oil to help keep them moist. Stir gently for about five minutes. This way, you keep the great taste and tender bite. Avoid using the microwave, as it can make the steak chewy. If you want to save steak bites for later, freezing is a good option. First, let them cool completely. Then, place them in a freezer-safe container. You can also use freezer bags, making sure to remove as much air as possible. They can last up to three months in the freezer. When ready to eat, thaw in the fridge overnight. Reheat them in a skillet for the best flavor. Enjoy your Garlic Butter Steak Bites with these storage tips for later meals! For the full recipe, check out the earlier section. Garlic butter steak bites pair well with many sides. Here are some great options: - Roasted vegetables: Carrots, Brussels sprouts, or asparagus are tasty choices. - Mashed potatoes: Creamy potatoes balance the rich steak flavor. - Rice: Fluffy rice soaks up the garlic butter sauce nicely. - Salad: A fresh green salad adds a crisp bite. - Garlic bread: Perfect for dipping into the garlic butter sauce. Yes, you can prep some parts ahead. Here are my tips: - Season the steak: You can season the steak cubes a few hours before cooking. This helps the flavors soak in. - Make the garlic butter sauce: Prepare the sauce in advance and store it in the fridge. Just warm it up before tossing in the steak. - Cook and store: You can cook the steak bites and store them in the fridge for up to two days. Reheat them gently before serving. If you want more heat, try these ideas: - Add more red pepper flakes: Increase the amount to your taste. - Use hot sauce: Drizzle some hot sauce over the finished dish. - Add jalapeños: Sauté sliced jalapeños with the garlic for extra spice. - Try chili powder: Sprinkle some chili powder on the steak while seasoning. These changes will add a nice kick to your garlic butter steak bites! For the full recipe, check out the [Full Recipe]. In this guide, we explored making garlic butter steak bites. We covered key ingredients, step-by-step cooking instructions, and tips for perfecting your dish. Remember to use fresh herbs for great flavor and adjust cooking times for your preference. You can also try alternatives like chicken or mushrooms. This dish is easy to store and reheat, making it perfect for any meal. Enjoy experimenting with flavors and creating a delicious steak experience!](https://joymealplan.com/wp-content/uploads/2025/06/487cc2c4-861e-43bd-80e8-4492eb920a60-768x768.webp)

![To make Easy Chicken Shawarma, gather these items: - 500g boneless, skinless chicken thighs - 2 tablespoons extra virgin olive oil - 3 cloves garlic, finely minced - 1 tablespoon ground cumin - 1 tablespoon ground coriander - 1 tablespoon smoked paprika - 1 teaspoon ground turmeric - 1 teaspoon ground cinnamon - 1 teaspoon sea salt - ½ teaspoon freshly ground black pepper - Juice of 1 large lemon - 4 soft pita breads - Fresh parsley, finely chopped, for garnish - Tomato, cucumber, and red onion, thinly sliced, for serving - Creamy yogurt or rich tahini sauce, for drizzling This list covers all you need for vibrant flavors. You can swap chicken thighs for chicken breasts if you prefer leaner meat. If you're short on spices, try a ready-made shawarma mix for ease. To prepare this dish, you'll need: - A medium mixing bowl for the marinade - A whisk to blend the ingredients - A grill or large skillet for cooking - A meat thermometer to check doneness - Storage containers for leftovers Using a meat thermometer ensures you cook the chicken to 75°C (165°F). This keeps it juicy and safe to eat. Store any leftovers in airtight containers for up to three days. Enjoy your flavorful meal, and don't forget to check the [Full Recipe] for all the steps! To start, we need to make a tasty marinade. Take a medium mixing bowl and combine these ingredients: - 2 tablespoons extra virgin olive oil - 3 cloves garlic, finely minced - 1 tablespoon ground cumin - 1 tablespoon ground coriander - 1 tablespoon smoked paprika - 1 teaspoon ground turmeric - 1 teaspoon ground cinnamon - 1 teaspoon sea salt - ½ teaspoon freshly ground black pepper - Juice of 1 large lemon Whisk these together until mixed well. This mix makes your chicken full of flavor. Next, add the 500g boneless, skinless chicken thighs. Make sure every piece is coated in the marinade. Cover the bowl tightly with plastic wrap. For the best taste, let it sit in the fridge for at least 1 hour. If you can, leave it overnight for even better flavor. When you are ready to cook, preheat your grill or a large skillet on medium-high heat. You want it nice and hot. Take the marinated chicken out of the fridge. Let it sit at room temperature for about 10 minutes. This helps it cook evenly. Place the chicken on the hot grill or skillet. Cook for about 6-8 minutes on each side. You want the chicken to have a nice char and be fully cooked. Check that the internal temperature reaches 75°C (165°F). Once cooked, let the chicken rest for 5 minutes. Then slice it into thin strips. This gives you a tender texture. Now, it’s time to fill our pitas. Take your warm pita bread and place a good amount of sliced chicken inside. For extra crunch and color, add some fresh toppings: - Fresh parsley, finely chopped - Tomato, thinly sliced - Cucumber, thinly sliced - Red onion, thinly sliced Finish your shawarma with a drizzle of creamy yogurt or zesty tahini sauce. Wrap the pita up tight, and it's ready to eat! Enjoy your homemade shawarma delight! For a complete guide, check out the Full Recipe. To achieve the best char marks on your chicken, start with a hot grill or skillet. Make sure the grill is preheated to medium-high heat. Cook the chicken without moving it too much. Let it sit for about 6 to 8 minutes on each side. This allows those crispy, golden marks to form. Resting the chicken before slicing is also key. Once you take the chicken off the heat, let it rest for 5 minutes. This helps the juices stay inside the meat. When you slice it, the chicken will be tender and juicy. Pair your chicken shawarma with tasty side dishes. A fresh tabbouleh salad makes a great choice. You can also serve hummus or baba ganoush for dipping. These flavors complement the shawarma well. For drinks, a chilled lemonade or mint tea works nicely. These drinks balance the spices and add a refreshing touch. Want to spice things up? Try adding a pinch of cayenne pepper to the marinade. This will give your chicken an extra kick. You can also drizzle some sriracha or harissa sauce over the finished shawarma for added heat. If you prefer milder flavors, simply reduce the spices. Use less cumin or paprika in the marinade. This way, you can adjust the taste to suit your preferences. For more variety, try adding fresh herbs like mint or dill for a burst of freshness. For the full recipe, check the section above. {{image_4}} You can easily make this dish plant-based. Use chickpeas or tofu instead of chicken. For chickpeas, drain and rinse one can. Toss them with the same marinade. If you choose tofu, press it to remove water and cut it into cubes. Marinate the tofu just like the chicken. For a veggie-loaded option, try grilled vegetables. Zucchini, bell peppers, and mushrooms work great. Slice them into strips and marinate them. Grill until they are tender and slightly charred. If you do not have a grill, don’t worry! You can use an Instant Pot. Cook the marinated chicken on high pressure for about 8 minutes. This keeps the chicken juicy. You can also use an oven. Preheat it to 200°C (400°F). Place the chicken on a baking sheet and roast for 20-25 minutes. Check that the chicken reaches 75°C (165°F) inside. Another great choice is the slow cooker. Add the marinated chicken and cook on low for 6-8 hours. This makes the chicken very tender and flavorful. To make your shawarma extra special, try new toppings. Feta cheese adds a nice salty flavor. Pickled vegetables can give a tangy crunch. You can also experiment with sauces. A spicy harissa or cool tzatziki can change the flavor. Consider regional spices too. Try za'atar for a herby taste or sumac for tartness. Each spice can make your shawarma unique. For the full recipe, check out Shawarma Delight: Easy Chicken Edition. To keep your chicken shawarma fresh, store it properly. Place the leftover chicken in an airtight container. This will help maintain its flavor and moisture. For the best taste, eat leftovers within three days. If you have assembled pitas, store the chicken and veggies separately. This keeps the pita from getting soggy. You can keep the sliced chicken in the fridge for three days, too. When it's time to enjoy your leftovers, reheating is key. Use a skillet or oven to heat the chicken. This method helps keep the chicken juicy. Avoid using a microwave, as it can dry out the meat. Heat the chicken over medium heat for about five minutes. Stir it gently to keep it moist. If the chicken seems dry, add a splash of water or broth. You can freeze leftover chicken shawarma for later. Place the cooled chicken in a freezer-safe container. Make sure to remove excess air to prevent freezer burn. It can last up to three months in the freezer. When you're ready to eat, thaw the chicken in the fridge overnight. Reheat it on the stove for the best texture. You can enjoy that delicious flavor anytime! Chicken shawarma is a popular dish from the Middle East. It has roots in the Levant region. Traditionally, cooks stack marinated meat on a vertical spit. They cook it slowly, letting the juices flow down. The meat is then shaved off in thin strips. The spices in shawarma are what make it special. Common spices include cumin, coriander, and paprika. These give the chicken a warm, rich flavor. Shawarma is often served in pita bread with fresh veggies and sauce. Yes, you can prep chicken shawarma in advance. Marinate the chicken the night before. This helps the flavors mix well. When you are ready to cook, take it out of the fridge. Cook it fresh for the best taste. You can also slice the cooked chicken and store it. Place it in an airtight container in the fridge. It will last for about 3 days. Just reheat it when you are ready to eat. If you want to change things up, try these alternatives to pita bread: - Flatbreads - Tortillas - Naan bread - Lettuce wraps for a low-carb option These options work well with the chicken and veggies. You can also serve shawarma over rice or in a bowl with salad. To make a gluten-free chicken shawarma, choose gluten-free pita or flatbreads. Look for brands that clearly state they are gluten-free. You can also use lettuce as a wrap. Always check the spice blend for gluten. Some pre-made spices might contain gluten. Make your own mix using cumin, paprika, and other safe spices. The best sauces for chicken shawarma include: - Creamy yogurt sauce - Rich tahini sauce Yogurt sauce is smooth and tangy. It cools down the spices. Tahini sauce is nutty and flavorful. Both add a wonderful touch to your shawarma. Drizzle them on top or serve them on the side for dipping. For the full recipe, check out Shawarma Delight: Easy Chicken Edition. In this guide, we explored how to make Easy Chicken Shawarma from start to finish. We covered essential ingredients, tools, marinating techniques, cooking methods, and clever tips for serving and storing leftovers. You can easily customize this dish for various tastes and dietary needs, ensuring everyone enjoys it. With a little practice, you’ll master the art of shawarma. Get ready to impress your family and friends with your new skills in the kitchen!](https://joymealplan.com/wp-content/uploads/2025/07/dcd86bca-5250-4056-852d-a4436d844aa2-768x768.webp)