Garlic Herb Roasted Rainbow Carrots Delightful Side Dish

If you’re looking to brighten up your dinner table, these Garlic Herb Roasted Rainbow Carrots are the perfect side dish! Their vibrant colors and delicious flavors make any meal feel special. With fresh garlic, a sprinkle of herbs, and a touch of olive oil, this dish is easy and fun to make. Join me as I share the simple steps to achieve perfectly roasted carrots, plus tips for tasty variations and storage!
Why I Love This Recipe
- Vibrant Colors: The mix of rainbow carrots adds a stunning visual appeal to any meal, making it not only delicious but also a feast for the eyes.
- Simple Ingredients: This recipe uses just a handful of common ingredients, making it easy to whip up without a trip to specialty stores.
- Healthy and Nutritious: Rainbow carrots are packed with vitamins and antioxidants, making this dish a healthy addition to your table.
- Flavorful Aroma: The combination of garlic and herbs creates an irresistible aroma that will have everyone eagerly anticipating dinner.
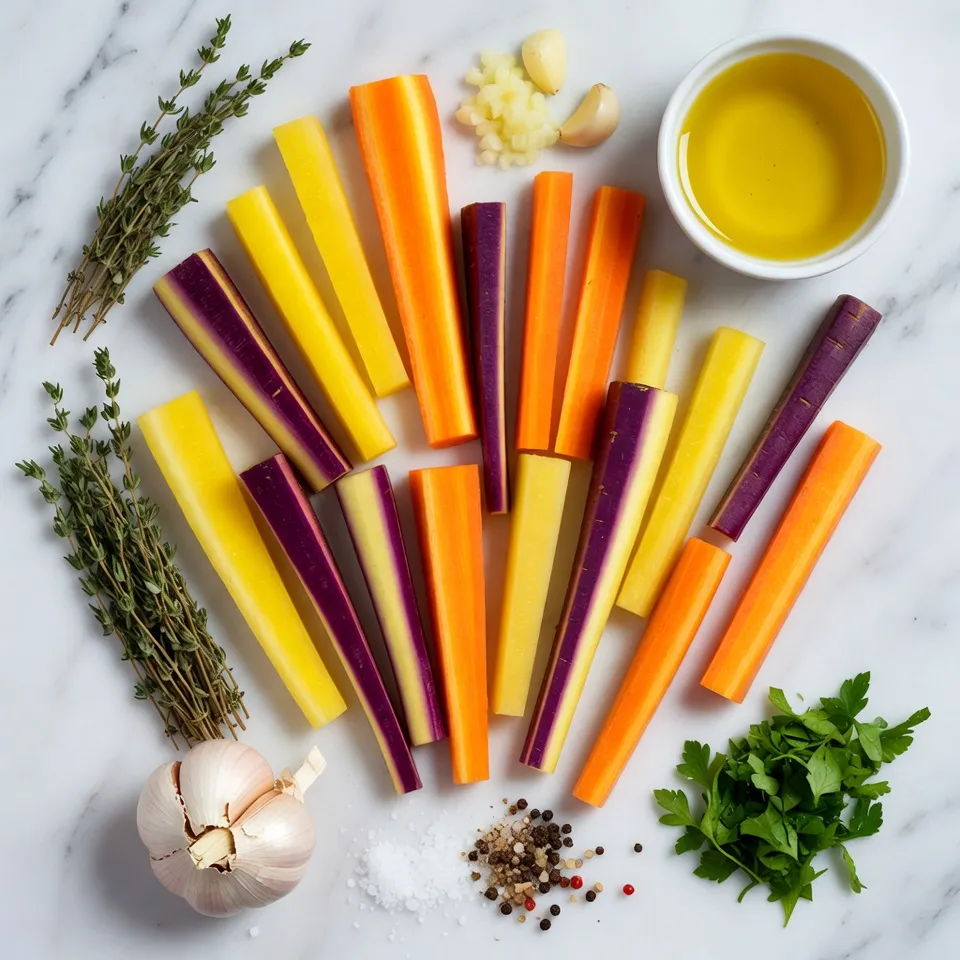
Ingredients
Main Ingredients
– 1 pound of rainbow carrots
– 4 cloves of fresh garlic
– 3 tablespoons of olive oil
– 1 teaspoon of dried thyme
– 1 teaspoon of dried rosemary
Seasoning
– Salt
– Black pepper
Garnish
– Fresh parsley
In this dish, I use rainbow carrots for their bright colors and sweet flavor. They add fun to any meal. Fresh garlic gives a strong taste that mixes well with the herbs. Olive oil helps the carrots roast nicely and adds richness. I like using dried thyme and rosemary since they are easy to find and bring great flavor.
For seasoning, I use salt and black pepper to taste. These simple seasonings highlight the natural sweetness of the carrots. A sprinkle of fresh parsley on top makes the dish look beautiful and adds a fresh taste.
When you gather all these ingredients, you get a vibrant mix ready to roast. Each bite of these garlic herb roasted rainbow carrots is a delight for the senses!

Step-by-Step Instructions
Preheat and Prepare
– Preheat oven to 425°F (220°C).
– Peel and cut 1 pound of rainbow carrots into uniform sticks.
Start by heating your oven. This ensures the carrots roast well. Uniform sticks help them cook evenly.
Mixing Ingredients
– Combine carrots with 4 minced garlic cloves, 3 tablespoons of olive oil, and 1 teaspoon each of dried thyme and rosemary.
– Season with salt and black pepper to taste.
In a large bowl, add the carrots. Next, sprinkle the minced garlic over them. Drizzle the olive oil on top. The herbs add great flavor. Season with salt and pepper to taste. Mix everything well. Make sure each stick is coated.
Roasting Process
– Arrange carrots on a lined baking sheet.
– Roast for 25-30 minutes, tossing halfway through.
Place the carrots in a single layer on a baking sheet. Lining it with parchment paper helps with cleanup. Roast the carrots for 25-30 minutes. Halfway, toss them for even cooking. When done, they should be tender and slightly caramelized. Enjoy the amazing aroma while they cook!
Tips & Tricks
Achieving Perfect Roasting
For the best results, cut your rainbow carrots into uniform sticks. This way, they cook evenly. When the sizes are different, some pieces may burn while others stay raw. Toss the carrots in the bowl after mixing in the oil and herbs. This helps each piece get coated well and cook evenly.
Enhancing Flavor
To boost the taste, try using fresh herbs like thyme or rosemary. Fresh herbs pack a strong punch of flavor. If you only have dried herbs, that works too. Just remember, dried herbs are more potent, so use less. You can even mix in some dill or basil for a twist.
Presentation Ideas
Make your dish pop with smart plating. Arrange the roasted carrots in a fan shape on your platter. This creates a beautiful visual. Drizzle a bit of olive oil around the edges for that fancy touch. You can also sprinkle fresh parsley on top for color and brightness. This small detail makes a big difference!
Pro Tips
- Use Fresh Herbs: Fresh herbs enhance the flavor of the carrots significantly; consider using fresh thyme and rosemary instead of dried for a more vibrant taste.
- Uniform Sizing: Cutting the carrots into uniform sticks ensures even cooking and caramelization, resulting in perfectly tender and flavorful bites.
- Check for Doneness: Roasting times can vary based on carrot thickness; check for tenderness with a fork during the last few minutes to avoid overcooking.
- Experiment with Flavors: Feel free to customize with different spices or add a splash of balsamic vinegar before roasting for an extra layer of flavor.

Variations
Alternative Ingredient Options
You can switch things up by using baby carrots. They are sweet and tender, making them a great choice. Other root veggies like parsnips or beets also work well. Each type brings its own flavor and color.
Feel free to mix in different herbs too. Try basil for a fresh taste or dill for a unique twist. You can even use fresh herbs instead of dried ones for a bolder flavor.
Flavor Enhancements
Want to spice things up? Add cumin for a warm, earthy taste or paprika for a hint of smokiness. Both spices can elevate your dish.
You can also mix in some citrus. Lemon juice or orange zest brightens the flavor. A splash of citrus makes the dish taste fresher and more vibrant.
Dietary Adjustments
This dish is easy to adapt for dietary needs. To make it vegan, just use olive oil and skip any dairy. It’s naturally gluten-free, so no changes are needed there.
If you’re watching your sodium, use less salt. You can also try salt-free herb blends for flavor without the added sodium. These adjustments keep the dish tasty and healthy.
Storage Info
Storing Leftovers
To store your leftover garlic herb roasted rainbow carrots, place them in an airtight container. This keeps them fresh in the fridge for up to five days. Make sure they cool down first to avoid condensation. When ready to eat, reheat them in the oven or on the stove. To reheat in the oven, preheat it to 350°F (175°C) and bake for about 10 minutes. This warms them evenly and keeps them crisp.
Freezing Options
You can freeze roasted carrots for later use. First, let them cool completely. Then, place them in a freezer-safe bag or container. Remove as much air as possible to prevent freezer burn. They can last in the freezer for up to three months. When you want to enjoy them again, defrost in the fridge overnight. To reheat, bake them in the oven at 350°F (175°C) for about 15 minutes until hot.
Shelf Life
Garlic herb roasted rainbow carrots last about five days in the fridge. Look for signs of spoilage such as a slimy texture or an off smell. If they look or smell bad, it’s best to discard them. Always trust your senses!
FAQs
How long do I roast rainbow carrots?
Roast rainbow carrots for 25 to 30 minutes. This time helps them become tender and caramelized. Be sure to toss them halfway through for even cooking.
Can I use regular carrots instead of rainbow carrots?
Yes, you can use regular carrots. However, rainbow carrots add a burst of color and a hint of sweetness. The taste may differ slightly, but both options are tasty.
What can I serve with garlic herb roasted rainbow carrots?
These carrots pair well with many dishes. Try them with grilled chicken, baked fish, or a hearty grain salad. They also work great as a side for roasted meats or a vegetarian main dish.
Roasting rainbow carrots is simple and fun. You learned about key ingredients like garlic, olive oil, and herbs. I shared easy step-by-step instructions to prepare and roast them for delicious results. We also explored tips for perfect roasting and ways to add flavor. Don’t forget the storage tips for leftovers!
Try these methods, make them your own, and enjoy colorful, tasty veggies with any meal. You’ll impress family and friends with this vibrant dis

Garlic Herb Roasted Rainbow Carrots
Ingredients
- 1 pound rainbow carrots, peeled and cut into uniform sticks
- 4 cloves fresh garlic, minced
- 3 tablespoons extra virgin olive oil
- 1 teaspoon dried thyme
- 1 teaspoon dried rosemary
- to taste salt
- to taste freshly ground black pepper
- for garnish fresh parsley, finely chopped
Instructions
- Start by preheating your oven to 425°F (220°C) to ensure it's hot enough for roasting.
- In a large mixing bowl, add the prepared rainbow carrots that have been peeled and cut into uniform sticks for even cooking.
- Sprinkle the minced garlic over the carrots, then drizzle in the olive oil. Add the dried thyme and rosemary for that wonderful herbaceous flavor.
- Generously season with salt and freshly ground black pepper to taste. Using your hands or a spatula, toss the mixture thoroughly until all the carrot sticks are evenly coated with the aromatic herbs and oil.
- Next, arrange the coated carrots in a single layer on a baking sheet that has been lined with parchment paper. This will prevent sticking and ensure easy cleanup.
- Place the baking sheet in the preheated oven and roast the carrots for 25-30 minutes. Halfway through the cooking time, give the carrots a quick toss to promote even caramelization and tenderness.
- Once they’re beautifully tender and slightly caramelized, remove the baking sheet from the oven and allow the carrots to cool slightly.
- Carefully transfer the roasted carrots to a serving platter and finish with a sprinkle of freshly chopped parsley for a burst of color and freshness before serving.


![- 2 cups cooked brown rice - 1 lb boneless, skinless chicken breast, diced - 1 can (15 oz) black beans, rinsed and drained - 1 cup corn (fresh, frozen, or canned) - 1 ripe avocado, diced - 1/2 cup shredded cheddar cheese - 1 tablespoon taco seasoning - Salt and black pepper to taste - Optional toppings: sour cream, salsa, sliced jalapeños For these Loaded Chicken Burrito Bowls, I focus on simple, fresh ingredients. The brown rice serves as a wholesome base. It adds fiber and nutrients. I choose boneless, skinless chicken breast for lean protein. It cooks up juicy and tender. Black beans bring extra protein and a creamy texture. Rinsing them helps remove excess sodium, making them healthier. Corn adds sweetness and a pop of color. You can use fresh, frozen, or canned, based on your preference. Avocado is a delightful addition. It brings creaminess and healthy fats. The shredded cheddar cheese adds richness and flavor. For seasoning, I use taco seasoning. It gives a bold taste without extra effort. I also add salt and black pepper to enhance the flavors. Toppings are where you can get creative. I suggest sour cream for creaminess. Salsa adds zest, and sliced jalapeños bring heat. Feel free to mix and match as you like. You can find the Full Recipe for all these delicious ingredients and how to prepare them. - Heat olive oil in a skillet over medium heat. - Add diced chicken and season with taco seasoning. First, I heat a tablespoon of olive oil in a skillet over medium heat. I want the oil to shimmer before adding the chicken. Once it’s hot, I toss in the diced chicken breast. I sprinkle it with taco seasoning, along with a pinch of salt and black pepper. I cook this for about 6 to 8 minutes. I stir often to ensure even cooking. The chicken should turn a lovely golden brown and reach an internal temperature of 165°F. - Prepare brown rice according to package instructions. - Fluff rice once cooked. While the chicken cooks, I prepare brown rice. I follow the package instructions closely. This step is key for fluffy rice. Once it’s cooked, I use a fork to fluff the rice. Fluffy rice makes a great base for my burrito bowls. - Mix black beans, corn, and tomatoes in a bowl. - Combine with cooked chicken and layer on rice. Next, I grab a large mixing bowl. I combine the rinsed black beans, corn, and halved cherry tomatoes. I gently toss them together until they mix well. Once the chicken is done, I add it to the bowl. I stir everything together to let the flavors blend. Now it's time to build the burrito bowls! I divide the fluffy brown rice into four serving bowls. I spoon the chicken mixture on top of the rice in each bowl. Next, I add diced avocado, shredded cheese, and fresh cilantro. For a zesty finish, I serve lime wedges on the side. You can also add sour cream or salsa if you want. For the full recipe, check the complete instructions and ingredient list. Enjoy making your loaded chicken burrito bowls! How to ensure chicken is cooked thoroughly To cook chicken safely, use a meat thermometer. The internal temperature should reach 165°F. Cook chicken pieces until they are golden brown and no longer pink inside. This ensures it is juicy and safe to eat. Best practices for fluffy rice For fluffy rice, rinse it well before cooking. This removes extra starch that makes it sticky. Cook it with the right water ratio, usually 2 cups of water for every cup of rice. After cooking, fluff it gently with a fork. This keeps the grains separate and light. Colorful arrangement ideas for the toppings To make your burrito bowls pop, layer the toppings by color. Place bright tomatoes, vibrant corn, and green avocado on top. This adds visual interest. You can also create small sections on the bowl for each topping. This way, each bite looks and tastes amazing. Using garnishes to enhance visual appeal Fresh herbs like cilantro can elevate your dish. Sprinkle them on top for a burst of color. Lime wedges can add a zesty touch. Place them artfully around the bowl for that extra flair. Suggestions for extra spices or ingredients to add To boost the flavor, try adding cumin or smoked paprika. These spices add warmth and depth. You can also mix in jalapeños for heat or lime juice for brightness. Freshly chopped garlic can also add a punch of flavor. Alternative cooking methods for chicken If you want to switch it up, grill or bake the chicken instead of pan-frying. Grilling adds a nice smoky flavor. Baking can keep it tender and juicy. You can marinate the chicken beforehand to infuse even more flavor. For the Full Recipe, check the earlier section for all the details! {{image_4}} You can easily make Loaded Chicken Burrito Bowls vegetarian or vegan. To do this, simply replace the chicken with a plant-based protein. Options include lentils, tempeh, or tofu. For a vegan cheese option, try cashew cheese or nutritional yeast. For gluten-free options, make sure to check your taco seasoning. Some brands add gluten. You can also swap brown rice for quinoa or cauliflower rice. If you like heat, add jalapeños or hot sauce to your bowl. This gives a spicy kick that enhances the flavors. You can also try different beans like pinto or kidney beans. Each type adds a unique taste and texture to your dish. Feel free to adjust your ingredients based on what is in season or what you like best. You can swap corn for bell peppers or zucchini for a fresh twist. For cheese, consider using feta or goat cheese for a different flavor. If you want a creamy topping, try Greek yogurt instead of sour cream. These swaps keep your bowls exciting! For the full recipe, check out the complete details in the recipe section. To keep your loaded chicken burrito bowls fresh, store them in airtight containers. This helps preserve flavor and texture. Place all components in separate containers if possible. This way, the rice, chicken, and toppings stay fresh longer. Generally, leftovers last about 3 to 4 days in the fridge. Make sure to check for any signs of spoilage before eating. If the chicken looks or smells off, it's best to toss it. When reheating, use the microwave for quick warmth. Place the food in a microwave-safe bowl, cover it with a damp paper towel, and heat it in 30-second intervals until warm. This method keeps the rice moist and prevents it from drying out. For the best texture, consider reheating in a skillet. Add a splash of water, cover, and cook on low heat until everything is warmed through. This method helps maintain flavor and texture. To freeze components, let them cool completely first. Portion the rice, chicken, and toppings into freezer-safe containers. Label them with the date. This makes it easy to track freshness. You can freeze cooked chicken and rice for up to 3 months. When ready to eat, thaw them overnight in the fridge. Reheat them as mentioned above to enjoy your delicious meal again. You can add many tasty toppings to your burrito bowls. Here are some great ideas: - Sour cream: Adds creaminess and a tangy flavor. - Salsa: Choose your favorite type, from mild to spicy. - Sliced jalapeños: For some heat and crunch. - Chopped green onions: Adds freshness and color. - Lettuce: A nice crunch and extra nutrients. - Black olives: For a salty, savory touch. - Cheese: Try a different cheese like queso fresco or pepper jack. Mix and match these options to find your favorite combination. Each topping can change the flavor and texture of the dish. Yes, you can prepare Loaded Chicken Burrito Bowls ahead of time. Here are some tips for meal prep: - Cook the chicken and rice: You can cook and store these in separate containers in the fridge. - Prep toppings: Chop your vegetables and store them in airtight containers. - Assemble before serving: When ready to eat, layer the rice, chicken, and toppings in a bowl. This keeps everything fresh. When stored properly, the ingredients can last for about 3 to 4 days in the fridge. You can easily customize your burrito bowls to fit your needs. Here are some tips: - Dietary needs: If you're vegetarian, use beans instead of chicken. For vegan, skip cheese and sour cream. - Flavor preferences: Add different spices or sauces to change the flavor. - Vegetable swaps: Use seasonal vegetables, like bell peppers or zucchini. - Grain choices: Try quinoa, cauliflower rice, or even lettuce wraps instead of brown rice. Get creative and make the dish your own! For the complete ingredients and instructions for Loaded Chicken Burrito Bowls, check out the [Full Recipe]. This post shared how to make tasty Loaded Chicken Burrito Bowls. You learned about main and optional ingredients. I explained step-by-step instructions, helpful tips, and fun variations. You can customize the bowls to your liking and store leftovers easily. Making these burrito bowls is fun and flexible. Enjoy your meal and get creative with flavors. The possibilities are endless, so dive in and make it your own!](https://joymealplan.com/wp-content/uploads/2025/07/a2d38b5a-a8a2-4e80-9f96-ef24cf5264b7-768x768.webp)


