Garlic Parmesan Pull-Apart Rolls Easy and Tasty Recipe

Are you ready to impress your family and friends with a delicious treat? Garlic Parmesan pull-apart rolls are easy to make and taste amazing. With simple ingredients and quick steps, you’ll bake up a warm, fluffy batch in no time. Follow my expert tips to perfect your technique, and get ready for compliments! Let’s dive into this tasty recipe and make your meal unforgettable.
Why I Love This Recipe
- Delicious Flavor Combination: The rich, savory taste of garlic paired with the nuttiness of Parmesan cheese creates an irresistible flavor that elevates any meal.
- Easy to Make: This recipe is straightforward and requires minimal ingredients, making it perfect for both novice and experienced bakers.
- Perfect for Sharing: The pull-apart nature of these rolls makes them a fun and interactive dish for gatherings, encouraging everyone to dig in together.
- Versatile Serving Options: These rolls can be enjoyed on their own, as a side to pasta dishes, or even dipped in marinara sauce for an extra treat!
Ingredients
List of Required Ingredients
– 3 cups all-purpose flour
– 1 packet (2 ¼ teaspoons) instant yeast
– 1 teaspoon sugar
– 1 teaspoon salt
– 1 cup warm water (around 110°F or 45°C)
– 3 tablespoons olive oil
– 4 cloves garlic, finely minced
– ½ cup grated Parmesan cheese
– ¼ cup fresh parsley, finely chopped
– 1 teaspoon dried Italian herbs (optional)
– 2 tablespoons melted butter
These ingredients come together to create the softest, most flavorful rolls. The flour is the base, giving the rolls structure. The instant yeast helps the dough rise quickly. A bit of sugar feeds the yeast, while salt adds flavor. Warm water is key; it wakes up the yeast.
Olive oil keeps the rolls moist. Garlic brings a robust flavor, while Parmesan cheese adds a rich, salty kick. Fresh parsley gives a pop of color and freshness. If you like Italian flavors, add the dried Italian herbs. Finally, melted butter adds richness and helps the rolls brown beautifully.
Each ingredient plays a role in making these rolls simply irresistible. You can adjust the garlic for more or less flavor. Also, feel free to swap in other herbs you enjoy. This recipe is all about personal taste and enjoying the process!

Step-by-Step Instructions
Activating the Yeast
To start, pour warm water into a large bowl. Add sugar and sprinkle the instant yeast over the top. Let it sit for about 5 minutes. You will see bubbles and froth forming. This means the yeast is alive and ready.
Preparing the Dough
Next, stir in the olive oil and salt. Then, add one cup of flour. Mix until you have a smooth batter. Gradually add the rest of the flour, about ½ cup at a time. Knead the dough for 5-7 minutes. It should feel soft and elastic when you’re done.
Rising the Dough
Now, lightly grease a clean bowl with olive oil. Place the kneaded dough inside. Cover it with a damp cloth and let it rise in a warm spot. This should take about 1 hour or until the dough doubles in size.
Shaping the Rolls
Once the dough has risen, gently punch it down. This will release any air bubbles. Divide the dough into 12 equal pieces and roll each piece into a smooth ball.
Coating the Dough Balls
In a medium bowl, mix minced garlic, melted butter, grated Parmesan cheese, parsley, and optional dried Italian herbs. Take each dough ball and dip it into this mix. Make sure each ball is well-coated.
Final Rising and Baking
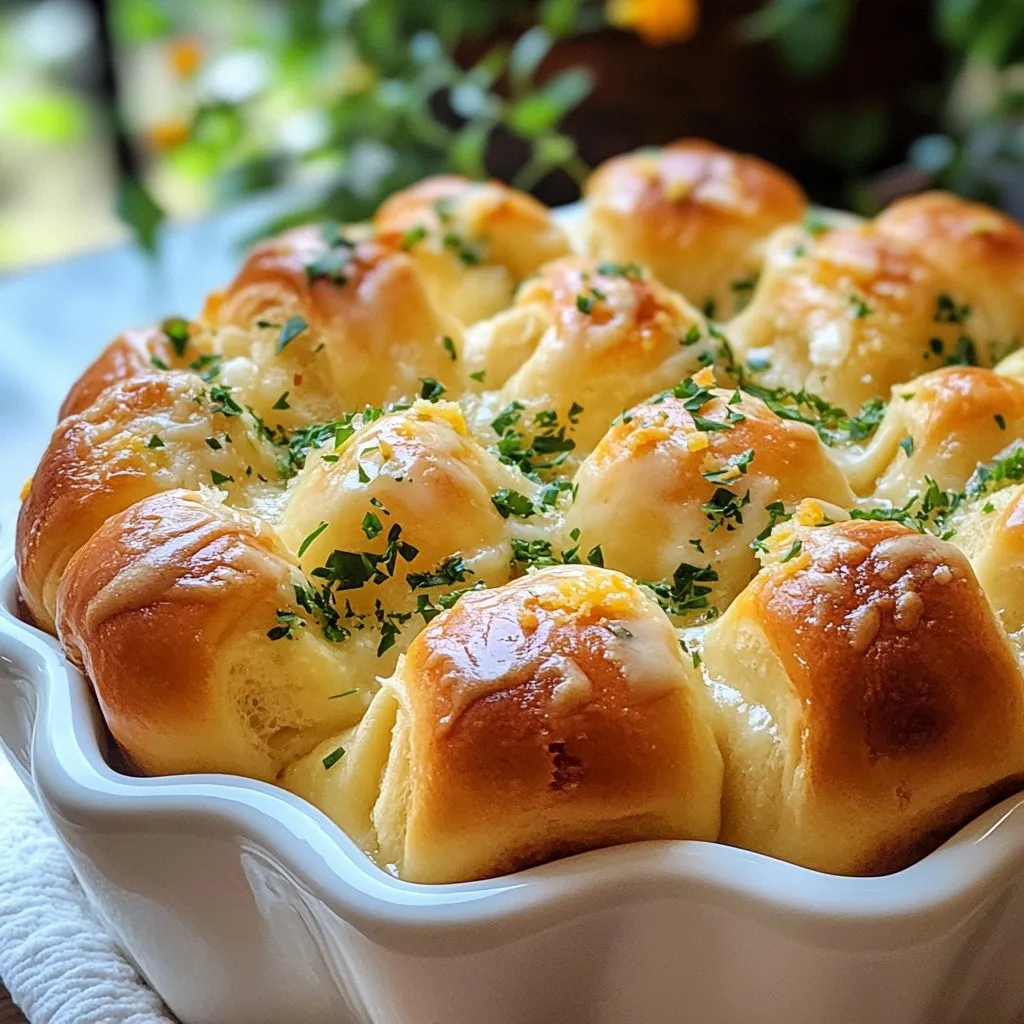
Arrange the coated dough balls in a greased bundt pan or round cake pan. Stack them to create a nice look. Cover the pan with a cloth and let the rolls rise again for about 30 minutes. Preheat your oven to 375°F (190°C). After the rolls have risen, bake them for 25-30 minutes. They should be golden brown on top. Let them cool in the pan for a few minutes before serving.
Tips & Tricks
Perfecting the Dough Consistency
– Knowing when the dough is ready: Your dough should feel soft and smooth. It should spring back when you poke it. If it feels sticky, add a bit more flour.
– Importance of kneading: Kneading helps develop gluten. This gives your rolls a nice structure. Aim to knead for about 5-7 minutes. Don’t rush; it makes a big difference!
Getting the Best Flavor
– Utilizing fresh vs. dried herbs: Fresh herbs give a bright taste. If you use dried herbs, reduce the amount. They are more potent. For garlic, fresh is best. Mince it finely for the most flavor.
– Tips for garlic preparation: Crush garlic cloves with a knife. This releases more oils and flavor. Then, mince it finely. You want that strong garlic punch in every bite!
Achieving Golden Brown Rolls
– Monitoring baking time: Set a timer for 25 minutes. Check for a golden color. If they aren’t brown, give them a few more minutes.
– Recognizing doneness signs: The rolls should sound hollow when tapped. You can also check the internal temperature. It should be around 190°F (88°C). This means they’re done!
Pro Tips
- Yeast Activation: Ensure your water temperature is around 110°F (45°C) to properly activate the yeast without killing it. Too hot or too cold water can affect the dough’s rise.
- Kneading Technique: Knead the dough until it’s smooth and elastic. This develops the gluten, which is essential for the bread’s structure and texture.
- Flavor Infusion: For an even more robust flavor, let the garlic and butter mixture sit for 10-15 minutes before coating the dough balls, allowing the garlic to infuse the butter.
- Serving Suggestion: Serve the rolls warm with a side of marinara sauce or garlic butter for dipping. They’re perfect as an appetizer or a side dish!

Variations
Flavor Additions
To make your garlic Parmesan pull-apart rolls even tastier, try adding herbs. Rosemary or thyme will bring a fresh twist. You can mix them into the dough or sprinkle them on top before baking. Cheese is another great addition. Try using mozzarella or cheddar for a gooey texture. Each cheese will give your rolls a unique flavor.
Gluten-Free Alternatives
If you need a gluten-free option, you can switch the flour. Use a gluten-free all-purpose blend instead. Make sure it has xanthan gum for the best results. You might need to adjust the yeast and water. Start with less water, as gluten-free flour can absorb more moisture.
Serving Suggestions
These rolls pair well with dips. Marinara sauce is a classic choice, but garlic butter is also great. You can serve them with a side salad or soup for a complete meal. Try adding a cheese platter for a fun appetizer spread. The rolls are perfect for sharing!
Storage Info
Storing Leftover Rolls
To keep your leftover Garlic Parmesan pull-apart rolls fresh, wrap them tightly in plastic wrap. Place them in an airtight container or a resealable bag. This helps keep them from drying out. Store the rolls in the fridge for up to three days. If you want to save them longer, freezing is a great option.
For freezing, let the rolls cool completely first. Then, wrap each roll in plastic wrap, followed by aluminum foil. This double-wrap prevents freezer burn. You can store them in the freezer for up to three months.
Reheating Suggestions
When you want to enjoy your rolls again, reheating is easy. The best method is to use the oven. Preheat your oven to 350°F (175°C). Place the rolls on a baking sheet and cover them with foil. Heat for about 10-15 minutes, until warmed through.
If you prefer the microwave, place a roll on a plate and cover it with a damp paper towel. Heat for about 15-20 seconds. This helps keep the rolls soft and warm. Just be careful not to overheat, or they may become tough.
FAQs
How long do garlic Parmesan pull-apart rolls last?
Garlic Parmesan pull-apart rolls stay fresh for about 3 days at room temperature. Store them in an airtight container. In the fridge, they last up to a week. For longer storage, freeze them. Wrap the rolls tightly in plastic wrap, then place them in a freezer bag. They can last up to 3 months in the freezer.
Can I make the dough ahead of time?
Yes, you can make the dough ahead. Prepare the dough and let it rise as directed. After the first rise, punch it down and wrap it tightly. Store it in the fridge for up to 24 hours. When ready, let it sit at room temperature for about 30 minutes before shaping the rolls. This helps the dough rise again.
What can I use instead of Parmesan cheese?
If you don’t have Parmesan cheese, try using Pecorino Romano. It has a similar flavor but is saltier. Another option is to use mozzarella for a milder taste. Nutritional yeast is also a great choice for a dairy-free version. It adds a cheesy flavor without the dairy.
Can I use active dry yeast instead of instant yeast?
Yes, you can use active dry yeast. However, you need to activate it first. Mix it with warm water and sugar and let it sit for about 5-10 minutes. Once it becomes frothy, add it to your dough. Adjust the rising times as active dry yeast may take longer to rise than instant yeast.
You now have a clear path for making garlic Parmesan pull-apart rolls. We covered every step from needed ingredients to variations, storage, and reheating advice. Remember, the key is in the dough’s texture and baking time. Use fresh herbs for the best taste and enjoy these rolls with your favorite dips. You can make them ahead and store them easily. I hope you feel ready to create this delicious treat and impress your friends and famil

Garlic Parmesan Pull-Apart Rolls
Ingredients
- 3 cups all-purpose flour
- 1 packet instant yeast (2 ¼ teaspoons)
- 1 teaspoon sugar
- 1 teaspoon salt
- 1 cup warm water (around 110°F or 45°C)
- 3 tablespoons olive oil
- 4 cloves garlic, finely minced
- 0.5 cup grated Parmesan cheese
- 0.25 cup fresh parsley, finely chopped
- 1 teaspoon dried Italian herbs (optional but recommended)
- 2 tablespoons melted butter
Instructions
- In a large mixing bowl, pour the warm water, then add the sugar and sprinkle the instant yeast over the top. Allow this mixture to rest for about 5 minutes until you see bubbles and froth forming, indicating the yeast is active.
- Next, stir in the olive oil and salt, followed by one cup of flour. Mix this together until you have a smooth batter-like consistency.
- Gradually incorporate the remaining flour, adding it about ½ cup at a time, kneading the dough with your hands or using a stand mixer fitted with a dough hook. Knead for about 5-7 minutes until the dough becomes soft, smooth, and elastic.
- Lightly grease a clean bowl with olive oil, place the kneaded dough into the bowl, cover it with a damp cloth, and let it rise in a warm environment for approximately 1 hour, or until it has doubled in size.
- Preheat your oven to 375°F (190°C).
- Once risen, gently punch down the dough to release any air bubbles. Divide the dough into 12 equal portions and roll each portion into a smooth ball.
- In a medium bowl, vigorously mix the minced garlic, melted butter, grated Parmesan cheese, chopped parsley, and optional dried Italian herbs until well combined.
- Take each dough ball and dip it into the garlic-Parmesan mixture, ensuring they are thoroughly coated in the flavorful mixture.
- Carefully arrange the coated dough balls in a greased bundt pan or a round cake pan, stacking them as you go to create a delightful rustic appearance.
- Cover the pan with a cloth and allow the assembled rolls to rise for an additional 30 minutes.
- Once the dough has risen again, place the pan into the preheated oven and bake for 25-30 minutes, or until the rolls are beautifully golden brown on top.
- After baking, let the rolls sit in the pan for a few minutes before inverting onto a serving plate.


![For Garlic Parmesan Brussels Sprouts, you will need: - 1 pound Brussels sprouts, trimmed and halved - 4 tablespoons high-quality olive oil - 3 cloves of garlic, finely minced - 1/2 cup freshly grated Parmesan cheese - 1 teaspoon smoked paprika - 1/2 teaspoon fine sea salt - 1/4 teaspoon freshly ground black pepper - 1 tablespoon freshly squeezed lemon juice - Fresh parsley, finely chopped (for garnish) You can swap some ingredients if needed. Use any firm cheese instead of Parmesan. Try using a mix of oils, like avocado oil, for a different flavor. If you want less garlic, use two cloves instead of three. For a kick, add chili flakes instead of smoked paprika. Fresh lemon juice can be replaced with vinegar if you have no lemon. Fresh ingredients make a big difference in flavor. Fresh Brussels sprouts taste sweeter and more vibrant. Fresh garlic adds a nice punch to the dish. Using high-quality olive oil enhances the overall taste and texture. Choose a cheese that melts well for the best outcome. Fresh parsley not only looks great but adds a bright flavor. By using fresh items, you create a dish that makes people want to come back for more. For the complete recipe, check out the Full Recipe. Start by preheating your oven to 400°F (200°C). This step is key for getting a nice roast. While the oven heats, wash and trim 1 pound of Brussels sprouts. Cut each sprout in half. This helps them cook evenly and allows more flavor to seep in. In a large bowl, mix the halved Brussels sprouts with 4 tablespoons of olive oil, 3 minced garlic cloves, 1 teaspoon of smoked paprika, 1/2 teaspoon of fine sea salt, and 1/4 teaspoon of black pepper. Toss everything together until the sprouts look glossy and well coated. The oil helps the spices stick, while the garlic adds a punch of flavor. Line a baking sheet with parchment paper for easier cleanup. Spread the Brussels sprouts in a single layer, making sure they have space. Place the sheet in your preheated oven and roast for 20-25 minutes. Stir halfway through to ensure they cook evenly. They are done when they are golden brown and crispy. As soon as they come out of the oven, sprinkle 1/2 cup of grated Parmesan cheese on top. Toss gently so the cheese melts and coats the sprouts. For a fresh kick, drizzle with 1 tablespoon of lemon juice before serving. You can find the full recipe for more details. For the best crispy Brussels sprouts, use the right oil. High-quality olive oil works wonders. Toss the sprouts well to coat them evenly. This helps them crisp up nicely. Roast them at 400°F (200°C) for 20 to 25 minutes. Stir them halfway through for even cooking. The key is to watch for that golden brown color. You want them crispy, not burnt. When roasting Brussels sprouts, space is key. If they are too close, they steam instead of roast. Spread them out in a single layer on your baking sheet. This allows hot air to circulate around each sprout. By not overcrowding, you will get that desired crispiness. Remember, a crowded pan can lead to soggy veggies. Garlic Parmesan Brussels sprouts shine as a side dish. They pair well with roasted meats, like chicken or pork. You can also serve them alongside pasta dishes for a hearty meal. For a fun twist, add a squeeze of lemon juice right before serving. Fresh parsley adds color and flavor. Feel free to explore and find your own favorite pairings. For the complete recipe, check out the [Full Recipe]. {{image_4}} You can change the flavor of Garlic Parmesan Brussels sprouts by adding bacon or nuts. Bacon gives a smoky taste. Just chop it and cook it until crispy. Then, mix it with the Brussels sprouts before roasting. Nuts like walnuts or pecans add crunch. Toss in some chopped nuts just before serving for a nice texture. You can also play with different seasonings. Italian herbs like oregano and basil work well. Just mix them with the olive oil before coating the Brussels sprouts. If you love heat, add chili flakes. They give a spicy kick that pairs nicely with garlic and cheese. Try cooking methods like air frying or sautéing. Air frying makes the sprouts crispy without much oil. Set your air fryer to 375°F and cook for about 15-20 minutes. Shake the basket halfway through for even cooking. Sautéing is quick and easy. Heat some olive oil in a pan and cook the sprouts for about 10 minutes until they are tender and golden. Each method changes the texture and flavor. Explore these options to find your favorite way to enjoy Garlic Parmesan Brussels sprouts! For more ideas, check the Full Recipe. After you enjoy your Garlic Parmesan Brussels sprouts, store the leftovers in an airtight container. Make sure they cool down first. Place them in the fridge for up to three days. Keeping them sealed helps maintain flavor and texture. If you leave them uncovered, they may become soggy and lose their crunch. To reheat your Brussels sprouts, use the oven for the best results. Preheat it to 350°F (175°C). Spread the leftovers on a baking sheet. Heat them for about 10-15 minutes. This method helps restore their crispiness. If you’re in a hurry, you can use the microwave. Heat them in short bursts of 30 seconds, stirring in between. This method may soften them, but they will still taste great. If you want to freeze Brussels sprouts, do it before cooking. Trim and halve them, then blanch in boiling water for three minutes. After blanching, quickly transfer them to an ice bath. This process stops the cooking and helps keep their bright color. Drain and dry them well. Pack the sprouts in freezer bags, removing as much air as possible. They will last in the freezer for up to three months. When you’re ready to cook, you can roast them straight from the freezer. Just add a few extra minutes to the cooking time. Enjoy this flavorful side dish anytime! For the full recipe, check out the section above. Yes, you can use frozen Brussels sprouts. They are convenient and save time. However, frozen sprouts may not roast as well as fresh ones. They might be softer and less crispy. If using frozen, thaw them first and pat dry. This helps reduce moisture when roasting. Brussels sprouts are very nutritious. They are low in calories and high in fiber. They contain vitamins C and K, which are great for your immune system. These little veggies also have antioxidants, which help protect your cells. Eating Brussels sprouts can support heart health and improve digestion. You can tell Brussels sprouts are ready when they are golden brown and crispy. Check for a nice caramel color on the outside. A fork should slide in easily, showing they are tender inside. You can also taste one to see if it has a nice roasted flavor. Enjoy them right after roasting for the best taste. You can find the Full Recipe [here](#). This article covered how to prepare and enjoy Brussels sprouts. We talked about fresh ingredients, cooking steps, and tips for crispiness. You can explore many variations to suit your taste. Remember to store leftovers properly for future meals. Brussels sprouts are healthy and tasty when cooked right. With these tips, you can make them your own. Enjoy experimenting and serving them in fun ways. Happy cooking!](https://joymealplan.com/wp-content/uploads/2025/07/ec750097-af39-4afd-becf-235105cbf3ae-768x768.webp)