Garlic Parmesan Roasted Chickpeas Crunchy Snack Delight

Looking for a snack that’s both crunchy and full of flavor? Garlic Parmesan roasted chickpeas are your answer! These tasty bites are not just easy to make; they’re also packed with protein and perfect for any time of the day. In this post, I’ll guide you through the simple steps to create this delightful treat, share tips to make them extra crispy, and explore fun variations. Get ready to snack smart!
Ingredients
List of Required Ingredients
– 1 can (15 oz) chickpeas, drained and rinsed
– 2 tablespoons olive oil
– 4 cloves garlic, minced
– 1/4 cup grated Parmesan cheese
– 1 teaspoon smoked paprika
– 1/2 teaspoon garlic powder
– 1/2 teaspoon onion powder
– Salt and pepper to taste
Optional Ingredients for Extra Flavor
– A pinch of cayenne pepper for heat
– Lemon zest for brightness
– A dash of Italian herbs for depth
Recommended Garnishes
– Fresh parsley, chopped
– Extra grated Parmesan cheese
– A squeeze of fresh lemon juice
Step-by-Step Instructions
Preparation of Chickpeas
Start by preheating your oven to 400°F (200°C). This heat gets the chickpeas crispy. Next, take a can of chickpeas (15 oz), then drain and rinse them well. After rinsing, spread the chickpeas on a clean kitchen towel. Pat them dry; this step is key for crunchiness. If they are wet, they won’t crisp up well.
Roasting Process
Now, put the dried chickpeas in a large bowl. Add 2 tablespoons of olive oil, 4 minced garlic cloves, 1 teaspoon of smoked paprika, 1/2 teaspoon of garlic powder, and 1/2 teaspoon of onion powder. Don’t forget to add salt and pepper to taste. Toss everything together until the chickpeas are fully coated.
Transfer the coated chickpeas to a baking sheet lined with parchment paper. Spread them out evenly. This helps them roast without sticking together. Place the baking sheet in your preheated oven. Roast for 25-30 minutes. Halfway through, stir the chickpeas to ensure they brown nicely.
Adding Parmesan Cheese
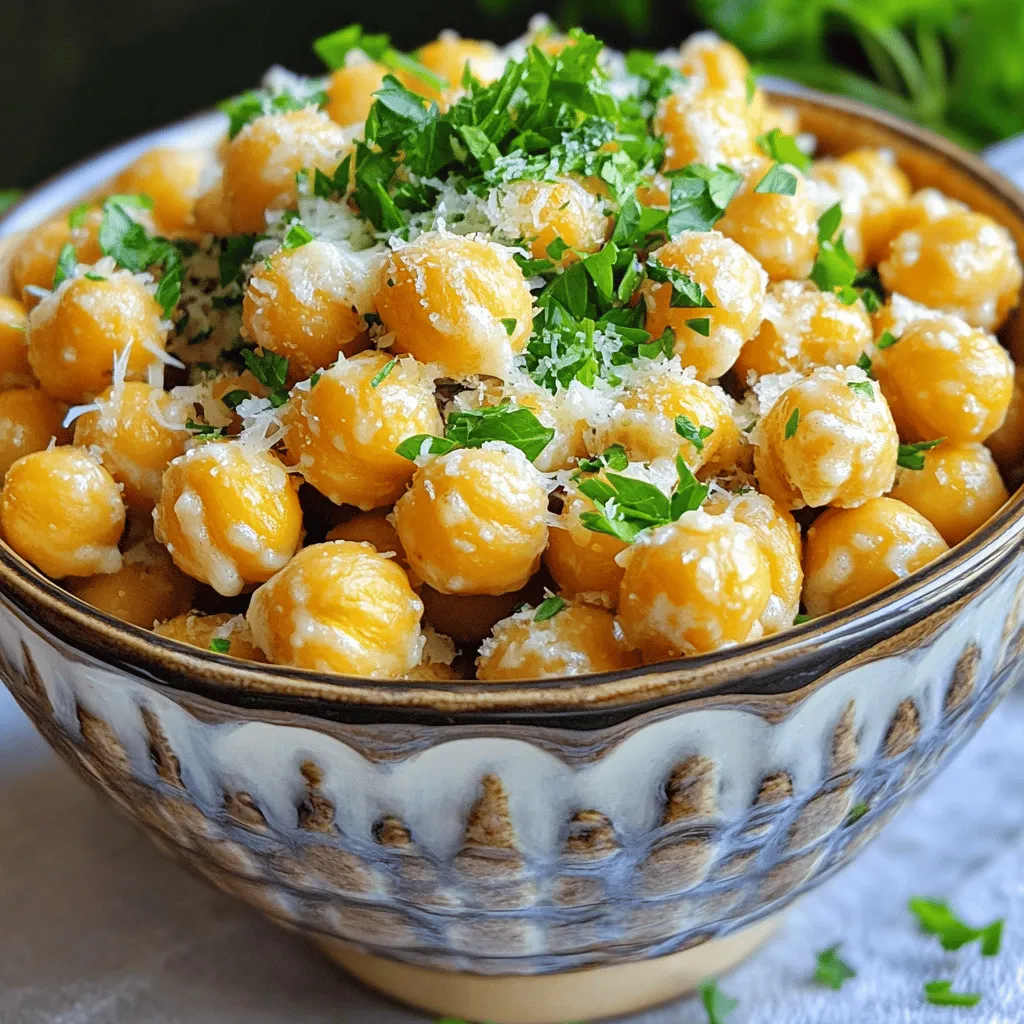
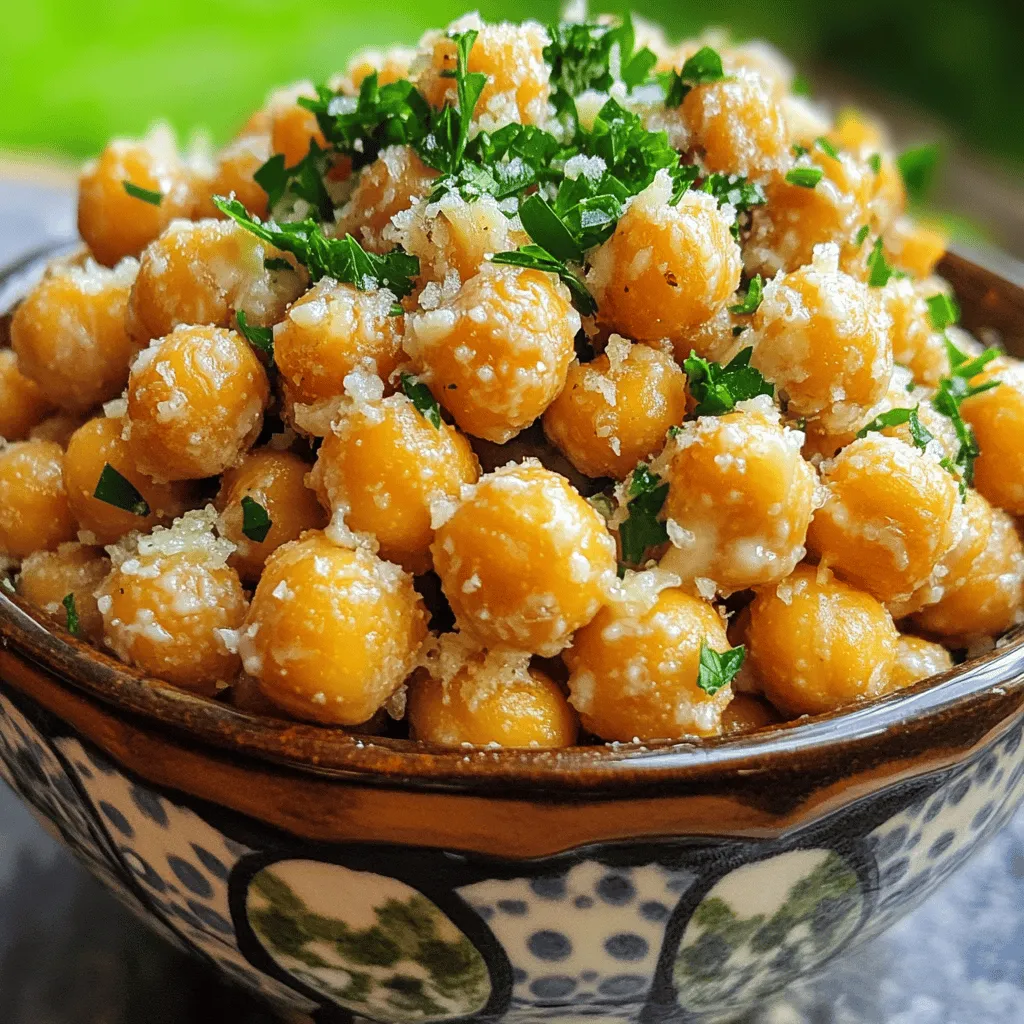
Once the chickpeas turn golden and crispy, take the baking sheet out. Immediately sprinkle 1/4 cup of grated Parmesan cheese over the hot chickpeas. Toss them lightly to help the cheese stick. Return the baking sheet to the oven for 5 more minutes. Watch closely; you want the cheese to melt and turn slightly golden.
After that, take them out and let them cool a bit. For extra flair, chop some fresh parsley and sprinkle it on top before you serve. Enjoy your delightful snack!
Tips & Tricks
How to Achieve Maximum Crispiness
To get your chickpeas super crispy, you must dry them well. After rinsing, use a towel to pat them dry. The drier they are, the crunchier they will be. Spread them out on the baking sheet in a single layer. This helps them roast evenly. Stir them halfway through cooking for the best results. Keep an eye on them; every oven works differently.
Substitutions for Ingredients
If you don’t have Parmesan cheese, you can use nutritional yeast for a vegan option. Instead of smoked paprika, regular paprika will work too. You can mix in spices like chili powder for heat or Italian herbs for a twist. Olive oil can be swapped with avocado oil for a different flavor.
Common Mistakes to Avoid
One big mistake is not drying the chickpeas. This leads to soggy snacks, not crispy ones. Another is overcrowding the baking sheet. If they sit on top of each other, they won’t crisp up. Lastly, don’t skip the stirring step. This helps all the chickpeas cook evenly and reach that perfect crunch.

Variations
Spicy Garlic Parmesan Chickpeas
Want a kick? Add heat with spicy garlic Parmesan chickpeas. To make this, mix in some cayenne pepper or red pepper flakes with your seasonings. Start with a small amount and adjust to your taste. The spice will pair well with the garlic and cheese, giving you a snack that packs a punch. You can enjoy these spicy chickpeas on their own or use them to top salads for an extra zing.
Herb-Infused Roasted Chickpeas
If you love fresh flavors, try herb-infused roasted chickpeas. Use dried herbs like oregano, thyme, or rosemary in your mix. You can also add fresh herbs after roasting for a burst of flavor. The herbs will complement the garlic and Parmesan, creating a fragrant and tasty snack. This variation works well as a garnish for soups or salads, adding a crunchy touch.
Vegan Friendly Alternatives
Not a fan of cheese? No problem! You can easily make vegan-friendly chickpeas. Instead of Parmesan, use nutritional yeast. It adds a cheesy flavor without dairy. Mix it in after roasting, just like you would with the cheese. You can also try adding lemon zest for brightness. This version is delicious and perfect for anyone on a plant-based diet.
Storage Info
Best Practices for Storing Leftovers
To keep your Garlic Parmesan Roasted Chickpeas fresh, store them in an airtight container. Make sure they cool completely before sealing. This helps prevent moisture, which can make them soggy. You can store them at room temperature for up to three days. For longer storage, keep them in the fridge for about a week.
How to Reheat for Optimal Crunchiness
When you reheat these chickpeas, you want to bring back that crunch. Preheat your oven to 350°F (175°C). Spread the chickpeas on a baking sheet. Bake for about 10 minutes. This will revive their crispiness. Avoid using the microwave, as it will make them soft.
Freezing Options
Freezing Garlic Parmesan Roasted Chickpeas is possible, but they may lose some crunch. If you want to freeze them, let them cool completely. Then, place them in a freezer-safe bag. Remove as much air as possible before sealing. They can last for about three months in the freezer. When ready to eat, thaw in the fridge and reheat in the oven to regain some crunch.
FAQs
How long do Garlic Parmesan Roasted Chickpeas last?
Garlic Parmesan Roasted Chickpeas last about 3-5 days when stored properly. Keep them in an airtight container. This helps maintain their crunch. If they get soft, you can re-crisp them in the oven. Just heat them for about 5-10 minutes at 350°F (175°C). It’s best to enjoy them fresh, but they still taste good after a few days.
Can I make this recipe in an air fryer?
Yes, you can make Garlic Parmesan Roasted Chickpeas in an air fryer! To do this, follow the same steps for seasoning the chickpeas. Then, place them in the air fryer basket in a single layer. Cook them at 400°F (200°C) for about 15-20 minutes. Shake the basket halfway through to ensure even cooking. This method gives you a quick and crispy snack.
What can I serve with Garlic Parmesan Roasted Chickpeas?
You can serve Garlic Parmesan Roasted Chickpeas with many tasty options. Here are some ideas:
– Hummus for dipping
– A fresh salad for crunch
– A cheese platter for variety
– Your favorite sauces, like ranch or tzatziki
These chickpeas make a great snack on their own, or you can pair them for a fun meal. Enjoy experimenting with different combinations!
You learned about making Garlic Parmesan Roasted Chickpeas using essential and optional ingredients. I shared step-by-step instructions for perfect roasting and tips to avoid mistakes. Variations give you options for spicy or vegan flavors. Storing and reheating tips help keep your chickpeas crispy.
In summary, this easy recipe offers great taste and nutrition. Enjoy trying new flavors and impressing friends with your snacks.


![- Preheat the oven to 400°F (200°C). - Rinse and trim the asparagus. First, I set my oven to 400°F (200°C). This temperature roasts the asparagus just right. Next, I rinse the asparagus under cold water. I clean each stalk well. To trim, I gently bend the end until it snaps. This removes the tough part. If you prefer, use a knife for a clean cut. - Mix garlic, olive oil, lemon zest, lemon juice, and seasonings. Now, let’s make the marinade! In a small bowl, I combine minced garlic, olive oil, lemon zest, and lemon juice. I add sea salt, black pepper, and red pepper flakes for a little heat. Whisk all these together until well mixed. This marinade brings a burst of flavor to our asparagus. - Toss asparagus in marinade. - Roast asparagus for 12-15 minutes in preheated oven. Next, I lay the asparagus on a baking sheet. I drizzle the marinade over them, making sure each spear gets coated. I use my hands or a spoon to toss gently. Then, I spread them out in a single layer. I place the tray in the hot oven. I roast the asparagus for 12-15 minutes. Halfway through, I give them a stir. This helps them cook evenly. When done, they should be tender with a bit of crispness. If you want, sprinkle grated Parmesan cheese over the asparagus in the last two minutes of roasting. It melts nicely and adds richness. Once finished, I take them out and garnish with fresh parsley. This adds color and makes the dish pop! For the complete recipe, check out the [Full Recipe]. How do you tell when asparagus is done cooking? Look for a bright green color. The stalks should be tender but still firm. You can also poke them with a fork to check for tenderness. If they bend easily but don’t break, they’re perfect! Want to boost the flavor? Try adding fresh herbs like thyme or basil. You can also use spices like garlic powder or onion powder. If you like a kick, sprinkle red pepper flakes on top. Just a pinch adds great heat without overpowering the dish. How can you serve Garlic Lemon Asparagus? First, arrange the asparagus on a nice platter. Keep them in a single layer for a neat look. You can sprinkle some extra lemon zest on top for brightness. Finally, add fresh parsley for a splash of color. This makes your dish pop and look tasty! For the full recipe, check out the complete guide. {{image_4}} You can cook Garlic Lemon Asparagus in different ways. Each method gives a unique taste. - Grilling: This adds a smoky flavor. You will get nice grill marks. But you should watch it closely. It cooks fast and may burn. - Roasting: This method brings out the natural sweetness. You will get a tender inside with a slight crisp. It takes a short time at high heat, which is perfect for busy cooks. - Sautéing on the stovetop: This is quick and easy. Heat oil in a pan, add the asparagus, and cook for a few minutes. You get a fresh taste and a bright green color. You can switch ingredients to suit your taste or diet. - Cheese Options: If you want a vegan dish, skip the Parmesan. You can use nutritional yeast for a cheesy taste without dairy. Feta cheese is also a great option if you want a different flavor. - Citrus Variations: Instead of lemon, try lime or orange. Each fruit brings its own twist. Lime gives a tangy kick, while orange adds sweetness. Many people have different diets. You can easily adapt this dish. - Gluten-Free: This recipe is already gluten-free. Just make sure any added ingredients are too. - Dairy-Free: Skip the cheese or use a dairy-free alternative. This keeps the dish light and fresh. - Low-Carb: Asparagus is low in carbs, making it perfect for health-conscious eaters. You can enjoy it without worries about carbs. Try these variations to make Garlic Lemon Asparagus your own! For the complete recipe, check the [Full Recipe]. To keep your Garlic Lemon Asparagus fresh, follow these tips: - Refrigeration: Place leftovers in an airtight container. This helps keep moisture in and prevents odors from other foods. Store them in the fridge for best results. - Freezing: If you want to save them longer, consider freezing. First, blanch the asparagus in boiling water for two minutes. Then cool them in ice water. Drain and place in freezer bags. Remove air to avoid freezer burn. When it's time to enjoy them again, you should reheat properly. - Reheating: For the best taste, heat in a skillet over medium heat. Add a splash of olive oil to keep them moist. Stir occasionally for even heating. You can also reheat them in the oven at 350°F (175°C) for about 10 minutes. Garlic Lemon Asparagus lasts about 3 to 5 days in the fridge. - Check for freshness: Look for any signs of spoilage, like discoloration or a sour smell. If they seem off, it's best to toss them. To maintain texture after storage, try these tips: - Avoid overcrowding in the container. This helps air circulate and keeps them crisp. - When reheating, don't overcook them. This keeps their vibrant color and crunch. Following these steps will help you enjoy your Garlic Lemon Asparagus longer, keeping the flavors fresh and delicious! For the complete preparation guide, check the Full Recipe. What are the health benefits of asparagus? Asparagus is low in calories and high in nutrients. It is rich in vitamins A, C, E, and K. This vegetable also has folate, which helps with cell growth. Asparagus is a good source of fiber, aiding digestion. Plus, it has antioxidants that fight free radicals in the body. Can I prepare Garlic Lemon Asparagus in advance? Yes, you can prepare Garlic Lemon Asparagus in advance. You can wash and trim the asparagus a day before. Mix the marinade and store it in the fridge. When you are ready to eat, toss the asparagus in the marinade and roast them. This helps the flavors meld well. Can I use frozen asparagus for this recipe? Yes, you can use frozen asparagus for this recipe. However, fresh asparagus will taste better. If using frozen, thaw them first. Drain excess water to avoid sogginess. Then proceed with the marinade and roasting steps. How can I make this recipe spicier? To make this recipe spicier, add more red pepper flakes. You can also add sliced fresh jalapeños or a dash of hot sauce. Mix these into the marinade for an extra kick. Start with a small amount and adjust to your taste. What dishes pair well with Garlic Lemon Asparagus? Garlic Lemon Asparagus pairs well with many dishes. It complements grilled chicken, fish, or steak. You can also serve it with pasta or rice. A light salad also works nicely with this dish. How can I incorporate this recipe into a meal prep plan? Incorporate Garlic Lemon Asparagus into your meal prep by adding it to your favorite meals. Roast a big batch and store it in the fridge. Use it as a side dish throughout the week. It can add color and flavor to your meals. In this blog post, we covered a simple yet delicious Garlic Lemon Asparagus recipe. We explored fresh ingredients, step-by-step cooking instructions, and useful tips for perfecting your dish. You learned about different cooking methods and diet modifications, plus how to store leftovers. Garlic Lemon Asparagus is a versatile side that enhances any meal. Try it out and enjoy creating your own flavors!](https://joymealplan.com/wp-content/uploads/2025/07/a67e5927-9a3c-4503-bb74-543c28219cb2-768x768.webp)
. When making chutney, you may face some common issues. One frequent mistake is using unripe peaches. Unripe peaches lack flavor and sweetness. Always pick ripe, fragrant peaches for the best taste. Another error is not allowing the mixture to rest. Resting lets the peaches release juices, creating a rich base. If you skip this step, your chutney may end up dry. Sometimes, people add too much salt. Remember, you can always add more later. Start with a small pinch and taste before adding more. Also, avoid boiling the chutney on high heat. This can burn the sugar and ruin the flavor. Always cook on medium heat for better results. To make your chutney even more delicious, consider adding spices. A pinch of cardamom or nutmeg can boost flavor. Cinnamon and cloves are great, but try mixing in some allspice for a warm twist. If you want to adjust sweetness, add more brown sugar or honey. For a tangy kick, add extra apple cider vinegar. If you like heat, increase the red pepper flakes. Start with a little and taste as you go. You control the flavor! {{image_4}} You can switch out peaches for other fruits. Apples, mangoes, or plums work great. Each fruit brings its own taste and texture. Use ripe, juicy fruits for the best flavor. Fresh seasonal fruit always wins. For example, use apples in the fall and mangoes in summer. This keeps your chutney fresh and exciting. You can change the heat and sweetness easily. For more spice, add extra red pepper flakes. If you like it sweet, add more brown sugar or honey. Try adding spices like cumin or coriander for a unique twist. You can also mix in herbs like cilantro for freshness. These small changes can craft a new flavor profile. For more ideas, check the Full Recipe for suggestions on different flavor combinations. To keep your Quick Peach Chutney fresh, follow these steps: - Use a clean glass jar with a tight lid. - Make sure the chutney cools to room temperature before sealing. - Store it in the fridge. This helps lock in the flavors. Glass jars are great because they do not absorb odors. You can also use airtight plastic containers if you prefer. Just make sure they are food-safe. Quick Peach Chutney lasts about one week in the fridge. After that, the flavors may fade. Always check for any signs of spoilage, like off smells or mold. You can freeze the chutney if you want to keep it longer. Pour it into freezer-safe containers, leaving some space for expansion. It can last up to three months in the freezer. When you want to use it, simply thaw it in the fridge overnight. This way, you can enjoy your chutney whenever you like! Yes, you can make this chutney ahead of time. In fact, it tastes better after sitting for a day or two. The flavors mix and deepen, making the chutney even more delicious. You can store it in the fridge for up to two weeks. Just keep it in an airtight container to prevent it from drying out. Peach chutney is safe for canning if you follow proper methods. You should use a water bath canner for safe preservation. Always make sure to process jars for at least 10 minutes to ensure safety. Check seals before storing them in a cool, dark place. This way, you can enjoy your chutney long after peach season has ended. Peach chutney pairs well with many dishes. You can serve it with grilled chicken or pork for a burst of flavor. It also complements cheese boards, especially with creamy cheeses. Try it on sandwiches or burgers for a sweet and tangy kick. For a simple snack, enjoy it with crackers. The options are endless! Quick Peach Chutney is simple and fun to make. We explored the main ingredients, focusing on ripe peaches and how their quality matters. I shared tips on preparation, cooking steps, and even storage options to keep your chutney fresh. We talked about common mistakes and how to adjust flavors. You can use other fruits or tweak spice levels for personal taste. Remember, chutney makes a great addition to meals and snacks. Enjoy making this easy recipe, and feel free to share your creations!](https://joymealplan.com/wp-content/uploads/2025/07/68e09f5d-054f-4bea-af91-fb6a51bc34a0-768x768.webp)


