Greek Salad Pita Pockets Fresh and Flavorful Delight

Are you ready to enjoy a fresh and flavorful lunch? Greek Salad Pita Pockets offer a tasty twist on a classic dish. They are packed with crunchy veggies and zesty dressing. In this guide, I’ll share the ingredients, steps, and tips to make these delicious pockets at home. Perfect for meal prep or a quick snack, you’ll want to savor every bite. Let’s dive in!
Why I Love This Recipe
- Fresh and Flavorful: This Greek Salad Pita Pocket is bursting with fresh vegetables and vibrant flavors, making it a delightful meal any time of the day.
- Quick to Prepare: In just 15 minutes, you can whip up these delicious pita pockets, perfect for a busy weeknight dinner or a healthy lunch on-the-go.
- Customizable: You can easily customize the ingredients based on your preferences or what you have on hand, making it a versatile recipe.
- Healthy and Nutritious: Packed with veggies and healthy fats from olives and olive oil, this recipe is not only tasty but also good for you.
Ingredients
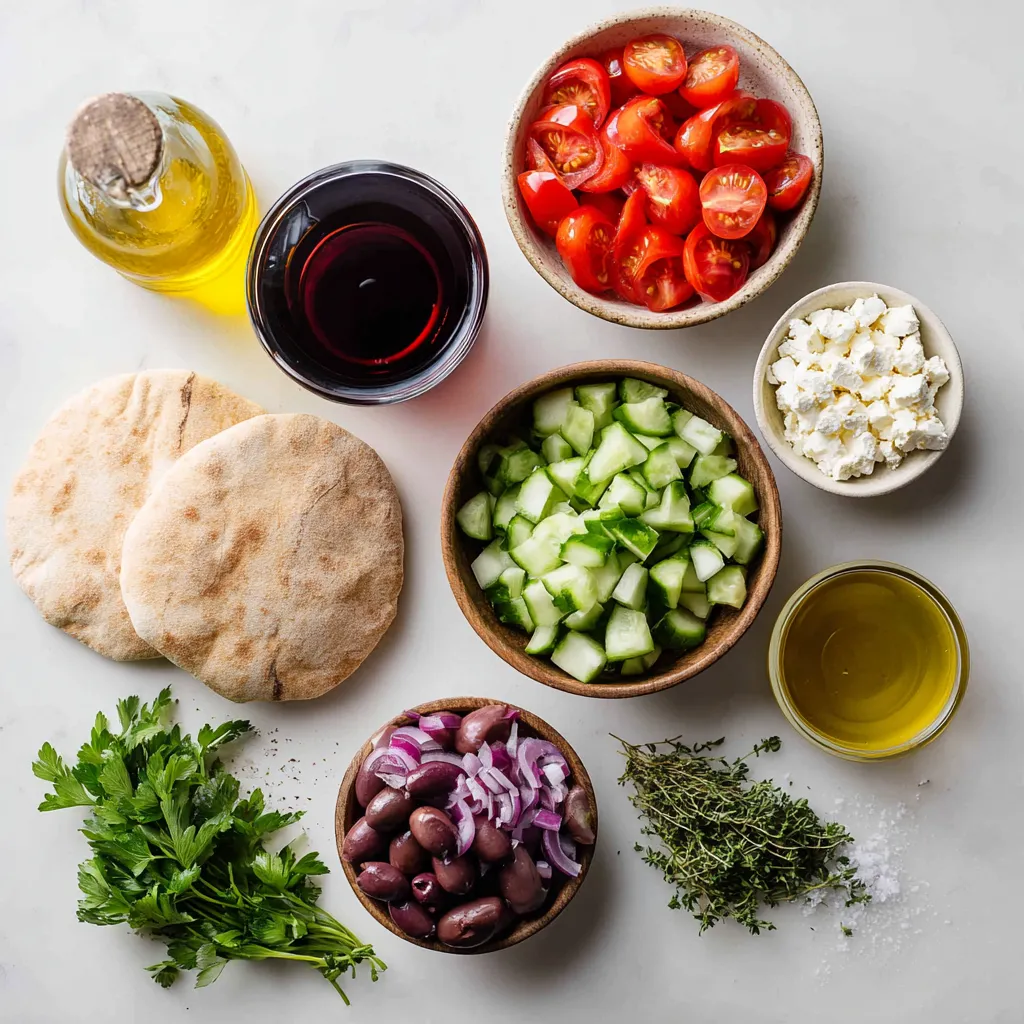
Complete List of Ingredients for Greek Salad Pita Pockets
To make Greek salad pita pockets, gather these fresh ingredients:
– 4 whole wheat pita pockets
– 1 cup cherry tomatoes, halved
– 1 cucumber, diced
– 1 red bell pepper, diced
– 1/2 red onion, finely chopped
– 1 cup Kalamata olives, pitted and halved
– 1/2 cup feta cheese, crumbled
– 2 tablespoons fresh oregano, chopped
– 2 tablespoons extra-virgin olive oil
– 1 tablespoon red wine vinegar
– Salt and pepper to taste
– Optional: A handful of fresh parsley for garnish
Nutritional Information Overview
Greek salad pita pockets are not just tasty; they are healthy too. They offer a good mix of nutrients. Each serving has protein from feta cheese, healthy fats from olive oil, and fiber from whole wheat pita and veggies. This meal is low in calories while being rich in vitamins and minerals. Enjoying these pockets can help you feel full and satisfied.
Substitutions for Common Ingredients
You can easily swap some ingredients to fit your taste or needs:
– Pita pockets: Use gluten-free pita for a gluten-free option.
– Feta cheese: Try goat cheese or a dairy-free cheese if you prefer.
– Kalamata olives: Use green olives or skip them if you don’t like olives.
– Olive oil: Avocado oil works well too.
– Fresh oregano: Dried oregano can work in a pinch. Just use less since it’s stronger.
Feel free to mix and match to create your perfect Greek salad pita pocket!

Step-by-Step Instructions
Preparation of Vegetables
Start by washing all your fresh vegetables. I recommend using cherry tomatoes, cucumbers, red bell peppers, and red onions.
– Halve the cherry tomatoes.
– Dice the cucumber and red bell pepper.
– Finely chop the red onion.
Place all these veggies into a large mixing bowl. Gently toss them together. Be careful not to bruise the tomatoes. This step sets the base for our fresh salad.
Mixing the Salad Ingredients
Next, we add some tasty extras to our vegetable mix. Stir in the Kalamata olives and crumbled feta cheese.
– Use a gentle hand to mix.
You want to keep the feta cheese intact. This gives the salad a nice texture. It also adds a salty kick that pairs well with the olives.
Dressing the Salad and Stuffing the Pita
Now, let’s make the dressing. In a small bowl, whisk together:
– 2 tablespoons extra-virgin olive oil
– 1 tablespoon red wine vinegar
– 2 tablespoons fresh oregano, chopped
– A pinch of salt and pepper
Once mixed, pour this dressing over the salad. Toss gently to coat everything evenly.
Next, take a whole wheat pita pocket. Open it carefully by running a knife along the edge or gently pulling it apart. Fill each pocket with the salad mixture. Make sure to include plenty of olives and feta for the best flavor.
Repeat until all your pita pockets are stuffed. Enjoy this fresh and flavorful dish!
Tips & Tricks
How to Choose Fresh Ingredients
When making Greek salad pita pockets, fresh ingredients are key. Look for bright, firm cherry tomatoes. They should feel heavy for their size. Choose cucumbers that are crisp and have smooth skin. For bell peppers, opt for ones that are shiny with no soft spots. Red onions should be solid and firm. Kalamata olives should be pitted and dark purple. For feta cheese, find a block or crumbles with a creamy texture. Fresh oregano is best if you can find it, with bright green leaves.
Best Practices for Stuffing Pita Pockets
Stuffing pita pockets can be tricky. First, gently open each pocket without tearing it. Use a small knife or your fingers to create a pocket. Start by adding a layer of salad mixture at the bottom. This keeps the filling from spilling out. Next, fill it with olives and feta for extra flavor. Don’t overstuff, or it might burst. Aim for balance, so every bite is tasty.
Suggestions for Serving and Presentation
Presentation makes a meal special. Arrange the stuffed pita pockets on a large platter. You can fan them out for a nice look. Add a bowl of tzatziki sauce next to the platter for dipping. Sprinkle fresh parsley on top for color. If you like, serve extra Kalamata olives on the side. This adds a fun touch and gives everyone options. Enjoy your vibrant Greek feast!
Pro Tips
- Use Fresh Ingredients: Always opt for the freshest vegetables and herbs to enhance the flavor and nutritional value of your Greek Salad Pita Pockets.
- Chill Before Serving: For the best flavor, let the salad mixture chill in the refrigerator for at least 30 minutes before stuffing the pita pockets. This allows the flavors to meld beautifully.
- Customize Your Fillings: Feel free to add additional ingredients like avocado, artichokes, or grilled chicken to personalize your pita pockets according to your taste preferences.
- Perfect Pita Technique: When opening the pita pockets, gently run your fingers around the edge to avoid tearing. This keeps the pockets intact for filling.

Variations
Vegetarian and Vegan Options
Greek salad pita pockets are great for everyone. If you want a vegetarian option, just skip the feta cheese. For a vegan version, use a plant-based feta. This keeps the flavor without any dairy. Also, you can add more veggies, like zucchini or avocado. These choices add taste and nutrients.
Additional Ingredients to Include
Feel free to mix in other ingredients! Here are some ideas:
– Chopped artichokes for a tangy flavor
– Roasted red peppers for sweetness
– Spinach or kale for extra greens
– Chickpeas for added protein and texture
These additions make your pita pockets even more delicious. You can create your own unique version!
Different Dressing Ideas
The dressing makes the meal shine. While the olive oil and vinegar are classic, you can try different flavors. Here are some options:
– Lemon juice for a fresh kick
– Balsamic vinegar for a sweet touch
– Greek yogurt for creaminess
– Tahini for a nutty flavor
Experiment with these dressings to find your favorite! Each one adds a new twist to the Greek salad pita pockets.
Storage Info
How to Store Leftover Pita Pockets
To keep your Greek salad pita pockets fresh, store them in the fridge. Place them in a sealed container to prevent them from drying out. If you have extra salad, store it separately. This way, the pita won’t get soggy.
Recommended Storage Containers
Use airtight containers or resealable bags for storage. Glass containers work well and are eco-friendly. If you prefer plastic, choose BPA-free options. Label the containers with the date, so you know when to eat them.
Reheating Tips and Best Practices
Reheat your pita pockets gently. Use a microwave for a quick warm-up. Heat for about 15-20 seconds at a time. Check often to avoid overheating. If you want a crispy texture, use an oven. Preheat it to 350°F (175°C), wrap the pockets in foil, and heat for about 10 minutes. Enjoy them warm for the best taste!
FAQs
What sides go well with Greek Salad Pita Pockets?
You can pair your Greek salad pita pockets with various sides. Some great options include:
– Tzatziki sauce for dipping
– Roasted vegetables for a warm side
– Hummus with pita chips
– A light fruit salad for sweetness
These sides will enhance your meal and offer different textures. They also add more flavors that complement the refreshing taste of the salad.
Can I prepare the salad ahead of time?
Yes, you can prepare the salad ahead of time. Just follow these steps:
1. Chop the vegetables: You can cut the tomatoes, cucumber, bell pepper, and onion in advance.
2. Mix the salad: Combine everything except the dressing. This keeps veggies fresh.
3. Store in the fridge: Keep it in an airtight container for up to 24 hours.
When ready to eat, add the dressing and stuff the pita pockets. This method saves time and keeps the salad crisp.
How do I make these pita pockets gluten-free?
Making gluten-free Greek salad pita pockets is simple. Here’s how:
– Use gluten-free pita bread: Many stores sell gluten-free options. Check the label.
– Ensure all ingredients are gluten-free: Confirm that olives, feta, and any added spices are gluten-free.
Follow the same steps in the recipe. You’ll get a tasty meal that everyone can enjoy!
Greek salad pita pockets are easy to make and packed with flavor. We covered the ingredients, steps to prepare, and useful tips for a great meal. You learned how to store leftovers and variations to try. Remember, fresh ingredients make a big difference. Experiment with different dressings and fillings to keep it exciting. With these ideas, you’re ready to create delicious and healthy pita pockets. Enjoy your cooking journe

Greek Salad Pita Pockets
Ingredients
- 4 whole wheat pita pockets
- 1 cup cherry tomatoes, halved
- 1 whole cucumber, diced
- 1 whole red bell pepper, diced
- 0.5 whole red onion, finely chopped
- 1 cup Kalamata olives, pitted and halved
- 0.5 cup feta cheese, crumbled
- 2 tablespoons fresh oregano, chopped
- 2 tablespoons extra-virgin olive oil
- 1 tablespoon red wine vinegar
- 1 pinch salt and pepper to taste
- 1 handful fresh parsley for garnish (optional)
Instructions
- Begin by washing and preparing your vegetables. In a large mixing bowl, combine the halved cherry tomatoes, diced cucumber, diced red bell pepper, and finely chopped red onion. Toss gently to mix without bruising the tomatoes.
- Next, stir in the Kalamata olives and crumbled feta cheese into the vegetable mixture. Use a gentle hand to mix everything together, ensuring the feta remains intact for texture.
- In a separate small bowl, create the dressing by whisking together the extra-virgin olive oil, red wine vinegar, chopped oregano, and a generous pinch of salt and pepper. Once well combined, pour this dressing over the salad mixture. Toss gently again to ensure every ingredient is evenly coated with the delicious dressing.
- Take one whole wheat pita pocket and carefully open it up by running a knife along the edge or just pulling it apart gently. Fill each pocket generously with the Greek salad mixture, ensuring each one receives a good mix of olives and feta for a flavorful bite.
- Repeat the stuffing process until all pita pockets are filled with the vibrant salad mixture.
- If you like, finish your creations with a sprinkle of fresh parsley on top of each stuffed pita pocket for a burst of color and freshness before serving.


![To make tasty honey garlic meatballs, you need: - 1 pound ground beef (or a blend of beef and pork for extra flavor) - 1/2 cup fresh breadcrumbs (homemade or store-bought) - 1/4 cup grated Parmesan cheese (for richness) - 1 large egg (to bind the mixture) - 2 cloves garlic, finely minced (for depth) - 1 tablespoon fresh ginger, finely minced (adds warmth) - 1/4 cup chopped green onions (for freshness) - Salt and black pepper to taste These main ingredients create a rich and flavorful base for the meatballs. The garlic and ginger add a nice zing, while the egg helps hold everything together. The honey garlic sauce is where the magic happens. You’ll need: - 1/2 cup honey (natural sweetness) - 1/4 cup soy sauce (for savory flavor) - 1 tablespoon rice vinegar (adds tang) - 1 teaspoon sesame oil (for nuttiness) - 1 teaspoon cornstarch mixed with 1 tablespoon water (to thicken the sauce) This sauce blends sweet and savory flavors. The honey pairs well with soy sauce, creating a perfect glaze for the meatballs. Feel free to customize your meatballs! Here are some ideas: - Use ground turkey instead of beef for a lighter option. - Add chopped herbs like parsley or cilantro for extra freshness. - Swap in breadcrumbs for crushed crackers if you want a different texture. - For a spicy kick, mix in some red pepper flakes. These tweaks can help you make the recipe your own. Enjoy experimenting with flavors! For the complete recipe, check out the Full Recipe link. To make tasty meatballs, start by gathering your ingredients. In a big bowl, combine: - 1 pound ground beef (or beef and pork mix) - 1/2 cup fresh breadcrumbs - 1/4 cup grated Parmesan cheese - 1 large egg - 2 cloves garlic, finely minced - 1 tablespoon fresh ginger, finely minced - 1/4 cup chopped green onions - Salt and black pepper to taste Use your hands or a spatula to mix these well. Be gentle! Overmixing will make the meatballs tough. You want them soft and tender. Now, it’s time to bake. Preheat your oven to 400°F (200°C). This step helps the meatballs cook evenly. Line a baking sheet with parchment paper. This keeps them from sticking and makes cleaning easy. Next, use clean hands to scoop out the meat mixture. Roll it into small balls, about 1 inch wide. Place them on the baking sheet, leaving space between each one. Bake for 15 to 20 minutes. You’ll know they’re done when they turn golden brown and reach an internal temperature of 165°F. While the meatballs bake, prepare the delicious sauce. In a small saucepan, mix: - 1/2 cup honey - 1/4 cup soy sauce - 1 tablespoon rice vinegar - 1 teaspoon sesame oil Heat this mix over medium heat. Stir it gently until it simmers. In a small bowl, mix 1 teaspoon cornstarch with 1 tablespoon water. Stir this into the sauce to thicken it. Cook for 2-3 more minutes until the sauce is shiny and thick. Once the meatballs are ready, take them out of the oven. Place them in a serving dish. Drizzle the warm honey garlic sauce over them. Garnish with extra chopped green onions for a fresh look. Enjoy every bite! For the full recipe, check out the details above. To make tender meatballs, start by mixing the meat gently. Overmixing makes them tough. Add breadcrumbs and egg for moisture. Let the mixture rest for a few minutes before shaping. This helps flavors blend well. Use clean hands to form the meatballs. Aim for about one inch in size for even cooking. For a rich honey garlic sauce, combine honey and soy sauce in a small pan. Heat it slowly to keep the honey from burning. Adding rice vinegar brings a nice tang. Finally, mix cornstarch with a bit of water to thicken it. Stir this mixture into the sauce until it coats the back of a spoon. This step is key for a glossy finish. These honey garlic meatballs shine on their own. Serve them on a platter with toothpicks. Pair them with rice or noodles for a full meal. Fresh veggies, like steamed broccoli or a crisp salad, add color and crunch. For added flair, drizzle extra sauce over the meatballs and sprinkle sesame seeds. This makes for a lovely presentation. Check the [Full Recipe] for more details! {{image_4}} You can use many meats for honey garlic meatballs. Ground beef is classic, but ground pork adds great flavor. You can even mix beef and pork for a tasty twist. Ground turkey is a leaner choice. It still pairs well with honey garlic sauce. Chicken also works great if you prefer a lighter meat. The key is to choose a meat you love. If you want a meat-free option, try using plant-based ground meat. There are many brands available today. You can also make meatballs with lentils or chickpeas. Just mash them up and mix in the same ingredients. For a fun twist, use quinoa or rice as a base. They both add texture and make the dish hearty. You can add fun flavors to your meatballs. Try mixing in some grated carrots or chopped bell peppers for a veggie boost. Fresh herbs, like cilantro or basil, can give a fresh kick. If you like heat, add red pepper flakes or sriracha to the mix. For an Asian twist, toss in some chopped water chestnuts or sesame seeds. These add crunch and make your meatballs stand out. You can find the full recipe to try these variations. After enjoying your honey garlic meatballs, let them cool down. Place them in an airtight container. They will stay fresh in the fridge for about 3 to 4 days. Make sure to separate layers with parchment paper to avoid sticking. To reheat, use the oven for best results. Preheat it to 350°F (175°C). Place the meatballs on a baking sheet. Heat them for about 10 to 15 minutes. This keeps them juicy and warm. You can also use the microwave, but they might get soggy. If you do use the microwave, cover them with a damp paper towel to keep moisture in. For long-term storage, you can freeze the meatballs. First, let them cool completely. Then, place them on a baking sheet in a single layer. Freeze them for a couple of hours until firm. Once frozen, transfer them to a freezer bag. They can last up to 3 months. When ready to eat, thaw them in the fridge overnight before reheating. These steps will help you enjoy your honey garlic meatballs anytime! Check out the Full Recipe for more cooking tips. Yes, you can use ground turkey instead of beef. Ground turkey makes a lighter meatball. It has less fat, so you may want to add a bit more cheese or breadcrumbs. This keeps the meatballs moist and tasty. The flavor will change slightly, but they will still taste great. To check if your meatballs are done, use a meat thermometer. They need to reach 165°F inside. You can also cut one in half. The inside should be no longer pink. Look for a nice golden brown color on the outside. These signs show that your meatballs are safe to eat. Honey garlic meatballs pair well with many sides. Here are some ideas: - Steamed rice - Roasted vegetables - Noodles - Salad - Mashed potatoes These sides balance the sweet and savory flavors. You can mix and match for a fun meal. For more ideas, check out the Full Recipe for serving suggestions. Honey garlic meatballs are simple and tasty. We covered the main ingredients and how to mix them. You learned step-by-step instructions for baking and making the sauce. I shared tips for tender meatballs and perfect sauce. You can also explore meat options and vegetarian choices. Don’t forget about storing leftovers and reheating them. Try the variations for a new twist. Enjoy cooking, and have fun sharing these delightful bites with friends and family!](https://joymealplan.com/wp-content/uploads/2025/05/91b0df71-a0c5-411f-83a7-9789c0a24c3c-768x768.webp)
![To make a fresh and tasty Asian cucumber salad, you need simple ingredients. Here’s what you’ll need: - 2 large cucumbers, thinly sliced - 1 medium carrot, peeled and julienned - 1 red bell pepper, cored and thinly sliced - 3 green onions, thinly chopped - 1/4 cup fresh cilantro leaves, roughly chopped - 1 tablespoon sesame seeds, lightly toasted These veggies give the salad crunch and color. Cucumbers add freshness, while carrots and bell peppers bring sweetness. You can also add extras to make your salad unique. Here are some ideas: - Sliced radishes for extra crunch - Chopped peanuts for a nutty flavor - Thinly sliced jalapeños for a spicy kick Feel free to mix and match based on what you like or have at home! A great dressing makes the salad shine. Here’s what you need for the dressing: - 3 tablespoons rice vinegar - 2 tablespoons soy sauce (preferably low-sodium) - 1 tablespoon sesame oil - 1 teaspoon granulated sugar - 1/2 teaspoon chili flakes (adjust according to heat preference) - Salt, to taste This dressing combines sour, salty, and sweet flavors, making every bite delightful. You can find the full recipe in the main document for all the steps! First, grab your sharp knife and cutting board. Start with the cucumbers. Slice them thinly. You want them to be about the thickness of a quarter. This helps them soak up the dressing well. Next, peel the carrot and cut it into thin strips. This is called julienning. For the red bell pepper, remove the seeds and slice it thinly too. Finally, chop the green onions and cilantro. Now, let's make the dressing. In a small bowl, mix the rice vinegar, soy sauce, sesame oil, granulated sugar, and chili flakes. Use a whisk or a fork to blend it well. Make sure the sugar dissolves completely. Taste it! If you want it sweeter, add a little more sugar. If you like it spicier, throw in more chili flakes. In a large mixing bowl, combine all your chopped vegetables. Pour the dressing over them. Use tongs to toss everything together. Make sure all the veggies get coated well. Let the salad sit for about 15 to 20 minutes. This helps the flavors meld together. Before serving, sprinkle the toasted sesame seeds on top. Toss gently one more time and serve. Enjoy your fresh and zesty Asian Cucumber Salad! For a full recipe, check [Full Recipe]. Choose cucumbers that feel firm and look smooth. Avoid cucumbers with soft spots or wrinkles. Check for bright color and no blemishes. The best cucumbers are crisp and vibrant. You can also pick Japanese or Persian cucumbers for a sweeter taste. These varieties are often less bitter than regular cucumbers. To boost the flavor of your salad, consider adding fresh herbs. Mint and basil work well. You can also try lime juice for a zesty kick. If you like it spicy, add more chili flakes or sliced jalapeños. For a sweet touch, include some diced mango or pineapple. Each addition offers a unique twist to the dish. Presentation matters when serving your salad. Use a large, shallow bowl to display it nicely. You can also serve it in individual bowls for a more personal touch. Add a sprinkle of extra sesame seeds on top for crunch. A few cilantro leaves can brighten the dish. For color, consider a light dusting of chili flakes, too. These small touches make the salad look as good as it tastes. {{image_4}} You can easily make this salad heartier by adding protein. Cooked shrimp, chicken, or tofu work well. For shrimp, try lightly boiling or grilling them. For chicken, use grilled or shredded cooked chicken. Tofu can be cubed and pan-fried for a crispy texture. Simply mix your choice of protein into the salad before serving. This boosts flavor and nutrition. Fruits and nuts add a fun twist to Asian cucumber salad. Consider adding mango or pineapple for sweetness. Thinly slice these fruits and toss them in with the veggies. Nuts like cashews or almonds bring a nice crunch. Toast them lightly for extra flavor. Just sprinkle them on top before serving for a delightful texture. You can easily adjust the spice levels to fit your taste. If you prefer a milder salad, reduce or omit the chili flakes. For a spicier kick, add more chili flakes or some sliced fresh chili. You can also try sriracha or chili oil for a different heat profile. Taste as you go to find your perfect balance. For the full recipe, check out the Crisp and Zesty Asian Cucumber Salad. To keep your Asian cucumber salad fresh, store it in an airtight container. Make sure all the air is out to prevent sogginess. Place the container in the fridge. The cool temperature helps maintain the crispness of the cucumbers. Always use clean utensils when serving to avoid contamination. This salad tastes best cold, so you don't need to reheat it. If you want to serve it later, take it out of the fridge about 10 minutes before serving. This helps the flavors to come alive again. Toss the salad gently to mix everything well before serving. You can add a few fresh herbs or sesame seeds for extra flavor just before serving. The salad will stay fresh in the fridge for about 2 to 3 days. After that, the cucumbers may start to lose their crunch. I don’t recommend freezing this salad. The texture of the cucumbers will change when frozen and thawed. For the best taste, enjoy your salad within a couple of days after you make it. Check out the Full Recipe for more details! Yes, you can make Asian Cucumber Salad ahead of time. It tastes great after sitting a bit. I recommend prepping it a few hours before serving. This lets the flavors meld well. If you want to make it a day in advance, that works too. Just keep it covered in the fridge. The cucumbers may lose some crunch, but the taste will still shine. You can easily swap some ingredients for this salad. If you don't have rice vinegar, use apple cider vinegar. For soy sauce, tamari works well for a gluten-free option. Don't have sesame oil? Olive oil can be a good choice. Feel free to add other veggies like radishes or avocado. You can make it your own! Asian Cucumber Salad stays fresh for about 2-3 days in the fridge. Keep it in a sealed container to maintain flavor and crunch. As time passes, the cucumbers may soften a bit. To enjoy it at its best, eat it sooner rather than later. For the full recipe, check out the section above. This article covered how to make a tasty Asian cucumber salad. We discussed key ingredients and flavors, along with useful tips for choosing fresh cucumbers. I shared easy steps for prepping, dressing, and combining your salad. You also learned about variations and how to store leftovers properly. In the end, this salad is fresh, versatile, and simple to make. Enjoy your cooking!](https://joymealplan.com/wp-content/uploads/2025/06/ec355424-4335-4c9e-817d-5cfd4eb3a0ec-768x768.webp)


