Greek Yogurt Chicken Salad Tasty and Light Meal Ideas

Looking for a healthy and tasty meal that won’t weigh you down? Greek Yogurt Chicken Salad is your answer! This dish packs protein from chicken and a creamy kick from Greek yogurt, making it a light yet satisfying choice. In this post, I’ll guide you through easy steps, ingredient swaps, and storage tips to keep your salad fresh. Dive in for a delicious recipe that’s perfect for lunch or dinner!
Ingredients
Main Ingredients
– 2 cups cooked chicken breast, shredded
– 1 cup plain Greek yogurt
– 1/2 cup celery, finely chopped
– 1/2 cup red grapes, halved
– 1/4 cup red onion, finely chopped
– 1/4 cup walnuts, roughly chopped
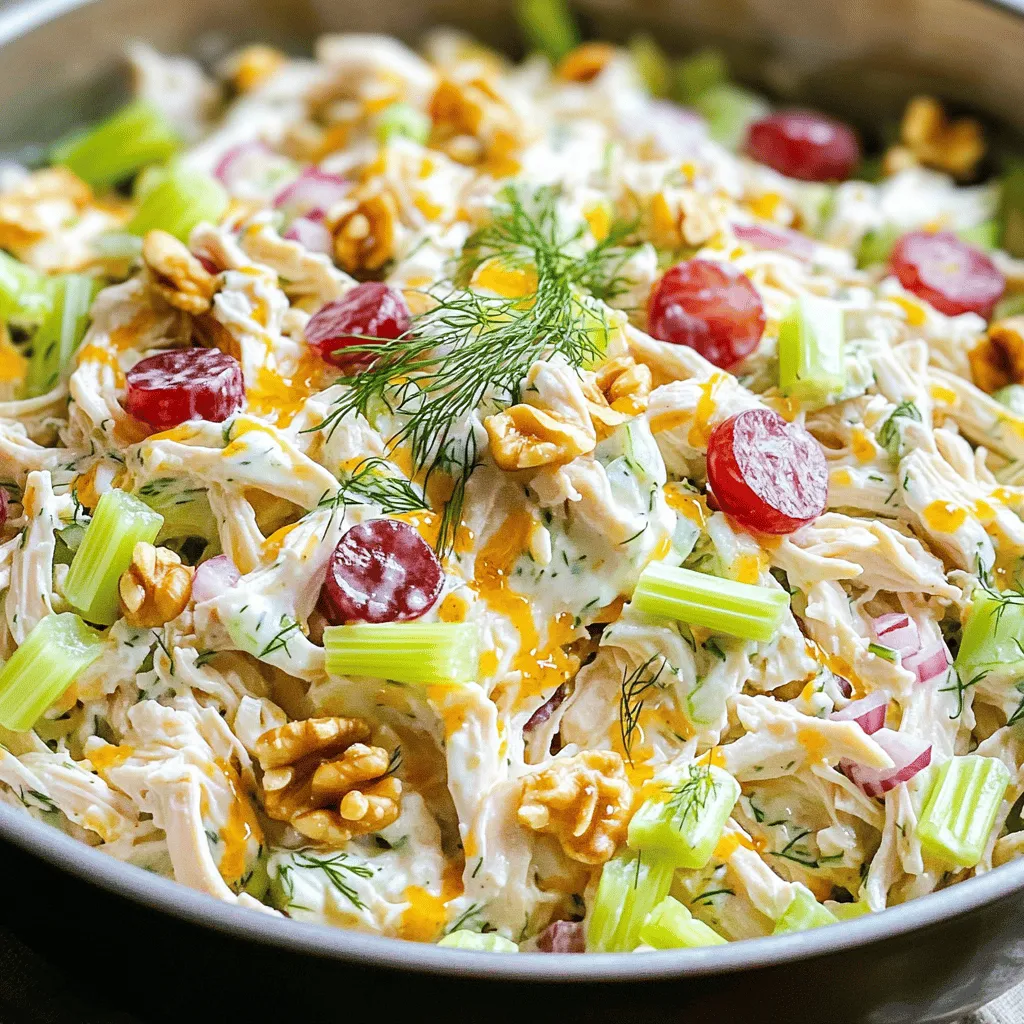
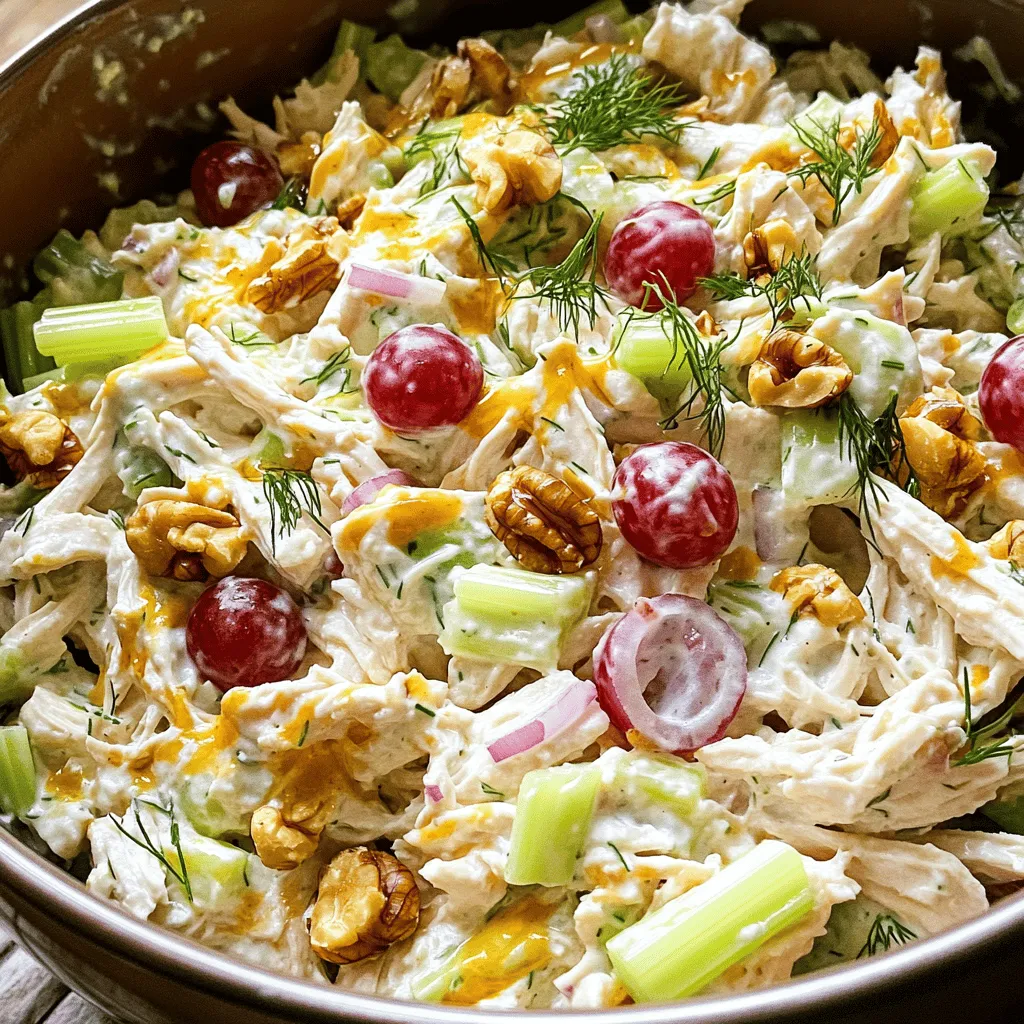
The main ingredients create a tasty and colorful dish. I love using cooked chicken breast, as it keeps the salad light. The Greek yogurt adds creaminess without extra fat. Chopped celery brings a nice crunch, and red grapes add a sweet touch. The red onion gives a bit of zing, while walnuts add more texture.
Dressing Components
– 1 tablespoon Dijon mustard
– 1 tablespoon honey
– 1 tablespoon fresh lemon juice
– Salt and freshly ground black pepper, to taste
– 1 teaspoon fresh dill, chopped (optional)
For the dressing, I mix Dijon mustard with honey and lemon juice. This combo balances sweet and tangy flavors. I like to season it with salt and pepper for taste. Fresh dill is optional but gives an aromatic hint. When you whisk it all together, it makes the salad even better.
Step-by-Step Instructions
Preparation Steps
1. In a large mixing bowl, combine the shredded chicken, plain Greek yogurt, finely chopped celery, halved red grapes, diced red onion, and chopped walnuts.
2. Stir gently to mix the ingredients without breaking the grapes.
3. In a separate small bowl, whisk together the Dijon mustard, honey, fresh lemon juice, a pinch of salt, and a few grinds of black pepper until the mixture is smooth.
Mixing Instructions
1. Drizzle the dressing over the chicken mixture.
2. Using a spatula or a wooden spoon, fold the dressing into the salad gently. This ensures every ingredient gets coated with the creamy yogurt dressing.
3. If you like, sprinkle the chopped fresh dill into the salad and fold it in for an aromatic touch.
Chilling and Serving
1. Cover the mixing bowl with plastic wrap or a lid. Place the salad in the refrigerator for at least 30 minutes. This helps the flavors meld and become richer.
2. For serving, scoop portions onto a bed of crisp lettuce. You can also use the salad as a hearty filling for sandwiches or wraps.
3. For a nice touch, garnish with a sprig of fresh dill or a sprinkle of extra chopped walnuts. Serve with lemon wedges on the side for extra freshness.
Tips & Tricks
Perfecting the Salad
To make the best Greek yogurt chicken salad, you want to mix the ingredients gently. This keeps the grapes whole and adds a nice touch to the dish. As you mix, be careful not to crush the grapes. Once you combine everything, taste the salad. You may want to adjust the salt and pepper to your liking. This little step makes a big difference.
Presentation Tips
Garnishing your salad makes it look even better. I suggest adding a sprig of fresh dill on top. This adds color and a nice aroma. You can also sprinkle some extra chopped walnuts for extra crunch. For serving, add lemon wedges on the side. The bright lemon juice gives a fresh kick when squeezed over the salad. You can serve this salad on a bed of crisp lettuce or use it as a filling for sandwiches or wraps. Enjoy the light, tasty meal!

Variations
Ingredient Swaps
You can change the protein in your salad easily. Turkey works great if you want a twist. Tofu is a good choice for a vegetarian option. Both give a nice texture and taste.
Feel free to add different fruits or nuts too. Try diced apples for sweetness. They add crunch and flavor. Pecans bring a buttery note that pairs well with yogurt.
Healthy Alternatives
If you want to switch up the yogurt, you have options. You can use other types of yogurt like coconut or almond yogurt. These can still keep your salad creamy and tasty.
For a lighter meal, think about low-calorie dressings. Vinegar-based dressings can cut calories without losing flavor. You can mix lemon juice with a touch of honey for a fresh twist.
Flavor Enhancements
Spice up your salad with fresh herbs or spices. Adding parsley or paprika gives it more depth. They can change the whole flavor profile.
Want something bolder? Try curry powder for a warm, exotic taste. Chipotle adds a smoky kick. Both can transform your chicken salad into a unique dish.
Storage Info
Refrigeration Guidelines
To store your Greek yogurt chicken salad properly, start by placing it in an airtight container. This helps keep it fresh. Make sure to seal the lid tightly. If you have any leftovers, store them right away. The salad can last in the fridge for about 3 to 4 days. Always check for any signs of spoilage before eating.
Best Practices
To keep your salad fresh for longer, avoid moisture. This means not adding extra ingredients like fruits or veggies until you are ready to eat. If you need to reheat the chicken salad, do so gently. Heat it in the microwave for a short time. Stir it well, and check the temperature before eating. Enjoy your meal without losing that creamy texture.
FAQs
Can I meal prep Greek Yogurt Chicken Salad?
Yes, you can meal prep Greek Yogurt Chicken Salad. It stays fresh for several days in the fridge. Just mix your ingredients and store them in an airtight container.
How long can I keep the salad in the fridge?
You can keep the salad in the fridge for up to 4 days. Just make sure it is in a sealed container to maintain freshness.
Is Greek yogurt healthier than mayonnaise?
Yes, Greek yogurt is often healthier than mayonnaise. It has fewer calories, less fat, and more protein. This makes it a great choice for a light meal.
Can I use frozen chicken for this recipe?
Yes, you can use frozen chicken. Just make sure to cook it fully before shredding. This adds convenience to meal prep.
What can I serve with Greek Yogurt Chicken Salad?
You can serve this salad with crisp lettuce, in wraps, or on whole grain bread. It also pairs well with fresh fruit or a light soup for a full meal.
This Greek Yogurt Chicken Salad is a tasty, healthy dish. You combine simple ingredients like chicken, yogurt, and grapes. The easy steps make it fun to prepare. Chill it for the best flavor, and serve it as a wrap or on lettuce.
Remember, you can swap ingredients for variety. Store leftovers properly to enjoy later. This salad is not just delicious; it’s versatile and nutritious. Try it out and make it your own!


![To make the Homemade Crunchwrap Supreme, gather these items: - 1 lb ground turkey or beef - 1 packet of taco seasoning - 1 cup black beans, drained and rinsed - 1 cup corn kernels (fresh or frozen) - 1 cup shredded cheddar cheese - 1 cup lettuce, finely shredded - 1 large tomato, diced - ½ cup sour cream - 4 large flour tortillas - 4 small tostada shells - 1 tablespoon olive oil - Salsa for serving Each Crunchwrap has around 500 calories. It includes protein from the meat and beans. The cheese adds calcium but also fat. Fresh veggies bring fiber and vitamins. If you want to cut calories, use less cheese or sour cream. This recipe feeds four, perfect for a family meal or a fun gathering. You can swap ground turkey for chicken or even tofu for a veggie option. Use black beans or pinto beans based on your taste. For cheese, try pepper jack for some heat. If you need a gluten-free option, use corn tortillas instead of flour. You can also replace sour cream with Greek yogurt for a healthier twist. Enjoy making it your own! Making a Homemade Crunchwrap Supreme is fun and easy. You start by cooking the meat. Then, you mix it with beans, corn, and cheese. Next, you assemble the wrap with layers of toppings. Finally, you cook the wrap until it’s crispy and golden. 1. Brown the Meat: Heat 1 tablespoon of olive oil in a skillet. Add 1 lb of ground turkey or beef. Cook it for 5-7 minutes until it’s browned. 2. Season the Meat: Drain any extra grease. Add 1 packet of taco seasoning. If needed, splash in some water. Cook for another 2-3 minutes. 3. Combine Ingredients: In a bowl, mix the seasoned meat with 1 cup of black beans, 1 cup of corn, and half of 1 cup of shredded cheese. Stir well. 4. Prepare the Tortilla: Lay out 1 large flour tortilla on a flat surface. 5. Assemble the Crunchwrap: Spoon the meat and bean mix into the center. Leave about 2 inches of space from the edges. 6. Add Tostada and Toppings: Place 1 small tostada shell on top of the mixture. Spread ½ cup of sour cream over the tostada. Add 1 cup of shredded lettuce, 1 diced tomato, and the rest of the cheese. 7. Fold the Crunchwrap: Fold the edges of the tortilla over the filling. Make pleats around the edge until it’s all enclosed. 8. Cook the Crunchwrap: Heat a non-stick skillet on medium heat. Place the crunchwrap seam-side down. Cook for 2-3 minutes until golden, then flip it and cook for another 2-3 minutes. 9. Serve: Cut each crunchwrap in half. Serve warm with salsa on the side. While I can't show pictures, I recommend you take photos of each step. It can help you track your progress. You can also find great visual aids in the [Full Recipe]. They can guide you through the cooking process with ease! To get that perfect crunchwrap texture, you want a good balance. Start with a large flour tortilla. This gives you room to fold. Use a small tostada shell inside. This will add a nice crunch. When you cook it, make sure your skillet is hot. A hot skillet helps create a nice, crispy outside. Flip it gently to avoid spills. Let it brown evenly on both sides for the best result. Flavorful meat is key to a great crunchwrap. I like to use ground turkey or beef. Sauté it in olive oil until browned. After that, add taco seasoning. This is where the magic happens. Follow the packet instructions for best results. If the meat seems dry, add a splash of water. This helps the seasonings stick and blend. Mix in black beans and corn for added taste and texture. Making ahead can save you time. You can prepare the meat mixture a day before. Just store it in an airtight container. When you are ready, assemble your crunchwraps. This way, you can enjoy a fresh meal with less work. You can also freeze the assembled crunchwraps. Just make sure to wrap them well. When you are ready to eat, heat them up in the skillet. This keeps them nice and crispy. For more details, check the Full Recipe. {{image_4}} You can easily make a tasty veggie crunchwrap. Just replace the meat with veggies. Use a mix of black beans, corn, and diced peppers. You can add mushrooms for a nice texture. To keep it creamy, use extra sour cream or a plant-based option. This way, you get all the flavor without meat! Want to spice things up? Add some jalapeños to the filling. You can use fresh slices or pickled ones. If you like heat, toss in some hot sauce or pepper flakes. A dash of chipotle seasoning in the meat gives a smoky kick. This adds a new level of flavor! Don’t stick to just one topping. Try different sauces like guacamole or zesty salsa. You can also add sliced olives or diced onions for crunch. Consider using different cheeses, like pepper jack, for extra flavor. Mix and match to create your perfect crunchwrap. For the full recipe, check out the Ultimate Crunchwrap Supreme. To keep your leftover Crunchwrap Supreme fresh, wrap it tightly in plastic wrap or foil. Place it in an airtight container. This way, it stays safe from air and moisture. Store it in the fridge for up to three days. To enjoy it later, make sure you don’t leave it out too long. Reheating your Crunchwrap is easy. Start by taking it out of the fridge. Place it in a skillet over medium heat. Cover it with a lid. Heat for about 3-4 minutes on each side. This method keeps it crispy. You can also use the microwave if you're in a hurry. Just place it on a microwave-safe plate. Heat it for about 1-2 minutes until warm. If you want to save your Crunchwrap for later, freezing is a great option. Wrap each Crunchwrap in plastic wrap, then in foil. This helps protect it from freezer burn. You can freeze them for up to three months. When you’re ready to eat, let it thaw in the fridge overnight. Then, reheat it as described above. Enjoy your homemade Crunchwrap Supreme whenever you crave it! For the full recipe, check out the Ultimate Crunchwrap Supreme . To make your Crunchwrap Supreme gluten-free, use gluten-free tortillas. You can find them at most grocery stores. Make sure the taco seasoning is also gluten-free. Check the label to be sure. All other ingredients in this recipe are naturally gluten-free. The best way to reheat a crunchwrap is to use a skillet. Heat it over medium heat for about 2-3 minutes on each side. This keeps the crunchwrap crispy. You can also use an oven at 350°F. Bake it for about 10 minutes. This method warms it through without making it soggy. Yes, you can customize your crunchwrap for any diet. For a vegetarian option, skip the meat and add more beans or veggies. You can also switch the cheese for a dairy-free kind. If you like spice, add jalapeños or hot sauce. This recipe is flexible and allows for many tasty changes. Try different flavors to find what you love most. For the full recipe, refer to the Ultimate Crunchwrap Supreme. In this post, I covered how to make a Crunchwrap Supreme from start to finish. We discussed key ingredients, cooking steps, and storage tips. I shared tricks for the perfect texture and flavorful meat. You have options for vegetarian and spicy versions, plus ways to adjust for your taste. With these insights, you can now make this fun and tasty meal. Enjoy your Crunchwrap adventure!](https://joymealplan.com/wp-content/uploads/2025/06/9254d856-97cc-48f7-bdd4-96eee0233a6c-768x768.webp)
![For this recipe, you will need: - 2 cups zucchini, sliced into rounds - 2 cups mixed bell peppers (red, yellow, and orange), chopped into bite-sized pieces - 1 cup cherry tomatoes, halved - 1 cup red onion, thinly sliced - 3 cloves garlic, minced These fresh vegetables shine when roasted. They bring color and taste to your dish. You can mix any summer vegetables you love. Try eggplant or asparagus for variety. To enhance the taste, gather: - 1 teaspoon dried oregano - 1 teaspoon dried thyme - 1/2 teaspoon smoked paprika - Salt and freshly cracked pepper to taste - Fresh basil leaves for garnish These herbs add depth and aroma. Oregano and thyme pair well with the sweetness of the veggies. Smoked paprika adds a lovely warmth and a hint of smokiness. Fresh basil leaves at the end brighten the dish. For roasting, you want to use the right oil. - 1/4 cup extra-virgin olive oil is my go-to choice. This oil adds richness and helps the veggies crisp up. You can also use avocado oil for a neutral taste. Avoid oils with low smoke points. Besides the herbs mentioned, consider: - A squeeze of fresh lemon juice for brightness - A sprinkle of chili flakes if you like heat These seasonings can lift the dish and make it even more exciting. A little acidity from lemon balances the flavors nicely. Start by washing all your vegetables well. This step removes dirt and pesticides. Next, chop the zucchini into rounds, bell peppers into bite-sized pieces, and halve the cherry tomatoes. Slice the red onion thinly. Then, mince the garlic. In a large bowl, combine all the chopped vegetables. Drizzle the olive oil evenly over the mix. Sprinkle in the dried oregano, dried thyme, smoked paprika, salt, and pepper. Use a large spoon to toss everything together. Make sure each piece gets coated with oil and seasoning. This ensures maximum flavor in every bite. Preheat your oven to 425°F (220°C). This temperature helps the vegetables roast perfectly. Spread your seasoned vegetables in a single layer on a large, rimmed baking sheet. This way, they roast evenly. Place the baking sheet in the oven. Roast the vegetables for about 25-30 minutes. Halfway through, stir the vegetables. This step is key for even cooking. You want them tender and slightly caramelized. Once your vegetables are done, remove them from the oven. Let them cool for a few minutes to enhance the flavors. For a fresh touch, garnish with basil leaves. Serve the roasted vegetables warm. You can place them over a bed of quinoa or alongside grilled chicken. Drizzle with more olive oil, and add extra herbs for a beautiful look. This dish is not only tasty but also healthy and colorful! To pick ripe summer vegetables, look for bright colors and firm textures. Zucchini should feel solid, while bell peppers should have smooth skin. When choosing cherry tomatoes, opt for those that are deep red and plump. For organic versus conventionally grown produce, organic options often have fewer pesticides. They can be a bit pricier but are great if you want to avoid chemicals. If you buy conventionally grown, wash them well to remove any residues. Set your oven to 425°F (220°C). This high heat helps the veggies caramelize. Spread them in a single layer on the baking sheet. Crowding them can make them steam instead of roast. Look for a golden brown color on the edges. This shows they are done. The veggies should be tender when pierced with a fork. Stir halfway through cooking to ensure even roasting, so all sides get that nice flavor. For the full recipe, check out the complete guide on making these vibrant roasted summer vegetables. {{image_4}} You can easily change the vegetables in this recipe. If you have other veggies, use them! Here are some ideas: - Swap zucchini for yellow squash. - Replace bell peppers with carrots or eggplant. - Use broccoli or cauliflower for a crunchy twist. - Try asparagus or green beans for a fresh bite. If you follow a special diet, you can make changes too. For a vegan option, this recipe is already perfect. If you need gluten-free, all ingredients work well. To switch up the flavor, try different spices. Here are some great ideas: - Add cumin for a warm, earthy taste. - Use curry powder for an exotic twist. - Sprinkle chili powder for a bit of heat. - For sweetness, mix in honey or maple syrup. These spices can change the whole meal. You can make it fit any cuisine you love. Enjoy exploring these flavors in your cooking! After you enjoy your roasted summer vegetables, let them cool first. This step helps keep them fresh. Store leftovers in an airtight container. This keeps moisture in and flavors safe. Roasted vegetables can last in the fridge for about 3 to 5 days. Always check for any signs of spoilage before eating. To reheat, use your oven or a skillet. Preheat your oven to 350°F (175°C). Spread the vegetables on a baking sheet and heat for about 10 minutes. This method keeps them crispy. In a skillet, add a splash of oil and heat over medium heat. Stir them gently until they warm up. You can also use leftover roasted vegetables creatively. Toss them in salads for a warm touch. Add them to pasta or grain bowls for more flavor. Mix them into omelets for a delicious breakfast. The options are endless! For the full recipe, check out [Full Recipe]. What are the best vegetables for roasting? The best vegetables for roasting are those that hold their shape and flavor. I love using: - Zucchini - Bell peppers - Cherry tomatoes - Red onion These veggies caramelize well and taste sweet when roasted. Feel free to mix in others like carrots or eggplant for variety. Can roasted vegetables be made ahead of time? Yes, you can make roasted vegetables ahead of time. Just roast them, let them cool, and store them in the fridge. They stay fresh for up to three days. When you’re ready to enjoy them, reheat in the oven for the best taste. How do I make roasted vegetables crispy? To make roasted vegetables crispy, follow these tips: - Spread them out on the baking sheet without crowding. - Use enough olive oil to coat each piece. - Stir halfway through cooking. These steps help achieve that crispy, golden finish. For the full recipe, check out the vibrant roasted summer vegetables recipe. Roasting summer vegetables is simple and rewarding. We learned how to choose fresh produce and seasonings. The blog covered easy step-by-step instructions for prepping and cooking. I shared tips for perfect roasting and ways to store and reheat leftovers. Incorporate these methods to enjoy tasty vegetables all season. Experiment with flavors and have fun. Your meals will shine with roasted veggies!](https://joymealplan.com/wp-content/uploads/2025/07/5b4132f7-a86e-4702-8661-8c8da9db132d-768x768.webp)